Table of Contents

Subscribe to Our Youtube Channel
Related Manuals for Viega Prevista Dry 8535.32


Summary of Contents for Viega Prevista Dry 8535.32
- Page 1 Prevista Dry washbasin element with indi‐ vidually adjustable ceramic height Instructions for Use for a barrier-free washbasin with a single-hole fitting, washbasin with a single-hole fitting Model Year built: 8535.32 from 03/2019 en_INT...
- Page 2 Prevista Dry washbasin element with individually adjustable ceramic height 2 from 38...
-
Page 3: Table Of Contents
Table of contents Table of contents About these instructions for use Target groups Labelling of notes About this translated version Product information Standards and regulations Intended use 2.2.1 Areas of use Product description 2.3.1 Overview 2.3.2 Operating mode 2.3.3 Compatible components 2.3.4 Technical data Accessories... -
Page 4: About These Instructions For Use
This restriction does not extend to possible operating instructions. The installation of Viega products must take place in accordance with the general rules of engineering and the Viega instructions for use. -
Page 5: About This Translated Version
About these instructions for use NOTICE! This symbol warns of possible damage to property. This symbol gives additional information and hints. About this translated version This instruction for use contains important information about the choice of product or system, assembly and commissioning as well as intended use and, if required, maintenance measures. -
Page 6: Product Information
Product information 2 Product information Standards and regulations The following standards and regulations apply to Germany / Europe and are provided as a support feature. Regulations from section: Fields of application / Mounting conditions Scope / Notice Regulations applicable in Ger‐ many Suitable masonry walls EN 1996-1-1... -
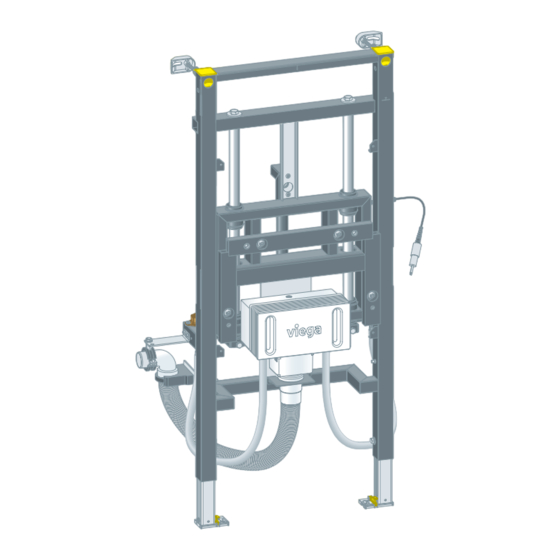
Page 7: Product Description
Product information Product description 2.3.1 Overview Fig. 1: Components and scope of delivery washbasin element transport lock Gas pressure spring hydraulic cylinder with hydraulic hose and actuation unit concealed connection box flexible hoses G ½ x 10 mm silicon grease Screws for fixing in support profile Screws and dowels for fixing in the floor 10 corner valves... -
Page 8: Compatible Components
Product information The gas pressure spring guarantees continuous adjustment of the washbasin height within a 20 cm range. Further information can be found in the instruction for use of the gas pressure spring. CAUTION! Risk of crushing The cover plate shifts in parallel with the wall surface during the height adjustment. -
Page 9: Accessories
8570.45 for mounting. support bracket The support bracket (model 8570.48) is used for the connection of mul‐ tiple Viega Prevista elements at an interval of less than 500 mm to enable a stable cladding. Spare parts If necessary, you can order the following spare parts: Cover plate, model 8570.45, glass... - Page 10 Product information Drain elbow model 8064.90, chrome-plated with flanged rim Drainpipe model 9945.143 chrome-plated with flanged rim 75 mm, article 121 587 chrome-plated with flanged rim 120 mm, article 670 856 Gas pressure spring model 8172.1, only in connection with Prevista Dry washbasin element model 8535.32 Steel hydraulic actuation...
- Page 11 Product information Cover plate for concealed connection box model 8314.5 chrome-plated, plastic 2 double straight screw fittings with compression fittings for copper pipe d10 2 connection pipes, chrome-plated, d10 Drain elbow 300 mm, chrome-plated brass Adjusting pipe, chrome-plated brass Prevista Dry washbasin element with individually adjustable ceramic height 11 from 38...
-
Page 12: Handling
Handling 3 Handling Assembly information 3.1.1 Mounting conditions Suitable walls Masonry walls Concreted walls Metal support profiles Prevista Dry Plus pre-wall constructions The wall constructions must comply with the regulations in section Ä „Regulations from section: Fields of application / Mounting condi‐ tions“... -
Page 13: Installation Dimensions
Handling Construction height With the construction height, the marked height of the upper edge of the finished floor must be observed. 3.1.2 Installation dimensions Fig. 3: Dimensions Assembly 3.2.1 Mounting the washbasin element Preparing the concealed connection box Prevista Dry washbasin element with individually adjustable ceramic height 13 from 38... - Page 14 Handling Remove the mounting template from the element. Remove the site protection from the concealed connection box. Seal the corner valve (e.g. using hemp). Screw the corner valve into the screw fitting. Prevista Dry washbasin element with individually adjustable ceramic height 14 from 38...
- Page 15 Handling INFO! Observe the additional markings when aligning the corner valves. Screw in until the connection to the washbasin fitting is between the markings. Mount the entire seats in the concealed connection box. The object can be heard locking into place. Prevista Dry washbasin element with individually adjustable ceramic height 15 from 38...
- Page 16 Handling Preparing the washbasin element Seal in the flexible hose on the thread side and assemble on the wall lead-in of the concealed connection box. Seal in the reducing sleeve on one side and pre-assemble with the wall lead-in. Please ensure that the supplied rubber seals are fitted correctly.
- Page 17 Handling Mount retaining plates 1 and 2. They can be attached on the left and right hand side of the element. Left: min. interval to wall 160 mm; external fixing points for support profiles with a depth of 75 mm. Right: min.
- Page 18 Mounting to a masonry wall Masonry and concreted walls When mounting multiple washbasin elements with an interval of > 500 mm, Viega recommends to use a Pre‐ vista Dry support bracket (model 8570.48). Observe the instructions for use of the support bracket when mounting.
- Page 19 Handling For mounting, Viega recommends to use a Prevista Dry fixing set. Determine and mark the fixing points. X1: 1100 mm X2: 460 mm Determine and mark the fixing points on the floor. X3: 375 mm Drill the holes. Insert the dowels.
- Page 20 Handling Adjust the construction height of the element in accordance with the on-site marking of the upper edge of the finished floor. X: 1000 mm Tighten the feet of the element using a fork spanner. Mount the two support brackets in accordance with the instructions for use for the support brackets.
- Page 21 Handling Mounting in Prevista Dry Plus Mount the Prevista Dry Plus pre-wall construction pursuant to the instructions for use of the Prevista Dry Plus system. Position the element on the floor rail. Fix the feet on the floor rail using the clips. Set the height of the element by means of the feet.
- Page 22 Handling ð The element is fixed in the Prevista Dry Plus pre-wall construc‐ tion. Prevista Dry washbasin element with individually adjustable ceramic height 22 from 38...
- Page 23 Handling Mounting in metal support profile Position the element on the floor rail. If necessary, adjust the foot depth from 50 mm (pre-mounted) to 75 Pull the foot out and turn by 90°. Screw the feet together with the support profile. Adjust the construction height of the element in accordance with the on-site marking of the upper edge of the finished floor.
-
Page 24: Set And Clad The Element
Handling If applicable, connect further elements to the element via the sup‐ port profile. 3.2.2 Set and clad the element Turn in the threaded rods by hand. Tighten the nuts of the threaded rods with a fork spanner. Place the protective caps on the threaded rods. Make the water connections. - Page 25 Handling Cut out the recesses for the mounting template. Clad the element with suitable gypsum cardboard cladding panels. The plasterboard cladding panels must not be screwed together with the height-adjustable internal frame! Mark the concealed socket on the left or right hand side, as required, and drill the recess hole.
-
Page 26: Mounting The Cover Plate
Handling Tile up to the mounting template and concealed socket. 3.2.3 Mounting the cover plate Remove the mounting template. Mount the bearing surface (H support) for the cover plate flush with the finished wall surface (size 17 / 19). Prevista Dry washbasin element with individually adjustable ceramic height 26 from 38... - Page 27 Handling Undo the four threaded nuts on the element (size 17). Undo the four front threaded nuts on the arms of the base (size 17 nut). Screw the threaded nuts in or out to adjust all four points flush with the wall surface.
- Page 28 Handling Shorten the threaded bolts for fixing the sanitary ware according to the ceramic used. Remove the transport lock and discard. Screw the sleeve onto the hydraulic cylinder. Screw the sleeve tightly into the concealed socket with the screws supplied. Screw on the actuating button and push the rosette onto the actuating button.
- Page 29 Handling Apply the silicone seal to the rear of the cover frame. The radius of the hydraulic actuation must be at least 50 mm. This prevents the hydraulic actuation from buckling. Align the cover frame. Attach the cover frame to the element with the recessed head screws supplied.
-
Page 30: Mount Concealed Connection Box
Handling Cut the concealed connection box flush with the cover plate INFO! Take care when cutting! Do not damage the cover plate. 3.2.4 Mount concealed connection box Cut the sound insulation panel to size. Mount the washbasin. Fasten the washbasin and seal using silicone. Prevista Dry washbasin element with individually adjustable ceramic height 30 from 38... - Page 31 Handling Manufacture the connection for the washbasin fitting on one side using the copper pipe supplied. If necessary, cut the chrome-plated pipe elbow supplied to the cor‐ responding length. Manufacture the second connection on the other side in the same way.
- Page 32 Handling Align the corner valves. When doing so, align the pipe elbow to the marking aid (line on the concealed connection box). Remove the plug. Insert the drain elbow into the lip seal of the odour trap. If applicable, identify sizes on the drain elbow and adjusting pipe that may have to be shortened.
-
Page 33: Changing The Sides Of The Hydraulic Hose
Handling Set the odour trap to the right size at the height. The vertical setting range is 20 mm. Attach the cover plate to the concealed connection box. The lateral supports serve as a safeguard against distortion. Turn the drain elbow to the right and in doing so secure it to the washbasin. - Page 34 Handling Undo the Allen screw (size 5) on the head of the gas pressure spring. Swing out the gas pressure spring to the left or right-hand side. Turn the head of the gas pressure spring with the hydraulic hose by 180°.
-
Page 35: Replacing Corner Valves
Handling Re-mount the hydraulic hose in the guide provided on the rear side of the washbasin element. 3.2.6 Replacing corner valves If the corner valve has to be replaced, proceed as follows: Cut the water supply. When replacing (size 19), counter the screw fitting with a spanner (size 27). - Page 36 Handling Lowering the washbasin CAUTION! Risk of crushing The cover plate shifts in parallel with the wall surface during the height adjustment. Due to this, there is the risk of crushing in the areas above and below the cover plate. –...
-
Page 37: Cleaning And Maintenance
Handling Lifting the washbasin CAUTION! Risk of crushing The cover plate shifts in parallel with the wall surface during the height adjustment. Due to this, there is the risk of crushing in the areas above and below the cover plate. –... -
Page 38: Disposal
Handling alcohol ammoniac hydrochloric acid phosphoric acid acetic acid The contents damage the surface. NOTICE! Pipe damage Do not use a cleaning spiral around the area of the flexible drain elbow on the washbasin connection. Consult a specialist company in the event of blockages. Disposal Separate the product and packaging materials (e.
Need help?
Do you have a question about the Prevista Dry 8535.32 and is the answer not in the manual?
Questions and answers