
Related Manuals for Viega Prevista Dry 8573


Summary of Contents for Viega Prevista Dry 8573
- Page 1 Prevista Dry fixing set Instructions for Use Single mounting of Viega Prevista Dry elements on a solid wall Model 8573 en_INT...
- Page 2 Prevista Dry fixing set 2 from 11...
-
Page 3: Table Of Contents
Table of contents Table of contents About these instructions for use Target groups Labelling of notes About this translated version Product information Standards and regulations Intended use 2.2.1 Areas of use Product description 2.3.1 Overview Handling Assembly 3.1.1 Mounting the fixing set Disposal Prevista Dry fixing set 3 from 11... -
Page 4: About These Instructions For Use
This restriction does not extend to possible operating instructions. The installation of Viega products must take place in accordance with the general rules of engineering and the Viega instructions for use. -
Page 5: About This Translated Version
About these instructions for use About this translated version This instruction for use contains important information about the choice of product or system, assembly and commissioning as well as intended use and, if required, maintenance measures. The information about the products, their properties and application technology are based on the current standards in Europe (e. -
Page 6: Product Information
Product information 2 Product information Standards and regulations The following standards and regulations apply to Germany / Europe and are provided as a support feature. Regulations from section: Fields of application / Mounting conditions Scope / Notice Regulations applicable in Ger‐ many Suitable masonry walls EN 1996-1-1... -
Page 7: Product Description
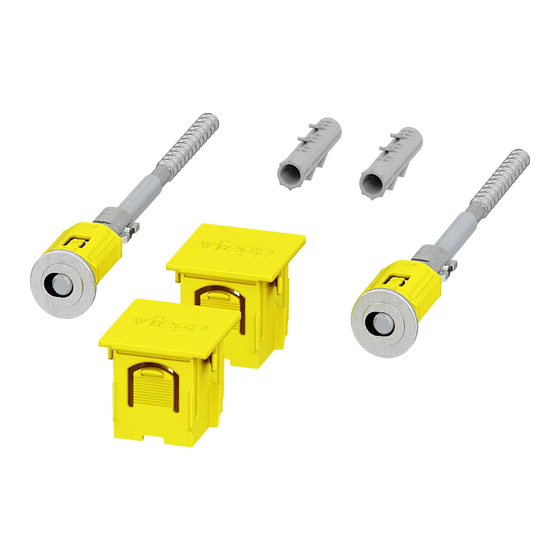
Product information Product description 2.3.1 Overview Fig. 1: Components Slide Mounting bracket Dowels and screws for wall mounting Threaded rods Prevista Dry fixing set 7 from 11... -
Page 8: Handling
Handling 3 Handling Assembly 3.1.1 Mounting the fixing set Mount the elements as shown by way of example of the Pre‐ vista Dry WC element with shower WC connection and vari‐ able ceramic height (model 8521). Determine and mark the fixing points. X1: depending on the element used. - Page 9 Handling Adjust the construction height of the element in accordance with the on-site marking of the upper edge of the finished floor. Tighten the feet of the element using a fork spanner (size 13). Align the depth of the element. X4: depending on the element used.
- Page 10 Handling Push the mounting bracket through the element on the threaded rods. Align the element and use the slide to attach the mounting bracket to the threaded rods. Loosely insert the caps. INFO! Do not press on the caps to engage them. Re-adjust the alignment of the element using the threaded rods.
-
Page 11: Disposal
Handling Push the caps down until they engage. Disposal Separate the product and packaging materials (e. g. paper, metal, plastic or non-ferrous metals) and dispose of in accordance with valid national legal requirements. Prevista Dry fixing set 11 from 11...
Need help?
Do you have a question about the Prevista Dry 8573 and is the answer not in the manual?
Questions and answers