Advertisement
QuantumII
MT RFID Installation Instructions
™
All parts needed to install the QuantumII™ MT™ RFID lock are included with each unit. Please check to make
sure all parts are accounted for before beginning installation. Do not substitute any of the parts. The use of
substitute parts will result in poor performance of the lock.
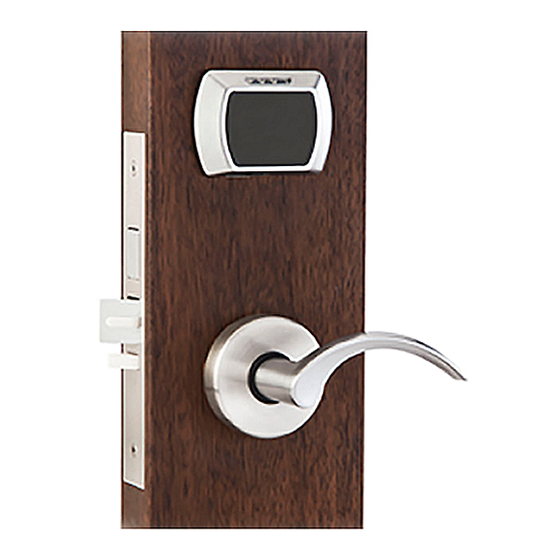
Proximity Reader Assembly
(A21710-COLOR)
Outside Lever Trim
(A20970-HAND-COLOR)
All information contained herein, including but not limited to product pricing and other intellectual property, is confidential and intended
for the sole use of the addressee(s) so named. Any misuse of this confidential information contained herein may result in legal action by
Computerized Security Systems dba SAFLOK and its parent company.
Mortise (see Mortise Options table)
Screw Pack
(A29070-COLOR)
Strike Plate
(30320-HAND-COLOR)
Mortise Options
A70000-Handing
Mortise, 1-3/4
A70020-Handing
Scalp Plate
Mortsie, 1-3/4
(51190-COLOR)
ADB
A70080-Handing
Mortise, 1-3/4
ADB, DAJ2
A70060-Handing
Mortise, 1-3/4
STD, DAJ2
Inside Trim Assembly
QCLXXXXXX-6--Color
Advertisement
Table of Contents

Related Manuals for Kaba Saflok QuantumII MT RFID


Summary of Contents for Kaba Saflok QuantumII MT RFID
- Page 1 QuantumII MT RFID Installation Instructions ™ All parts needed to install the QuantumII™ MT™ RFID lock are included with each unit. Please check to make sure all parts are accounted for before beginning installation. Do not substitute any of the parts. The use of substitute parts will result in poor performance of the lock.
- Page 2 QuantumII MT RFID Installation Instructions Pg 2 of 8 Preparing the door and door frame Prepare the door using the QuantumII RFID reader installation template or drill fixture. The door edge prep is a standard, full-mortise prep for a 1-1/4” x 8” front plate (1” x 8” and 1” x 7-3/4” custom front plates are optional). The door surface holes and mortise are customized for the SAFLOK trim.
- Page 3 QuantumII MT RFID Installation Instructions Pg 3 of 8 Preparing the door and door frame (continued) 3. The mortise plate has an adjustable bevel. Align the mortise front plate with the bevel of the door edge and tighten the two bevel adjustment screws at the top and bottom of the mortise case. Position the mortise case in the door edge with the motor wire routed through the notch (see Fig.
- Page 4 QuantumII MT RFID Installation Instructions Pg 4 of 8 Installing the lock trim The outside lever trim has two carriage bolts that fit into the diagonal holes in the mortise case. These carriage bolts establish an accurate trim position with respect to the mortise case assembly, allowing the levers and bolt mechanism to operate without binding.
- Page 5 QuantumII MT RFID Installation Instructions Pg 5 of 8 Installing the lock trim (continued) 9. Connect ribbon cable, motor cable, and power wire to the PCB. See Fig. 6. Be sure not to crease ribbon. 10. Watch for the green LED on the card reader to flash four times while you connect the battery wire to the PCB. The green light indicates that the PCB has reset.
- Page 6 QuantumII MT RFID Installation Instructions Pg 6 of 8 Installing the lock trim (continued) 13. Secure the inside trim cover to the inside trim using two M4 x 16mm Torx screws (see Fig. 7). M4 x 16mm Torx Fig. 7 14.
- Page 7 QuantumII MT RFID Installation Instructions Pg 7 of 8 Testing Lock Functionality Pass a Construction key over the QuantumII MT RFID reader. The green light will flash for five seconds. Be sure that the green light flashes for five seconds while the exterior lever remains operable. If the green lights do not flash, refer to the table below.
- Page 8 QuantumII MT RFID Installation Instructions Pg 8 of 8 SAFLOK Door Unit Inspection Criteria Appearance • Finish is free of blemishes or scratches that would distract from lock appearance • Lock body and under plate (if used) are mounted straight on the door • Door scalp is mounted straight and flush with the door edge • Jamb strike is mounted straight and is flush with the jamb face • Correction of minor blemishes on the door jamb are the responsibility of the property’s maintenance department Lock Function • Knob or lever rotates and moves freely • Lever is horizontal to floor when at rest position • Dead bolt extends fully and retracts without binding (door open) • Lock latch and dead bolt engage jamb strike plate freely • Anti-pick latch when depressed (door open) • Anti-pick latch is depressed when contact is made with the strike plate (door closed) Electronics/Keycards •...
Need help?
Do you have a question about the Saflok QuantumII MT RFID and is the answer not in the manual?
Questions and answers
What dimension for the door prep in the end of the door? Not on the face.
The door edge prep for the Kaba Saflok QuantumII MT RFID is a standard, full-mortise prep for a 1-1/4” x 8” front plate. Optional custom front plates are available in 1” x 8” and 1” x 7-3/4” sizes.
This answer is automatically generated