Table of Contents
Advertisement
Quick Links
Advertisement
Table of Contents

Related Manuals for Philco PTB 821 BU


Summary of Contents for Philco PTB 821 BU
- Page 1 REFRIGERATOR USER’S MANUAL PTB 821 BU...
- Page 2 Dear customer, Thank you for buying a PHILCO brand product. So that your appliance serves you well, please read all the instructions in this user‘s manual.
-
Page 3: Table Of Contents
CONTENTS PART 1: SAFETY AND WARNING INFORMATION ..................2 PART 2: VIEW OF THE APPLIANCE ......................... 5 PART 3: INSTALLATION ........................... 6 PART 4: CHANGING OVER THE FREEZER COMPARTMENT DOOR ............13 PART 5: OPERATION AND FUNCTIONS ....................... 14 PART 6: NOISES DURING OPERATION ......................16 PART 7: DEFROSTING ............................ -
Page 4: Part 1: Safety And Warning Information
PART 1: SAFETY AND WARNING INFORMATION 2014/30/EU 2014/35/EU This appliance is in accordance with the following EU guidelines: 2009/125/EC and EC.643/2009 and 2002/96/EC For your safety and correct usage before installing and fi rst using the appliance, read this user manual carefully, including its hints and warnings. - Page 5 • WARNING — Do not use electrical appliances inside the food storage compartments of the appliance, unless they are of the type recommended by the manufacturer. • WARNING — The refrigerant and insulation blowing gas are fl ammable. When disposing of the appliance, do so only at an authorized waste disposal centre.
- Page 6 • Keep buring candles, lamps and other items with naked fl ames away from the appliance so that do not set the appliance on fi re. • The appliance is intended for keeping food stuff and/or beverages in normal household as explained in this instruction booklet The appliance is heavy.
-
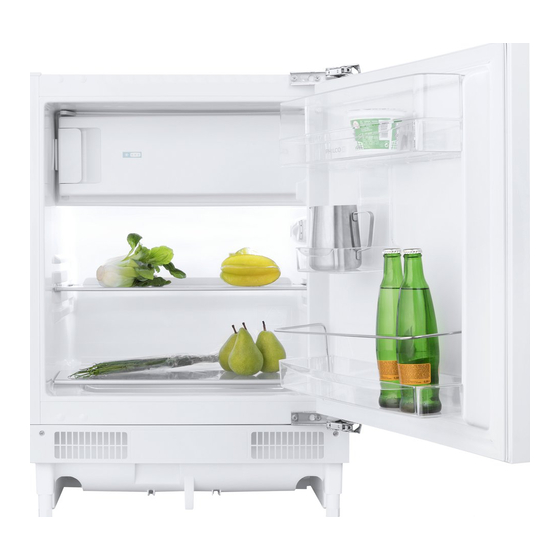
Page 7: Part 2: View Of The Appliance
PART 2: VIEW OF THE APPLIANCE Freezer Chamber Ice Tray Temperature Regulator Shelf Crisper Drawer Cover Crisper Drawer Rack Cover Upper rack on the door Lower rack on the door NOTE: Due to unceasing modifi cation of our products your refrigerator may be slightly diff erent from this Instruction Manual, but its functions and using methods remain the same. -
Page 8: Part 3: Installation
PART 3: INSTALLATION Positioning Position the appliance away from sources of heat such as stoves, radiators, direct sunlight etc. Maximum performance and safety are guaranteed by maintaining the correct indoor temperature for the class of unit concerned, as specifi ed on the rating plate. This application perform well from N to ST. The Appliance may not work properly if it is left for a longer period at a temperature above or below the indicated range. - Page 9 Dimensions of mounting slot Height regulation EN - 7 Copyright © 2016, Fast ČR, a. s. 05/2016...
- Page 10 Installation of the appliance under the worktop Fastening the appliance under the worktop EN - 8 Copyright © 2016, Fast ČR, a. s. 05/2016...
- Page 11 • This must be done before fi tting the cabinet outer door. • Ensure the fridge is unplugged and empty. • We recommend you have someone to assist you. Tools required • Phillips style screwdriver. • Flat bladed screwdriver. WARNING! Take care when opening the hinges, They are sprung and there is a risk of injusry if they close on your hand.
- Page 12 Supporting the bottom of the door as you do so. Be careful with the hinges. Remove the door. With the top hinge open undo the screws holding it to the cabinet. Be careful with the hinge, use a long shafted screwdriver if you have one. Remove the blanking plates for the cabinet.
- Page 13 Repeat with the other hinge, Replace the cabinet blanking plates. Replace the door and re-attach the hinges. Check that the larder fridge door is aligned horizontally and vertically and that the door seals are secure on all sides before fi nally tightening the hinge bracket screws. EN - 11 Copyright ©...
- Page 14 Mounting the kitchen cabinet door EN - 12 Copyright © 2016, Fast ČR, a. s. 05/2016...
-
Page 15: Part 4: Changing Over The Freezer Compartment Door
PART 4: CHANGING OVER THE FREEZER COMPARTMENT DOOR Open the freezer compartment door a little way Using a small screwdriver, press the spring in the opening of the lower door bearing slightly upwards and take the door bearing out complete with the door. Position the covering cap (M) on the opposite side Turn the freezer compartment door through 180°... -
Page 16: Part 5: Operation And Functions
PART 5: OPERATION AND FUNCTIONS Starting up and temperature regulation Insert the plug of the connection lead into the plug socket with protective earth contact. When the refrigerator compartment door is opened, the internal lighting is switched on. The temperature selector knob is located on the right side of the refrigerator compartment. Setting 0 means: Off . - Page 17 Changing the light bulb WARNING! Before changing the light bulb, switch off the appliance and unplug it, or pull the fuse or the circuit breaker. Light bule data: 220-240V, max.15W. To switch off the appliance, set the temperature regulator to position “0”. Unplug the mains plug.
-
Page 18: Part 6: Noises During Operation
PART 6: NOISES DURING OPERATION The following noises are characteristic of refrigeration appliances: Clicks Whenever the compressor switches on or off , a click can be heard. Humming As soon as the compressor is in operation, you can hear it humming. Bubbling When refrigerant fl ows into thin tubes, you can hear bubbling or splashing noises. - Page 19 • In the event of operation after prolonged periods of disuse, take care to set the thermostat knob to the highest setting, and switch on the appliance under no-load conditions for 2-3 hours, then place food in the refrigerator as required and adjust the thermostat knob to an intermediate setting. Appliances with compartments that have no symbol are unsuitable for freezing fresh foods and for storing frozen food •...
-
Page 20: Part 7: Defrosting
PART 7: DEFROSTING Why defrosting Water contained in food or getting into air inside the fridge be opening doors may form a layer pf frost inside. It will weaken the refrigeration when the frost is thick. While it is more than 10mm thick, you should defrost. Defrosting in fresh food storage compartment It is automatically controlled by switching the temperature regulator on or off so that there is no need of operation of defrosting. -
Page 21: Part 8: Energy Saving Tips
PART 8: ENERGY SAVING TIPS Do not place warm foods into the appliance. Allow warm foods to cool fi rst. Do not install the appliance near cookers, radiators or other sources of warmth. High ambient temperatures cause longer, more frequent operation of the compressor When the product works, please do not open the door too often or leave the door open any longer than necessary. -
Page 22: Part 9: Troubleshooting
PART 9: TROUBLESHOOTING Defective operation of the appliance is not always due to a technical fault but is always due to a technical fault but is often caused by incorrect installation or use. To avoid unnecessary technical assistance and relative expenses we recommend the following procedures. -
Page 23: Part 10: Information Sheet
INFORMATION SHEET: Philco Philco brand: Brand Philco Model identifi cation PTB 821 BU Type of appliance 3) Energy effi ciency class (A... low electricity consumption to G high electricity consumption) Electricity consumption per 365 days 1) kWh Total available volume: l... - Page 24 Changes to the text, design and technical specifi cations may occur without prior notice and we reserve the right to make these changes. Czech is the original version. Manufacturer address: PHILCO, Praha 10, Černokostelecká 2111, CZ-10000; CZECH REPUBLIC EN - 22 Copyright © 2016, Fast ČR, a. s.
Need help?
Do you have a question about the PTB 821 BU and is the answer not in the manual?
Questions and answers