
Related Manuals for KinAn LC2808


Summary of Contents for KinAn LC2808
- Page 1 18.5"FHD KVM Console (8 Port /16 Port/24 Port /32 Port) User Manual www.kinankvm.com @all right reserved Shenzhen Kinan Technology Co., Ltd Print date: 2019 / 11 Version: V1.0...
-
Page 2: Table Of Contents
User Manual 8 Port / 16 Port / 24 Port / 32 Port Contents Overview....................2 Description ..................2 Features .................... 2 Structure and Size ................4 Rear View ..................5 Hardware Installation ................6 Rack Mounting .................. 6 KVM Installation Diagram ..............7 Operation.................... -
Page 3: Overview
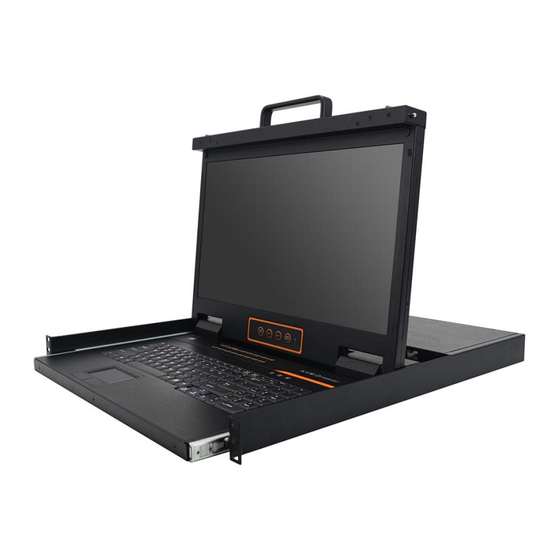
User Manual 8 Port / 16 Port / 24 Port / 32 Port Overview Description The CAT5 LCD KVM console integrates multiple-port CAT5 KVM switches in a 1U height console. Multiple computers can be controlled from the single monitor- keyboard-mouse console. There is no better way to save time and money than with a CAT5 console installation. - Page 4 User Manual 8 Port / 16 Port / 24 Port / 32 Port Front View 1-1.1 front view 1.LCD Module 6.Touchpad 2.Rear Bracket Slot 7.Handle 3.OSD Controls 8.Release Catch 4.Front bracket 9.Display Panel 5.Keyboard 10. Switch LED - 3 -...
-
Page 5: Structure And Size
User Manual 8 Port / 16 Port / 24 Port / 32 Port Structure and Size 1-1.2. - 4 -... -
Page 6: Rear View
User Manual 8 Port / 16 Port / 24 Port / 32 Port Rear View -48V CONSOLE 100V~240V AC/47~63Hz -36V~-72V DC IN 2 -1 -48V CONSOLE 100V~240V AC/47~63Hz -36V~-72V DC IN 2 -1 -48V CONSOLE 100V~240V AC/47~63Hz -36V~-72V DC IN 2 -1 -48V CONSOLE... -
Page 7: Hardware Installation
User Manual 8 Port / 16 Port / 24 Port / 32 Port Hardware Installation Rack Mounting A standard rack mounting kit is provided to mount the switch in a depth of 620-720mm in a standard 19”rack. For other mounting distance, the rear brackets need to be customized accordingly. With one person hold the switch in place and the other person slides the L bracket into the switch’s side mounting brackets from the front to the back, then screws the brackets to the rack. -
Page 8: Kvm Installation Diagram
User Manual 8 Port / 16 Port / 24 Port / 32 Port KVM Installation Diagram 1) Make sure the KVM console has been connected to the ground.( ①) 2) Connect the adapter to the KVM and the PC or server(②③) 3) Connect any available KVM port and KVM adapter with CAT5 cables.( ④) 4) Plug the female port of the power cable in the KVM power socket, and plug the male port in the AC power port.( ⑤) -
Page 9: Operation
User Manual 8 Port / 16 Port / 24 Port / 32 Port Operation Release the release catch; 2-1.3 unlocking *Note: The release lock can only do horizontal locking, it can’t bear any load. Pull the KVM console all the way out until it clicks into place; ... - Page 10 User Manual 8 Port / 16 Port / 24 Port / 32 Port Closing the console Close the LCD display panel and the power automatically shut down. Push the release catch in the direction of the arrow; pull the LED panel all the way in until it automatically locks up.
-
Page 11: Led Operating Instructions
User Manual 8 Port / 16 Port / 24 Port / 32 Port LED Operating Instructions Figure 3.1 LED front views Components Function 1-16 Switching freely from port 1 to port 16 Press 【1】and 【2】 at the same time for three Reset seconds resets the keyboard and mouse Press【7】... - Page 12 User Manual 8 Port / 16 Port / 24 Port / 32 Port Figure 3.2 32 Port LED front views Components Function Switching from port 1 to port 32 Port 8 : If you want to switch to Port 8, press【8】, , then press “Enter”, and the LED light displays 0~9 +Enter...
-
Page 13: Osd Operation
User Manual 8 Port / 16 Port / 24 Port / 32 Port OSD Operation Double click the right button of the mouse or double click hotkey【Scroll Lock】 to invoke below OSD main menu. You can customize the OSD hotkeys; find more details in OSD function instructions. -
Page 14: Osd Functions
User Manual 8 Port / 16 Port / 24 Port / 32 Port OSD Functions Menu Keys Submenu/Explanation Set User login-Set User login account and password Set accessible-Set access permissions BRC Mode -monitor multiple computers at the same time Load Default-reset the menu to the original factory default settings All-Lists all the ports on the installation Power On-lists only powered on ports that have... -
Page 15: F1-Adm
User Manual 8 Port / 16 Port / 24 Port / 32 Port F1-ADM Menu Overview Operating instructions 1) Press 【F1】 or 【←】 【→】 enters the F1 submenus. 2) Press 【↑】【↓】moves the highlight bar to select the submenu. 3) Press 【Enter】 selects and exits ADM menu. - Page 16 User Manual 8 Port / 16 Port / 24 Port / 32 Port 2. Set Accessible—press [Enter] to select Set Accessible, then below menu appears: (diagram 4-1.3) Diagram 4-1.3 Menu Explanation Full access function to the station and can do any FULL operation to the ports Read only function, you can only read the port but...
- Page 17 User Manual 8 Port / 16 Port / 24 Port / 32 Port 3. BRC Mode Off - Press [Enter] to enter the BRC mode, enter the main menu, press 【F7】 to add or delete a port that need broadcast function. When BRC mode is effect, a speaker symbol appears in QV column.
-
Page 18: F2-Scan
User Manual 8 Port / 16 Port / 24 Port / 32 Port F2-Scan Menu Overview Operating instruction Press 【F2】 or 【←】 【→】 enters the F2 submenus. 2) Press 【↑】 【↓】 moves the highlight bar to select the submenu. 3) Press【Enter】selects and exits Scan menu. -
Page 19: F3-Set
User Manual 8 Port / 16 Port / 24 Port / 32 Port F3-Set Menu Overview Operating instructions 1) Press 【F3】 or 【←】 【→】 enters the F3 submenus. 2) Press 【↑】【↓】moves the highlight bar to select the submenu. 3) Press【Enter】selects and exits Set menu. - Page 20 User Manual 8 Port / 16 Port / 24 Port / 32 Port OSD Hotkey Operation Operating instruction Press【F3】and move the highlight bar with【↓】 to select “OSD Hotkey ”submenu. Press 【Enter】and below screen appears: KVM default hotkey:【Scroll Lock】 Select the“【Ctrl】 【Ctrl】 +【KVM Hotkey】 “ and press【Enter】, and then the 【Ctrl hotkey is available in this hotkey mode, the mouse hotkey can't enter the OSD menu.
-
Page 21: F4-Tool
User Manual 8 Port / 16 Port / 24 Port / 32 Port F4-Tool Menu Overview Operating instructions 1) Press【F4】or 【←】【→】enters the F4 submenus. 2) Press 【↑】 【 ↓】 moves the highlight bar to select the submenu. 3) Press【Enter】 selects and exits Tool menu. -
Page 22: F6-Edit Port Names
User Manual 8 Port / 16 Port / 24 Port / 32 Port F6-Edit port names Select the port with【↑】【↓】 key; Press F6 and key in the new name or modify the old one, then press Enter to save the name and exit editing. -
Page 23: Appendix
User Manual 8 Port / 16 Port / 24 Port / 32 Port Appendix Specifications Model LC2808 LC2816 LC2824 LC2832 Direct Computer connections 1024 Keyboard, Port emulation PS/2, USB mouse LCD model FHD TFT View area 18.5” Optimum 1920×1080@60Hz resolution...
Need help?
Do you have a question about the LC2808 and is the answer not in the manual?
Questions and answers