Advertisement
Quick Links
When using electrical equipment, basic safety precautions should always be followed including the following:
READ AND FOLLOW ALL SAFETY INSTRUCTIONS
1.
DANGER- Risk of shock- Disconnect power before installation.
DANGER – Risque de choc – Couper l'alimentation avant l'installation
2.
This luminaire must be installed in accordance with the NEC or your local electrical code. If you are not familiar with these
codes and requirements, consult a qualified electrician.
Ce produit doit être installé conformément à NEC ou votre code électrique local. Si vous n'êtes pas familier avec ces codes
et ces exigences, veuillez contacter un électricien qualifié.
3.
These luminaires are thermally protected. Do not install insulation within 3 inches (76 mm) of luminaire sides or junction box nor
above luminaire in such a manner as to entrap heat.
Ne pas mettre l'isolant a moins de 76 mm (3 po) de toute partie du luminaire. Convient aux plafonds suspendus.
4.
Blinking of this thermally protected luminaire may indicate overheating.
Si l'ampoule de ce luminaire a protection thermique clignote, cela peut signifier une surchauffe.
5.
This luminaire must be supported by main runners or other building structure that is capable of supporting luminaire weight.
6.
Do not mount near gas or electric heaters.
7.
Equipment should be mounted in locations and at heights where it will not be subjected to tampering by unauthorized
personnel.
8.
The use of accessory equipment not recommended by the manufacturer may cause an unsafe condition.
9.
Do not use this equipment for other than its intended use.
SAVE THESE INSTRUCTIONS FOR FUTURE REFERENCE
LUMINAIRE INSTALLATION
1
Wiring Nut
STEP 1
• Mark a spot on the ceiling to indicate the
luminaire location.
• Use this mark as a center point and scribe a
6-1/2" diameter circle on the ceiling and cut
hole using proper cutting tool.
NOTE: Cut a 5-1/8" (for 4" luminaire ),
8-1/16" (for 8" luminaire) opening.
STEP 2
• Remove cable tie from the LED engine
before installation.
STEP 3
• This luminaire is provided with universal
mounting brackets that accept the following
mounting means: C-Channels, flat bar
1 of 3
IMPORTANT SAFEGUARDS
Universal Mounting
Bracket
hangers, ¾" and 1-1/2" lathing, or ½"
conduit (order mounting means separately).
• Install selected mounting means through
the universal mounting bracket.
STEP 4
• From above ceiling, position luminaire so
that the trim opening of the housing fits
inside the hole cut in the ceiling.
STEP 5
• Secure the C-channels, conduit or bar
hangers to the ceiling structure in such
a way to provide sufficient support to
the luminaire as well as to prevent the
luminaire from moving up.
NOTE: T-bar clips may be purchased
separately using accessory part number
RARC7.
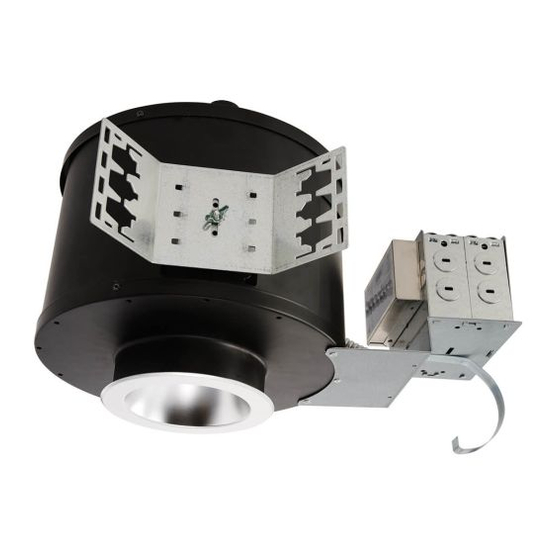
LED COMMERCIAL DOWNLIGHT
INSTALLATION INSTRUCTIONS
S-DL4-EB, S-DL6-EB, S-DL8-EB
2
Fished Ceiling
Structure
STEP 6
• Adjust the plaster ring by loosening wing
nuts located on each of the hanging
brackets. See Figure 1.
STEP 7
• Raise or lower the luminaire so that the
plaster ring is flush with or no more than
1/16" above the ceiling finished surface. See
Figure 2.
• Tighten wing nuts.
NOTE: Luminaire may be adjusted to
accommodate ceiling thickness up to 1-3/8"
thick.
STEP 8
• Make the appropriate electrical connections
per the Electrical Connections Section on
the last page..
Plaster Frame
LPN00428X0001A0_A
Advertisement

Subscribe to Our Youtube Channel
Related Manuals for Cree Essentia S-DL4-EB


Summary of Contents for Cree Essentia S-DL4-EB
-
Page 1: Important Safeguards
LED COMMERCIAL DOWNLIGHT INSTALLATION INSTRUCTIONS S-DL4-EB, S-DL6-EB, S-DL8-EB IMPORTANT SAFEGUARDS When using electrical equipment, basic safety precautions should always be followed including the following: READ AND FOLLOW ALL SAFETY INSTRUCTIONS DANGER- Risk of shock- Disconnect power before installation. DANGER – Risque de choc – Couper l’alimentation avant l’installation This luminaire must be installed in accordance with the NEC or your local electrical code. - Page 2 TEST SWITCH MOUNTING STEP 1 • Mount the supplied 2W-ITS (2 wire illuminated test Wall or Ceiling switch) in a location that is visible and accessible by maintenance personnel. Flexible Conduit • The 2W-ITS mounts through a ½” hole in the ceiling next to the luminaire or on the wall with the provided test Luminaire switch plate.
- Page 3 Risk Of Electric Shock, Disconnect Both The Branch Circuit-Breakers Or Fuses And Emergency Power Supplies Before Servicing.” © 2016 Cree, Inc. All rights reserved. For informational purposes only. Content is subject to change. See lighting.cree.com/warranty for warranty and specifications. Cree...
Need help?
Do you have a question about the Essentia S-DL4-EB and is the answer not in the manual?
Questions and answers