Table of Contents
Advertisement
Quick Links
Table of Contents
Safety Instructions & Warnings
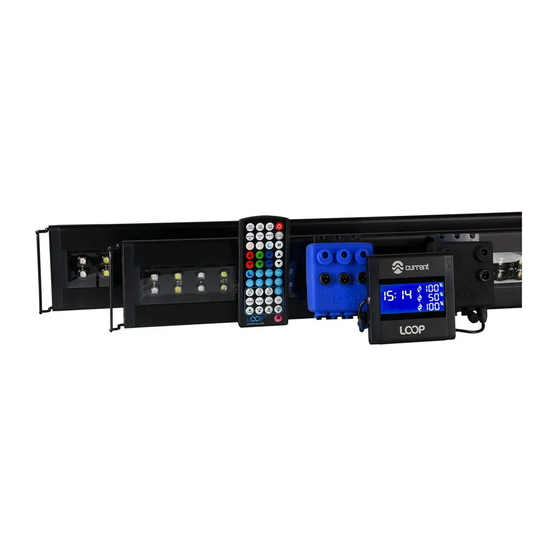
What's Included
Install Orbit Marine IC PRO LED 3
Cable Connections
Remote & Controller Overview
Controller Programming
Warranty & Safety Warnings
Safety Instructions & Warnings
IMPORTANT: Please refer to additional safety warnings on last page.
- Carefully examine light fixture, wires and all components before and after installation. Ensure there is no
damage or water on any components BEFORE plugging into a GFCI wall outlet.
- NEVER plug in a wet cord. Always unplug with dry hands for any maintenance or service.
- Ensure 12VDC UL® transformer is plugged into a GFCI approved outlet with a drip loop for each light
fixture. If using eFlux wave or flow pumps, ensure a 24VDC UL ® transformer is used with drip loop.
- Turn controller OFF and disconnect lights and pumps from power & GFCI outlet before performing service.
- Never look directly into the LEDs.
- Never run pumps dry or out of water.
- Follow all safety instructions for any eFlux wave or flow pumps or additional accessory add-ons.
- eFlux wave pumps create a tremendous amount of water flow. Do not install pump where the
strong current can harm corals or animals.
- eFlux wave pumps can produce powerful waves in both wave and surge modes. Ensure your aquarium is
designed for wave pumps and ensure pumps are mounted low enough not to push water out of the
aquarium tank.
- Ensure light fixture is kept clean of any saltwater or salt creep. Fixture is IP65 rated for water splashing
but must be kept clean of water, moisture, salt creep and/or any mineral deposits.
Use caution when
installing magnets
Ensure pump location
will not spill water from
wave motion
Drip
Loop
Ensure use of drip
loop for all cables
1
2
4
5
7
12
Orbit Marine PRO IC LED
eFlux Accessory
Wave Pump Add-on
Ensure correct voltage power
supply for each component
P3
P2
P1
L2
L1
LOOP
®
Manifold HUB
12V DC ONLY
Wave Pump
Manifold HUB
24VDC ONLY
LOOP
Controller
SAVE THESE INSTRUCTIONS
Page 1
Thank You!
For purchasing our Orbit Marine IC PRO LED
Lighting system. Please read all instructions
before getting in the LOOP
24VDC
Power Supply
12VDC
Power Supply
12VDC
Power Supply
IC Light
Drip
Loop
Ensure use of drip
loop for all cables
®
Safety Instructions
!
®
Keep fixture clean of
water and/or salt creep
Use only with GFCI
Protected AC Outlet
AC Power
GFCI Outlet
Advertisement
Table of Contents

Subscribe to Our Youtube Channel
Related Manuals for Current Orbit Marine IC PRO LED


Summary of Contents for Current Orbit Marine IC PRO LED
- Page 1 Safety Instructions & Warnings What’s Included Thank You! Install Orbit Marine IC PRO LED 3 For purchasing our Orbit Marine IC PRO LED Cable Connections Lighting system. Please read all instructions Remote & Controller Overview before getting in the LOOP ®...
-
Page 2: Recommended Accessories
™ Orbit Marine IC PRO LED Light Additional Help For additional installation & operating instructions and videos, visit our website at www.current-usa.com What’s Included Each Orbit Marine IC PRO LED lighting system includes: Note: If your Orbit Marine IC PRO LED is... -
Page 3: Fixture Installation
Note: Two (2) additional extension cables (J) are included with each Orbit Marine IC PRO system. These extension cables can be used for either your Orbit Marine IC Pro LED lights, eFlux Wave or DC pumps. Step 5. Using included wood mounting screws, mount the IC Light & Wave Pump HUB Manifold IC Controller (F) into bracket. - Page 4 Connect IR Sensor micro USB cable into Port#2 on bottom of IC Light Manifold HUB (optional)* c. Connect Orbit Marine IC PRO LED light #1 into L1 Light Connection on front of IC Light Manifold HUB** d. Connect 12V DC transformer cable into L1 Light Power DC input on front of IC Light Manifold HUB c.
- Page 5 IC Remote Control Overview ® Light Power ON/OFF - press to turn light fixture and Main IC controller on or off CLOCK Set time of day - press to set the 24:00 clock/current time of day TIME TIME CLOCK ENTER...
-
Page 6: Clean Feed
Orbit Marine IC PRO LED Light LOOP IC Controller Overview ® LOCK Mode Designates if LOOP IC Controller ® and wireless IR remote are locked Color Adjustment W=White & also or unlocked B=Blue indicates active ON Time Pump Indicator CLOCK... - Page 7 ® will shut off after 30 seconds. Note: Turning the Orbit Marine IC PRO LED lights off will not turn the wave pumps off. Pumps will continue to run at their programmed setting. Pumps must be turned on/off separately than IC lights using the pump Main On/Off key.
- Page 8 5 seconds. “W” WEATHER will appear on the LOOP IC Controller screen and the current weather program icon ® will be displayed on the bottom of the screen and will display during weather cycle.
-
Page 9: Feed Mode
Installation Instructions LOOP IC Controller Programming ® To Program a CUSTOM Color Spectrum Press CUSTOM key M on wireless remote and “L4” will display on the LOOP ® IC Controller screen. Use the RGBW keys to change the % intensity. Once the desired color spectrum is achieved, Press and hold the CUSTOM key for 5 seconds. - Page 10 LOOP IC Controller ® will flash and show its current flow program. Operational Flow Modes There are three modes of water flow available for Pumps 1 and 2; Stream/Steady, Surge/Gyre and Wave/Pulse.
-
Page 11: Reset Loop
Installation Instructions LOOP IC Controller Programming ® Program Flow Mode Press the FLOW mode key STREAM WAVE you wish to run the pump SURGE in on the remote. The LOOP IC Controller display will show as follows: ® P=Pump 1,2,3=indicates the pump being programmed P=Wave/Pulse Mode L=Stream Mode S=Surge Mode... - Page 12 Loop Drip Loop Current-USA One Year Limited Warranty This product MUST be purchased from an authorized Current-USA reseller. Visit our website for a list of unauthorized resellers. Current USA, Inc. warrants this product against defects in materials and worksmanship for ONE (1) YEAR from the date of original retail purchase and is none transferable.
Need help?
Do you have a question about the Orbit Marine IC PRO LED and is the answer not in the manual?
Questions and answers