HunterDouglas Powerview Quick Start Manual
Hide thumbs
Also See for Powerview:
- Installation operation care (32 pages) ,
- Manual (24 pages) ,
- Quick start manual (9 pages)
Advertisement
Quick Links
MANUAL
Powerview® Quick Start Guide Gen 1
This guide will help getting you started with your Powerview® purchase.
Step 1. Install your shades
Make sure you have properly installed your shades and that they are connected to a power source (battery ack or power
supply).
Step 2. Your Powerview® components
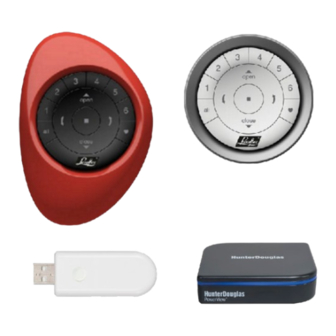
Packed with your purchased product you will find one or more remotes, repeaters and a Hub (which is optional and only
required when you want to control your shades using a tablet or smartphone). Remotes come in different shapes and
colours. Please locate them all before you start.
Pebble
Step 3. Pairing remotes
Note
If you only have one remote, please proceed to
By pairing PowerView® remotes you make all your remotes part of the same PowerView® Network. This is important for
seamless installation of the PowerView® system.
Page 1 of 14
Wall Surface
step
4.
Repeater
Hub (optional), required
for controlling your
shades with a tablet or
smartphone.
version: 1.0
Advertisement

Summary of Contents for HunterDouglas Powerview
- Page 1 Note If you only have one remote, please proceed to step By pairing PowerView® remotes you make all your remotes part of the same PowerView® Network. This is important for seamless installation of the PowerView® system. Page 1 of 14...
- Page 2 MANUAL This instruction will make use of the following button on the remote: Take all remotes. Name one remote "SOURCE" Name the rest of the remotes "TARGET" Repeat the following steps until all "TARGET" remotes have been set. "TARGET REMOTE" : Remove back cover. Keep the batteries in place Page 2 of 14 version: 1.0...
- Page 3 MANUAL "TARGET REMOTE" : Press the reset button for six seconds. The group buttons will flash on the press of the Reset button, then again at six seconds. "TARGET REMOTE" : Close the cover. "SOURCE REMOTE" : Press for 6 stop seconds.
- Page 4 MANUAL Step 4. Adding a shade to a remote A Remote can control 6 groups of shades (which are the buttons 1 to 6). The instructions below assign a shade to group 1. Depending on your preference you can choose your own group. This instruction will make use of the following buttons on the Remote: Find the...
- Page 5 MANUAL Release the Shade button If your remote is still flashing Press for 6 stop seconds. Keep pressing until the flashing stops. Step 5. Install repeaters Installation of a repeater is necessary when your shade is not responding to a command from your remote control. Preferably put the repeater halfway between the unresponsive shade and the remote control location.
- Page 6 (The repeater light will turn off. The repeater is now part of your personal Powerview® Network.) Step 6. Connect and setup the Hub. If you have not purchased a Hub please proceed to Additional actions to proceed with your installation.
- Page 7 If not you can clear the data on the hub. Goto Erase hub data in the Additional actions chapter. Step 7. Connect the Powerview® app to the Hub. Take your remote control. Download the Powerview® app from the app store or play store. Start the app.
- Page 8 You can now start with the app. For further instructions please go to www.luxaflex.co.uk/powerview-installation Additional actions. Your Powerview Network is now setup and ready to be further adjusted to your preferences. Follow the steps in this chapter or go to www.luxaflex.co.uk/powerview-installation for more information.
-
Page 9: Set A Favorite Position
MANUAL Press group 1 (Group 1 will light up.) Press open (Shades assigned to group 1 will open) Press stop (Shades assigned to group 1 will stop) Press close (Shades assigned to group 1 will close) Pressing instead of will move all shades from all 6 groups on the remote. - Page 10 MANUAL Move your shade to the desired favorite position (Use your open, close and stop buttons to move the shade.) Press for 6 seconds. stop (Keep pressing until the remote lights start blinking.) Press and hold the shade button Press the ...
- Page 11 6 groups to their favorite position. Remove a shade from a group This will remove a shade from a group on your remote control. It will not remove the shade from the Powerview® network.
- Page 12 (Keep pressing until the flashing stops.) Install a Scene Controller A Scene Controller works in combination with the Powerview® App. It can activate scenes which are created in the App. Start the App and open the side menu. Select Scene Controllers and follow the App instructions.
- Page 13 MANUAL Erase hub data Find the following button on the back of the Hub. Press for 6 seconds hub erase Wait for the hub to start flashing red and blue. All data on the hub is now cleared. Page 13 of 14 version: 1.0...
-
Page 14: Important Notice
MANUAL Important notice Hunter Douglas Europe B.V. and its affiliates (Hunter Douglas) reserve the right to make corrections, enhancements, improvements and other changes to its products and services, and to discontinue any product or service. Buyers should obtain the latest relevant information before placing orders and should verify that such information is current and complete.


Need help?
Do you have a question about the Powerview and is the answer not in the manual?
Questions and answers