HunterDouglas PowerView Manual
Hide thumbs
Also See for PowerView:
- Installation operation care (32 pages) ,
- Manual (24 pages) ,
- Quick start manual (14 pages)
Table of Contents
Advertisement
Quick Links
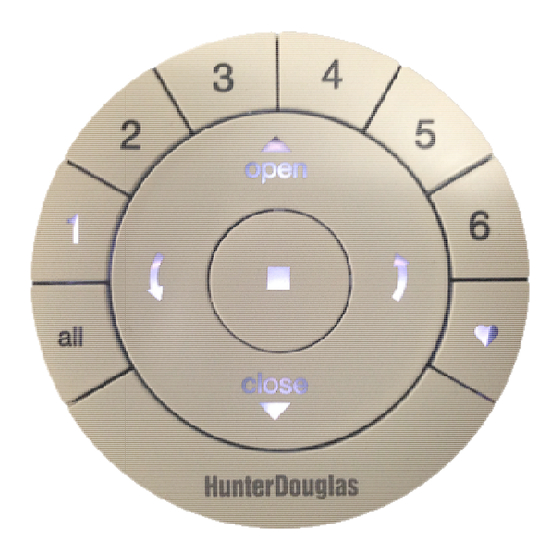
FRONT:
Group 1
LEFT ARROW
Sends the middle rail DOWN
on Top-Down/Bottom-Up or
Duolite™ products
Sends vanes to fully
All Groups
closed left-facing
position on Luminette®
Sheers
BACK
(cover removed):
Page 1 of 8
PowerView™ Remote Control Guide
Group 3
OPEN
Group 2
CLOSE
Group 4
Group 5
STOP
(Press and hold for program mode)
Rev 1.8
Group 6
RIGHT ARROW
Sends the middle rail UP
on Top-Down/Bottom-Up
or Duolite™ products.
Sends vanes to fully
Favorite
closed right-facing
(shade position)
position on Luminette®
Sheers
BATTERY
COMPARTMENT
(2) 3V CR 2032
01292015
Advertisement
Table of Contents

Related Manuals for HunterDouglas PowerView


Summary of Contents for HunterDouglas PowerView
- Page 1 PowerView™ Remote Control Guide FRONT: Group 4 Group 3 OPEN Group 5 Group 2 Group 1 Group 6 RIGHT ARROW LEFT ARROW Sends the middle rail UP Sends the middle rail DOWN on Top-Down/Bottom-Up on Top-Down/Bottom-Up or or Duolite™ products.
- Page 2 PowerV View™ Remote Control Guide Battery Placement: 1. Remove Cover. 2. Place Batteries. Press notch to move cover slightly Press notch to move cover slightly Use two CR 2032 3V batteries. Slide one Use two CR 2032 3V batteries. clockwise to release and remove cover. clockwise to release and remove cover.
- Page 3 PowerView™ Remote Control Guide Groups A GROUP can be a single window covering or multiple window coverings. There are six unique assignable groups to use on each remote. NOTE: It is recommended that only similar window coverings be included in a group because of differences in product features and operation. When a shade is added to a group for the first time, it is also added to a network that links shades and devices together.
- Page 4 PowerView™ Remote Control Guide Resetting Limits – Designer Roller Shades & Designer Screen Shades Only 1. Press and hold the manual control button on the shade for eighteen seconds. Continue to hold the manual control button as the shade jogs at six seconds and twelve seconds. Release it after a third jog at eighteen seconds to clear the bottom limit.
- Page 5 PowerV View™ Remote Control Guide Setting Favorites Position Each shade has one favorite position Each shade has one favorite position which is set by default at 50% of the shade height. Setting a which is set by default at 50% of the shade height. Setting a new favorite position replaces any previous setting.
- Page 6 PowerView™ Remote Control Guide 6. Selecting the right arrow* will open vanes to 100%. a. OR send the middle rail UP on Top-Down/Bottom-Up or Duolite™ products. b. OR send vanes to fully closed right-facing position on Luminette® Sheers. 7. Select the left arrow* to close vanes.
- Page 7 PowerView™ Remote Control Guide Table of Remote Functions by Shade Type: Left Arrow Right Arrow Open Close Stop ♥ Heart shade stacked shade down Moves shade to Standard Stacking at top at bottom No effect No effect Stops shade preset favorite...
- Page 8 Piekstraat 2, 3071 EL Rotterdam, The Netherlands Piekstraat 2, 3071 EL Rotterdam, The Netherlands certify and declare under our sole responsibility that the PowerView ™ Remote Control conforms with the essential requirements of the certify and declare under our sole responsibility that the conforms with the essential requirements of the EMC directive 2004/108/EC and R&TTE directive 1999/5/EC.
Need help?
Do you have a question about the PowerView and is the answer not in the manual?
Questions and answers