
Subscribe to Our Youtube Channel
Related Manuals for Viega Eco Plus 8130.2


Summary of Contents for Viega Eco Plus 8130.2
- Page 1 Viega Eco Plus WC element Instructions for Use Viega Eco Plus Model Year built: 8130.2 from 03/2014 en_INT...
- Page 2 Viega Eco Plus WC element 2 from 23...
-
Page 3: Table Of Contents
Assembly information 3.1.1 Mounting conditions 3.1.2 Installation dimensions 3.1.3 Required tools Assembly 3.2.1 Mounting WC element 3.2.2 Converting actuation 3.2.3 Preparing optional actuation versions 3.2.4 Setting the flush volume Cleaning and maintenance Disposal Viega Eco Plus WC element 3 from 23... -
Page 4: About These Instructions For Use
This restriction does not extend to possible operating instructions. The installation of Viega products must take place in accordance with the general rules of engineering and the Viega instructions for use. -
Page 5: About This Translated Version
German/European directives specified in this manual: The information herein is not binding for other countries and regions; as said above, they should be understood as a recommendation. Viega Eco Plus WC element 5 from 23... -
Page 6: Product Information
Intended use 2.2.1 Areas of use The Viega Eco Plus WC element is suitable for mounting on masonry wall constructions and support profiles pursuant to the regulations in section Ä „Regulations from section: Fields of application / Mounting conditions“ on page 6. -
Page 7: Compatible Components
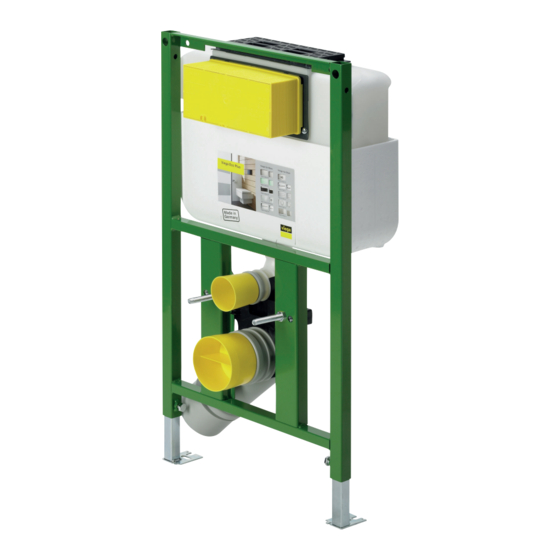
Product information Fig. 1: Components 1 - Viega Eco Plus WC element 2 - threaded rods for fixing sanitary objects (gauges for bore hole 180 or 230 mm) 3 - adjustable feet 4 - drain elbow 5 - fixing height for the WC ceramic: 330 mm 6 - Viega concealed cistern 2L 7 - marking 0.7 m above the upper edge of the finished floor... - Page 8 Flush plate sensitive Visign 8352.21 sensitive for Care Visign for More Flush plate sensitive 230 V 8352.11 sensitive Visign for More 100 Flush plate sensitive 6.5 V 8352.12 Visign for More 100 Viega Eco Plus WC element 8 from 23...
-
Page 9: Sound Protection
2.3.4 Technical data Flush volume Small flush volume Factory setting approx. 3 l Setting range approx. 3–4 l Large flush volume Factory setting approx. ca. 6 l Setting range approx. 6–9 l Viega Eco Plus WC element 9 from 23... -
Page 10: Handling
3.1.1 Mounting conditions Suitable walls The Viega WC element is suitable for mounting on masonry wall con‐ structions and support profiles pursuant to the regulations in section Ä „Regulations from section: Fields of application / Mounting condi‐ tions“ on page 6. -
Page 11: Installation Dimensions
Masonry and concreted walls You should use a support bracket (model 8165) when mounting multiple WC elements with an interval of > 490 mm. Observe the instructions for use of the support bracket when mounting. Viega Eco Plus WC element 11 from 23... - Page 12 Mount the fixing set with the fork spanner (size 13). 560638_B2 Align the height (size 17) of the WC element in accordance with the height marking. Mark fixing points on the floor. Viega Eco Plus WC element 12 from 23...
- Page 13 Set the installation depth of the pre-wall element (200 mm) with the fork spanner (size 17). Mount WC threaded rods (gauges for bore hole 180 or 230 mm). Clip in drain elbow. click Viega Eco Plus WC element 13 from 23...
- Page 14 Install site protection of the flush actuation. Attach protective caps for threaded rods onto WC ceramic. Mount protective plug. Carry out water connection. Double clad WC element with IFGP cladding panels (model 8055.10) (2 x 12.5 mm). Viega Eco Plus WC element 14 from 23...
- Page 15 Determine construction height in accordance with the on-site marking of the upper edge of the finished floor. Pull WC element up (height marking) and align. Tighten feet with the fork spanner (size 17). 0-200 Mark holes for floor supports. Viega Eco Plus WC element 15 from 23...
- Page 16 Handling Drill holes. Ø10 Attach element to floor (size 13). Attach WC element to the support profiles using the screws sup‐ plied. Connect the WC element flush with the support profiles. Viega Eco Plus WC element 16 from 23...
- Page 17 Clip in drain elbow. click Install site protection of the flush actuation. Attach protective caps for threaded rods onto WC ceramic. Mount protective plug. If necessary, mount a reducer. Carry out water connection. Viega Eco Plus WC element 17 from 23...
-
Page 18: Converting Actuation
Actuation can take place optionally from the front or the top. The actua‐ tion is pre-mounted from the front in delivery condition. To convert actuation from above, proceed as follows: Remove lateral cistern cover. Viega Eco Plus WC element 18 from 23... - Page 19 Press the bow backwards from the mounting of the mechanism. Turn the mechanism's lock by 90° in an anti-clockwise direction. ð The mechanism is unlocked and can be removed. Remove mechanism. Remove upper revision cover. Viega Eco Plus WC element 19 from 23...
- Page 20 Turn the mechanism's lock by 90° in a clockwise direction. ð The mechanism is locked. Hang the mechanism in the bow of the drain valve. Insert cistern cover from above. Viega Eco Plus WC element 20 from 23...
-
Page 21: Preparing Optional Actuation Versions
Positioning of the cistern power pack X1= max. 0.75 m X2= max. 2.75 m with an extension cable, 1 x article number 628 505 X3= max. 4.75 m with two extension cables, 2 x article number 628 Viega Eco Plus WC element 21 from 23... -
Page 22: Setting The Flush Volume
Push the slide control below the drain valve to the desired large flush volume: left: approx. 6 l right: approx. 9 l Cleaning and maintenance Cleaning may only be carried out by specialist trade professionals or qualified experts. Viega Eco Plus WC element 22 from 23... -
Page 23: Disposal
Disposal Separate the product and packaging materials (e. g. paper, metal, plastic or non-ferrous metals) and dispose of in accordance with valid national legal requirements. Viega Eco Plus WC element 23 from 23...
Need help?
Do you have a question about the Eco Plus 8130.2 and is the answer not in the manual?
Questions and answers