Table of Contents
Advertisement
Available languages
Available languages
Quick Links
Advertisement
Table of Contents

Related Manuals for BURNHARD WAYNE


Summary of Contents for BURNHARD WAYNE
- Page 1 TRAGBARER 2-BRENNER GASGRILL PORTABLE 2-BURNER GAS GRILL WAYNE...
-
Page 2: Table Of Contents
INHALT TRAGBARER 2-BRENNER GASGRILL WAYNE Technische Daten Sicherheitshinweise Lieferumfang/Teilebeschreibung Gasgrill aufbauen Gasflasche anschließen Gasgrill betreiben Gasgrill reinigen Regelmäßige Wartung Fehlerbehebung Gasgrill aufbewahren Kundenservice Entsorgung/Umweltschutz... - Page 3 CONTENT PORTABLE 2-BURNER GAS GRILL WAYNE Specifications Safety instructions Equipment delivered/Description of components Assembling the gas grill Connecting the gas cylinder Operating the gas grill Cleaning the gas grill Regular maintenance Troubleshooting Storing the gas grill Customer service Disposal/recycling...
-
Page 5: Technische Daten
TECHNISCHE DATEN Leistung: insgesamt 3,5 kW Maße (B/T/H): 65 x 46 x 39 cm Gewicht: ca. 12,6 kg Nennwärmebelastung (HO) Brenner: 3,5 kW Geräteklasse: I3B/P(50), I3+(28-30/37) Anschlusswert (gesamt): 250 g/h (G31) / 255 g/h (G30) Ausgangsdruck: 50 mbar für Butan und Propan (DE), 28-30 mbar für Butan und 37 für Propan (UK) Gasart: Propan (G31) und Butan (G30) -
Page 6: Sicherheitshinweise
Änderungen und Irrtümer in Ausstattungsmerkmalen, Technik, Farben und Design vorbehalten. SYMBOLERKLÄRUNG Dieses Symbol warnt vor Gefahren, die zu Schäden am Gerät führen oder Verletzungen nach sich ziehen können. SICHERHEITSHINWEISE VERWENDUNGSZWECK Dieser Gasgrill darf ausschließlich im Freien und an einem gut belüfteten Ort benutzt werden. -
Page 7: Allgemeine Sicherheitshinweise
GERÄT AUSPACKEN Gefahr für Kinder. Lebensgefahr durch Ersticken/Verschlucken. Halte das Verpa- ckungsmaterial von Kindern fern. Entsorge es sofort. Bewahre Kleinteile außerhalb deren Reichweite auf. GASANLAGE ANSCHLIESSEN Brand- und Explosionsgefahr • Dieser Gasgrill darf nur mit einem Druckregler betrieben werden. Alle Austausch- Druckregler und Schlauchleitungen müssen der EN 16129:2013 und den nationalen Vorschriften entsprechen. - Page 8 • Unsachgemäße Montage des Grills auf Verschmutzungen und entfer- kann gefährlich sein. Halte dich ne diese, bevor du den Gasgrill in genau an die Montageanleitung. Betrieb nimmst. • Dieser Gasgrill ist nicht für die ge- • Entzünde die Gasflamme nicht mit werbliche Nutzung vorgesehen.
- Page 9 der Gasflasche zugedreht und die • Nach Gebrauch die Gaszufuhr an Gasflasche zum Schutz des Druck- der Gasflasche schließen. reglers und der Schlauchleitung vom • Der Deckel muss beim Entzünden Gasschlauch abgeschraubt werden. der Brenner immer geöffnet sein. GASGRILL WARTEN Brand- und Explosionsgefahr •...
- Page 10 schalten, schließe den Deckel, bis das Feuer gelöscht ist. • Achtung: Versuche niemals, einen Öl- oder Fettbrand mit Wasser zu löschen. • Halte Abstand vom Brandherd und informiere unverzüglich die Feuerwehr. ERSTE-HILFE-MASSNAHMEN Maßnahmen nach Einatmen von Gas • Einatmen von hohen Gaskonzentrationen können Ersticken verursachen. Mögliche Symptome sind Verlust der Bewegungsfähigkeit und Bewusstlosigkeit.
- Page 11 TRANSPORTHINWEISE Brand- und Explosionsgefahr • Transportiere die Gasflasche möglichst nicht in Fahrzeugen, deren Laderaum nicht von der Fahrerkabine getrennt ist. Der Fahrer muss die möglichen Gefahren der Ladung kennen und er muss wissen, was bei einem Unfall oder Notfall zu tun ist. •...
-
Page 12: Lieferumfang/Teilebeschreibung
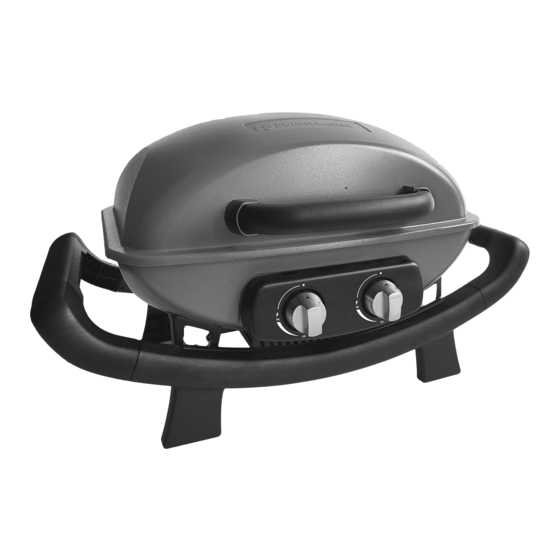
LIEFERUMFANG/TEILEBESCHREIBUNG... - Page 13 Ref. Beschreibung Menge Deckelthermometer Deckel Deckelscharnier-Schraube Deckelgriff Emaillierter Gussrost Edelstahlbrenner (links) Edelstahlbrenner (rechts) Piezo-Zündung Brennbox (Korpus) Korpus Winkelträger (links) Korpus Winkelträger (rechts) Wärmeisolierung A Wärmeisolierung B Umlenkblech (Front) Gas-Hauptventil Gas-Hauptverteiler Gasschlauch Kontrollstation Drehknopf (Regler) Fettauffangblech Auffangblech-Halterung Tragegriff Stand (vorne) Stand (hinten) Warnhinweis-Klappe Schaft und Feder Querschiene...
- Page 14 BEFESTIGUNGEN...
-
Page 15: Gasgrill Aufbauen
GASGRILL AUFBAUEN Verletzungsgefahr Der Grill wird teilweise vormontiert geliefert. Entferne vor Beginn der Montage alle Verpackungsmaterialien und die Schutzfolien von den Einzelteilen. Du benötigst einen Kreuzschraubenzieher für den Aufbau des Grills. - Page 18 ACHTUNG: • Betreibe den Grill ausschließlich auf einem ebenen, nicht brennbaren Untergrund. • Der Grill strahlt Hitze ab. Stelle den Grill nie direkt an Glasfronten, Wände, Pflanzen etc. Der minimale Abstand zu Objekten jeder Art beträgt: Nach hinten: 1,5 m Zur Seite: 1,5 m Nach oben:...
-
Page 19: Gasflasche Anschließen
1,5 m 1,5 m 1,5 m 1,5 m GASFLASCHE ANSCHLIESSEN Brand- und Explosionsgefahr Die folgenden Teile sind im Lieferumfang enthalten. Sie entsprechen der Norm, die für das jeweilige Land gilt, in das der Grill geliefert wird: • Gasschlauch (vormontiert): CE-anerkannte Schlauchleitung ausreichender Länge (max. - Page 20 1. Stelle sicher, dass beide Regler auf „OFF“ stehen. 2. Drehe die Schutzkappe von der Verschraubung am Gasgrill ab. Schraube die Überwurfmutter am Schlauchende auf die Verschraubung am Gasgrill. Drehe die Überwurfmutter mit den Fingern fest. Verwende keinen Schraubenschlüssel oder anderes Werkzeug, damit die Gasdichtung nicht beschädigt wird.
- Page 21 3. Stelle die Gasflasche auf einen ebenen, nicht brennbaren Untergrund neben den Grill. 4. Schraube die Überwurfmutter des Schlauchs auf die Verschraubung am Druck- regler und ziehe die Verbindung mit einem Schraubenschlüssel fest an. 5. Schraube die Überwurfmutter am Druckregler auf die Verschraubung an der Gasflasche.
-
Page 22: Gasgrill Betreiben
ENERGIESPARTIPPS 1. Schalte den Grill aus, sobald du mit dem Grillen fertig bist. 2. Heize den Grill bei geschlossenem Deckel nur 10-15 Minuten vor (ausgenommen der Erstbenutzung). 3. Es ist nicht nötig, den Grill länger als angegeben vorzuheizen. WARNUNG: Überprüfe die Gasanschlüsse vor jedem Gebrauch auf Brüche, Risse oder Abnutzungen. - Page 23 Schrubbe im Anschluss mit einer Edelstahlbürste über die Gussroste. Die Farbe im Inneren des Gasgrills kann sich leicht verändern. Dies ist ein natürlicher Vorgang. Gasgrill einschalten 1. Öffne den Deckel des Grills. die „HI“ Position drehst, halte 2. Drehe alle Stellknöpfe im Uhrzei- den Knopf gedrückt.
-
Page 24: Gasgrill Reinigen
GASGRILL REINIGEN Reinigung nach jedem Gebrauch Schließe den Deckel und stelle beide Brenner auf „HI“. Lasse den Grill 15-20 Minuten ausbrennen, bis kein Rauch mehr aus dem Grill aufsteigt. Schließe alle Brenner und drehe das Ventil der Gasflasche zu. Öffne den Grill und schrubbe die Roste mit einer Edelstahlbürste sauber. - Page 25 Hast du die Brenner ausgebaut, kannst du die Brennbox mit warmem Wasser und etwas Spülmittel reinigen. Achte darauf, dass der Ablauf immer frei von Verschmutzungen ist. 1. Löse alle Schrauben mit Hilfe eines Kreuzschraubenziehers. 2. Ziehe die Brennstäbe vorsichtig aus der Brennbox und schraube die Zündungen 3.
-
Page 26: Regelmäßige Wartung
2. Die Grillroste vollständig einfetten. Verwende dazu ein Fett mit einem hohen Anteil an gesättigten Fettsäuren, z.B. Kokosfett, Kokosnussöl oder Schmalz. 3. Die Roste auf den Grill legen und auf höchster Temperatur bei geschlossenem Deckel 30 Minuten einbrennen. Hierdurch wird das Fett dauerhaft in das Eisen eingebrannt und es entsteht eine schützende Patina. -
Page 27: Fehlerbehebung
Es empfiehlt sich, die dreckigen Stellen am Rand der Gussroste nach allen 2-3 An- wendungen nach dem Ausbrennen und Bürsten separat zu reinigen. Nimm hierfür die Roste aus dem Grill und schrubbe sie mit warmem Wasser (kein Spülmittel) und einem Drahtschwamm (Topfschwamm) vorsichtig sauber. Im Anschluss gründlich mit einem Tuch trockenreiben, einölen und wieder in den Grill einsetzen. -
Page 28: Gasgrill Aufbewahren
Kleine Flamme Brenner und Zündung oder Verpuffung Fremdkörper im Brenner säubern im Brenner Knallendes oder Grill an einen fauchendes Zu viel Wind windgeschützteren Geräusch Ort stellen GASGRILL AUFBEWAHREN • Bewahre den Gasgrill in einem vor Frost geschützten und trockenen Raum auf. Schließe die Grillhaube und decke das Gerät ab, um es vor Verschmutzungen und Beschädigungen zu schützen. -
Page 29: Kundenservice
KUNDENSERVICE Grundsätzlich unterliegen unsere Produkte der gesetzlichen Gewährleistungs- pflicht von 2 Jahren. Ansprüche darüber hinaus können nur in Verbindung mit dem Kaufbeleg bearbeitet werden. Verschleißteile schließen bei der üblichen Abnutzung einen Gewährleistungsanspruch aus. Die Lebensdauer hängt von der jeweiligen Behandlung und Nutzung der Produkte ab und ist daher variabel. Wende dich für Fragen zur Bedienung oder Funktion unserer Artikel an unseren Kundenservice: Rufnummer Deutschland: +49 (0)800 270 70 27... -
Page 31: Specifications
SPECIFICATIONS Power: 3.5 kW total Dimensions (H/W/D): 65 x 46 x 39 cm Weight: approx. 12.6 kg Nominal heat output (HO) in total: 3.5 kW Appliance category: I3B/P(50), I3+(28-30/37) Gas consumption (total): 250 g/h (G31) / 255 g/h (G30) Outlet pressure: 50 mbar for butane and propane (GER), 28-30 mbar for butane and 37 mbar for propane (UK) Type of gas:... -
Page 32: Safety Instructions
EXPLANATION OF SYMBOLS SAFETY INSTRUCTIONS Please read through the operating instructions carefully before use and keep them for future reference. INTENDED USE This gas grill may only be used outdoors and in well-ventilated areas. Never use the gas grill inside a building, garage, or any other enclosed area. General warnings •... -
Page 33: General Safety Instructions
UNPACKING THE DEVICE Danger to children. Danger to life through suffocation/ingestion. Keep the packa- ging material away from children. Dispose of it immediately. Keep small parts out of their reach. CONNECTING THE GAS SYSTEM Fire and explosion hazard • This gas grill shall only be operated with a pressure regulator. Any replacement pressure regulator and hose assembly should comply with EN 16129:2013 and the national regulation. - Page 34 • Use the gas grill outdoors only. Make • The surfaces of the gas grill become sure that the gas grill is protected very hot during operation. Warn bys- from the wind. tanders and keep children away from • Keep the grill away from moisture, the gas grill.
- Page 35 MANTAINING THE GAS GRILL Fire and explosion hazard • The gas system may only be repaired and serviced by authorised specialist per- sonnel. Do not make any changes to the gas grill or pressure regulator. • Change the pressure regulator and hose after 10 years maximum, even if no external damage is noticeable.
- Page 36 FIRST AID MEASURES What to do in case of gas inhalation • Inhaling high gas concentrations can lead to suffocation. Possible symptoms include loss of mobility and unconsciousness. The victim does not realise that he or she is suffocating. If inhaled in low concentrations, the gas can cause dizzi- ness, headaches, nausea, and problems with coordination.
-
Page 37: Storage Instructions
INSTRUCTIONS FOR TRANSPORT Fire and explosion hazard • If possible, do not transport the gas cylinder in vehicles in which the load compart- ment is not separated from the driver' s cab. The driver must be aware of the po- tential dangers of the cargo and must know what to do in the event of an accident or emergency. -
Page 38: Equipment Delivered/Description Of Components
EQUIPMENT DELIVERED/ DESCRIPTION OF COMPONENTS... - Page 39 Ref. Description Quantity Lid thermometer Lid hinge screw Lid handle Enamelled cast iron grate Stainless steel burner (left) Stainless steel burner (right) Piezo ignition Firebox (body) Left angle bracket (body) Right angle bracket (body) Thermal insulation A Thermal insulation B Baffle (front) Main gas valve Main gas distributor...
- Page 40 ATTACHMENTS AND FASTENERS...
-
Page 41: Assembling The Gas Grill
ASSEMBLING THE GAS GRILL Risk of injury The grill comes partially pre-assembled. Before starting to assemble the grill, remove all packaging materials and protective wrappings from the various components. You will need a Phillips screwdriver to assemble the grill. - Page 44 ATTENTION: • Only operate the grill on a level, non-flammable surface. • The grill radiates heat. Never place the grill next to glass windows, walls, plants, etc. The grill must be placed a minimum distance from objects of any kind: 1.5 m behind 1.5 m to the side 1.5 m above...
-
Page 45: Connecting The Gas Cylinder
1.5 m 1.5 m 1.5 m 1.5 m CONNECTING THE GAS CYLINDER Fire and explosion hazard The grill comes with the following components. They comply with the norms appli- cable in the country where the grill is delivered: • Gas hose (pre-attached): CE-approved gas hose of appropriate length (max. 1.5 m), allowing for kink-free attachment. - Page 46 1. Make sure that both knobs are set to “OFF”. 2. Remove the protective cap on the gas grill. Screw the union nut at the end of the gas hose onto the screw connection on the gas grill. Use your hand to tighten the union nut.
- Page 47 3. Place the gas cylinder on a level, non-flammable surface next to the grill. 4. Screw the union nut on the gas hose onto the pressure regulator. Use a wrench to tighten the connection. 5. Screw the union nut on the pressure regulator onto the gas cylinder. Use your hand to tighten the connection.
-
Page 48: Operating The Gas Grill
ENERGY SAVING TIPS 1. Turn the grill off as soon as you are done grilling. 2. Preheat the grill with the lid closed for only 10-15 minutes (except for the first use). 3. You do not need to preheat the grill longer than specified. WARNING: Check the gas connections for breakages, wear or tear before use. - Page 49 This is harmless. Make sure the grill is ventilated adequately. Afterwards, use a brass brush to scrub over the cast iron grates. The colour on the inside of the gas grill may change slightly. This is a natural process. Igniting the gas grill 1.
-
Page 50: Cleaning The Gas Grill
CLEANING THE GAS GRILL Cleaning after each use Close the lid and set both burners to “HI”. Let the grill burn for 15-20 minutes until there is no more smoke coming out of the grill. Turn off all burners and close the gas cylinder valve. - Page 51 Always make sure that the process is free of contamination. 1. Use a Phillips screwdriver to loosen all screws. 2. Carefully remove the burner rods from the firebox and unscrew the ignitions. 3. Use a metal brush to scrub the burners and remove burned-in liquids and flash rust.
-
Page 52: Regular Maintenance
REGULAR MAINTENANCE After grilling, you should prepare the grill for the next use. Let the grill burn freely at maximum heat with the lid closed to burn up any residues on the grates and then brush them off. Follow the procedure below to do this: 1. -
Page 53: Troubleshooting
TROUBLESHOOTING Problem Possible cause Solution Connect new gas Gas cylinder is empty cylinder Have the pressure Faulty pressure regulator regulator checked by Burner does not a specialist dealer ignite Impurities in the burner Clean the burner Impurities in the ignition Clean the ignition system or gas hose and gas hose... -
Page 54: Storing The Gas Grill
STORING THE GAS GRILL If possible, store the cast iron grates in a dry place during winter. General cleaning of the grill should be done every 3-4 months. You should let the grease residues burn, empty the grease trap, and clean the grease tray and grates every time you use the grill. -
Page 55: Disposal/Recycling
DISPOSAL/RECYCLING Our products are manufactured with the highest degree of care and are designed for a long durability. Regular maintenance and cleaning help to prolong durability. If the device is defective and cannot be repaired, it must not be disposed at home. The product and its packaging must be disposed of in accordance with local regula- tions. - Page 56 IMPRESSUM Aufbau- und Bedienungsanleitung tragbarer 2-Brenner Gasgrill Wayne Art-Nr.: 943294 (DE), 943295 (UK) Druck- und Satzfehler vorbehalten. Copyright © Springlane GmbH Reisholzer Werftstraße 25a 40589 Düsseldorf, Germany Telefon: +49 (0)211 749 55 10 Telefax: +49 (0)211 749 55 11 0 E-Mail: info@springlane.de...
Need help?
Do you have a question about the WAYNE and is the answer not in the manual?
Questions and answers