Table of Contents
Advertisement
Quick Links
Advertisement
Table of Contents

Related Manuals for Bellfires Wi-fi box


Summary of Contents for Bellfires Wi-fi box
- Page 1 Manual for the Bellfi res Wi-Fi box in combination with the Bellfi res Gas app...
-
Page 3: Table Of Contents
Setting the Bellfi res Gas app ..............3.1 Installation ..................3.2 Registration ..................3.3 Connect the tablet or smartphone of the Bellfi res Wi-Fi box .... 3.4 Fire settings ..................3.5 Connecting extra mobile devices ............. Operating the fi re of the Bellfi res Gas app .......... - Page 4 English Instructions for use...
-
Page 5: Introduction
It is also possible to carry out fault diagnostics remotely. Once the Bellfi res Wi-Fi box has been installed, it is still possible to operate the fi re using the remote control supplied. For remote control operation, consult the manual ‘Instructions for use &... -
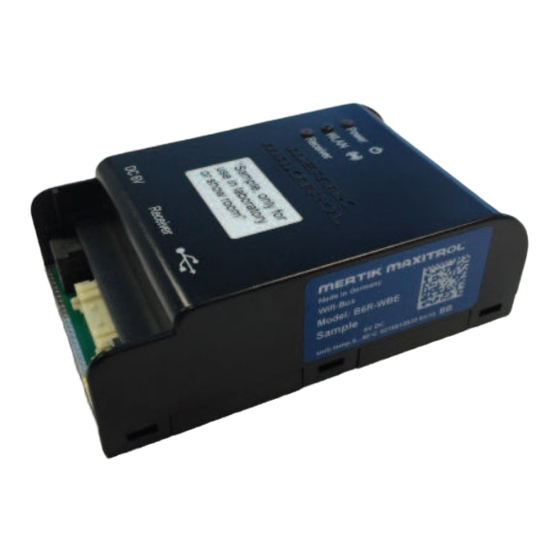
Page 6: Components
The receiver with Wi-Fi functionality can be recognised by the blue sticker. Article number: 341644 • Connecting cable between the • 230VAC / 6VDC adapter Bellfi res Wi-Fi box and the receiver Article number: 302092 Article number: 341647 Instructions for use... - Page 7 English • Hand-held transmitter Article number: 341643 This must be provided with a blue sticker. If the remote control is provided with a green or silver-coloured sticker, it is not suitable for use in combination with the Bellfi res Wi-Fi box.
-
Page 8: Connections Receiver
Electrical Connection connection for external for gas valve operating “rear burner” (option) SI: Serial Interface RESET button Bellfi res Wi-Fi box connection RESET button AUX: Electrical Sticker Blue connection for gas valve “rear burner” SI: Serial Interface Bellfi res Wi-Fi box... -
Page 9: Connections Bellfi Res Wi-Fi Box
2.3 CONNECTIONS BELLFIRES WIFI BOX ºC / ºF: Connection for temperature sensor (option) Not in use Reset button RESET options on the Bellfi res Wi-Fi box Pressing time RESET button Function 1 second Blue Power LED Activates “Acces Point” mode fl... -
Page 10: Installation Bellfi Res Wi-Fi Box
“SI” on the receiver and the input “Receiver” on the Bellfi res Wi-Fi box. • Connect the 6 VDC mains adapter to the receiver. • As soon as the Bellfi res Wi-Fi box is connected, the LED lights will light up. Instructions for use... - Page 11 Note: If the external temperature sensor is not connected, then the room temperature will be read by the hand transmitter. • The Bellfi res Wi-Fi box can now be set using the Bellfi res Gas app. The fi re can then be operated using the Bellfi res Gas app.
- Page 12 English Gas pipe “Rear burner” Gas pipe “Front burner” Burner 8 Wire Motor- cable knob Pilot light Thermocouple REGULATOR supply BLOCK Pilot light gas pipe connection “black” Thermocouple interruptor “red” Hand-held transmitter Gas valve “Rear burner” Convection Ambient lighting Thermo-electrical (option) (option) cable...
-
Page 13: Setting The Bellfi Res Gas App
To change the router settings, refer to the corresponding manual or contact the manu- facturer of the router. After connecting the Wi-Fi box to the home network, the initial router settings can be restored, if desired. The connection between the Wi-Fi box and the home network will remain. -
Page 14: Registration
English Start the Bellfi res Gas app on your smartphone or tablet LANGUAGE • Select the required language English Deutsch Francais Nederlands Espanol • Select the required temperature scale TEMPERATURE- AND TIME SETTINGS (˚C or ˚F) • Select 12-hour or 24-hour Temperature scale ºF ºC... - Page 15 English REGISTRATION First name: Last name: • Complete the requested details Address: Zip Code: City: Country: Phone: Phone: Dealer: • The email address is the user name for your account E-mail: • The password must have at least 8 characters Password: •...
-
Page 16: Connect The Tablet Or Smartphone Of The Bellfi Res Wi-Fi Box
Login 3.3 CONNECT THE TABLET OR SMARTPHONE TO THE BELLFIRES WI-FI BOX The Bellfi res Wi-Fi box which is installed in the fi re (see chapter 2) creates its own network. To operate the fi re using the Bellfi res Gas app, the Bellfi res Wi-Fi box’s network must connect to your own home network (wifi... - Page 17 Privacy Important: If the Bellfi res Wi-Fi box is still not displayed after a few minutes, the Wi-Fi box must be reset by pressing the reset button for 20 seconds (see page 9). The Bellfi res Wi-Fi box will automatically restart after this. As soon as it is displayed on the screen, the installation can be continued.
- Page 18 • Return to the Bellfi res Gas app and connect the Bellfi res Wi-Fi box to your own network. Connect Wi-Fi Box To Your Wi-Fi Router • To do this, complete the following details Name Your Fire: º Name of the fi re (free to...
-
Page 19: Fire Settings
English 3.4 FIREPLACE SETTINGS Once the Bellfi res Wi-Fi box of the appliance has been connected to your home net- work, the fi re’s specifi cations can be entered into the Bellfi res Gas app. • Please select options your fi... -
Page 20: Connecting Extra Mobile Devices
The Bellfi res Gas app is ready for use. 3.5 CONNECTING EXTRA MOBILE DEVICES Once you have connected a mobile device to the Bellfi res Wi-Fi box for the fi rst time, you can connect other mobile devices. • Download the Bellfi res Gas app from the App Store or Google Play on the mobile device that you want to connect •... -
Page 21: Operating The Fi Re Of The Bellfi Res Gas App
English OPERATING THE FIRE WITH THE BELLFIRES GAS-APP 4.1 START SCREEN: On/Off button Outside temperature Quick menu yellow = function is activated grey = function is deactivated Room temperature Access to menu An activated function is represented by a yellow icon in the right hand menu. -
Page 22: Explanation Of The Symbols
English 4.2 EXPLANATION OF THE SYMBOLS On /Off Switches the fi re on or off. After turning off the fi re, it will take approx. 30 seconds before the fi re can be turned on again. Outside temperature The temperature is displayed here as soon as the Bellfi... - Page 23 English ECOwave The fl ame height varies automatically by one of the 3 available fl ame effect programs. The duration of a fl ame effect program can also be set. Fan system (optional) If the fi re is fi tted with a convection fan, then it will set the fan system’s speed.
-
Page 24: Menu Functions
English MENU FUNCTIONS Profi les A total of 4 operating profi les can be saved. Select one of the four profi les. Once a profi le has been selected, the “profi les” symbol and the activated profi le number will appear at top left. Instructions for use... - Page 25 English Profi les Various settings can be stored within one profi le. See the description of the various components below. To save a setting, select “Yes” at “Save to profi le?”. Save to profi le? To stop profi le settings, select “No” at “Save to profi le?”. Instructions for use...
- Page 26 English Manual operation Adjust the fl ame height by moving your fi nger over the coloured circle. At the left- most position (lowest fl ame) or rightmost position (highest fl ame), the relevant fl ame icon at the bottom of the display will also light up. With the 3 buttons at the bottom, a low fl...
- Page 27 English Thermostat Change the set temperature by moving your fi nger over the coloured circle, or by touching one of the coloured segments. The displayed temperature is the measured room temperature. After activation of the thermostat function, the thermostat symbol and “APP” will appear in the remote control window.
- Page 28 English Timer The time interval after which the fi re will switch itself off can be set using the timer. The maximum time that can be set is 09:59 hours. Start the timer by pressing the “power” button at the bottom of the timer. Pressing the “power” button again will stop the timer.
- Page 29 English Program mode A maximum of 8 timing programs can be set. The day, time and temperature can be set by pressing the program’s number. Instructions for use...
- Page 30 English Program mode The start time and the temperature respectively can be set using the green segments. CLEAR ON time ON temperature CLEAR The days of the week can be set using the grey segment. Instructions for use...
- Page 31 English Program mode CLEAR Active days The end time and the temperature respectively can be set using the red segments, once this time has been reached. Instead of the temperature, the “standby” position can also be selected. This will switch off the main burner, but the pilot light will keep burning.
- Page 32 English Program mode CLEAR OFF time CLEAR OFF temperature Return to the program selection screen by clicking on the icon at top left. Instructions for use...
- Page 33 English Program mode 06:00 18.0 º 08:00 STANDBY In the selection screen, a program can be activated or deactivated by clicking on the “power” button to the left of the program. After activation of the program mode function, the program mode symbol and “APP”...
- Page 34 English ECOwave A selection can be made between three dynamic fl ame heights, whcih can be repeated every 15, 20 or 25 minutes as desired. Select the fl ame height with the fl ame icons and adjust the time interval with the left button. The potential gas saving is visible on the left.
- Page 35 English ECOwave The thermostat can be activated by pressing the ˚C button. The temperature will then be controlled by the temperature set with the thermostat function. The thermostat only works in combination with the right-hand fl ame pattern gradient. After activation of the ECOwave function, the ECOwave symbol and “APP” will appear in the remote control window.
- Page 36 English Fan system (optional) Set the fan system to the required continuously adjustable setting from position 1 (slow) to position 4 (fast). Start and stop the fan system with the “power” button at the bottom of the screen. The fan always starts in position ‘4’. After a few seconds, the fan will switch to the last position set before the fi...
- Page 37 English Lighting (optional) Set the light intensity by moving over the lamp from top to bottom or the reverse. The lamp can be switched on or off with the “power” button at bottom right. AUX (double burner) Only for fi res fi tted with a double burner (Centre Fire burner, Line Fire burner or a Premium Fire burner).
- Page 38 English Child safety If the child safety is activated, then it is only possible to switch the fi re off with the on/off button. All other functions are unavailable. Activate the child safety by pressing the child symbol in the menu for a few seconds. Once the safety mechanism is activated, the following screen will appear.
- Page 39 English Child safety Remove the child safety by fi rst keeping the child safety symbol in the left hand menu pressed and after 2 seconds simultaneously pressing a few seconds the child safety symbol at the temperature indicator. Instructions for use...
-
Page 40: Troubleshooting
Wi-Fi box by pressing the reset button for 20 seconds (see Section 2.3) and carrying out the installation again The Wi-Fi box is out of Reduce this distance or reach from the Wi-Fi router use a Wi-Fi extender. Subsequently, reset the... - Page 41 English Problem Possible cause Possible solution The temperature Reset the receiver by indication on the pressing the reset button ‘Bellfi res Gas’ app on the receiver only once shows “N/A” very briefl y. You will hear a beep. (Consult the user manual of the gas fi...
- Page 42 English Instructions for use...
- Page 44 Your Bellfi res dealer 04 - 200917 - 342810...
Need help?
Do you have a question about the Wi-fi box and is the answer not in the manual?
Questions and answers