Table of Contents
Advertisement
Advertisement
Table of Contents

Related Manuals for Dentsply Sirona Gutta-Smart


Summary of Contents for Dentsply Sirona Gutta-Smart
- Page 1 Gutta‑Smart™ Directions for Use...
-
Page 2: Table Of Contents
Table of Contents Table of Contents Introduction . . . . . . . . . . . . . . . . . . . . . . . . . . . . . . . . . . . 4 Indications for use . - Page 3 Table of Contents 5.3.5 Handpiece Operation ........22 5.3.5.1 Pack Handpiece –...
-
Page 4: Introduction
Congratulations on your purchase of the Gutta‑Smart™ cordless obturation system. These Directions for Use are always kept up to date by Dentsply Sirona to bring them in line with the latest developments. You will find the current version on the website shown on the back cover page of this manual. -
Page 5: Contraindications
• If any irregularities with the device should occur during treatment, turn it off. Contact Dentsply Sirona by phone or online at the contact information shown on the back cover page of this manual, or contact your Dentsply Sirona autho- rized service partner. - Page 6 If a defect should occur, contact Dentsply Sirona by phone or online at the contact information shown on the back cover page of this manual, or contact your Dentsply Sirona autho- rized service partner.
- Page 7 Warnings Battery and Transport • The battery charging connections on the handpieces are a proprietary connec- tion. Only use the base station and power adapter supplied with the device to charge the device. Use of non-original chargers jeopardizes the safety of the patient and user.
-
Page 8: Precautions
Precautions Precautions Read the following precautions before use. • Place the cannula gently into the canal. Too much pressure will stop the motor from turning. • Do not charge, operate or store at high temperatures. Comply with the speci- fied operating and storage conditions. •... -
Page 9: Step By Step Instructions
Step by Step Instructions Step by Step Instructions 3 Warnings 4 Precautions Refer to chapters to determine any special care to exercise before starting to use the complete device. 132 C ° 5 .2 Package Before use, please check the exact contents of the package. See Contents. -
Page 10: Package Contents
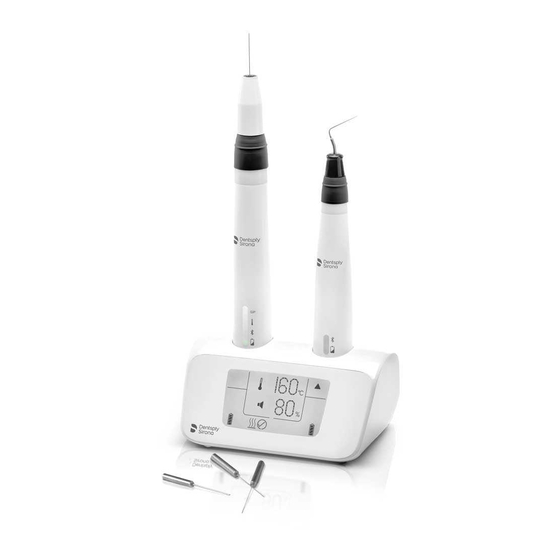
Step by Step Instructions 5 .2 Package Contents Step Action Carefully remove the device and the accessories from their packaging and place them on a flat surface. Check that the device is supplied with all the components listed below. Flow Handpiece Pack Handpiece Power Adapter (100–240V, 50–60Hz) - Page 11 Step by Step Instructions Thermal Response Flow Heater Electric Heat Pluggers (EHP) Tip (TRT)* (HTR) Small Medium Large (black) (yellow) (blue) *(purchased separately) 40/.025 50/.05 60/.06 COLOR AND MATERIALS JULY 24, 2017 REF AEU-65 SN EN19000719-001 EU-65 Gutta-Percha (GP) Cannula 9000719-001 Bending 20 Ga Cartridges (10 pack)
-
Page 12: System Setup
Step by Step Instructions 5 .3 System Setup 5 .3 . 1 Charging the Handpieces Step Action Attach the correct plug adapter for your country onto the power adapter, then plug the power adapter into an electrical outlet. Plug the cord from the power adapter into the socket on the back of the base station. -
Page 13: Attaching Handpiece Instruments
Step by Step Instructions 5 .3 .2 Attaching Handpiece Instruments 5 .3 .2 . 1 Attaching Electric Heat Plugger (EHP) to Pack Handpiece Step Action Select one of the three EHPs provided (small, medium or large). Push the EHP into the end of the pack handpiece until it seats firmly. EHPs can be installed in any one of 4 orientations. -
Page 14: Attaching Heater (And Gp Cartridge) To Flow Handpiece
Step by Step Instructions 5 .3 .2 .3 Attaching Heater (and GP cartridge) to Flow Handpiece Step Action Select a GP cartridge (20, 23 or 25 Ga). Insert the GP cartridge through the HTR. Thread the HTR (with the GP cartridge) onto the flow handpiece. Finger tight- en only! Bend the cannula to the desired angle using the cannula bending tool. - Page 15 For example, if you want to program the handpiece on the left, press the left side of the touch-screen. NOTES: THIS ILLUSTRATION SHOWS CURRENT BRANDING TO DATE. DENTSPLY SIRONA LOGO IS ROTATED TO HORIZONTAL AND LOGO ON CHARGER MEMBRANE HAS BEEN MOVED TO LOWER LEFT PER TEAM MEETING DISCUSSION ON SEPT.
-
Page 16: Programming The Pack Handpiece
Step by Step Instructions 5 .3 .3 . 1 Programming the Pack Handpiece Step Action Press the segment of the touch-screen directly below the pack handpiece to activate the settings for the pack handpiece. For instructional purposes, the pack handpiece is assumed to be on the right side of the base station in the following illustration of the touch-screen. -
Page 17: Programming The Pack Handpiece For The Thermal Response Tip (Trt)
Step by Step Instructions 5.3.3.1.1 Programming the Pack Handpiece for the Thermal Response Tip (TRT) Step Action Press the segment of the touch-screen directly below the pack handpiece to activate the settings for the pack handpiece. 5 .3 .2 .2 Attaching Thermal Insert the TRT into the pack handpiece. -
Page 18: Programming The Flow Handpiece
Step by Step Instructions 5 .3 .3 .2 Programming the Flow Handpiece Step Action Press the segment of the touch-screen directly below the flow handpiece to activate the settings for the flow handpiece. The GP level indicator uses the position of the GP push-rod to estimate the GP level remaining in the cartridge. -
Page 19: Pack And Flow Handpieces - Common Features
Step by Step Instructions 5 .3 .4 Pack and Flow Handpieces — Common Features These features are common to both handpieces. For features exclusive to 5 .3 .4 . 1 Pack Handpiece Features 5 .3 .4 .2 Flow each handpiece, see GLOSS WHITE MATCHED TO X-SMART IN PROCESS... -
Page 20: Pack Handpiece Features
Step by Step Instructions 5 .3 .4 . 1 Pack Handpiece Features ELECTRIC HEAT PLUGGER (EHP) THERMAL RESPONSE TIP (TRT) CUFF SWITCH (EHP MODE) Temperature setting: 100°–400°C. Press and hold the raised ridge on the cuff switch to heat the EHP. -
Page 21: Flow Handpiece Features
Step by Step Instructions 5 .3 .4 .2 Flow Handpiece Features FLOW HEATER (HTR) Removing the HTR initiates GP push-rod retraction. CUFF SWITCH Press the raised ridge on the cuff switch to initiate heating, if not already at set temperature. Heating takes approximately 90 seconds. -
Page 22: Handpiece Operation
Step by Step Instructions 5 .3 .5 Handpiece Operation Step Action Fully charge handpieces before starting a procedure. Disinfect handpieces and sterilize tips before starting a procedure. See Cleaning, Disinfection and Sterilization. Do not sterilize the GP cartridges. Handpieces will automatically turn off after 20 minutes of inactivity. Press the power switch on the handpiece to turn back on. -
Page 23: Flow Handpiece - Gutta-Percha (Gp) Operation
Step by Step Instructions 5 .3 .5 .3 Flow Handpiece – Gutta-Percha (GP) Operation Step Action Install the desired GP cartridge and the HTR on the flow handpiece. Use the cannula bending tool to place a smooth radius curve on the cannula so it can extend to within 5 mm of the working length of the canal. -
Page 24: Cleaning, Disinfection And Sterilization
Cleaning, Disinfection and Sterilization Cleaning, Disinfection and Sterilization 6 . 1 Forward The components of the Gutta‑Smart™ have not been disinfected or sterilized when they are delivered. Please perform the necessary steps before every treat- ment. You are responsible for the sterility of accessories; always ensure that only validated methods of cleaning/disinfection and sterilization are used, that regular mainte- nance and inspections are performed on the equipment (disinfector, sterilizer) and that the validated parameters are maintained in every cycle. -
Page 25: Electric Heat Pluggers (Ehp), Thermal Response Tips (Trt) And Flow Heaters (Htr)
Cleaning, Disinfection and Sterilization Clean the exterior of the handpieces with a soft cloth moistened with a mild non-chlorinated detergent or disinfecting solution. Do not spray any liquid directly on the handpieces. Do not allow any mois- ture to get past the barrier created by the front-end sealing caps and into the handpiece electronics. -
Page 26: Gutta-Percha Cartridges (Gp)
Cleaning, Disinfection and Sterilization 6 .5 Gutta-Percha Cartridges (GP) Step Action Prior to using a GP cartridge on a patient, wipe the cannula with isopropyl alcohol and allow to dry. GP cartridges are for single patient use only. Do not immerse GP cartridges into any liquid. Do not use GP cartridges after the expiration date. -
Page 27: Supplies And Accessories
Supplies and Accessories Supplies and Accessories For replacement supplies and accessories, contact Dentsply Sirona by phone or online at the contact information shown on the back cover page of this manual. Part Description Gutta-percha cartridge 20 gauge Gutta-percha cartridge 23 gauge Gutta-percha cartridge 25 gauge Small electric heat plugger (40/.025 ) -
Page 28: Technical Characteristics
Technical Characteristics Technical Characteristics Specification Description ANSI/AAMI ES60601-1:2005/(R)2012, ETL Classified CSA CAN/CSA-C22.2 NO. 60601-1:14 IEC 80601-2-60(First Edition): 2012 Manufacturer and European representative Gutta‑Smart™ Model Box Dimensions (Length x 237 mm x 147 mm x 133 mm Height x Width) Weight 1.46 kg (3.22 lb) Power supply LiFePO4 Battery, 3.2 V, 1500 mAh... - Page 29 Technical Characteristics 132 C ° Specification Description 132 C ° • Use: in enclosed spaces 132 C ° • Ambient temperature: 15°C - 35°C; (59°F - 95°F) 35° C (95° F) 15° C (59° F) • Relative humidity: < 90%; non- condensing at 0°C Operating conditions (32°F) •...
- Page 30 Technical Characteristics Guidance and manufacturer´s declaration electromagnetic emission Gutta‑Smart™ is intended for use in the electromagnetic environment specified below. The customer or the user of Gutta‑Smart™ should assure that it is used in such an envi- ronment. Emissions test Compliance Electromagnetic environment - guidance Gutta‑Smart™...
- Page 31 Technical Characteristics Guidance and manufacturer´s declaration electromagnetic immunity Gutta‑Smart™ is intended for use in the electromagnetic environment specified below. The customer or the user of Gutta‑Smart™ should assure that it is used in such an envi- ronment. Immunity test IEC 60601 Compliance Electromagnetic level...
- Page 32 Technical Characteristics Guidance and manufacturer´s declaration electromagnetic immunity Gutta‑Smart™ is intended for use in the electromagnetic environment specified below. The customer or the user of Gutta‑Smart™ should assure that it is used in such an envi- ronment. Immunity test IEC 60601 Compliance Electromagnetic level...
- Page 33 Technical Characteristics Recommended separation distances between portable and mobile RF communi- cations equipment and Gutta‑Smart™ Gutta‑Smart™ is intended for use in an electromagnetic environment in which radiat- ed RF disturbances are controlled. The customer or the user of Gutta‑Smart™ can help prevent electromagnetic interference by maintaining a minimum distance between portable and mobile RF communications equipment (transmitters) and Gutta‑Smart™...
-
Page 34: Troubleshooting
• Turn the handpiece off and then back on again. If the handpiece still appears to be malfunctioning, contact Pack or flow handpiece is mal- Dentsply Sirona by phone or online at the contact functioning. information shown on the back cover page of this manual, or contact your Dentsply Sirona authorized service partner. -
Page 35: Warranty
(“Installation of electrical equipment in rooms used for medical purposes”) and the regulations applicable in your country. • If you have any questions, contact your dealer or Dentsply Sirona by phone or online at the contact information shown on the back cover page of this manual. -
Page 36: Disposal Of Product
Disposal of Product Disposal of Product Comply with your national regulations, guidelines and requirements for the dis- posal of end-of-life electrical equipment and batteries. Make sure the product or battery is not mixed with other types of waste when it is being disposed of. -
Page 37: Identification Of Symbols
Identification of Symbols Identification of Symbols Symbol Identification WARNING: Serious injury or death may result if ignored. CAUTION: Damage to property or the environment may result if ignored. Additional information, explanation on operation and performance. Consult Instructions for Use Electronic Instructions for Use 132 C °... - Page 38 Identification of Symbols Symbol Identification ° Direct current (connection for power supply) Use by date ° ° ° Do not sterilize ° Do not re-use Accessory Dangerous voltage Caution, hot surface Cartridge contents: gutta-percha Cartridge cannula: silver Cartridge capsule: aluminum Bluetooth®...
- Page 40 Address: 608 Rolling Hills Drive Johnson City, TN 37604 Phone: 1.800.662.1202 Email: contact@dentsplysirona.com Fax: 1.800.597.2778 Web: dentsplysirona.com Outside U .S .A . and Canada: Dentsply Sirona Address: Maillefer Instruments Holding Sa Chemin du Verger 3 CH-1338 Ballaigues, Switzerland Web: dentsplysirona.com For Dental Use Only.
Need help?
Do you have a question about the Gutta-Smart and is the answer not in the manual?
Questions and answers