DK2 Power OPC503 Assembly Manual
3 inch chipper shredder
Hide thumbs
Also See for OPC503:
- Assembly manual (33 pages) ,
- Instructions manual (14 pages) ,
- Installation manual (20 pages)
Advertisement
Quick Links
DK2 POWER USA
4301 S Valley View Blvd STE 10-11
Las Vegas, NV 89103
Support@DK2POWER.com
702-331-5353 8-4 M-F
OFF ROAD TOWING ONLY
CHIPPER SHREDDER TOP LOADING
CHIPPER ASSEMBLY GUIDE
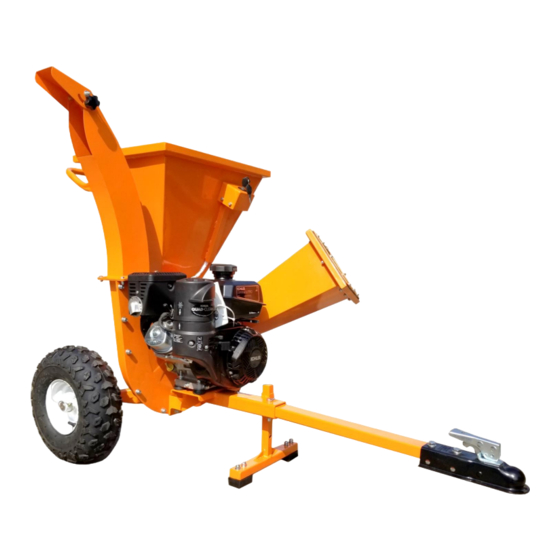
MODEL: OPC503
3 INCH CHIPPER SHREDDER
BRUSH TO 3 INCHES
TOWABLE
KOHLER ENGINE
REV 0 12/31/18
Advertisement

Related Manuals for DK2 Power OPC503


Summary of Contents for DK2 Power OPC503
- Page 1 CHIPPER ASSEMBLY GUIDE MODEL: OPC503 3 INCH CHIPPER SHREDDER DK2 POWER USA 4301 S Valley View Blvd STE 10-11 BRUSH TO 3 INCHES Las Vegas, NV 89103 TOWABLE Support@DK2POWER.com KOHLER ENGINE 702-331-5353 8-4 M-F CHIPPER SHREDDER TOP LOADING OFF ROAD TOWING ONLY...
- Page 2 The Chipper is shipped in a crate. Leave the sides folded down and use as your work space. NOTE: UPON INSPECTION OF PARTS IF YOU FIND ANY DAMAGE OR MISSING PARTS PLEASE CALL DK2 POWER AT 702-331-3535 OR CONTACT US VIA OUR WEBSITE WWW.DK2POWER.COM...
- Page 3 STEP 2: 1. Remove all hardware from chute mounting holes, take care to NOT drop hardware down into the chute opening. 2. Install the chute and the mounting hardware. INSTALL with hardware that is supplied with the chute.
- Page 4 STEP 3: 1. Mount the FEED CHUTE onto the Chipper using supplied bolts and hardware. INSTALL with the nuts and bolts mounted on the unit to assemble the chip chute.
- Page 5 STEP 4 1. INSTALL THE HANDLE USING 4 BOLTS PREINSTALLED ON THE CHUTE FOR THE HANDLE TO BE ASSEMBLED.
- Page 6 STEP 5: 1. INSTALL TOW BAR, SECURE HITCH PIN SPRING LATCH.
- Page 7 STEP 6: READ THE ENGINE MANUAL SUPPLIED WITH YOUR UNIT FOR FULL ENGINE OPERATION, SAFETY, AND MAINTENANCE. ON/OFF KEY LOCK GAS – USE MID GRADE OR HIGHER CHOKE – LEFT IS ON / RIGHT IS OFF (RUN POSITION) GAS ON/OFF SWITCH – LEFT IS OFF / RIGHT IS ON THROTTLE –...
- Page 8 6. Remove the blade, reverse it to the new sharp edge and reinstall it. Use only DK2 POWER OEM blades. 7. Use Loctite on the bolt threads when replacing bolts. 8. Remove the feed chute to access additional blades.
- Page 10 Part Number Description Part Number. Description. M10*70 bolt gland hitch trailer 5/16-24UNF*135 bolt washer ⌀ 10.5* ⌀ 22*2 main chipper room spring washer ⌀ 10 O-latch ⌀ 8 M10locknut tire M8*45 bolt axle washer ⌀ 8.4* ⌀ 20*1.6 M8*16 bolt Rubber pad M6locknut support feet...
- Page 11 OPERATION – BEFORE TURNING KEY AND PULL STARTING ENGINE CLEAR AREA OF ALL PEOPLE AND PROPERTY THAT COULD BE DAMAGED. THINK SAFETY. CHIPS ARE FLYING PROJECTILES AND CAN CAUSE INJURY. WEAR SAFETY GLASSES, HEARING PROTECTION, AND GLOVES DO NOT WEAR LOOSE FITTING CLOTHES THAT COULD GET STUCK IN THE MACHINE MOVING PARTS, ONLY CHIP WOOD, CHILDREN SHOULD NOT RUN THIS EQUIPMENT, STAY ALERT OF YOUR SURROUNDING AND PERSONS THAT COULD APEAR IN THE CHIP PATH WHILE YOU ARE WORKING.
-
Page 12: Quick Start Setup
QUICK START AND TROUBLE SHOOTING GUIDE QUICK START SETUP • ADD 10W30 OIL TO ENGINE • ADD GAS • PIN BOTH WHEELS INTO PIVOT BRAKE HOLES. • TURN KEY ON • HALF THROTTLE (CHOKE OPTIONAL FOR COLD STARTS) • PULL START THE ENGINE TREE CHIPPING •... - Page 13 DIESEL TRACTORS – Chassis component parts only, no labor, ENGINES – 1 YR KOHLER WARRANTY 3PT EQUIPMENT – 1-YEAR parts only, Gearbox drive unit 3-year warranty parts only. DK2 POWER OUTDOOR EQUIPMENT – 1-Year parts only, no labor. 3-year commercial Kohler warranty. THIS WARRANTY DOES NOT COVER OR APPLY TO:...
Need help?
Do you have a question about the OPC503 and is the answer not in the manual?
Questions and answers