R82 High-low indoor Manual
Hide thumbs
Also See for High-low indoor:
- User manual (139 pages) ,
- Mounting instruction (11 pages) ,
- Mounting instruction (4 pages)
Table of Contents
Advertisement
Quick Links
See also:
User Manual
Advertisement
Table of Contents

Related Manuals for R82 High-low indoor


Summary of Contents for R82 High-low indoor
- Page 1 English manual © 2010 R82 A/S. All rights reserved. The R82 logo and the product names are registered trademarks of R82 A/S. 2017-06 - Rev. 10...
-
Page 2: Intended Purpose
A wide selection of seats can be combined with the frame . Please go to http:// www.r82.org/media/102124/frame_and_seat_combination.pdf for more informa- tion about combinations. Indoor use High-low indoor frame: EN 12182 High-low:x indoor frame: EN 12182 Outdoor use High-low outdoor frame: EN 12182 and 12183... -
Page 3: Table Of Contents
Individual foot supports for x:panda..............12 Gasspring adjustment..................13 Transport Fittings ....................14 Product identification ..................14 Declaration of Conformity ................. 15 R82 Warranty ....................15 Safety ....................... 15 Service information ................... 16 Presales information ..................16 Power unit ......................17 Disposal ...................... -
Page 4: Frame/Seat
Frame High-low High-low:x High-low:x indoor/ indoor outdoor Seat outdoor one sz. sz. 1 sz. 2 sz. 3 sz. 1 sz. 2 ● ○ ○ ○ Panda Futura sz. 1 ● ○ ○ ○ Panda Futura sz. 2 ● ○ ○ ○... -
Page 5: Frames
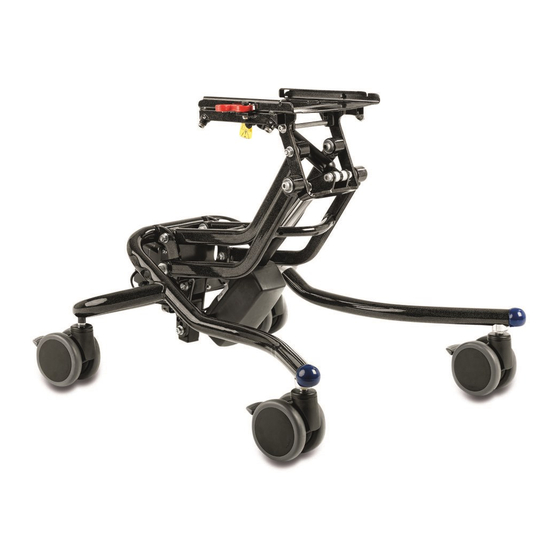
HIGH-LOW SZ. 1 HIGH-LOW:X SZ. 1+2 INDOOR FRAME The instructions below are for High-low and for High-low:x. The frame is height adjustable from floor to table height. When pressing the footpedal (A) the height is adjusted individually. The foot pedal is equipped with a security lock (B). - Page 6 HIGH-LOW SZ. 1 HIGH-LOW:X SZ. 1+2 OUTDOOR FRAME The instructions below are for High-low and for High-low:x. The frame is height adjustable from floor to table height. When pressing the foot pedal (A) the height is adjusted individually. The foot pedal is equipped with a security knob.
- Page 7 HIGH-LOW:X HYDRAULIC SZ. 2 INDOOR FRAME The instructions below are for High-low:x hy- draulic. The frame is height adjustable from floor to table height. By stepping on the foot pedal (A) the height is adjusted upwards by using a pum- ping motion of the foot.
- Page 8 HIGH-LOW:X HYDRAULIC SZ. 2 OUTDOOR FRAME The instructions below are for High-low:x hy- draulic. The frame is height adjustable from floor to table height. By stepping on the foot pedal (A) the height is adjusted upwards by using a pum- ping motion of the foot.
- Page 9 INDOOR AND OUTDOOR FRAME WITH POWER HIGH-LOW SZ. 1 HIGH-LOW:X SZ. 1+2 The instructions below are for High-low and for High-low:x. Both the High-low/High-low:x indoor and out- door frame is available with an actuator. Use the handset (A) to adjust the height of the seat. Be careful when lowering this frame from the highest position to the lowest because of the risk of finger entrapment etc.
- Page 10 INDOOR FRAME WITH POWER HIGH-LOW:X SZ. 3 The High-low:x indoor frame sz. 3 is only available with an actuator. Use the handset (A) to adjust the height of the seat. Be careful when lowering this frame from the hig- hest position to the lowest because of the risk of finger entrapment etc.
-
Page 11: Push Brace For Indoor Frame
PUSH BRACE FOR INDOOR FRAME Depth adjustment: Loosen the screws (A) at both sides of the frame and depth adjust the push brace. The push brace adjusts in two depths and clicks into place with the security pin. Fasten in the desired position. Warning 05 Squeezing Hazard between seat and push- brace when adjusting seat angle. -
Page 12: Adjusting The Individual Foot Supports
ADJUSTING THE INDIVIDUAL FOOT SUPPORTS Angle adjustment - foot support bar: Loosen the handle (A). Height adjustment - foot support bar: Loosen the screw (B) using a 6 mm Allen key. Multi adjustment: Loosen the screws (C) to angle, width, depth and height adjust the foot support. -
Page 13: Gasspring Adjustment
GASSPRING ADJUSTMENT Some of the frames are equipped with a gas- spring to regulate the angle. After a period the gasspring might need to be adjusted. The ad- justment is only neccessery when: - the gasspring releases itself - the gasspring can not be released at all If the gasspring releases itself;... -
Page 14: Transport Fittings
TRANSPORT FITTINGS Mount the two fittings (A) with the symbol (B) on both sides of the frame. PRODUCT IDENTIFICATION XXXXXXX Max load: xxx kg DMR ver.: XXXX Max load: xxx kg Art. no.: XXXXXXX Product: XXXX - Size X High-low/High-low:v/High-low:x indoor and outdoor frame (XX)XXXXXXXXXXXXXX(XX)XXXXXX(XX)XXXXXX A) Serial number... -
Page 15: Declaration Of Conformity
If there is any doubt as to the continued safe use of your Outdoor frames: EN 12182 and EN 12183 R82 product or if any parts should fail, stop using the Enclosed tools: product immediately and contact your local dealer as soon as possible •... -
Page 16: Service Information
Accessories and spare parts Maintenance of a medical device is wholly the responsibility The products from R82 can be supplied with a variety of of the owner of that device. Failure to maintain a device in accessories which comply with the needs of the individual accordance with the instructions may invalidate the device’s... -
Page 17: Power Unit
Power unit Technical Data For an optimum lifetime the power unit must be connected to the Battery - BA18 mains voltages as often as possible (e.g. every night). Charge the Capacity 1.3 Ah - 24V DC batteries 12 hours before use. •... -
Page 18: Emc
Do not use this equipment Use of accessories, transducers and cables where there is a risk that other electrical and/ other than those specified or provided by R82 or electronic equipment can interfere with this could result in increased EM emission or de- equipment. - Page 19 Test modes during immunity tests: Battery mode, standby armed/ready. Charging mode, actuator not running. EM immunity standards IEC 60601-1-2:2014 test levels Additional test levels Electrostatic discharge ± 8 kV contact ± 6 kV contact IEC61000-4-2 ± 2 kV, ± 4 kV, ± 8 kV, ± 15 kV air Radiated RF EM fields 10 V/m 20 V/m...
-
Page 20: Symbols
For indoor use For indoor and outdoor use Consult instructions The latest version of the instructions is always available on the R82 website and can be printed in larger sizes Warning This symbol appears in the User Guide along with a number referring to the instructions below. -
Page 21: Measures
50 - 290 High-low:x outdoor frame, sz. 2 w/hydraulik 50 - 290 * Further information regarding max. load/user weight at transportation: http://www.r82.org/media/102124/frame_and_seat_combination.pdf TECHNICAL DATA DISTRIBUTOR Frame: Powderpainted steel PRODUCER R82 A/S Parallelvej 3 8751 Gedved Please find your distributor on R82.org... -
Page 22: Lifting And Transfer
LIFTING AND TRANSFER Always use the correct lifting techniques for this purpose...
Need help?
Do you have a question about the High-low indoor and is the answer not in the manual?
Questions and answers