
Related Manuals for ActronAir LR7-1W


Summary of Contents for ActronAir LR7-1W
- Page 1 WALL CONTROLLER Operation Manual Model Numbers LR7-1W (White) LR7-1G (Grey) IMPORTANT NOTE: Please read this manual carefully before installing or operating your air conditioning unit.
-
Page 2: Table Of Contents
Operation Manual LR7 Wall Controller Table of Contents 01. General Information ..................3 02. Waste Electrical and Electronic Equipment Disposal Guidelines ...... 4 03. Maintenance ....................4 04. Operational Precautions .................. 4 05. System Information ..................5 06. Features ......................6 07. Wall Controller Functions ................7 08. -
Page 3: General Information
100% functional product testing. However, ActronAir cannot guarantee that all the aspects of the product and the software included with the product respond to the requirements of final application, despite the product being developed according to state of the art technology. The customer, both end user/specifier and installer, assume all liability and risks relating to the configuration of the product in order to reach the expected results in relation to the specific design and system installation. -
Page 4: Waste Electrical And Electronic Equipment Disposal Guidelines
5. Ensure that the temperature sensor is always clean and free of dust or dirt build-up to maintain sensor accuracy. 6. Do not pull apart or attempt to service the control interface, should you need service to the device, contact ActronAir Service Department on 1800 119 229. -
Page 5: System Information
Operation Manual LR7 Wall Controller 05. System Information Air Conditioner Model No. Serial No. The air conditioner model and serial number is situated on the access panel of the outdoor unit bottom left corner. Wall Controller Model No. The wall controller model number is situated in front of the wall controller. Installer Company Name Phone Number... -
Page 6: Features
Operation Manual LR7 Wall Controller 06. Features Auto-Restart After Power Failure Should a power failure occur whilst the air conditioner is running, the wall controller will restart the air conditioner in the same mode when the power is restored, if this option is selected. Dual/Triple Wall Control Operation (Optional) Up to three wall controllers can be installed on one system. -
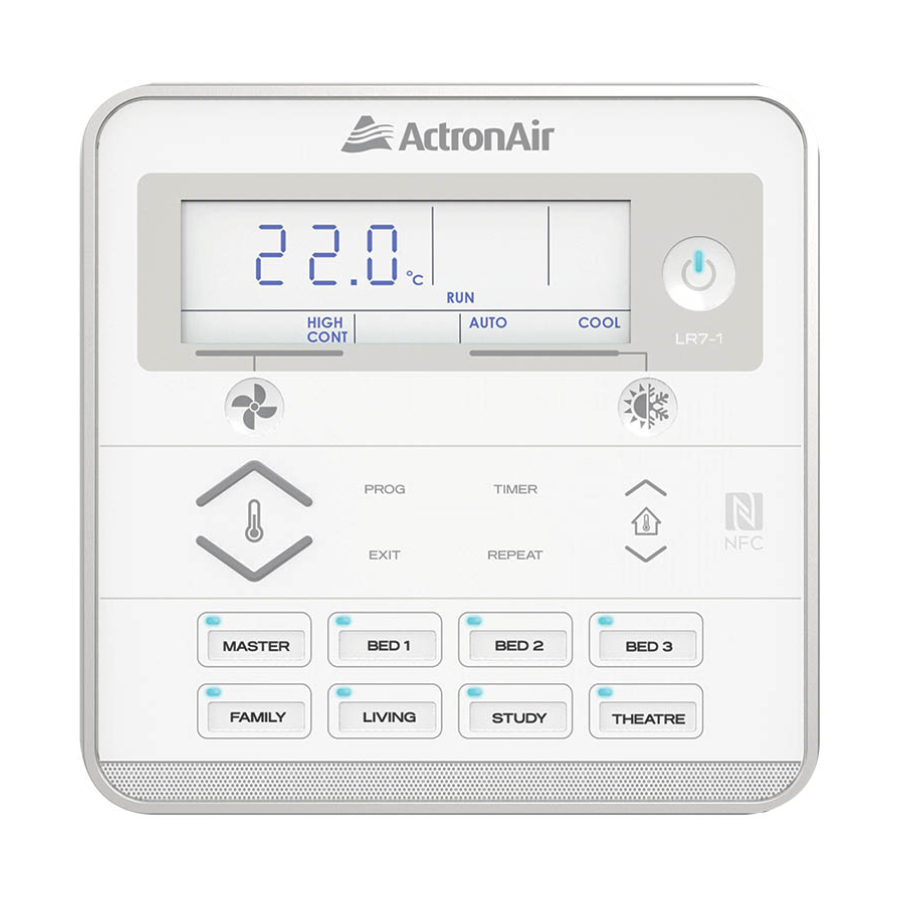
Page 7: Wall Controller Functions
Operation Manual LR7 Wall Controller 07. Wall Controller Functions LCD Display Zone 5 Button with On/Off Indicator Displays the setting and operation Zone 6 Button with On/Off Indicator conditions (See next page for details). Program Button* Zone 7 Button with On/Off Indicator For setting the clock and for entering the Zone 8 Button with On/Off Indicator 7-Day time clock menu. - Page 8 Operation Manual LR7 Wall Controller Set Back Indicator Day Indicator Indicates that the system is operating to Display the day of the week when the time achieve Set back temperature. is shown and which day is selected for programming. Timer Indicator Time Clock Indicator Indicates timer is in operation.
-
Page 9: Turning Air Conditioner On/Off
Operation Manual LR7 Wall Controller 08. Turning Air Conditioner On/Off NOTE The air conditioning system will re-start on your last settings and operating mode e.g. 22 C set temperature, AUTO mode, HIGH fan speed. The display will show the Set Temperature, Fan Speed, Fan Mode and Mode of Operation. 08.01. - Page 10 Operation Manual LR7 Wall Controller 2. Adjust the Indoor Fan speed (LOW, MED and HIGH ) by pressing the button successively until you reach the desired speed. NOTE button will allow Fan Only operation. Additionally, whilst the system is Off, pressing 10.02.
-
Page 11: Timer Operation
Operation Manual LR7 Wall Controller 11. Timer Operation NOTE Setting up the timer operation can only be made via Wall Control 1 (C-1). When you press TIMER button on Wall Control 2 or 3, it will show C-2 or C-3 on the display. This is to indicate that the wall control is not the C-1 wall control, and setting up the timer is not possible. - Page 12 Operation Manual LR7 Wall Controller 11.02. ON Timer 1. Press the TIMER button to enter timer menu. NOTE The system’s status must be Off to set an ON Timer. 2. Press the buttons to select the desired time for the system to turn On. The maximum adjustable timer hours are 24 with 0.5 hour (30 minute) adjustable increments.
-
Page 13: Backlight Function
Operation Manual LR7 Wall Controller 12. Backlight Function 12.01. LCD Backlight Level Adjustment 1. Press and continue to hold the REPEAT button. 2. Press the buttons to adjust the backlight level as follows: • To brighten the backlight, press the button. -
Page 14: Program Menu
Operation Manual LR7 Wall Controller 13. Program Menu NOTE • The Program Menu has a 60 second inactive time out, once expired, display will return to the home screen. • Program Menu 01 (7-Day Programmable Function), 02 (Clock) and 03 (Temperature Set back) can only be set via Wall Control 1 (C-1). - Page 15 Operation Manual LR7 Wall Controller 3. Press the button to scroll from OFF to ON. 4. Press the PROG button to accept the selection and re-activate the time clock. 5. Press the EXIT button twice to go back to main display screen. TIME CLOCK indicator will re-appear in the screen, indicating that the Time Clock has been reactivated.
- Page 16 Operation Manual LR7 Wall Controller NOTE Pressing the button will enable or disable the Time Clock program. Example: Press the button to adjust the time in 15 minutes increments. AM and PM will toggle after the 12th Hour. 4. Press the PROG button to move to Event 1 Off time. Press the buttons to adjust the time in 15 minutes increments.
- Page 17 Operation Manual LR7 Wall Controller 7. Repeat the above steps until you have programmed all the events you require. Otherwise, press the EXIT button twice to exit Program Menu. TIME CLOCK display will show on the screen to indicate that it is active.
- Page 18 Operation Manual LR7 Wall Controller 4. You have now copied the previous day’s events into the current day displayed. Repeat Steps 2 and 3 above for the remaining days where you wish to repeat the programmed events and times. 13.01.06. Programming Past Midnight NOTE •...
- Page 19 Operation Manual LR7 Wall Controller 5. Press the button to delete Tuesday’s event. -:-- will be displayed indicating the event is cancelled. 6. Repeat above process to repeat other days event otherwise, press the EXIT button twice to exit Program Menu. NOTE Cancelling Event 1 will cancel both Event 1 and Event 2.
- Page 20 Operation Manual LR7 Wall Controller 4. Continue pressing the PROG button to get to desired event to re-activate. 5. Press the button to re-activate Tuesday’s event. The event’s On time will be displayed indicating the event is re-activated. 6. Press the EXIT button twice to exit Program Menu. 13.01.09.
- Page 21 Operation Manual LR7 Wall Controller 4. Press the PROG button to accept the selection and de-activate time clock, then press the EXIT button once. TIME CLOCK indicators will disappear from main screen, indicating that the Time clock has been de-activated. 13.02.
- Page 22 Operation Manual LR7 Wall Controller 5. Press the PROG button to accept the desired hour. Minute field will start blinking. 6. Press the buttons to adjust the Minutes. 7. Press the PROG button to accept the desired minutes. Day field will start blinking. Day indicator will be flashing, i.e.
- Page 23 Activating Temperature Set back may cause unit to operate even if the LR7 Wall controller is Off. Please proceed with activating the Temperature Set back feature if you understand the purpose and operating parameters. For further enquires, please contact ActronAir Technical Support on 1800 119 229. 1. Press the PROG button to enter program Menu.
- Page 24 Operation Manual LR7 Wall Controller 13.03.02. Setting Temperature Set back NOTE The Set back mode Cool to and Heat to limits can only be adjusted from the temperature set back menu. In the occurrence of when the unit’s setpoint (prior to Set back operation) is below the Heat to limit or higher than the Cool to limit, the unit’s setpoint will automatically become the new Set back limit.
- Page 25 Operation Manual LR7 Wall Controller buttons to change the COOL set back temperature. 5. Press the 6. Press the PROG button to accept COOL set back temperature. Next screen will show HEAT set back temperature adjustment. 7. Press the buttons to change the HEAT set back temperature. 8.
- Page 26 Operation Manual LR7 Wall Controller 13.03.03. Temperature Set back Screens Tabulated below are the different screens that are displayed on the LR7 during Set back operation. - Heat To Set back limit Set back - Cool To Set back limit Set back - Unit setpoint prior to unit turned off setpoint...
- Page 27 Operation Manual LR7 Wall Controller 3. Press the PROG button to enter Program Menu 03. NOTE Display will show set back display. ON field is blinking. buttons to toggle from ON to OFF. 4. Press the 5. Press the PROG button to confirm the selection. 6.
- Page 28 Operation Manual LR7 Wall Controller 4. Press the PROG button to enter Program Menu 04. NOTE Mode lock is Off by default. 5. Press the buttons to turn the Mode lock ON. 6. Press the PROG button to accept the selection. Press the EXIT button once to go back to the Main Screen.
- Page 29 Operation Manual LR7 Wall Controller 13.05. Setpoint Lock 13.05.01. Activating Setpoint Lock NOTE • Setpoint Lock will prevent user from changing the setpoint on wall controller. • Setpoint Lock may be set independently on each wall controller connected. 1. Set the setpoint based on the desired target temperature. 2.
- Page 30 Operation Manual LR7 Wall Controller 5. Press the buttons to turn the setpoint lock ON. 6. Press the PROG button to accept the selection. 7. Press the EXIT button once to go back to main Screen 8. When the buttons is pressed. The symbol will appear for 3 seconds and user won’t be able to change set temp.
- Page 31 Operation Manual LR7 Wall Controller 2. Press the PROG button to enter program Menu 3. Press the buttons to navigate to Program Menu 06. 4. Press the PROG button to enter Program Menu 06. NOTE Fan speed lock is Off by default. 5.
- Page 32 Operation Manual LR7 Wall Controller 8. When the button is pressed, the symbol will appear for 3 seconds and user won’t be able to change fan speed. NOTE To disable Fan Speed Lock, follow same steps above. However, in step 5 select OFF. 13.07.
-
Page 33: Filter Timer
Operation Manual LR7 Wall Controller 4. Press the buttons to turn the Keypad lock ON. 5. Press the PROG button to accept the selection. 6. Press the EXIT button once to go back to the main Screen 7. When any button is pressed (EXCEPT PROG and ), the symbol will appear for 3 seconds and user won’t be able to access any of those buttons. -
Page 34: Near Field Communication (Nfc) Tag
5. A pop-up window will appear to redirect you to below will appear. https://www.actronair.com.au/nfc 6. List of Controller Models will appear on the screen of your mobile device. Select the model number of your controller to view the operation manual. -
Page 35: Document: 0525-075 Ver. 2
NFC. 4. Once successfully scanned, a pop-up window will appear to redirect you to external website. https://www.actronair.com.au/nfc 5. List of Controller Models will appear on the screen of your mobile device. Select the model number of your controller to view the operation manual. - Page 36 ©Copyright 2019 Actron Engineering Pty Limited ABN 34 002767240. ®Registered Trade Marks of Actron Engineering Pty Limited. ActronAir is constantly seeking ways to improve the design of it’s products, therefore specifications are subject to change without notice. Document: 0525-075 Ver. 2 Issue Date: 09/2019...
Need help?
Do you have a question about the LR7-1W and is the answer not in the manual?
Questions and answers
What to do if unit is frozen over and it won't defrost itself