Rotary SM40 Operation & Maintenance Manual
Hide thumbs
Also See for SM40:
- Operating and maintenance manual (64 pages) ,
- Operation & maintenance manual (12 pages)

Subscribe to Our Youtube Channel
Related Manuals for Rotary SM40


Summary of Contents for Rotary SM40
- Page 1 SM40 Scissor Lifts & & Rheinland © March 2010 by Rotary Lift...
-
Page 2: Table Of Contents
SM40LT-47/51 User Manual Chapter headings page 1. Declaration of Conformity ..........................2 2. Technical characteristics ..........................3 3. Designation ..............................…..4 4. Expulsion of the lift ........................………….5 5. -
Page 3: Sm40Lt
Herewith we declare, that the machinery described below Produktbezeichnung / product denomination: 4-Säulen-Hebebühne / 4-post vehicle lift Serien- / Typenbezeichnung / model / type: SM40-47; SM40-51; SM40AT47; SM40AT-51 Tragfähigkeit 4000 kg / capacity 4000 kg SM40LT-47; SM40LT-51 SM40LTAT-47; SM40LTAT-51 Tragfähigkeit 4000/3000 kg// capacity 4000/3000 kg Maschinen-/Seriennummer / machinery / serial number: ……………….. - Page 4 Net weight lift…………….......................... 1955 kg Maximum volume level for the equipment leader in the job................70 dB(A) Ambient temperature area …………........................0 bis + 50°C Area of the relative humidity (without condensation)……………………..............30 bis 95% Measures SM40-LT-47...
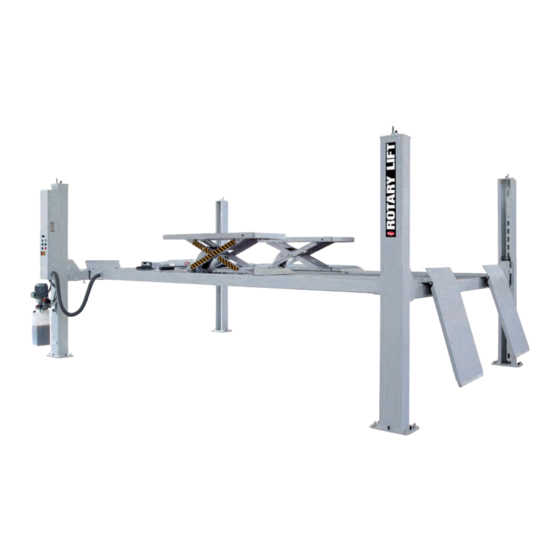
- Page 5 3 - NAME part sescription description part Auxiliary lift Hydraulic power unit Plattform Compressed air maintenance unit Fixed runway Movable runway Wheel Stopp () ramp Column with control unit column Grounplate of column crossbeam...
- Page 6 If you have the model of lift, the standard number and possible additional parts ready, becomes to you the customer service of the supplier can still give better assistance. You find the following information on the model badge: Load capacity (kg) : 4000 (Hebebühne) 3000 (Radfreiheber) MODEL SM40/LT-47/51 Electric supply (V) : 230/400 PRODUCTION Power(kW) : YEAR...
- Page 7 must amount to 3/5 on the front and 2/5 at the rear, and vice versa. left to the right of distribution: may not exceed 10%. Abb. 2 CARE Provide for the fact that with the decreasing of auto parts the balance is not affected, in particular if you use the bicycle free siphons for beginning.
- Page 8 6 - GENERAL SAFETY TIPS The vehicle lift may be served only by certified and authorized specialist staff. Changes or modifications in the vehicle lift which were not approved before by BlitzRotary GmbH release aforesaid party from any compensation duty, either directly or indirectly. The removing or altering of safety devices is an offence against the European safety regulations.
- Page 9 7 - TRANSPORT The transport of the device must be carried out according to the following instructions: • Protect the hydraulic device and the switch box against weather influence and avoid their danger by sudden temperature variations. • On account of her size and her weight the vehicle lift with a suitable forklift or pallette lift must be carried and the forks must be placed under the prescribed points (fig.
- Page 10 9 - INSTALLATION PLACE CARE Follow with a choice of the installation place for the vehicle lift topical directives with regard to safety in the job. CARE Point out the authorized customer service of the supplier to all in ground pipe or cable (electricity, air pressure, waters...) which could become broken with the drilling of the holes for the sure fixing of the vehicle lift.
- Page 11 10 - INSTALLATION CARE The installation has to go from a certified expert and according to the following instructions carried outwerden. Driving rails and cross beams Positioning of the driving rails Position both driving rails approx. 90 cm of each other on wooden documents by chance 10 cm. The standard ground plan is shown in the chapter "INSTALLATION PLACE".
- Page 12 Remove the electric connections from the cross beams. Electric control module for the absorption tackles: Connect the electric connections with the marks E6 and E7 (illustrations 8 and 9). Lighting: Connect the electric connections with the mark E8 (illustration 8). Provide for the fact that the electric cables run by the channels, trailing and protective lines.
- Page 13 Equipment of the pneumatics line Connect the end of the pneumatics lines marked with A1 on the sides of the rope rolls of the attached driving rail with the t links in both cross beams (Abbidlung 12). Lead the pneumatics line marked with A2 on the sides of the rope rolls of the attached driving rail by the inside of the cross beam, then by the channel of the adjustable driving rail and connect them then with the T-piece in the middle of the mobile driving rail (illustration 12).
-
Page 14: Scope
illustration15 COLUMNS Installation Take the point from the stroke column. Bring the stroke column with the help of a suitable stroke device (crane, elevating platform truck...) in position. Use a plumb line to compensate the stroke column. Use, if inevitably, under the base plate of the column balance metal sheets. Reduce the distance between the stroke column and the plastic guide on 1 mm (illustration 15). -
Page 15: Hydraulic Power Unit
Position the air pressure unit at the side of the stroke column. Go forward for it as follows: Illustration 19 Fasten the air pressure unit with both cross screwings which were already Mend detached earlier. Connect the flexible pneumatics line, from the hydraulic device coming, angle connection with the on the top side of the air pressure unit. - Page 16 Connection with the mains supply (tax circles) CARE All works which are carried out in the electrical system of this machine must be carried out, all the same as unimportant they may also be, from a certified expert. Connect 4 electric connections of the switch box with 4 suitable, free connections in the hydraulic aggregate. Every connection is provided with a safety device, so that it is impossible to carry out a wrong connection.
- Page 17 There are 6 different Sciherheitsvorrichtungen. Purpose of the safety What it of is produced and Effect of the device on the Effect of the device on the device where it is to be found main vehicle lift auxiliary lift Signaltongeber zum Schutz This device consists of a sensor which is The Senkbewegung of both An acoustic discontinuous signal is to be...
- Page 18 12 - STEUERUNGEN Die Komponenten 1 bis 8 sind im Schaltkasten installiert. Komponente 9 ist im unteren Kasten installiert. Die Komponenten 10 und 11 sind an den Seiten des unteren Kastens installiert. bildung 23 9. Key “electronic adjustment control” 10. Key “levelling of auxiliary lift” (only LT version) 1.
- Page 19 Senkvorgangs of the main vehicle lift an acoustic discontinuous signal is to be heard to point out the user to be especially attentive during this process (on account of the danger of cuts or cerium bruises on the feet). This key functions only if it is held low-spirited.
-
Page 20: Installation
13 - INSTALLATION CARE The vehicle lift must be installed by certified professional forces which can check then whether the vehicle lift and all mechanical and electric safety devices function properly. The instructions stand in the chapter "SET-UP" (exclusively as information for the technical customer service or authorized supplier). - Page 21 checks to the examination of the flawless functionality of all safety equipments of the vehicle lift by. Cleansing works and regular servicing must be carried out under deduction of the following instructions: pay attention with the cleaning and servicing to the safety. Head and auxiliary lift must be in the mechanical safety setting. Put the main switch on the position "0"...
- Page 22 15 - Instructions for use The vehicle lift may be served only by authorised staff. The use of the vehicle lift could be very dangerous if the operator does not know the information contained in this manual. FUNCTIONALITY OF THE VEHICLE LIFT Positioning of the vehicle on the vehicle lift ramps: Check whether the weight of the vehicle does not amount more than 4,000 kg (if it is lifted on the main vehicle lift) or 3,000 kg (if it is lifted on the auxiliary lift).
- Page 23 Emergency -Switch Around the vehicle lift if necessary (wrong functionality to stop failure) you put the main switch on "0" and you interrupt the pneumatics cycle which connects the panel with the air pressure care. Check that the panel receives no more air pressure.
-
Page 24: Controls
Illustration 27 Illustration 28 Illustration 29 Part B Teil A Part D Part A Part B Emergency hand cover Part C CARE During the whole lowering process it is absolutely necessary to lock the danger zone and to prevent access for each. authorized and certified expert which carries out this work must be very attentive. - Page 25 If the vehicle lift is not used any more, you make this unsuitable, while you separate the electric hydraulic aggregate from the stroke columns. Make the parts which show a danger incompetently. Classify the materials according to her usability. Decontaminate different materials like waste metal and electronic components about suitable counters. Hazardous waste must be diminished and be classified and be decontaminated afterwards according to the local rules and directives.
- Page 26 19 - INFORMATION AND WARNING TIPS TO THE OIL Disposal of used oil Decontaminate used oil not in drain, drainage ditches or waters. Keep it in special containers to let decontaminate it of special companies. Losses and spillage Cover spillage of the make on the floor with sand or other absorbing materials. Then the dirty area must be cleaned with the help of solvents as fast as possible by lubricating, before toxic vapours become free.
- Page 27 20 - FUNCTIONAL PROBLEMS Check whether the main switch stands on position "1" that the electricity supply is flawless and indicates the pressure measuring instrument on the FRL aggregate at least one pressure of 6 bars. IRREGULARITIES CAUSES REMOVAL Oil escapes Hydraulic connection broken.
- Page 28 21 - FIRE EXTINGUISHER To select the best fire extinguisher, keep please to the following table: Ignitable liquids Electric devices Abbildung 30 Dry materials Pulverised water YES Foam Powder Foam Powder Powder YES* YES* * : applicable with absence of more actual fire fire-fighting methods, or in case of smaller fires. CARE The tips in this table are intended for general situations and as general instructions for all users.
-
Page 29: Circuit
Illustration 31 - Position of the wires on the Illustration 32 Positioning of the beams in Illustration33 - Connection of the coils the engine terminal box. transformers Check the functions of the panel and make sure that these correspond precisely to the representations in the flow sheet. If the electric hydraulic aggregate was connected to the electricity network and was put the main switch on the position "1", the panel is activated. - Page 30 Press the key “main vehicle lift lower” and check whether the runways stop about 150 mm about the starting position. Finish the test run with entire lowering of the vehicle lift. During this last phase a discontinuous warning signal must be to be heard. Check the flawless functionality of the electronic control device.
- Page 31 column Lower the Nivellierer (illustration 34) by hand to adjust the Axle of role second contact (interruption contact). Measure the lever distance C horizontally between the wheel axle (illustration 34) and the outside of the column. Adjust, if necessary, the interruption contact, while you shift the attached block, so that the difference from distance amounts to C and to distance A the value of 28 mm (±2mm).
- Page 32 to shut off Around the adjustment process for both absorption: lower the main vehicle lift and the auxiliary lift up to the starting position. hold the key "auxiliary lift level" low-spiritedly and press at the same time the key “auxiliary lift lower”. While you hold the keys low-spirited, the absorption is aimed.
- Page 33 Illustration 36 Setting of the columns Check with the help of the perpendicular cable that every column is vertical. If one of the columns is vertical not completely, go forward as follows: Loosen the M16 bolts on the base plate of the column. Straighten the column with the help of 3 M16 x 40 adjusting screws completely vertically.
-
Page 34: Safety Devices
The new system of cable connection and cable control switches. Please not remove the springs in the inside of the attachment. The springs are necessary for the function of the cable control. Lower the vehicle lift up to the bottom. Centre a vehicle with a weight by chance 2 t on the driving mechanism ways. - Page 35 23 - PNEUMATICS FLOW SHEET Pneumatics pistons (mechanical release cross Pneumatics pistons (mechanical beam) release auxiliary lift) Pneumatics magnetic valves24 V (DC) Distributor Aerial entrance Servicing unit...
- Page 36 24 - HYDRAULIC FLOW SHEET Auxiliary lift 1 main piston 1 slave piston Diameter 110 mm Diameter 100 mm Main vehicle lift 1 piston diameter 90 mm safety valve Safety (Opening: 2 mm) valve(Opening: 2 Safety valve (Opening: 1,4 mm) Pressure junction Part Name...
- Page 37 25 - ELEKTRISCHER SCHALTPLAN EV13 Pneumatics magnetic valve for the locking handles of the main vehicle lift EV12 Pneumatics magnetic valve for the locking handles of the auxiliary lifts Acoustic warning signal thermic protection contactor Levelling key of the auxiliary lifts Electronic Nivelliersteuerungstaste Temperature safety device in the engine Fuse main current circle...
- Page 38 26 - OPTIONALES ZUBEHÖR...
- Page 39 Machine lamp It is possible to attach 4 lamps (230V-36W). Set from 2 ramp. A light switch is in the switch box. These both ramps are instead of both front buffers (see chapter "NAME" to install part 7), if vehicles must leave the vehicle lift forwards.
- Page 40 27 - INSTALLATIONSBERICHT Hebebühne: SM40LT-47/51 Serien-Nr: Installationsdatum: ZU TESTENDES TEIL Hinweise zum Haub Radfr Steue Steuer Kontrollmessungen, die von dem vom Lieferanten Anwendungskapitel säul t-Heb eiheb rknüp knüppe Test abgeschlossen authorisierten Kundendienst in Anwesenheit des Benutzers (NU) oder knü ebüh pel/H l/Netza (Feld ankreuzen)
- Page 41 28 - REGELMASSIGER WARTUNGSBERICHT Hebebühne: SM40LT-47/51 Serien- Nr: Installationsdatum: ZU TESTENDES TEIL Hub- Steu Haupt Radfrei Steue Steuer Test abgeschlossen (Feld säule erkn -Hebe heber rknüp knüpp Hinweise zum ankreuzen) üpp bühne pel/H el/Netz Kontrollmessungen, die von dem vom Lieferanten Anwendungskapitel uban anschl...
- Page 42 29 - WARTUNGSPLAN Mit der Einhaltung dieses Wartungsplans wird der Benutzer den Richtlinien genügen (Test bei der Installation, Prüfung der Seilzüge aller 3 Monate und allgemeiner Tests aller 12 Monate) Es ist die Aufgabe des Käufers, nachstehende Tabelle auszufüllen und zu aktualisieren. Datum Bedienung Anmerkungen...
- Page 43 Wieder-Inbet Authorisierter Lieferant oder zugelassene Prüfstelle riebnahme Firmenname Name des Technikers Unterschrift JA/NEIN...
- Page 45 Replacement Parts: See installers package for parts breakdown sheet. Order Genuine Rotary replacement parts from your nearest Autho- rized Parts Distributor. Maintenance Assistance: Contact your local Rotary distributor. Should further assistance be required, contact Rotary Lift, at one of the phone numbers listed below. BlitzRotary GmbH Fon +49.771.9233.0 USA: +1.812.273.1622 (Headquarter)
Need help?
Do you have a question about the SM40 and is the answer not in the manual?
Questions and answers