
Related Manuals for Thermo Scientific Invitrogen Qubit Flex Fluorometer


Summary of Contents for Thermo Scientific Invitrogen Qubit Flex Fluorometer
- Page 1 Qubit Flex Fluorometer ™ USER GUIDE Catalog Number A44984, A45924, A45925 Publication Number MAN0018186 Revision A.0 For Research Use Only. Not for use in diagnostic procedures.
- Page 2 Manufacturer: Life Technologies Holdings Pte Ltd | Block 33 | Marsiling Industrial Estate Road 3 | #07-06, Singapore 739256 Information in this document is subject to change without notice. DISCLAIMER: TO THE EXTENT ALLOWED BY LAW, THERMO FISHER SCIENTIFIC AND/OR ITS AFFILIATE(S) WILL NOT BE LIABLE FOR SPECIAL, INCIDENTAL, INDIRECT, PUNITIVE, MULTIPLE OR CONSEQUENTIAL DAMAGES IN CONNECTION WITH OR ARISING FROM THIS DOCUMENT, INCLUDING YOUR USE OF IT.
-
Page 3: Table Of Contents
Contents About this guide ......................3 1. Product information ....................5 Product contents .............................. 5 Product description ............................6 Instrument exterior components ........................7 Product specifications ............................. 8 2. Getting started ...................... 10 Set up the Qubit Flex Fluorometer......................10 ™... - Page 4 6. Instrument maintenance ..................87 Maintenance and cleaning..........................87 Software updates ............................88 System verification ............................90 Replace battery .............................. 95 Appendix A: Troubleshooting ..................97 Troubleshooting ............................. 97 Critical Qubit ™ Assay considerations ......................99 Appendix B: Ordering information ................101 Qubit ™...
-
Page 5: About This Guide
About this guide Overview This user guide describes how to operate the Qubit ™ Flex Fluorometer. User The guides listed below are available with the Qubit ™ Flex Fluorometer. documentation Guide Pub. No. Qubit ™ Flex Fluorometer User Guide MAN0018186 Qubit ™... - Page 6 Safety alert words Four safety alert words appear in Thermo Fisher Scientific user documentation at points in the document where you need to be aware of relevant hazards. Each alert word—IMPORTANT, CAUTION, WARNING, DANGER—implies a particular level of observation or action, as defined below: IMPORTANT! –...
-
Page 7: Product Information
1. Product information Product contents The Qubit ™ Flex Fluorometer (Cat. No. A44984) is shipped with the following components: Component Quantity Qubit ™ Flex Fluorometer 1 each Qubit Flex power cord (shipped separately) 1 each ™ USB drive 1 each Qubit Flex LAN cable 1 each... -
Page 8: Product Description
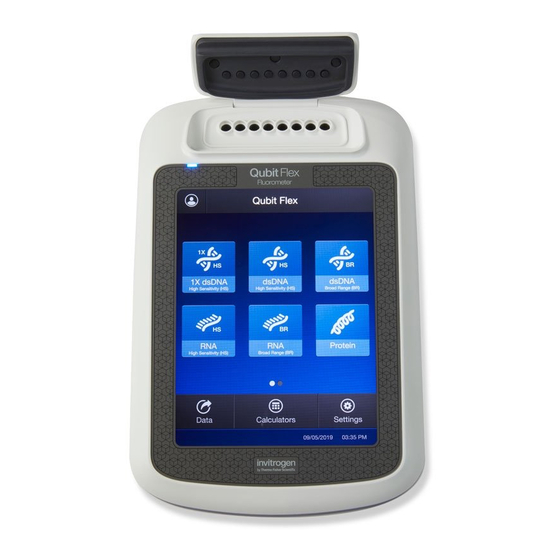
Product description Qubit ™ Flex The Qubit ™ Flex Fluorometer is a benchtop fluorometer for the quantification of DNA, RNA, microRNA, and protein. With the Qubit ™ Flex Fluorometer, you can Fluorometer directly measure the fluorescence of up to 8 samples simultaneously using the highly sensitive and accurate fluorescence-based Qubit ™... -
Page 9: Instrument Exterior Components
Instrument exterior components Top view Rear view Touchscreen is the user interface containing the controls for all the functions needed and displays data from the assays. Sample chamber is used to load the Qubit ™ Flex Tube Strip containing your samples into the fluorometer for analysis. -
Page 10: Product Specifications
Product specifications Physical Instrument type: Benchtop fluorometer characteristics Instrument dimensions: 7.3 in (w) × 11.1 in (l) × 4.1 in (h) (18.6 cm × 28.2 cm × 10.3 cm); rectangular shape 60 oz. (1.7 kg) Weight: Operating power: 100–240 ±10% VAC, 1.3 A Frequency: 50/60 Hz Electrical input:... - Page 11 Hardware Display: 8-inch capacitive touchscreen with high resolution color display Output ports: 3× USB ports Networking capability: Connection via the LAN (RJ-45) port using an Ethernet cable or wirelessly using the supplied Wi-Fi adaptor Power supply: AC adaptor with country‐specific power cords USB drive Capacity: 4 Gigabyte...
-
Page 12: Getting Started
2. Getting started Set up the Qubit Flex Fluorometer ™ Install the The Qubit ™ Flex Fluorometer is a stand-alone instrument that does not require connection to a computer. instrument After unpacking the instrument, place the instrument on a flat, level, dry surface. - Page 13 Set language and After you accept the EULA, the instrument shows the Language displayed and Date/Time screens, which allow you to set language and date/time options. If you date/time options wish, you can later change the language settings from the SettingsInstrument SettingsLanguage screen (page 85).
-
Page 14: Connect To The Network
Connect to the network (Optional) Connect After you set language and date/time options, the instrument displays the Network Connection screen, which allows you to configure network options. If to the network you wish, you can skip this step and connect to the network later from the SettingsInstrument settingsNetwork connection screen (page 78). - Page 15 For wireless connection, select the network you want to join, then follow the on-screen instructions to configure the network options. When finished, press Join. For wired connection, configure the network connection options, then press Done. For detailed instructions on how to join a network (wireless or wired) and configure network options, see “Network connection”, page 78.
-
Page 16: After Instrument Setup
After instrument setup Home screen After you have set instrument preferences, the instrument automatically displays the Home screen each time it is powered on. From the Home screen, you can: • Sign in to your local instrument profile or your Connect ™... - Page 17 About Instrument The About Instrument screen displays information about your Qubit ™ Flex Fluorometer, including the currently installed software version. screen To access the About Instrument screen: On the Home screen, press Settings. On the Settings screen, press About Instrument to display the About Instrument screen.
-
Page 18: Sign In
Sign in Create a local Qubit ™ Flex Fluorometer allows you to create a local instrument profile for each user. A local instrument profile allows you to save to a mapped network location instrument profile and it is also required to connect to your Connect ™... - Page 19 On the Create Profile screen, press Create. If you wish to use the instrument without creating a local profile, press Skip. You can always create an instrument profile later. Press the User name field, enter the desired user name for the profile (1−20 alphanumeric characters, no spaces), then press Done.
- Page 20 Sign in to your After you have joined a network, you can also connect to your Connect ™ account, Thermo Fisher’s cloud-based platform, to store and access your data files. Connect account ™ Note: To connect to the Thermo Fisher Cloud, you must have a Connect ™...
- Page 21 Connect to the Cloud screen offers three methods to sign in to your Thermo Fisher Connect ™ account: • Instrument Connect App on your mobile phone (Step 5, page 19) • Dashboard on PC (Step 6, page 20) • Instrument (Manually) (Step 7, page 21) To connect to your Thermo Fisher Connect account with the Instrument...
- Page 22 To connect to your Thermo Fisher Connect ™ account with Dashboard on PC: Go to thermofisher.com/cloud and sign in to your Thermo Fisher Connect ™ account. b. On the Connect dashboard, press the Instrument Connect button. ™ Instrument Connect screen opens. On the Instrument Connect screen, press Add an instrument.
- Page 23 Press Dashboard on PC on Connect to the Cloud screen (on the Qubit ™ Flex instrument; see page 19) to display the linking code. Enter the linking code displayed on the Qubit ™ Flex instrument into the Add an instrument dialog, then press Send. g.
- Page 24 When you have signed in to your Thermo Fisher Connect ™ Account, the Profile button on the Home screen becomes blue. When signed in, you can export your data to your Connect ™ account. Qubit ™ Flex Fluorometer User Guide...
-
Page 25: Guidelines For Using The Qubit ™ Flex Fluorometer
Guidelines for using the Qubit Flex Fluorometer ™ Recommendations To obtain the best results, follow the recommendations below. For more information, see “Critical Qubit ™ Assay considerations”, page 99. • Do not operate the instrument in direct sunlight. • Wear gloves during sample handling. •... -
Page 26: Perform Assays
3. Perform assays Before you begin Materials needed • A Qubit assay kit appropriate for quantifying your samples (see page 101 for ™ available Qubit ™ assay kits and ordering information) • DNA, RNA, or protein samples in Qubit ™ Flex Tube Strips •... - Page 27 Press Screen name, then select your instrument profile from the available options. Note: The Connect icon next to a screen name indicates that the profile has an associated Connect ™ account. When the Connect icon is blue, the profile is signed in to the associated Connect ™...
-
Page 28: (Optional) Use The Assay Range Calculator To Determine The Assay Range
(Optional) Use the Assay Range Calculator to determine the assay range The on-board Assay Range Calculator displays the core sample concentration range for which the selected assay is most accurate, as well as the extended low and high ranges based on your sample volume. Knowing the assay range can help you determine which Qubit ™... - Page 29 Select the Assay for which you wish to view the assay accuracy range. Enter the sample volume to be used directly in the sample volume text box. You can also use the + and – buttons or adjust the sample volume wheel. The Assay Range Calculator displays the Core sample concentration range for the selected assay and the Extended low and high ranges based on your input.
- Page 30 Note: Samples with concentrations within the Core range of the assay will have <15% relative error for the given sample volume. Samples with concentrations within the extended range will have <25% relative error for the given sample volume. Increase or decrease the sample volume to observe how changes in the sample volume affect Core and Extended accuracy ranges for the assay.
- Page 31 Press the Information icon on the header bar to view the Range Details (relative errors for the core and extended ranges) and guidelines for obtaining best assay results. Press Close to return to the Assay Range Calculator. (Optional) If desired, repeat the procedure for another assay to determine whether it would provide more accurate results in the expected concentration range.
-
Page 32: Use The Reagent Calculator To Prepare Qubit ™ Working Solution
Use the Reagent Calculator to prepare Qubit Working Solution ™ Use the on-board Reagent Calculator to determine the amount of Qubit ™ dye and buffer required to prepare the Qubit ™ Working Solution for your samples and standards. Use the Reagent On the Select Calculator screen, press Reagent to open the Reagent Calculator. - Page 33 Press Enter to calculate the amount of Qubit ™ dye and buffer required to prepare the Qubit ™ Working Solution with these inputs. Note: You can change the total number of tubes that you plan to run or the overage selection on this screen. Press Done to return to the Select Calculator screen.
-
Page 34: Run Standards For Assay Calibration
Run standards for assay calibration For each assay, you can run new standards to calibrate the assay on the Qubit ™ Flex Fluorometer or use the values from the previous calibration. For more information, see “Qubit ™ Flex Fluorometer calibration”, page 100. IMPORTANT! Be sure to use the appropriate standards for your assay. - Page 35 When prompted, load the Qubit ™ Flex Tube Strip containing Standard #1 into the sample chamber, then press Run standards. The reading takes ~3 seconds. When prompted, insert Standard #2, then press Run standards. For Qubit ™ protein assays only: When prompted, insert Standard #3, then press Run standards.
- Page 36 Calibration results • If the calibration is successful, Standards complete screen with the Fluorescence vs. Concentration graph is displayed. In the Fluorescence vs. Concentration graph, the standard data points are connected by a line and open circles represent correct standards. •...
- Page 37 (Optional) Re-run In the Calibration error screen, press Done. standards after If you wish to re-run the standards, or run new standards, prepare a fresh set calibration error of standards, then load Standard #1 into the instrument. Press Run standards, then repeat the calibration procedure (page 25). Qubit ™...
-
Page 38: Read Samples
Read samples Before you begin • Calibrate the Qubit Flex Fluorometer as described on page 25. (Run the ™ appropriate standards or accept the values from the previous calibration.) • Prepare the samples. Refer to the instructions provided with the assay. Note: Incubate the samples for the appropriate amount of time after mixing them with the working solution (2 minutes for the Qubit ™... - Page 39 Press Next to go to the Sample volume screen. In the Sample volume screen, enter the sample volume added to the assay tube (between 1 and 20 µL). You can enter the volume directly in the sample volume text box, use the + and –...
- Page 40 (Optional) Enter Press More options to open More Options screen, where you can: Assay kit lot #, Add Tags, • Enter assay kit lot # (Step 2, page 38) Add Sample IDs • Add Tags to your sample run (Step 3, page 39) •...
- Page 41 To add a tag to your samples in the run, press Add Tags on the More Options screen to open the Add Tag screen. To create a new tag, press the Create new run tag text box to open the Create New Tag screen, enter the new tag, then press Enter.
- Page 42 Select the desired tag from the list of available tags, then press Apply to add the selected tag to your samples and return to the More Options screen. The tag you have applied to your sample run is displayed on the More Options screen and the Add Tags button changes to Edit Tags.
- Page 43 Note: The file containing the sample IDs must be in CSV (comma separated value) format and filled out like the example below: first “Plate Barcode” then “Well” and “Sample Id”. Select the file containing the sample IDs from the list of available files, then press Apply.
- Page 44 Run Samples Press Run samples. The reading takes approximately 3 seconds and the results are displayed in graph view in the Results screen (see “Results”, page 43). To display the results in list view, press the Graph button to unselect it. The Results screen lists the concentration of each original sample using the output units selected at the beginning of the assay.
-
Page 45: Results
Results View results The instrument automatically displays the Results screen after the completion of each sample run. By default, the results are displayed in graph view, which shows the Fluorescence vs. Concentration graph and lists the concentration of each original sample below the graph. In the graph: •... - Page 46 To display the results in list view, press the Graph button to hide the graph. The Results screen shows the concentration of each original sample in a list form, using the output units selected at the beginning of the assay. •...
-
Page 47: (Optional) Use The Molarity Calculator To Determine Sample Molarity
(Optional) Use the Molarity Calculator to determine sample molarity The on-board Molarity Calculator allows you to calculate the molarity of your samples based on nucleic acid length and their measured concentration. Use the Molarity On the Results screen, press Calculators, then select Molarity to open the Molarity Calculator. - Page 48 Note: The Qubit ™ Flex Fluorometer auto-populates the Molecular weight (MW) depending on the Qubit ™ assay performed (for example, for the dsDNA HS assay, it uses a default value of 660 g/mol for the average molecular weight of one DNA base pair). To change the auto-populated MW value, press the Molecular weight field and enter the desired average molecular weight of your sample.
- Page 49 Press Calculate to calculate the molarity of your samples based on the assay results and DNA length in the output units that you have selected. Note: When you press Calculate, the instrument saves the data from molarity calculations with the sample data in the CSV file. To export your results, press Export.
-
Page 50: (Optional) Use The Normalization Calculator To Determine How To Dilute The Samples To The Same Molarity, Concentration, Or Mass
(Optional) Use the Normalization Calculator to determine how to dilute the samples to the same molarity, concentration, or mass The on-board Normalization Calculator helps you to normalize your samples of variable concentration to the same molarity, concentration, or mass using the results from your assay. - Page 51 Normalize your On the Normalization Calculator screen, select Molarity. samples to the same molarity Enter the Final sample mass and select units. Enter the Final sample volume and select units, then press Enter. Note: The minimum allowed sample volume on the Normalization Calculator is 5 µL.
- Page 52 Press Calculate to see how much sample and buffer to mix to achieve the desired final sample concentration and volume. Note: When you press Calculate, the instrument saves the data from normalization calculations with the sample data in the CSV file. Press the right arrow to view page 2 of results, which displays the required sample:buffer dilution before mixing...
- Page 53 Press the right arrow again to view page 3, which displays the actual sample concentration (“Concentration”). Press the left arrow to go back to the previous page. To export your calculations, press Export. The instrument exports the complete CSV file with all sample data, including the normalization calculation results. Otherwise, press Done to close the Normalization calculator and go back to the Calculator screen.
- Page 54 Normalize your On the Normalization Calculator screen, select Concentration. samples to the same concentration Enter the Final sample concentration and select units. Enter the Final sample volume and select units, then press Enter. Note: The minimum allowed sample volume on the Normalization Calculator is 5 µL.
- Page 55 Press Calculate to see how much sample and buffer to mix to achieve the desired final sample concentration and volume. Note: When you press Calculate, the instrument saves the data from normalization calculations with the sample data in the CSV file. Press the right arrow to view page 2 of results, which displays the required sample:buffer dilution before mixing...
- Page 56 Press the right arrow again to view page 3 of results, which displays the actual sample concentration (“Concentration”). Press the left arrow to go back to the previous page. To export your calculations, press Export. The instrument exports the complete CSV file with all sample data, including the normalization calculation results.
- Page 57 Normalize your On the Normalization Calculator screen, select Mass. samples to the same mass and volume Enter the Final sample mass and the desired units. Enter the Final sample volume and the desired units, then press Enter. Note: The minimum allowed sample volume on the Normalization Calculator is 5 µL.
- Page 58 Press Calculate to see how much sample and buffer to mix to achieve the desired final sample concentration and volume. Note: When you press Calculate, the instrument saves the data from normalization calculations with the sample data in the CSV file. Press the right arrow to view page 2 of results, which displays the required sample:buffer dilution before mixing...
- Page 59 Press the right arrow again to view page 3 of calculation results, which displays the actual sample concentration (“Concentration”). Press the left arrow to go back to the previous page. To export your calculations, press Export. The instrument exports the complete CSV file with all sample data, including the normalization calculation results.
-
Page 60: Manage Data
4. Manage data Overview The Qubit ™ Flex Fluorometer can save data for up to 10,000 samples. For the saved data, the Qubit ™ Flex Fluorometer allows you to: • View detailed data for each sample (page 58). • Rename data files (page 63). •... - Page 61 (Optional) Filter To filter data sets by Assay or Tag, press Actions to open the Actions screen, then select Filter data. data sets On the Filter Data screen, press Assay, then select the Assay of interest. Qubit ™ Flex Fluorometer User Guide...
- Page 62 If you had applied a tag to the assay (page 38), select the Tag from the list. Otherwise, go to step 4. Press Apply to filter the data list by the assay and tag you have selected. Only the data sets that satisfy the filter criteria are displayed in the Data screen.
- Page 63 Select data set and On the Data screen (filtered or not filtered), press the data set of interest. The Data set screen opens and displays a list of samples in that run. view detailed sample data To view the sample details, press the sample of interest. A Data details screen opens.
- Page 64 Information in the detailed sample data Run ID RFU values for the standards Sample name Date of last read standards Assay date Sample volume Original sample concentration Dilution factor Qubit tube sample concentration Excitation channel ™ Assay name Optional information (Tags, Reagent lot etc.) Sample RFU* value Molarity calculation information (units, nucleic acid length, MW, molarity)
-
Page 65: Edit Sample Name
Edit sample name Edit On the Data screen, select the data set of interest, then select the sample you want to rename. sample name On the Data details screen, press the Sample set # field (indicated by red arrow). Edit Sample Name screen opens. ... - Page 66 Enter the desired sample name, then press Enter. Data Details screen reappears and displays the new sample name. If you wish to rename all of the samples in the data set, press the Next button to go the next sample (instead of pressing Enter at step 3), then enter the new name for that sample.
- Page 67 Repeat for all remaining samples. When finished renaming all the samples, press Enter. Data Details screen reappears and displays the new sample name. Press the Back button to return to the Data screen for the assay. All of the samples display the new sample names.
-
Page 68: Export Data
Export data Introduction The Qubit ™ Flex Fluorometer is designed for standalone use; it does not require an external computer. However, to archive data and generate reports, you can export the numeric data stored in the CSV file to a computer using a USB flash drive, or save to your Connect ™... - Page 69 To export only individual data entries from a data set, press the data set of interest to view individual samples in the data set. Press the check box to the left of the samples that you wish to export. You can select multiple samples to export.
- Page 70 After you have selected the data sets or the samples, press Actions, then select Export. In the Export data screen, select the Export method. Available options are Cloud (i.e., your Connect ™ account), USB, and Network Drive. • To export data to a USB drive, insert the USB drive into the Qubit ™...
- Page 71 Press Export to export the data. The numeric data is automatically saved as a CSV file. You can open the CSV file using any spreadsheet program. Qubit ™ Flex Fluorometer User Guide...
-
Page 72: Delete Data
Delete data Delete data files On the Home screen, press Data. On the Data screen, press the check box to the left of each data set you wish to delete. To select all data sets, press the blue check icon on the header row. To delete only individual sample files from a data set, press the data set of interest to view individual samples in the data set, then press the check box to the left of the samples you wish to delete. - Page 73 Press Delete. A warning screen appears. Press Delete to permanently delete the sample data or data set. Press Cancel to return to the screen previously viewed without deleting any data. Qubit ™ Flex Fluorometer User Guide...
-
Page 74: Configure Instrument Settings
5. Configure instrument settings Instrument settings You can configure the following instrument settings for the Qubit ™ Flex Fluorometer from the SettingsInstrument Settings screen: • Sleep mode (page 73) • Brightness (page 74) • Date/Time (page 75) • Network Connection (page 78) •... -
Page 75: Sleep Mode
Sleep mode Adjust the sleep The Qubit ™ Flex Fluorometer has a sleep mode (i.e., automatic standby) that is triggered by inactivity. The system default is 10 minutes of inactivity before the mode instrument goes into sleep mode. On the Instrument Settings screen (page 72), press Sleep Mode. ... -
Page 76: Brightness
Brightness Adjust screen On the Instrument Settings screen (page 72), press Brightness. brightness Move the Brightness slider up or down to adjust the brightness of the display. Press Done to save the changes and return to the Instrument settings screen. Press Cancel or Back ( ) to return to the Instrument settings screen without saving the changes. -
Page 77: Date And Time
Date and Time Set the date and On the Instrument Settings screen (page 72), press Date/Time. time Press Time Zone, then select the time zone for your location from the list. Qubit ™ Flex Fluorometer User Guide... - Page 78 Press Date, then choose MM DD YYYY, DD MM YYYY, or YYYY MM DD for the date format. To set the date, press the DD, MM, and YYYY fields to enter the Day, Month, and Year. Press Enter when finished entering the date, then press Done. Qubit ™...
- Page 79 Press Time, then choose 12 Hour or 24 Hour for the time format. 12-Hour format 24-Hour format To set the time, press the Hours and Minutes fields to enter the Hours and Minutes. If you have chosen the 12 Hour format, select AM or PM. 12-Hour format 24-Hour format Press Enter when finished entering the time, then press Done.
-
Page 80: Network Connection
Network connection Access the Network Connection screen allows you to connect to an available wireless network using the supplied Wi-Fi adaptor, or to configure and join a local area Network network via the LAN (RJ-45) port using an Ethernet cable. After you have joined a Connection screen network, you can also connect to Thermo Fisher’s Connect ™... - Page 81 Connect to a Wi-Fi Ensure that your USB Wi-Fi dongle is inserted into one of the available USB ports on the instrument (see page 7). network If it is not, insert the Wi-Fi dongle, then restart the instrument by disconnecting and reconnecting the power supply. Press SettingsInstrument Settings, then select Network connection.
- Page 82 Connect to a local Ensure that the instrument is connected to an active network jack via the LAN (RJ45) port (page 7) using a standard Category 6 Ethernet cable. area network (LAN) On the Instrument Settings screen, press Network connection, then select Wired.
- Page 83 Map a Network Ensure that the instrument is connected to an active network and that you have signed in to your profile (page 24). Drive On the Instrument Settings screen, press Network connection, then select Network Drive. On the Network Drive screen, press Drive location, enter the location of the drive to save your Qubit Flex files, then press Enter.
- Page 84 Press Domain name, enter the domain name where the drive is located, then press Enter. Press User name, enter your user name for the network drive, then press Enter. Qubit ™ Flex Fluorometer User Guide...
- Page 85 Press Password, enter your password for the network drive, then press Enter. When finished entering all the required fields for the Network Drive, press Connect. Qubit ™ Flex Fluorometer User Guide...
-
Page 86: Reset Instrument
Reset instrument Reset instrument Reset instrument function returns the Qubit ™ Flex Fluorometer to its default factory settings, and erases all saved data and user-defined instrument settings. On the Instrument Settings screen (page 72), press Reset instrument to display the Reset Qubit Flex screen. -
Page 87: Language
Language Change the You can change the language that the Qubit ™ Flex Fluorometer displays to English (default), French, German, Italian, Spanish, simplified Chinese, and Japanese. displayed language On the Instrument Settings screen (page 72), press Language to display the Language screen. -
Page 88: Cloud Region
Cloud region Change the cloud On the Instrument Settings screen (page 72), press Cloud region. region Select the cloud region from the available choices, then press Change. When prompted, press Change to close the warning screen, then press Change again to change the cloud region of the instrument. The instrument will restart after changing the cloud region. -
Page 89: Instrument Maintenance
6. Instrument maintenance Maintenance and cleaning Maintenance The Qubit ™ Flex Fluorometer does not need regular maintenance. To troubleshoot problems with the instrument, contact Technical Support (page 111). • Do not perform any repairs or service on the Qubit ™ Flex Fluorometer to avoid damaging the instrument. -
Page 90: Software Updates
Software updates Before you begin Download the latest software to a USB drive or to your network from thermofisher.com/qubit. If using a USB drive, insert the USB drive into the instrument. If using a network drive, ensure that the instrument is connected to the network wirelessly or via an Ethernet cable. - Page 91 Note: If the USB drive is not inserted into the USB drive port or the instrument does not recognize the USB drive, a warning message is displayed. To proceed with the software update, insert the correct USB drive into the instrument, then press Retry. If a new update is available and the appropriate files are detected, the instrument displays “Software update is available”.
-
Page 92: System Verification
System verification The system verification checks the internal components of the Qubit ™ Flex Fluorometer and requires the use of the Qubit ™ Flex System Verification Assay Kit (Cat. No. Q33254). Perform the system verification when a problem with the instrument is suspected. - Page 93 When prompted, set up three Qubit ™ Flex Tube Strips and label the tube strip lids 1−3. Add 200 µL of Blank Reagent to each tube of tube strip #1, 200 µL of Green Fluorescence Reagent to each tube of tube strip #2, and 200 µL of Far Red Fluorescence Reagent to each tube of tube strip #3, then press Next.
- Page 94 When prompted, ensure that the Qubit ™ Flex Verification Assay is prepared, then press Next. Insert tube strip #1 into the sample chamber, close the lid, then press Read. When prompted, read tube strip #2 and tube strip #3 as described for tube strip #1.
- Page 95 10. Press Report to view the System Verification Report or press Data Log to view and export the available data logs (page 93). The System Verification Report shows the pass/fail status of the instrument components. Far Red Fluorescence Channel Fail All Pass 11.
- Page 96 12. To export a Data Log as a PDF report, select the desired Data Log, press Actions, then press Export. You can select multiple Data Logs for export. 13. Select Cloud (Thermo Fisher Connect ™ cloud-based platform), USB, or Network Drive for the location where you want to save the PDF report of the Verification Assay Test Results.
-
Page 97: Replace Battery
Replace battery The Qubit ™ Flex Fluorometer contains a 3 V CR2450 battery, which is required to record the export CSV file date and time. When the battery runs out, the system cannot keep the time setting, which indicates the need to replace the battery. Replace battery Disconnect the Qubit ™... - Page 98 Pry the old battery from its housing using a flat-head screwdriver and remove it. Insert the new 3 V CR2450 battery to the battery housing. Arrange two cable assemblies into the groove on the bottom chassis, place the top chassis on the bottom chassis so that the slots for the screws align properly, then tighten the four screws on the bottom chassis using a Phillips- head screwdriver.
-
Page 99: Appendix A: Troubleshooting
Appendix A: Troubleshooting Troubleshooting Handling samples • The calibration standards included in the Qubit microRNA, Qubit RNA HS, ™ ™ and Qubit RNA BR Assay Kits are high-quality RNA standards. The integrity ™ and concentration of these standards is critical to the optimal performance of the Qubit ™... - Page 100 Low reading • The sample is out of range. Use a sample that is more concentrated or use a lower dilution (for example, 20 µL in 180 µL instead of 10 µL in 190 µL). • For Qubit ™ quantification assays, view the Fluorescence vs.
-
Page 101: Critical Qubit ™ Assay Considerations
Critical Qubit Assay considerations ™ How the Qubit ™ The Qubit ™ Flex Fluorometer generates concentration data based on the relationship between the two standards used in calibration (three for the Qubit ™ Flex Fluorometer protein assay). The plot below shows the line corresponding to the curve-fitting calculates algorithm (a modified Hill plot) used in the calculation of concentration data for concentration... - Page 102 Assay temperature The Qubit ™ assays were designed to be performed at room temperature (22–28°C), and temperature fluctuations can influence the accuracy of the assay. To minimize temperature fluctuations, store all kit reagents at room temperature and insert all assay tubes into the Qubit Flex Fluorometer only for as much time ™...
-
Page 103: Appendix B: Ordering Information
Appendix B: Ordering information Qubit Flex Fluorometer and accessories ™ The following products can be used with the Qubit ™ Flex Fluorometer and are available separately from Thermo Fisher Scientific. For more information, visit thermofisher.com or contact Technical Support (page 111). Product Quantity Cat. -
Page 104: Appendix C: Safety
Appendix C: Safety Symbols on instruments Electrical symbols The following table describes the electrical symbols that may be displayed. Symbol Description Indicates a terminal that can receive or supply alternating current or voltage. Safety symbols The following table describes the safety symbols that may be displayed. Each symbol may appear by itself or in combination with text that explains the relevant hazard (see “Safety labels on instruments”). -
Page 105: Safety Labels On Instruments
Safety labels on instruments The following CAUTION, WARNING, and DANGER statements may be displayed on Thermo Fisher Scientific instruments in combination with the safety symbols described in the preceding section. Hazard English Français symbol CAUTION! Hazardous chemicals. Read the ATTENTION! Produits chimiques dangereux. Safety Data Sheets (SDSs) before handling. -
Page 106: General Instrument Safety
General instrument safety WARNING! PHYSICAL INJURY HAZARD. Use this product only as specified in this document. Using this instrument in a manner not specified may result in personal injury or damage to the instrument. Operating the Ensure that anyone who operates the instrument has: instrument •... -
Page 107: Chemical Safety
Chemical safety Chemical hazard WARNING! CHEMICAL HAZARD. Before handling any chemicals, refer warning to the Safety Data Sheet (SDS) provided by the manufacturer, and observe all relevant precautions. WARNING! CHEMICAL STORAGE HAZARD. Never collect or store waste in a glass container because of the risk of breaking or shattering. Reagent and waste bottles can crack and leak. -
Page 108: Chemical Waste Safety
Chemical waste safety Chemical waste CAUTION! HAZARDOUS WASTE. Refer to Safety Data Sheets (SDSs) hazard and local regulations for handling and disposal. Chemical waste To minimize the hazards of chemical waste: safety guidelines • Read and understand the Safety Data Sheets (SDSs) provided by the manufacturers of the chemicals in the waste container before you store, handle, or dispose of chemical waste. -
Page 109: Electrical Safety
Electrical safety DANGER! ELECTRICAL SHOCK HAZARD. Severe electrical shock can result from operating the Qubit ™ Flex Fluorometer without its instrument panels in place. Do not remove instrument panels. High‐voltage contacts are exposed when instrument panels are removed from the instrument. Power DANGER! ELECTRICAL HAZARD. -
Page 110: Biological Hazard Safety
Biological hazard safety WARNING! BIOHAZARD. Biological samples such as tissues, body fluids, and blood of humans and other animals have the potential to transmit infectious diseases. Follow all applicable local, state/provincial, and/or national regulations. Wear appropriate protective eyewear, clothing, and gloves. Read and follow the guidelines in these publications. ATTENTION! BIOHAZARD. -
Page 111: Safety, Electromagnetic Compatibility (Emc), And Environmental Standards
Safety, Electromagnetic compatibility (EMC), and Environmental standards This section provides information on: • U.S. and Canadian safety and EMC standards • European safety, EMC, and Environmental standards • Australian EMC standards • China RoHS Standards U.S. and Canadian The Qubit ™... - Page 112 European Safety, Safety EMC, and This instrument meets European requirements for safety (Low Voltage Directive Environmental 2014/35/EU). This instrument has been tested to and complies with standards: standards IEC/EN 61010-1:2010, “Safety Requirements for Electrical Equipment for Measurement, Control and Laboratory Use, Part 1: General Requirements.” IEC/EN 61010-2-081:2015, "Safety requirements for electrical equipment for measurement, control, and laboratory use - Part 2-081: Particular requirements for automatic and semi-automatic laboratory equipment for analysis and other...
-
Page 113: Documentation And Support
Documentation and support Obtaining support Technical support Visit thermofisher.com/support for the latest in services and support, including: • Worldwide contact telephone numbers • Product support, including: Product FAQs Software, patches, and updates Training for many applications and instruments • Order and web support •... - Page 114 thermofisher.com/support | thermofisher.com/askaquestion thermofisher.com 11 October 2019...
Need help?
Do you have a question about the Invitrogen Qubit Flex Fluorometer and is the answer not in the manual?
Questions and answers