Seca 787 Instructions For Use And Warranty
Hide thumbs
Also See for seca 787:
- Instructions for use manual (144 pages) ,
- Instructions for use and warranty (130 pages)
Table of Contents
Advertisement
Advertisement
Table of Contents

Related Manuals for Seca seca 787


Summary of Contents for Seca seca 787
- Page 1 787 / 797...
- Page 2 Instructions for use and warranty ....3 Mode d'emploi et garantie ......44 Instrucciones de uso y garantía .
-
Page 3: Table Of Contents
9. Servicing ........40 (seca 797) ......23 10. - Page 4 14. Disposal ....... . . 42 14.1 Device ......42 14.2 Batteries and rechargeable batteries .
-
Page 5: Description Of Device
Body mass index (BMI) can be calculated automatically from the measuring results. USB interface (seca 797 only) A barcode scanner can be connected to the USB interface. This allows users and patients to be identified by means of their barcodes and measuring results assigned in the EMR system. -
Page 6: Safety Information
This also applies to additional devices recommended by seca. Your attention is drawn to the fact that local laws take precedence over... -
Page 7: Preventing Electric Shock
Service partner. You can find service partners in your area at www.seca.com or by sending an e-mail to service@seca.com. ► Only use original seca accessories and spare parts, otherwise seca will not grant any warranty. CAUTION! Patient hazard, malfunction ►... -
Page 8: Preventing Damage To Device
WARNING! Danger of slipping ► Ensure that the weighing platform is dry before the patient steps onto it. ► Ensure that the patients feet are dry before he or she steps onto the weighing platform. ► Make sure that the patient steps onto and off the weighing platform slowly and safely. -
Page 9: Handling Measuring Results
NOTICE! Inconsistent measuring results ► Before you electronically save measurement values determined using this device and use them further (e.g. in seca PC software or in an EMR system), make sure that the measurement values are plausible. ► If measurement values are transmitted to seca PC software or an EMR system, make sure prior to further use that the measurement values are plausible and are assigned to the correct patient. -
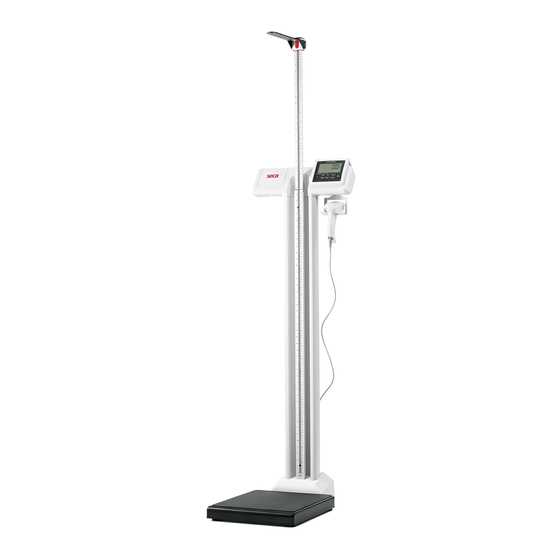
Page 10: Overview
For supporting the display head and the measuring rod Column For supporting the column Column holder Power supply For connecting a seca plug-in power supply unit connection socket For weighing patients Weighing platform To take type AA batteries, 1.5 V... -
Page 11: Display Unit Controls
Device component Function For covering the cables Cover panel For transporting the measuring station Recessed handle USB interface (seca 797 For connecting a barcode scanner only) Socket for electronic For connecting the electronic height measuring unit height measuring unit Connecting cable... - Page 12 103 have any queries, contact your administrator or hospital technician. • The external interface module is available as an optional accessory for the seca 452 measuring station (➔ “Optional accessories (seca 787)”, page 42). seca 787 12 •...
-
Page 13: Symbols In The Display
English 3.3 Symbols in the display Item Symbol Meaning Indicates the status of the WiFI connection and the field strength of the WiFi network (condition: Active interface module): • When setting up the WiFi network: - Flashing: Device connecting to a WiFi router - Illuminated: Device and WiFi router are connected and the WiFi connection has been made •... -
Page 14: Menu Structure (Seca 787)
3.4 Menu structure (seca 787) rESEt • HOLD1 HOLd • HOLD2 • On UnIt* • OFF HCAL 150.0 cm AOFF 30 ... 600 S HCAL = Height Calibration AOFF = Auto OFF • On AHOLd • OFF AHOLd = Auto Hold... -
Page 15: Markings On The Device And On The Type Plate
• max xx A: Maximum current consumption x-y V max. xx A • : Note polarity of connector plug use compatible seca adapter only • : Operate device with direct current display cable Connection for display cable, model only seca 797 Do not dispose of device with household waste 3.7 Markings on the packaging... -
Page 16: Starting Up Device
Open packaging here Packaging material can be disposed of through recycling programs 4. STARTING UP DEVICE 4.1 Scope of delivery (seca 787) seca Measuring Device Instructions for Use Item Component Pcs. Weighing platform with column holder Display head with display unit and connecting cable... -
Page 17: Scope Of Delivery (Seca 797)
English 4.2 Scope of delivery (seca 797) seca Measuring Device Instructions for Use Item Component Pcs. Weighing platform with column holder Display head with display unit, display cable and connecting cable Barcode scanner holder Measuring rod Column (with four pre-fitted screws) -
Page 18: Fitting The Measuring Rod
Fitting the measuring rod Proceed as follows to fit the measuring rod to the column. 1. Lie the column down on the floor. 2. Place the spacer sleeves on the bores in the column. 3. Extend the upper telescopic element far enough to expose the lower assembly bore in the lower telescopic element. -
Page 19: Fitting The Column
English 8. Place a slot-head screw in the upper assembly bore and the spacer sleeve underneath it. 9. Tighten the slot-head screw. 10. Push the upper telescopic element into its lowest position. Fitting the column Proceed as follows to fit the column to the weighing platform. 1. -
Page 20: Fitting The Display Head
NOTE One or two cables will be present, depending on the model: • Connecting cable ( seca 787 • Connecting cable and display cable ( seca 797 3. Put the display head on the column. -
Page 21: Switching The Positions Of The Display Unit And The Battery Compartment
English only: Connect the display cable: seca 797 a) Draw the display cable out of the column b) Plug the display cable into the labeled socket c) Fix the display cable in position with the cable clip 10. Set the measuring station in an upright position. - Page 22 If a barcode scanner is installed, route the barcode seca 797 scanner cable over the strain relief and secure it with a cable tie if required (➔ “Connecting the barcode scanner (seca 797)”, page 25). 6. Fit the display unit:...
-
Page 23: Fitting The Barcode Scanner Holder (Seca 797)
English Fitting the barcode scanner holder (seca 797) The barcode scanner holder can be fitted to either side of the display head. It can be fitted offset by 90° to point forwards, sideways or backwards. 1. Put the barcode scanner holder in the desired position. -
Page 24: Transporting The Device
4.4 Transporting the device The device is equipped with two casters to facilitate transport over short distances. 1. If necessary, remove the plug-in power supply unit from the power socket and from the device. 2. Fold down the measuring flap and push the upper telescopic element of the measuring rod into its lowest position. -
Page 25: Connecting The Plug-In Power Supply Unit (Variant-Dependent)
Tighten the cross-head screw behind the battery compartment lid Connecting the plug-in power The seca plug-in power supply unit is included in the scope of delivery or is available as an optional accessory depending on variant. supply unit (variant-dependent) -
Page 26: Setting Up The Wifi Connection (Seca 797)
4. Fit the cover panel: a) Insert cover panel b) Place and tighten 2 cross-head screws 4.7 Setting up the WiFi connection (seca 797) Setting the WiFi function 1. Switch on the measuring station (➔ “Switching on the device”, page 28). -
Page 27: Connecting The Device To The Wifi Network (Wps)
WPS function of the WiFI router or want to incorporate several devices. 1. Connect the barcode scanner to the device (➔ “Connecting the barcode scanner (seca 797)”, page 25). 2. Enter the data for the WiFi network in the software as seca connect 103 described in the System instructions for use for the software. -
Page 28: Operation
1. Ensure that there is no load on the measuring station. 2. Press the on/off key. All the elements of the display are shown briefly, then appears in the seca display. The measuring station is operational when is displayed. Switching off the device ►... -
Page 29: Measuring Weight
English 5.3 Measuring weight Weighing CAUTION! Injury from incorrect position of the measuring flap Injuries may result if the measuring flap is at patient height when folded up. ► Ensure that the measuring flap is above patient height before the patient steps onto the weighing platform. -
Page 30: Displaying Weight Permanently (Hold)
Displaying weight permanently If you activate the function, the weight value is displayed permanently. Hold (Hold) 1. Press the key. Hold The display flashes until a stable weight is measured. The weight value is displayed permanently. The message is displayed. HOLD 2. -
Page 31: Entering Height Value (Height)
• Transmitting measured values to the software via WiFi seca connect 103 (➔ “Scanning ID(s) and transmitting data via WiFi (seca 797)”, page 33) 1. Determine the height value (➔ “Measuring heights < 1.22 m”, page 30). 2. Press the key. - Page 32 1. Fold up the measuring flap until it engages in a horizontal position. 2. Extend the upper telescopic element until the patient can get under the measuring flap comfortably. 3. Ask the patient to stand under the measuring flap: – Upright posture –...
-
Page 33: Calculating And Displaying Body Mass Index (Bmi)
NOTE The display automatically returns to height and weight value after approx. 10 s. 5.6 Scanning ID(s) and transmitting data via WiFi (seca 797) The internal interface module of the device connects the measuring station to seca an EMR system wirelessly via the software. -
Page 34: Other Functions (Menu)
797 NOTE only: Explanation of the functions under the menu item: seca 797 ➔ “Setting up the WiFi connection (seca 797)” (page 26). Navigating in the menu 1. Keep the key depressed until a menu item is displayed. Menu The last menu item selected is displayed. -
Page 35: Setting Filtering (Fil)
English 1. Select the item from the menu. HOLd 2. Confirm your selection. The current setting is displayed. 3. Select the desired setting: – : A new load on the measuring station clears the display HOLd 1 value – : Removing the load from the measuring station clears the HOLd 2 display value 4. -
Page 36: Calibrating Measuring Rod (Hcal)
– Switching units of measurement ( UnIt Units of height and weight are reset to metric units. NOTE only: If you restore the factory settings, the WiFi settings will seca 797 be retained. 1. Select the item from the menu. rESEt 2. -
Page 37: Resetting Wifi Settings (Reset) (Seca 797)
English Resetting WiFi settings (rESEt) If you reset the WiFi settings, the following information will be cleared: (seca 797) – Network name (SSID) – Network code NOTE If you reset the WiFi settings, the factory settings for the measuring station will also be restored automatically. The factory settings will be available once the measuring station has been restarted. -
Page 38: Sterilizing
“Troubleshoot- ing” in this document, you may not use the device. ► Have the device repaired by seca Service or by an authorized service partner. ► Follow the section entitled “Servicing” in this document. -
Page 39: Problems With Data Transmission
• Contact your administrator or hospital Workflow LED is defective technician • Inform seca Service • Ask the patient to get off the seca mea- suring device and wait until the Workflow The Workflow LED illuminates LED goes out Errors occurred during data transmission in red, the measuring result is •... -
Page 40: Servicing
Incorrect measurements as a result of poor servicing ► Have servicing and repairs carried out exclusively by seca Service or by an authorized service partner. ► You can find service partners in your area at www.seca.com or by sending an e-mail to service@seca.com. 10.TECHNICAL DATA 10.1 General technical data... -
Page 41: Weighing Data
100 V – 240 V Power supply frequency 50 Hz – 60 Hz Current consumption • approx. 55 mA seca 787 • seca 797 - WiFi function and USB interface deactivated approx. 55 mA - WiFi function and USB interface activated approx. -
Page 42: Optional Accessories (Seca 787)
Will be provided in the course of seca connect 103 integration projects • Barcode scanner (medical device) Cannot be ordered through seca; for recommendations, see System instructions for use for seca connect 103 12.OPTIONAL ACCESSORIES (SECA 797) Accessory Article number Integration •... -
Page 43: Declarations Of Conformity
The warranty shall become null and void where the device is opened by per- sons not expressly authorised to do so by seca. In the event of a warranty issue, please contact your local seca office or the dealer from whom you ordered the product.
Need help?
Do you have a question about the seca 787 and is the answer not in the manual?
Questions and answers