Sign In
Upload
Download
Table of Contents
Contents
Add to my manuals
Delete from my manuals
Share
URL of this page:
HTML Link:
Bookmark this page
Add
Manual will be automatically added to "My Manuals"
Print this page
×
Bookmark added
×
Added to my manuals
Manuals
Brands
3M Manuals
Measuring Instruments
QUESTemp 44
User manual
3M QUESTemp 44 User Manual
Heat stress monitors
Hide thumbs
1
2
Table Of Contents
3
4
5
6
7
8
9
10
11
12
13
14
15
16
17
18
19
20
21
22
23
24
25
26
27
28
29
30
31
32
33
34
35
36
37
38
39
40
41
42
43
page
of
43
Go
/
43
Contents
Table of Contents
Bookmarks
Table of Contents
Table of Contents
Introduction
Questempº Models
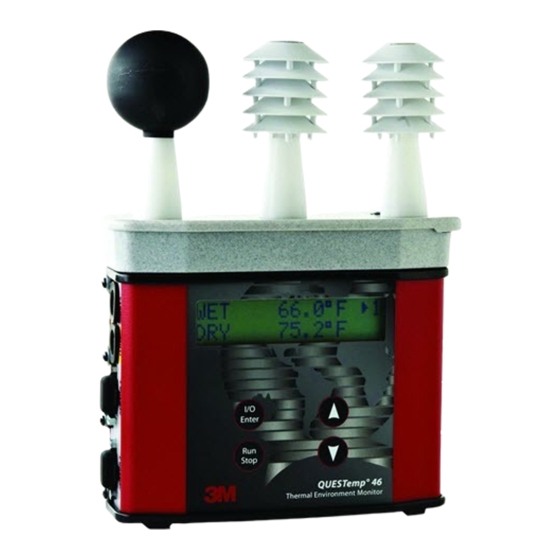
Figure 1-1: Questempº 44/46 in a Thermal Environment
Getting Started
Up and Running Overview
Keypad Operation
I/O Enter Key
Up Arrow Key
Down Arrow Key
Run/Stop Key
Escaping or Moving Back One Screen
Figure 1-2: Keypad Explained
Turning On/Off and Basic Operation
Placing the Questempº 44/46 on the Job Site
Figure 1-3: Main Menu of the QTº44/46
Sensors
About the Sensor Bar
Globe Thermometer
Waterless Wetbulb Sensor and Relative Hiumidity Sensor
Dry Bulb Thermometer
Figure 1-4 about Sensor Bar and Serial Number
Figure 1-5 Sensors Identified
Remote, Sensors 2 and 3
Tri-Sensor Weighted Average
Measurements
Waterless Wetbulb
Computing Waterless Wetbulb and Wind Speed
Wetbulb Globe Temperature
Stay Times/Rest Times (QTº46 Only)
Heat Index/Humidex
Airflow
Thermal Comfort
Operating Questempº 44/46
View
Setup
Figure 1-6 Viewing Measured Data
Setup for Waterless Wetbulb Measurement (Airflow Rate)
Figure 1-7 Setting the Airflow for Waterless Wetbulb Sensor
Print
Reset
Run
Figure 1-8 Run Mode Indicator
Displayed Items
Figure 1-9 Wet and Dry Screen
Figure 1-10: Globe Screen
Figure 1-11: Wbgti & Wbgto Screen
Figure 1-12: RH and H.I/HU Screen
Figure 1-13: Air Flow Screen on QTº46
Figure 1-14: Stay Times (ACGIH)
Figure 1-15: Time & Date Screen
Figure 1-16: Battery & Memory Screen
Figure 1-17: Navy Stay Time Screen
Stay Time Date
Data Logging
Figure 1-18: Marine Heat Condition Flag System
Figure 1-19: EPRI Stay Time Screen
Printing
Serial
Parallel
Figure 1-20: Sample Printout
Figure 1-21: Sample Printout
Airflow Functionality
Figure 1-22: Airflow Configuration
Operating Sequence
Data Logging Airflow
Batteries for Air Probe
Operational Check
Power Options
9-Volt Alkaline Battery Replacement
Approved 9-Volt Batteries
Nimh Battery Pack
Appendix A: Specifications
Appendix B: Heat Exposure Tables
Acgih
ACGIH Clothing Corrections
United States Navy
Flag Conditions for U.S. Navy/Marine Corp. Ashore
Electrical Power Research Institute (EPRI)
Appendix C: Accessories
Air Probe Accessories
Appendix D: PC Communications
QSP-II Quick Overview
Retrieving Your Studies into QSP-II
Downloaded Node (Where Your Data Is Stored)
Viewing Your Heat Stress Data in QSP-II
Adding Panels (Charts/Graphs)
Saving Your Customized Layout (Charts/Graphs)
Creating Reports
Viewing and Printing Reports
Quest Service
Contacting Quest Technologies
International Customers
Warranty
Advertisement
Quick Links
1
Figure 1-1: Questempº 44/46 in a Thermal Environment
2
Getting Started
Download this manual
3M Occupational Health and Environmental Safety Division
3M
QUESTemp°
Heat Stress Monitors
™
™
Robust Construction
From the
From the
Market Leader
QUESTemp
44 and QUESTemp
46 User Manual
o
o
Table of
Contents
Previous
Page
Next
Page
1
2
3
4
5
Advertisement
Table of Contents
Need help?
Do you have a question about the QUESTemp 44 and is the answer not in the manual?
Ask a question
Questions and answers
Related Manuals for 3M QUESTemp 44
Measuring Instruments 3M QUESTemp 46 User Manual
Heat stress monitors (43 pages)
Measuring Instruments 3M QUESTEMP 36 Operator's Manual
Thermal environment monitor (14 pages)
Measuring Instruments 3M Edge eg5 User Manual
Personal noise dosimeter (72 pages)
Measuring Instruments 3M Clean-Trace LM1 User Manual
Luminometer (33 pages)
Measuring Instruments 3M GMI PS200 Series Operation & Maintenance Manual
Portable gas monitor (58 pages)
Measuring Instruments 3M Dynatel 2250M Operator's Manual
Cable/pipe/fault advanced locator (65 pages)
Measuring Instruments 3M Dynatel 7550 Series Operator's Manual
Cable/pipe/fault/ems locator (70 pages)
Measuring Instruments 3M Dynatel 965AMS Instructions Manual
Advanced modular system (60 pages)
Measuring Instruments 3M Dynatel 965AMS User Manual
Advanced modular system vdsl2 service module future-proof testing platform (48 pages)
Measuring Instruments 3M SCOTT SEMS II PRO Operation And Maintenance Instructions
Wireless scba telemetry system for the air-pak x3 pro scba (28 pages)
Measuring Instruments 3M Workstation Monitor 724 User Manual
Workstation monitor (25 pages)
Measuring Instruments 3M The Edge Quick Start Manual
(2 pages)
Measuring Instruments 3M Edge Manual
Personal noise dosimetry (6 pages)
Measuring Instruments 3M LM1 User Manual
Clean-trace luminometer (22 pages)
Measuring Instruments 3M Clean-Trace NGi Luminometer User Manual
With docking station (31 pages)
Measuring Instruments 3M Stormscope Series 2 Instruction Manual
Wx-pa weather mapping systems (36 pages)
This manual is also suitable for:
Questemp 46
Table of Contents
Print
Rename the bookmark
Delete bookmark?
Delete from my manuals?
Login
Sign In
OR
Sign in with Facebook
Sign in with Google
Upload manual
Upload from disk
Upload from URL


Need help?
Do you have a question about the QUESTemp 44 and is the answer not in the manual?
Questions and answers