Lectrosonics SMWB Quick Start Manual
Wireless microphone transmitters and recorders
Hide thumbs
Also See for SMWB:
- Instruction manual (24 pages) ,
- Instruction manual (30 pages) ,
- Instruction manual (30 pages)
Table of Contents
Advertisement
Quick Links
Download this manual
See also:
Instruction Manual
Q
uick
S
tart
G
uide
Wireless Microphone Transmitters
and Recorders
SMWB, SMDWB, SMWB/E01, SMDWB/E01, SMWB/X, SMDWB/X
Fill in for your records:
Serial Number:
Purchase Date:
Digital Hybrid Wireless
This guide is intended to assist with
initial setup and operation of your
Lectrosonics product.
For a detailed user manual, down-
load the most current
version at:
www.lectrosonics.com
US Patent 7,225,135
®
1 August 2019
Advertisement
Table of Contents

Related Manuals for Lectrosonics SMWB


Summary of Contents for Lectrosonics SMWB
- Page 1 Wireless Microphone Transmitters and Recorders SMWB, SMDWB, SMWB/E01, SMDWB/E01, SMWB/X, SMDWB/X Digital Hybrid Wireless US Patent 7,225,135 ® Fill in for your records: This guide is intended to assist with initial setup and operation of your Serial Number: Lectrosonics product.
-
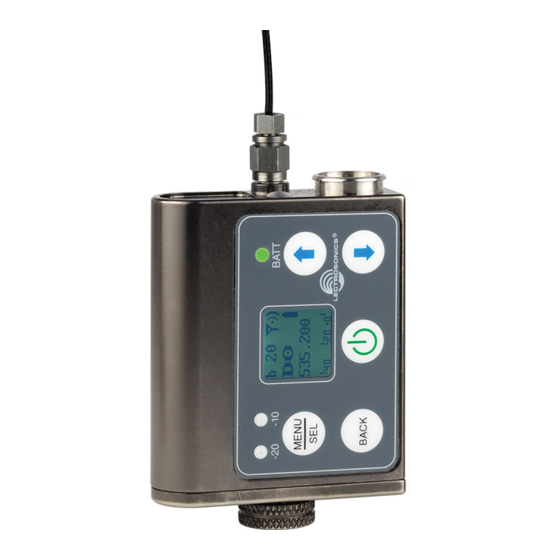
Page 2: Controls And Functions
IFB receivers, and certain receivers from other manufactur- ers (contact the factory for details). Plus, the SMWB has a built in recording function for use in situations where RF may not be possible or to work as a stand alone recorder. The record function and transmit functions are exclusive of each other - you cannot record AND transmit at the same time. -
Page 3: Battery Installation
Because some batteries run down quite abruptly, using the Power LED to verify battery status will not be reliable. However, it is possible to track battery status using the battery timer function available in Lectrosonics Digital Hybrid Wireless receivers. The battery door opens by simply unscrewing the knurled knob part way until the door will rotate. -
Page 4: Long Button Press
From the Main/Home Screen, the following shortcuts are available: • Record: Press the MENU/SEL + UP arrow simultaneously Stop Recording: Press the MENU/SEL + DOWN arrow simultaneously • NOTE: The shortcuts are only available from the main/home screen AND when a microSDHC memory card is installed. LECTROSONICS, INC. - Page 5 Turn the RF output on with the Rf On? item in the power menu, or by • turning the power off and then back on while holding the power button in and waiting for the counter to reach 3. www.lectrosonics.com...
- Page 6 To stop recording, press MENU/SEL and choose Stop; the word SAVED appears on the screen b 19 Files Format SAVED 503.800 Stop Gain To play back the recordings, remove the memory card and copy the files onto a computer with video or audio editing software installed. LECTROSONICS, INC.
-
Page 7: Smwb Main Menu
SMWB Main Menu From the Main Window press MENU/SEL. Use the UP/Down arrow keys to select the item. Files Use arrow keys to Files Select from 0014A000 select file in list listing BACK 0013A000 Format? Use arrow keys to initiate... -
Page 8: Smwb Power Button Menu
SMWB Power Button Menu From the Main Window press the power button. Use the UP/DOWN arrow keys to select the item. Press SEL to return to Resume the previous screen Press SEL to turn the Pwr Off power off Rf On? -
Page 9: Setup Screen Details
When the frequency step size is set to 25 kHz, the hex number will appear smaller and may include a fraction. Fraction b 470 1/4 = .025 MHz Note that the frequency has 1/2 = .050 MHz increased by 25 474.525 kHz from the upper 3/4 = .075 MHz example. www.lectrosonics.com... - Page 10 Power Button menu. Helpful Features on Receivers To aid in finding clear frequencies, several Lectrosonics receivers offer a SmartTune feature that scans the tuning range of the receiver and displays a graphical report that shows where RF signals are present at different levels, and areas where there is little or no RF energy present.
- Page 11 3) Prepare the signal source. Position a microphone the way it will be used in actual operation and have the user speak or sing at the loudest level that will occur during use, or set the output level of the instrument or audio device to the maximum level that will be used. www.lectrosonics.com...
-
Page 12: Selecting Frequency
25 Freq. kHz and 100 kHz increments when the step size is 100 kHz. b 19 494.500 These two fields Freq. Freq. always step in the same increments b 19 1 block steps 494.500 494.500 1 MHz steps LECTROSONICS, INC. -
Page 13: Selecting Frequency Using Two Buttons
If the Step Size is 25 kHz with the frequency set between even 100 kHz steps and the Step Size is then changed to 100 kHz, the mismatch will cause the hex code to display as two asterisks. b 19 Freq. Step Size and b 19 Frequency mismatch 494.525 494.500 www.lectrosonics.com... -
Page 14: About Overlapping Frequency Bands
• LF 70 70 Hz • LF 100 100 Hz • LF 120 120 Hz • LF 150 150 Hz The roll-off is often adjusted by ear while monitoring the audio. Rolloff Rolloff Compat 70 Hz StepSiz Phase LECTROSONICS, INC. -
Page 15: Selecting The Compatibility (Compat) Mode
200 Series: 200 Mode • 100 Series: 100 Mode • Mode 6:* Mode 6 • Mode 7:* Mode 7 • IFB Series: IFB Mode Modes 3, 6 and 7 work with certain non-Lectrosonics models. Contact the factory for details. www.lectrosonics.com... - Page 16 Neg. Phase Setting Transmitter Output Power The output power can be set to: US, X • 25, 50 or 100 mW • 10, 25 or 50 mW Compat TxPower 25 mW StepSiz 50 mW Phase 100 mW TxPower LECTROSONICS, INC.
-
Page 17: Restoring Default Settings
Naming Sc&Take Seq # Takes Clock Naming MicroSDHC Memory Card Info MicroSDHC Memory Card information including space remaining on card. Fuel gauge [SMWB Takes Storage used Naming E......F Storage capacity SD Info Available recording Default time (H : M : S) Restoring Default Settings This is used to restore the factory settings. - Page 18 Speed Class 10 UHS Speed Class 1 Stand-alone UHS Speed Class I UHS Speed Class I Accompanying microSDHC logo microSDHC Logo is a trademark of SD-3C, LLC LECTROSONICS, INC.
-
Page 19: Formatting Sd Card
SMDWB never low level formats a card and we strongly advise against doing so with the computer. To format the card with the SMWB/SMDWB, select Format Card in the menu and press MENU/SEL on the keypad. NOTE: An error message will appear if samples are lost due to a poor performing “slow”...
Need help?
Do you have a question about the SMWB and is the answer not in the manual?
Questions and answers