Auriol 282650 Operation And Safety Notes
Hide thumbs
Also See for 282650:
- Operation and safety notes (227 pages) ,
- Operation and safety notes (191 pages)
Table of Contents
Advertisement
Available languages
Available languages
Quick Links
FUNK-WETTERSTATION / RADIO-CONTROLLED
WEATHER STATION / STATION MÉTÉO RADIOGUIDÉE
FUNK-WETTERSTATION
Bedienungs- und Sicherheitshinweise
STATION MÉTÉO RADIOGUIDÉE
Instructions d'utilisation et consignes de sécurité
BEZDRÁTOVÁ METEOSTANICE
Pokyny pro obsluhu a bezpečnostní pokyny
ESTAÇÃO METEOROLÓGICA SEM FIOS
Instruções de utilização e de segurança
IAN 282650
RADIO-CONTROLLED WEATHER STATION
Operation and Safety Notes
RADIOWEERSTATION
Bedienings- en veiligheidsinstructies
ESTACIÓN METEOROLÓGICA
INALÁMBRICA
Instrucciones de utilización y de seguridad
Advertisement
Chapters
Table of Contents

Subscribe to Our Youtube Channel
Related Manuals for Auriol 282650


Summary of Contents for Auriol 282650
- Page 1 STATION MÉTÉO RADIOGUIDÉE RADIOWEERSTATION Instructions d‘utilisation et consignes de sécurité Bedienings- en veiligheidsinstructies BEZDRÁTOVÁ METEOSTANICE ESTACIÓN METEOROLÓGICA INALÁMBRICA Pokyny pro obsluhu a bezpečnostní pokyny Instrucciones de utilización y de seguridad ESTAÇÃO METEOROLÓGICA SEM FIOS Instruções de utilização e de segurança IAN 282650...
- Page 2 DE / AT / CH Bedienungs- und Sicherheitshinweise Seite GB / IE Operation and Safety Notes Page FR / BE Instructions d‘utilisation et consignes de sécurité Page NL / BE Bedienings- en veiligheidsinstructies Pagina 116 Pokyny pro obsluhu a bezpečnostní pokyny Strana 154 Instrucciones de utilización y de seguridad Página 190...
- Page 3 25 23...
-
Page 5: Table Of Contents
Einleitung ....................Seite Bestimmungsgemäße Verwendung ............. Seite Teilebeschreibung ..................Seite Technische Daten ..................Seite Lieferumfang ....................Seite 10 Sicherheit ....................Seite 10 Allgemeine Sicherheitshinweise ..............Seite 11 Sicherheitshinweise zu Batterien ..............Seite 11 Vor der Inbetriebnahme ............. Seite 13 Geräte aufstellen ..................Seite 13 Außenfühler in Betrieb nehmen .............. - Page 6 Luftdruck der vergangenen 12 Stunden ablesen ........Seite 29 Einstellung des Luftdruckanzeige ..............Seite 30 Kanal einstellen .................... Seite 31 Temperatur und Temperatur-Trend anzeigen ..........Seite 32 Luftfeuchtigkeit und Luftfeuchtigkeit-Trend anzeigen ........Seite 32 Maximale / minimale Temperatur / Luftfeuchtigkeit anzeigen ....Seite 33 Temperatur- und Frostalarm .................
-
Page 7: Einleitung
Funk-Wetterstation Einleitung Wir beglückwünschen Sie zum Kauf Ihres neuen Produkts. Sie haben sich damit für ein hochwertiges Produkt entschieden. Die Bedienungsanleitung ist Teil dieses Pro- dukts. Sie enthält wichtige Hinweise für Sicherheit, Gebrauch und Entsorgung. Ma- chen Sie sich vor der Benutzung des Produkts mit allen Bedien- und Sicherheitshinweisen vertraut. -
Page 8: Teilebeschreibung
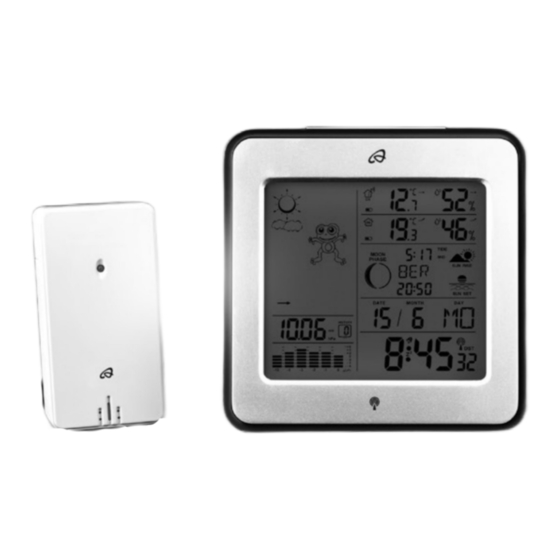
Teilebeschreibung Wetterstation: Datums-Anzeige Innentemperatur (°C / °F) Monats-Anzeige Batterieanzeige Alarm 1 Luftfeuchtigkeit-Trend (Außen) SNOOZE-Anzeige Luftfeuchtigkeit (Außen) Funkturm-Symbol Temperartur- und Frost-Alarm DST-Anzeige (Sommerzeit) (maximal / minimal) Zeitanzeige Temperatur-Trend (Außen) Alarm 2 Außentemperatur (°C / °F) Wochentags-Anzeige Batterieanzeige (Außenfühler) Sonnenaufgang / Gewählter Kanal Uhrzeit des Sonnenaufgangs Luftdruck-Balkenanzeige Tidenhub-Anzeige... -
Page 9: Technische Daten
CITY-Taste Batteriefach Außenfühler: Kontroll-LED Kanal-Wahlschalter Aufhängevorrichtung Batteriefach RESET-Taste Technische Daten Wetterstation: Temperaturmessbereich: 0 bis +50 °C +32 bis +122 °F Temperaturauflösung: 0,1 °C Messbereich Luftfeuchtigkeit: 20–95 % Auflösung Luftfeuchtigkeit: Funksignal: Batterie: 3 x AA, 1,5 V (Gleichstrom) Luftdruckbereich: 850 - 1050hPa Außenfühler: Temperaturmessbereich: –20 bis +65 °C... -
Page 10: Lieferumfang
Auflösung Luftfeuchtigkeit: HF Übertragungssignal: 433 MHz HF Übertragungsreichweite: max. 30 Meter (im freien Gelände) Batterie: 2 x AA, 1,5 V (Gleichstrom) Schutzart: IPX4 (spritzwassergeschützt) Lieferumfang 1 Wetterstation 2 Batterien AA, 1,5 V (vorinstalliert) 1 Außenfühler 1 Bedienungsanleitung 3 Batterien AA, 1,5 V (vorinstalliert) Sicherheit Lesen Sie alle Sicherheitshinweise und Anweisungen. -
Page 11: Allgemeine Sicherheitshinweise
Allgemeine Sicherheitshinweise Kinder unterschätzen häufig die Gefahren. Halten Sie Kinder stets vom Produkt fern. Dieses Produkt kann von Kindern ab 8 Jahren und darüber sowie von Personen mit verringerten physischen, sensorischen oder mentalen Fähigkeiten oder Man- gel an Erfahrung und Wissen benutzt werden, wenn sie beaufsichtigt oder be- züglich des sicheren Gebrauchs des Produkts unterwiesen wurden und die daraus resultierenden Gefahren verstehen. - Page 12 VORSICHT! EXPLOSIONSGEFAHR! Laden Sie Batterien niemals wieder auf! Achten Sie beim Einlegen auf die richtige Polarität! Diese wird in den Batterie- fächern angezeigt. Reinigen Sie Batterie- und Gerätekontakt vor dem Einlegen falls erforderlich. Entfernen Sie erschöpfte Batterien umgehend aus dem Produkt. Es besteht er- höhte Auslaufgefahr! Batterien gehören nicht in den Hausmüll! Jeder Verbraucher ist gesetzlich verpflichtet, Batterien ordnungsgemäß...
-
Page 13: Vor Der Inbetriebnahme
Vor der Inbetriebnahme Geräte aufstellen Setzen Sie die Batterien zuerst in den Außenfühler, dann erst in die Wetterstation. VORSICHT! Stellen Sie bei der Wahl des Aufstellortes sicher, dass die Geräte keiner direkten Sonneneinstrahlung, Vibration, Staub, Hitze, Kälte und Feuchtigkeit ausgesetzt sind. Stellen Sie die Geräte nicht in der Nähe von Hitzequellen, z. B. Heizkörpern, auf. -
Page 14: Außenfühler In Betrieb Nehmen
Außenfühler in Betrieb nehmen Entfernen Sie die Batteriefachabdeckung auf der Rückseite des Außenfühlers. Entfernen Sie den Batterie-Sicherungsstreifen. Der Außenfühler ist nun betriebs- bereit und die Kontroll-LED leuchtet kurz auf. Schließen Sie die Batteriefachabdeckung. Außenfühler montieren: Hinweis: Sie benötigen für diesen Arbeitsschritt eine Bohrmaschine. Suchen Sie einen geeigneten Platz für den Außenfühler. - Page 15 Ziehen Sie den Batterie-Sicherungsstreifen heraus. Schließen Sie das Batteriefach anschließend wieder. Sobald der Batterie-Sicherungsstreifen entfernt ist, startet die Wetterstation den Empfang des Funksignals. Hinweis: Wechseln Sie während des Empfangs nicht den Standort der Wetterstation. Andernfalls kann es zu Empfangsstörungen kommen. Wetterstation mit dem Außenfühler und dem DCF-Funksignal verbinden: Die Wetterstation versucht nach dem Entfernen des Batterie-Sicherungsstreifens eine Verbindung zum Außenfühler herzustellen.
- Page 16 Minuten in Anspruch und wird im LC-Display durch das blinkende Funkturm-Symbol angezeigt. Bei erfolgreichem Empfang des DCF-Funksignals wird das Funkturm-Symbol dauerhaft im LC-Display angezeigt. Wenn zum Zeitpunkt der Inbetriebnahme keine Synchroni- sation mit der Atomuhr möglich ist, können Sie die Uhrzeiteinstellungen auch manuell vornehmen (siehe „12- / 24-Stundenformat / °C / °F / hPa / inHg / Zeitzone / Uhr- zeit / Datum / Sprache manuell einstellen“).
-
Page 17: Bedienung
Bedienung DCF-Funksignal empfangen Die Uhr der Wetterstation beginnt nach erfolgreicher Verbindung mit dem Außen- fühler oder 3 Minuten nach Entfernen des Batterie-Sicherungsstreifens automatisch mit der Suche nach dem DCF-Funksignal. Die Suche wird im LC-Display durch das Blinken des Funkturm-Symbols angezeigt. Hinweis: In Gebäuden aus Stahlbeton kann der Empfang des Funksignals stark beeinträchtigt werden (siehe „Geräte aufstellen“). -
Page 18: 24-Stundenformat / °C / °F / Hpa / Inhg / Zeitzone / Uhrzeit / Datum / Sprache Manuell Einstellen
Möglichkeit, die Zeit manuell einzustellen. Wenn ein Empfang des DCF-Funksignals erfolgreich ist, werden die manuell eingestellten Werte überschrieben. 12- / 24-Stundenformat / °C / °F / hPa / inHg / Zeitzone / Uhrzeit / Datum / Sprache manuell einstellen Der Empfang des DCF-Funksignals kann am Aufstellort der Wetterstation gestört bzw. unterbrochen sein. - Page 19 4. Bestätigen Sie Ihre Eingabe durch Drücken der MODE-Taste. Die Zeitzonen- Anzeige blinkt im Display. Drücken Sie die + oder – -Taste, um den gewünschten Wert (-2 bis +2) einzustellen. Hinweis: Sollten Sie sich in einem Land befinden, in dem zwar immer noch das DCF-Signal empfangen wird, in dem aber die aktuelle Uhrzeit abweicht, können Sie die Zeitzonen-Einstellung dazu benutzen, um das Produkt auf die aktuelle Uhrzeit einzustellen.
-
Page 20: Weckzeit Einstellen
7. Bestätigen Sie Ihre Eingabe durch Drücken der MODE-Taste. Die Jahresanzeige der Zeitanzeige blinkt. Drücken Sie die + oder – -Taste, um den gewünschten Wert einzustellen. 8. Bestätigen Sie Ihre Eingabe durch Drücken der MODE-Taste. Die Monats-An- zeige der Datums-Anzeige blinkt. -
Page 21: Weckfunktion Aktivieren / Deaktivieren
3. Drücken Sie die + oder – -Taste , um den gewünschten Wert einzustellen. 4. Bestätigen Sie Ihre Eingabe durch Drücken der MODE-Taste. Die Minutenanzeige blinkt. Wiederholen Sie Schritt 3, um den Wert für die Minuten einzustellen. 5. Bestätigen Sie Ihre Eingabe durch Drücken der MODE-Taste. Tipp: Halten Sie die + oder –... -
Page 22: Alarmsignal Ausschalten
Alarmsignal ausschalten Drücken Sie mit Ausnahme der SNOOZE- / LIGHT-Taste eine beliebige Taste, um das Alarmsignal zu stoppen. Sie müssen den Alarm nicht wieder aktivieren. Er schaltet sich in der bereits eingestellten Alarmzeit automatisch ein. Hinweis: Das Alarmsignal ertönt für ca. 2 Minuten. SNOOZE-Funktion Drücken Sie die SNOOZE- / LIGHT-Taste , um in den SNOOZE-Modus... - Page 23 Folgende Wetter-Symbole zeigt die Wetterstation an: sonnig leicht bewölkt bewölkt regnerisch Regen + Schnee DE/AT/CH...
-
Page 24: Standort Auswählen
Die Wettersymbole zeigen die Wetterbewegungen der nächsten acht Stunden an und nicht das aktuelle Wetter. Die Wetterstation kann den Luftdrucktrend anzeigen. Folgende Anzeigen sind möglich: Der Luftdruck wird steigen. Der Luftdruck bleibt konstant. Der Luftdruck wird sinken. Standort auswählen Drücken Sie die CITY-Taste . -
Page 25: Standort Manuell Auswählen
Nach einem kurzen Augenblick zeigt die Wetterstation die Zeiten für Sonnenauf- und Sonnenuntergang, die Mondphasen sowie den Tidenhub gering (TIDE LO), mittel (TIDE MID) und hoch (TIDE TH) an. Standort manuell auswählen Drücken und halten Sie die CITY-Taste für ca. 2 Sekunden gedrückt. Drücken Sie die + oder –... - Page 26 Folgende Länder und Städte können ausgewählt werden: Germany Berlin Rostock Bosnia & Sarajevo (DE) Her- Saarbrücken SAA zegovina Bremen Stuttgart (BA) Köln Croatia Split Dortmund (HR) Würzburg Dresden Zagreb Australia Canbera Düsseldorf (AU) Czech Brno (CZ) Erfurt Melbourne Prague Frankfurt Sydney Denmark Alborg...
- Page 27 Dijon Lecce New Zea- Wellington land (NZ) Lille Messina Norway Bergen Lyon Milan (NO) Marseille Naples Lillehammer Metz Palermo Oslo Nantes Parma Poland Cracow Nice Perugia (PL) Orleans Rome Gdansk Paris San Remo Poznan Perpignan Triest Warsaw Rouen Turin Portugal Faro (PT) Strasbourg...
- Page 28 Badajoz Lugano Barcelona Sion Bilbao St. Gallen Cordoba Zurich Eivissa Ibiza United Aberdeen Kingdom La Coruna (GB) Las Palmas Belfast Leon Birmingham Madrid Cardiff Malaga Glasgow Palma de London Mallorca Manchester Salamanca Newcastle Sevilla upon Tyne Valencia Plymouth Zaragoza United Los Angeles Sweden Gothenburg...
-
Page 29: Mondphasen
Mondphasen Die Wetterstation verfügt über eine Anzeige, die automatisch die aktuelle Mond- Phase anzeigt. Neumond Wachsender Halbmond Wachsender Halbmond Vollmond Vollmond Abnehmender Halbmond Abnehmender Vollmond Halbmond Luftdruck der vergangenen 12 Stunden ablesen Drücken Sie wiederholt die HISTORY-ABS / REL-Taste , um die Luftdruckwerte der vergangenen 12 Stunden ablesen zu können. -
Page 30: Einstellung Des Luftdruckanzeige
Einstellung des Luftdruckanzeige Die Wettervorhersage dieser Wetterstation beruht auf einer Auswertung der Veränderung des Luftdrucks. Die Luftdruckanzeige ist werksseitig auf den absoluten Luftdruck eingestellt. Da der Luftdruck generell mit der Höhe über dem Meeresspiegel absinkt, wird vom öffentlichen Wetterdienst in der Regel der so genannte relative Luftdruck angegeben. Dieser relative Luftdruck wird der Topografie des Geländes angepasst, um ver- gleichbare Werte zu erhalten. -
Page 31: Kanal Einstellen
Wenn Sie möchten, dass die Wetterstation den absoluten Luftdruck anzeigt, gehen Sie vor wie folgt: Drücken und halten Sie die HISTORY ABS/REL-Taste für ca. 3 Sekunden gedrückt. Drücken Sie anschließend die + oder – -Taste, um zur absoluten Luftdruckanzeige zu wechseln. Bestätigen Sie durch Drücken der HISTORY ABS / REL-Taste. Kanal einstellen Die Wetterstation empfängt das Signal des Außenfühlers automatisch, nachdem Sie alle Einstellungen vorgenommen haben. -
Page 32: Temperatur Und Temperatur-Trend Anzeigen
Temperatur und Temperatur-Trend anzeigen Die aktuelle Innentemperatur und der Temperatur-Trend (Innen) werden im LC-Display angzeigt. Nach erfolgreicher Verbindung mit dem Außenfühler wird die Außentemperatur und der Temperatur-Trend (Außen) angezeigt. Folgende Anzeigen sind möglich: Die Temperatur steigt. Die Temperatur bleibt konstant. Die Temperatur sinkt. -
Page 33: Maximale / Minimale Temperatur / Luftfeuchtigkeit Anzeigen
Nach erfolgreicher Verbindung mit dem Außensensor zeigt die Wetterstation den Luftfeuchtigkeit-Trend (Außen) sowie die Luftfeuchtigkeit (Außen) im LC-Dis- play an. Maximale / minimale Temperatur / Luftfeuchtigkeit anzeigen Die minimale / maximale Temperatur / Luftfeuchtigkeit wird nach dem Einlegen der Batterien erstmals gemessen und in der Wetterstation gespeichert. Die maximalen und minimalen Werte für Temperatur, Hygrometer und Luftdruck werden automatisch gespeichert. -
Page 34: Temperatur- Und Frostalarm
Temperatur- und Frostalarm Der Temperaturalarm ist ein kurzer Signalton, der ertönt, sobald die Außentemperatur den vorgegebenen Temperaturbereich über- oder unterschreitet. Gehen Sie zur Ein- stellung des gewünschten Temperaturbereichs wie folgt vor: Drücken Sie die – -Taste , um in den Modus des Temperaturalarms zu gelangen. -
Page 35: Hintergrundbeleuchtung
Ist der Frostalarm aktiviert, erscheint das dazugehörige Symbol neben der Außentemperatur. Das Alarmsignal ertönt bei –1 °C bis + 3 °C. Ist der Temperaturalarm aktiviert, erscheint das dazugehörige Symbol neben der Außentemperatur. Das Alarmsignal ertönt bei den eingestellten Werten. Sind Temperatur- und Frostalarm aktiviert, erscheinen beide Symbole auf dem Display. Hintergrundbeleuchtung Drücken Sie die SNOOZE / LIGHT-Taste . -
Page 36: Batterien Wechseln
Batterien wechseln Wetterstation: Wechseln Sie die Batterien, wenn das LC-Display unleserlich oder die Batteriean- zeige angezeigt wird. Entfernen Sie die Batteriefachabdeckung auf der Rückseite der Wetterstation. Entnehmen Sie die verbrauchten Batterien. Legen Sie 3 neue Batterien vom Typ AA, 1,5 V ein. Hinweis: Achten Sie dabei auf die richtige Polarität. -
Page 37: Fehler Beheben
Fehler beheben Hinweis: Das Produkt enthält elektronische Bauteile. Daher ist es möglich, dass es durch Funkübertragungsgeräte in unmittelbarer Nähe gestört wird. Entfernen Sie solche Geräte aus der Reichweite der Wetterstation / des Außen- fühlers oder entnehmen Sie kurzzeitig die Batterien aus der Wetterstation / dem Außenfühler, wenn das Display Störungen anzeigt. -
Page 38: Reinigung Und Pflege
Reinigung und Pflege Verwenden Sie in keinem Fall Flüssigkeiten und keine Reinigungsmittel, da diese das Produkt beschädigen. Reinigen Sie das Produkt nur äußerlich mit einem weichen trockenen Tuch. Spritzen Sie den Außensensor in keinem Fall, z. B. mit einem Gartenschlauch, ab. - Page 39 Möglichkeiten zur Entsorgung des ausgedienten Produkts erfahren Sie bei Ihrer Gemeinde- oder Stadtverwaltung. Werfen Sie Ihr Produkt, wenn es ausgedient hat, im Interesse des Um- weltschutzes nicht in den Hausmüll, sondern führen Sie es einer fachge- rechten Entsorgung zu. Über Sammelstellen und deren Öffnungszeiten können Sie sich bei Ihrer zuständigen Verwaltung informieren.
-
Page 40: Garantie
Garantie Das Produkt wurde nach strengen Qualitätsrichtlinien sorgfältig produziert und vor Anlieferung gewissenhaft geprüft. Im Falle von Mängeln dieses Produkts stehen Ihnen gegen den Verkäufer des Produkts gesetzliche Rechte zu. Diese gesetzlichen Rechte werden durch unsere im Folgenden dargestellte Garantie nicht eingeschränkt. Sie erhalten auf dieses Produkt 3 Jahre Garantie ab Kaufdatum. -
Page 41: Informationen
Informationen Konformitätserklärung Wir OWIM GmbH & Co. KG, Stiftsbergstraße 1, DE-74167 Neckarsulm, DEUTSCHLAND, erklären in alleiniger Verantwortung, dass das Produkt: Funk-Wetter- station · Model-Nr.: Z31915 Version: 02 / 2017, auf das sich diese Erklärung be- zieht, mit den Normen / normativen Dokumenten der 1999/5/EC übereinstimmt. Diese Unterlagen können Sie bei Bedarf von www.owim.com herunterladen. - Page 42 Introduction .................... Page 44 Intended use ....................Page 44 Parts description ................... Page 45 Technical data ....................Page 46 Included items ....................Page 47 Safety ......................Page 47 General Safety Information ................. Page 48 Safety Instructions for Batteries ..............Page 48 Before use ....................
- Page 43 Reading the barometric pressure for the last 12 hours ......Page 65 Adjusting the air pressure indication ............Page 66 Setting the channel ..................Page 67 Displaying temperature and temperature trend ......... Page 68 Displaying the humidity and humidity trend ..........Page 68 Displaying the maximum / minimum temperature / humidity .....
-
Page 44: Introduction
Radio-controlled weather station Introduction We congratulate you on the purchase of your new product. You have chosen a high quality product. The instructions for use are part of the product. They contain important information concerning safety, use and disposal. Before using the prod- uct, please familiarise yourself with all of the safety information and instructions for use. -
Page 45: Parts Description
Parts description Weather station: Date display Humidity trend (outdoor) Month display Humidity (outdoor) Alarm 1 Temperature and frost alarm SNOOZE display (maximum / minimum) Radio tower symbol Temperature trend (outdoor) DST display (summer time) Outdoor temperature (°C / °F) Time display Battery state display (outdoor Alarm 2 sensor) -
Page 46: Technical Data
HISTORY ABS / REL button Battery compartment CITY button Outdoor sensor: Control LED Channel selector switch Mount Battery compartment RESET button Technical data Weather station: Temperature measurement range: 0 to +50 °C +32 to +122 °F Temperature resolution: 0.1 °C Humidity measurement range: 20 %–95 % Humidity resolution:... -
Page 47: Included Items
Humidity measurement range: 20 %–95 % Humidity resolution: HF transmission signal: 433 MHz HF transmission range: max. 30 metres (in open area) Batteries: 2 x AA, 1.5 V (direct current) Degree of protection: IPX4 (splash-proof) Included items 1 Weather station 1 Outdoor sensor 3 Batteries AA, 1.5 V (pre-installed) 2 Batteries AA, 1.5 V (pre-installed) -
Page 48: General Safety Information
General Safety Information Children frequently underestimate the dangers. Children should be kept away from the product at all times. This product can be used by children aged from 8 years and above and persons with reduced physical, sensory or mental capabilities or lack of experi- ence and knowledge if they have been given supervision or instruction con- cerning use of the product in a safe way and understand the hazards involved. -
Page 49: Before Use
Remove spent batteries from the device immediately. There is an increased danger of leaks! Batteries must not be disposed of in the normal domestic waste! Every consumer is obliged to dispose of batteries properly in accordance with the regulations! Keep batteries away from children. Do not throw batteries into a fire. Never short-circuit them or take them apart. -
Page 50: Preparing To Use The Outdoor Sensor
not place the devices close to sources of heat, e.g. radiators. Otherwise they may be damaged. Do not place the devices on valuable or sensitive surfaces unless these are appropriately protected. Otherwise they may be damaged. Please ensure that neighbouring devices are not operated at the same frequency of 433 MHz. -
Page 51: Preparing The Weather Station For Use
Find an appropriate place for the outdoor sensor. Note: Please ensure that you install the outdoor sensor within a radius of 30 m from the weather station. Check that there are no obstacles between the outdoor sensor and the weather station. Otherwise there may be interference of the transmission of data. - Page 52 Connecting the weather station with the outdoor sensor and the DCF radio signal: After removal of the battery safety strip the weather station attempts to establish a connection with the outdoor sensor. This process can take a few minutes. The symbol will keep flashing for few minutes.
-
Page 53: Operation
Radio signal (DCF): The DCF signal (time signal transmitter) consists of time pulses emitted by one of the most accurate clocks in the world close to Frankfurt / Main, Germany. In ideal conditions, your weather station can pick up this signal over a distance of up to approx. -
Page 54: Setting The 12 / 24 Hour Mode / °C / °F / Hpa / Inhg / Time Zone / Time / Date / Language Manually
In order to correct any deviations from the exact time, the clock is automatically synchronised with the DCF radio signal every day at 1:00, 2:00 and 3:00. Reception of the DCF radio signal can also be started manually on the weather station. Press the + and –... - Page 55 Note: The AM symbol in the time display stands for before noon in the 12 hour mode. The PM symbol in the time display stands for after noon in 12 hour mode. 2. Confirm your setting by pressing the MODE button. The temperature unit “°C “ or “°F”...
-
Page 56: Setting The Alarm Time
If you do not press any button for 20 seconds, the LCD automatically reverts to the standard display. 6. Confirm your setting by pressing the MODE button. The minute indicator of the time display blinks. Press the + or – button to set the desired value. 7. -
Page 57: Activating / Deactivating The Alarm Function
3. Press the + or – button to set the desired value. 4. Confirm your setting by pressing the MODE button. The minutes display flashes. Repeat step 3 to set the minutes. 5. Confirm your setting by pressing the MODE button. Tip: Hold the + or –... -
Page 58: Switching Off The Alarm Signal
Switching off the alarm signal Press any button except the SNOOZE- / LIGHT button to stop the alarm signal. It is not necessary to reactivate the alarm. It switches itself automatically to the alarm time which has already been set. Note: The alarm signal sounds for approx. - Page 59 The weather station displays the following weather symbols: sunny slightly cloudy cloudy rainy GB/IE...
-
Page 60: Selecting The Location
rain + snow The weather symbols indicate the weather fluctuation over the next eight hours and not the current weather. The weather station can display the barometric pressure trend You may see the following displays: The barometric pressure will rise. The barometric pressure will remain constant. -
Page 61: Selecting The Location Manually
Press the + or – button to select your location. Press the CITY button to confirm your entry. If the abbreviation for your location does not appear in the display, you may enter a user-defined location (see “Selecting the location manually”). After a brief moment, the weather station displays the times for sunrise and sun- down, the lunar phases as well as the tidal range - low (TIDE LO), medium (TIDE MID) and high (TIDE TH). - Page 62 You can choose from the following countries and cities: Germany Berlin Rostock Liege (DE) Saarbrücken Bosnia & Sarajevo Bremen Herzego- Stuttgart vina (BA) Köln Croatia Split Dortmund Würzburg (HR) Dresden Australia Canberra Zagreb Düsseldorf (AU) Czech Brno Erfurt Melbourne (CZ) Frankfurt Sydney Prague...
- Page 63 Dijon Lecce Wellington Zealand Lille Messina (NZ) Lyon Milan Norway Bergen Marseille Naples (NO) Metz Palermo Lillehammer Nantes Parma Oslo Nice Perugia Poland Cracow (PL) Orleans Rome Gdansk Paris San Remo Poznan Perpignan Triest Warsaw Rouen Turin Portugal Faro Strasbourg Venice (PT) Toulouse...
- Page 64 Andorra Geneva Badajoz Lucerne Barcelona Lugano Bilbao Sion Cordoba St. Gallen Zurich Eivissa Ibiza United Aberdeen La Coruña Kingdom Las Palmas (GB) Leon Belfast Madrid Birmingham Malaga Cardiff Palma de Mal- Glasgow lorca London Salamanca Manchester Sevilla Newcastle Valencia upon Tyne Zaragoza Plymouth Sweden...
-
Page 65: Lunar Phases
Lunar phases The weather station has a display which automatically displays the current lunar phase New moon Waxing half- Half-moon Waxing full moon moon Full moon Waning full Half-moon Waning half- moon moon Reading the barometric pressure for the last 12 hours Press the HISTORY ABS / REL button repeatedly to read the barometric pressure values for the last 12 hours. -
Page 66: Adjusting The Air Pressure Indication
Adjusting the air pressure indication The forecast of this weather station is basing on an analysis of the change of the air pressure. The barometric pressure is factory provided adjusted to the absolute air pressure. As the air pressure generally decreases with the height beyond sea level, the public weather service always announces the so-called relative air pressure. -
Page 67: Setting The Channel
If you want your weather station to announce the absolute air pressure, proceed like this: Press and hold the HISTORY ABS / REL button for approx. 3 seconds. After- wards press the + or – button, to change to the absolute air pressure. Confirm by pressing the HISTORY ABS / REL button. -
Page 68: Displaying Temperature And Temperature Trend
Displaying temperature and temperature trend The current indoor temperature and the temperature trend (indoors) shown in the LC display. After successfully connecting with the outdoor sensor, the weather station can display the outdoor temperature and the temperature trend (outdoor) . You may see the following displays: The temperature is rising. -
Page 69: Displaying The Maximum / Minimum Temperature / Humidity
= Humidity < 40 % COMFORT = Humidity 40–70 %, indoor temperature 20 °C–28 °C = Humidity > 70 % After a successful connection has been made with the outdoor sensor, the weather station shows the humidity trend (outdoors) and the humidity (outdoors) the LC display. -
Page 70: Temperature And Frost Alarm
Temperature and frost alarm The temperature alarm is a short beep, which sounds as soon as the outdoor temperature exceeds or falls below the preset temperature range. Follow the below procedures to set the desired temperature range. Press the – button to get top the temperature alarm mode. -
Page 71: Background Lighting
If the temperature alarm is activated, the corresponding symbol appears next to the outdoor temperature. The alarm signal sounds at the set values. If the temperature and frost alarm are activated, both symbols appear in the display. Background lighting Press the SNOOZE / LIGHT button . -
Page 72: Troubleshooting
Remove the battery compartment cover on the back of the weather station. Remove the used batteries. Insert 3 new batteries type AA, 1.5 V. Note: Make sure that the polarity is correct when you insert the battery. The correct polarity is shown inside the battery compartment Close the battery compartment. -
Page 73: Cleaning And Care
If the display indicates a problem, move such objects away from the weather station or outdoor sensor or remove the batteries from the weather station or outdoor sensor for a short while and then replace them. Obstacles such as concrete walls can also cause that the reception is disturbed. In this case, change the location (eg near a window). -
Page 74: Disposal
Disposal The packaging is made entirely of recyclable materials, which you may dispose of at local recycling facilities. The Green Dot is not valid for Germany. Observe the marking of the packaging materials for waste separation, which are marked with abbreviations (a) and numbers (b) with following meaning: 1–7: plastics / 20–22: paper and fibreboard / 80–98: com- posite materials. -
Page 75: Warranty
Faulty or used batteries must be recycled in accordance with Directive 2006/66/CE and its amendments. Return the batteries and / or the product through the appropri- ate collection facilities. Environmental damage through incorrect disposal of the batteries! Batteries may not be disposed of with the usual domestic waste. They may contain toxic heavy metals and are subject to hazardous waste treatment rules and regulations. -
Page 76: Information
The warranty period begins on the date of purchase. Please keep the original sales receipt in a safe location. This document is required as your proof of purchase. This warranty becomes void if the product has been damaged, or used or maintained improperly. - Page 77 GB/IE...
- Page 78 Introduction ..................Page Utilisation conforme à l’usage prévu ............Page Description des pièces et éléments ............Page Données techniques .................Page Fourniture ....................Page Sécurité ....................Page Instructions générales de sécurité ............Page Consignes de sécurité relatives aux piles / aux piles rechargeables ..Page Avant la mise en service ............Page Installation des appareils .................Page Mise en service du capteur extérieur ............Page...
- Page 79 Consultation de la pression atmosphérique des dernières 12 heures ..Page 103 Réglage de l‘affichage de la pression atmosphérique ......Page 104 Réglage du canal ..................Page 105 Affichage de la température et de la tendance de température ..Page 106 Affichage de l’humidité de l’air et de la tendance de l’humidité...
-
Page 80: Introduction
Station météo radioguidée Introduction Nous vous félicitons pour l‘achat de votre nouveau produit. Vous avez opté pour un produit de grande qualité. Le mode d‘emploi fait partie intégrante de ce pro- duit. Il contient des indications importantes pour la sécurité, l’utilisation et la mise au rebut. -
Page 81: Description Des Pièces Et Éléments
Description des pièces et éléments Station météo : Affichage de la date Indicateur de confort (maximal / Affichage du mois minimal) Alarme 1 Température ambiante (°C / °F) Affichage SNOOZE Affichage de l’usure des piles Symbole de tour hertzienne Tendance d’humidité de l’air Affichage DST (heure d’été) (extérieur) Affichage de l’heure... -
Page 82: Données Techniques
Prévision météorologique Touche canal (CH) Touche SNOOZE- / LIGHT Touche HISTORY ABS / REL Touche MODE Touche CITY Touche + Boîtier à piles Touche – Capteur extérieur : LED de contrôle Sélecteur de canal Dispositif de suspension Boîtier à piles Touche RESET Données techniques Station météo : Plage de température :... -
Page 83: Fourniture
Capteur extérieur : Plage de température : -20 à +65 °C -4 à +149 °F Plage de mesure Humidité de l’air : 20–95 % Précision Humidité de l’air : Signal de transmission HF : 433 MHz Amplitude de transmission HF : max. 30 mètres (en extérieur) Pile : 2 x AA, 1,5 V (courant continu) -
Page 84: Sécurité
Sécurité Lisez toutes les consignes de sécurité et instructions ! Tout manquement aux consignes de sécurité et instructions peut causer une électrocution, un incendie et de graves blessures. CONSERVEZ TOUTES LES CONSIGNES DE SÉCURITÉ ET INSTRUCTIONS POUR CONSULTATION ULTÉRIEURE ! Instructions générales de sécurité Les enfants sous-estiment souvent les dangers. -
Page 85: Consignes De Sécurité Relatives Aux Piles / Aux Piles Rechargeables
Consignes de sécurité relatives aux piles / aux piles rechargeables DANGER DE MORT ! Rangez les piles / piles rechargeables hors de la por- tée des enfants. En cas d’ingestion, consultez immédiatement un médecin ! RISQUE D‘EXPLOSION ! Ne rechargez jamais des piles non rechargeables. -
Page 86: Avant La Mise En Service
En cas de fuite des piles, retirez-les aussitôt du produit pour éviter tout endom- magement. Utilisez uniquement des piles / piles rechargeables du même type. Ne mélan- gez pas des piles / piles rechargeables usées et neuves ! Retirez les piles / piles rechargeables, si vous ne comptez pas utiliser le produit pendant une période prolongée. -
Page 87: Mise En Service Du Capteur Extérieur
PRUDENCE ! Lors du choix du lieu d’installation de l’appareil, assurez-vous que les appareils ne sont pas exposés aux rayons directs du soleil, à des vibrations, à la poussière, à la chaleur, au froid et à l’humidité. N’installez pas les appareils à proximité... -
Page 88: Mise En Service De La Station Météo
Montage du capteur extérieur : Remarque : Il vous faut une perceuse pour cette étape de travail. Cherchez un emplacement approprié pour le capteur extérieur. Remarque : veillez à monter le capteur extérieur dans un rayon de 30 m par rapport à la station météo. Assurez-vous qu’il n’y ait pas d’obstacles gênants entre le capteur extérieur et la station météo. - Page 89 Remarque : pendant la réception, ne changez pas l’emplacement de la station météo. Sinon, la réception risque d’être entravée. Connexion de la station météo au capteur extérieur et au signal radio DCF : la bande de sécurité des piles ayant été retirée, la station météo tente d’établir une liaison avec le capteur extérieur.
- Page 90 une synchronisation avec l’horloge de référence atomique n’est pas possible, vous pouvez également procéder manuellement au réglage de l’heure (voir « Réglage manuel du mode 12 / 24 h / °C / °F / hPa / inHg/ du fuseau horaire / de l’heure / de la date / de la langue »).
-
Page 91: Utilisation
Utilisation Réception du signal radio DCF Lorsque la connexion au capteur extérieur est établie ou 3 minutes après le retrait de la bande de sécurité des piles, l’horloge de la station météo se met automati- quement à rechercher le signal radio DCF. Cette recherche du signal est affichée sur l’écran à... -
Page 92: Réglage Manuel Du Mode 12 / 24 H / °C / °F / Hpa / Inhg / Du Fuseau Horaire / De L'heure / De La Date / De La Langue
Remarque : si, en raison de défauts, d’une distance trop importante par rapport à l’émetteur etc., l’horloge de la station météo ne peut recevoir le signal radio DCF, vous avez la possibilité de régler l’heure manuellement. Lorsque le signal radio DCF sera capté, les valeurs réglées manuellement sont corrigées. - Page 93 3. Confirmez les saisies par une pression sur la touche MODE. L‘unité de pression atmosphérique clignote à l‘écran. Appuyez sur la touche + ou - afin de régler l‘unité désirée (hPa / inHg). 4. Confirmez les saisies par une pression sur la touche MODE. L’affichage des fuseaux horaires clignote à...
-
Page 94: Régler L'heure Du Réveil
7. Confirmez les saisies par une pression sur la touche MODE. L’affichage des années clignote. Appuyez sur la touche + ou – pour régler la valeur souhaitée. 8. Confirmez les saisies par une pression sur la touche MODE. L’affichage des mois pour la date clignote. -
Page 95: Activation / Désactivation De La Fonction Réveil
4. Validez les entrées par une pression sur la touche MODE. L’affichage des mi- nutes clignote. Répétez l’étape 3 pour régler la valeur des minutes. 5. Validez les entrées par une pression sur la touche MODE. Conseil : maintenez la touche + ou – enfoncée. Ceci permet de régler les valeurs plus rapidement. -
Page 96: Désactivation De L'alarme
Désactivation de l’alarme Appuyez sur n’importe quelle touche à l’exception de la touche SNOOZE / LIGHT pour arrêter le signal d’alarme. Il n’est pas nécessaire de réactiver l’alarme. L’alarme s’active automatiquement à l’heure réglée. Remarque : le signal d’alarme retentit pendant env. 2 minutes. Fonction SNOOZE Pendant que le signal d’alarme retentit, appuyez sur la touche SNOOZE / LIGHT... - Page 97 La station météo affiche les symboles météo suivants : ensoleillé légèrement nuageux nuageux pluvieux FR/BE...
- Page 98 pluie + neige Les symboles météo indiquent les variations météorologiques pour les huit prochaines heures et non la météo actuelle. La station météo peut afficher la tendance de pression atmosphérique Les affichages suivants sont possibles : Pression atmosphérique en hausse. Pression atmosphérique constante. Pression atmosphérique en baisse.
-
Page 99: Sélection Du Site
Sélection du site Appuyez sur la touche CITY . L’affichage du site clignote; la longitude et la latitude sont affichées. Appuyez sur la touche + ou - pour sélectionner votre site. Appuyez sur la touche CITY pour confirmer votre saisie. Si l’abréviation pour votre site n’apparaît pas à... - Page 100 Appuyez sur la touche + ou - pour régler la différence entre votre fuseau horaire et GMT. Appuyez sur la touche CITY pour confirmer votre saisie. Réglez les degrés de latitude et de longitude de votre site de la même manière. Après un court instant, la station météo affiche les heures de lever et de coucher du soleil, les phases lunaires ainsi que la marée basse (TIDE LO), la marée moyenne (TIDE MID) et la marée haute (TIDE TH).
- Page 101 Wels Brest Cagliari Belgium Antwerp Cherbourg- Florence (BE) Octeville Foggia Brugge Clermont- Genua Ferrand Brussels Lecce Dijon Libramont Messina Lille Liege Milan Lyon Bosnia & Sarajevo Naples Her- Marseille Palermo zegovina Metz (BA) Parma Nantes Croatia Split Perugia Nice (HR) Rome Orleans Zagreb...
- Page 102 Eindhoven Slovenia Ljubliana Berne (SI) Groningen Chur Spain Alicante Rotterdam Geneva (ES) The Hague Lucerne Andorra New Zea- Wellington Lugano Badajoz land (NZ) Sion Barcelona Norway Bergen St. Gallen (NO) Bilbao Zurich Lillehammer Cordoba United Aberdeen Oslo Eivissa Ibiza Kingdom Poland Cracow La Coruna...
-
Page 103: Phases Lunaires
Phases lunaires La station météo dispose d’un écran qui affiche automatiquement la phase lunaire actuelle. Nouvelle lune Premier Dernier Lune gibbeuse croissant quartier croissante Pleine lune Lune gibbeuse Dernier Dernier décroissante quartier croissant Consultation de la pression atmosphérique des dernières 12 heures Appuyez à... -
Page 104: Réglage De L'affichage De La Pression Atmosphérique
Réglage de l‘affichage de la pression atmosphérique Les prévisions de cette station météo reposent sur l‘évaluation des changements de pression atmosphérique. L‘affichage de la pression atmosphérique est réglé en usine sur la pression atmosphérique absolue. Étant donné que la pression atmosphérique baisse géné- ralement au prorata de l‘altitude au-dessus du niveau de la mer, le service météo- rologique public indique en général ce qu‘on appelle la pression atmosphérique relative. -
Page 105: Réglage Du Canal
Validez en appuyant sur la touche HISTORY ABS / REL. Votre station météo affiche maintenant la pression atmosphérique relative. Si vous souhaitez que la station météo affiche la pression atmosphérique absolue, procédez comme suit : Appuyez sur la touche HISTORY ABS / REL et maintenez-la enfoncée pendant environ 3 secondes. -
Page 106: Affichage De La Température Et De La Tendance De Température
- 3 : canal capteur extérieur 3 - : changement automatique de canal Affichage de la température et de la tendance de température La température ambiante actuelle et la tendance de température (intérieure) s’affichent sur l’écran à cristaux liquides. Lorsque la connexion au capteur extérieur a réussi, la température extérieure la tendance de la température (extérieure) s’affichent sur l’écran à... -
Page 107: Affichage De L'humidité De L'air Et De La Tendance De L'humidité De L'air
Affichage de l’humidité de l’air et de la tendance de l’humidité de l’air La tendance de l’humidité de l’air (intérieur) actuelle ainsi que l’humidité de l’air (intérieur) actuelle s’affichent à l’écran à cristaux liquides. L’indicateur de confort classe l’humidité de l’air en trois catégories. Les catégories ci-dessous sont disponibles : = Humidité... -
Page 108: Alarme De Température Et De Gel
Les valeurs maximales et minimales de température, d’hygrométrie et de pression de l’air sont automatiquement mémorisées. Lorsque la station météo est en mode d’affichage de l’heure , appuyez sur la touche + pour afficher la valeur maximale. Appuyez deux fois sur la touche + pour afficher la valeur minimale. Maintenez la touche + enfoncée pendant env. -
Page 109: Activation / Désactivation De L'alarme De Température Et De Gel
Activation / désactivation de l’alarme de température et de gel Si plusieurs capteurs extérieurs sont activés, appuyez sur la touche du canal pour en sélectionner un. Appuyez plusieurs fois sur la touche – pour activer l’alarme de température et de gel. Si l’alarme de gel est activée, le symbole correspondant s’affiche à... -
Page 110: Affichage De L'usure Des Piles
Affichage de l’usure des piles Le témoin des piles s’affiche sur l’écran à cristaux liquides lorsque les piles du capteur extérieur sont faibles. Veillez à remplacer les piles à temps (voir « Rem- placement des piles »). Remplacement des piles Station météo : Remplacez les piles lorsque l’écran à... -
Page 111: Dépannage
Insérez 2 piles neuves de type AA, 1,5 V. Remarque : respectez la polarité. Celle-ci est indiquée dans le boîtier à piles Fermez le boîtier à piles. Dépannage Remarque : le produit contient des composants électroniques. Certaines interférences dues aux appareils à transmission radio placés à proximité sont donc possibles. -
Page 112: Nettoyage Et Entretien
Un autre facteur qui peut conduire à des troubles de réception sont les piles vides ou faibles du capteur extérieur. Échangez-les contre des nouvelles. Nettoyage et entretien N’utilisez en aucun cas de liquides ni de produits nettoyants, ceux-ci endom- mageraient le produit. Nettoyez uniquement l’extérieur du produit à... - Page 113 Le produit et les matériaux d’emballage sont recyclables, mettez-les au rebut séparément pour un meilleur traitement des déchets. Le logo Tri- man n’est valable qu’en France. Votre mairie ou votre municipalité vous renseigneront sur les possibilités de mise au rebut des produits usagés. Afin de contribuer à...
-
Page 114: Garantie
Cd = cadmium, Hg = mercure, Pb = plomb. Pour cette raison, veuillez toujours dé- poser les piles usées aux points de collecte municipaux. Garantie Le produit a été fabriqué selon des critères de qualité stricts et contrôlé conscien- cieusement avant sa livraison. En cas de défaillance, vous êtes en droit de retourner ce produit au vendeur. -
Page 115: Informations
sur des composants fragiles, comme des interrupteurs, des batteries ou des élé- ments fabriqués en verre. Informations Déclaration de conformité Nous OWIM GmbH & Co. KG, Stiftsbergstraße 1, DE-74167 Neckarsulm, ALLE- MAGNE déclarons sous notre seule et unique responsabilité que le produit : Station météo radioguidée modèle n° : Z31915 version : 02 / 2017, auquel se rapporte la présente déclaration, est conforme aux normes / documents normatifs de la Direc- tive 1999 / 5 / CE. - Page 116 Inleiding ....................Pagina 118 Correct gebruik ..................Pagina 118 Onderdelenbeschrijving ................ Pagina 119 Technische gegevens ................Pagina 120 Leveringsomvang ................... Pagina 121 Veiligheid ................... Pagina 121 Algemene veiligheidsinstructies ............. Pagina 122 Veiligheidsinstructies voor batterijen / accu‘s ........Pagina 123 Voor de ingebruikname ............
- Page 117 Luchtdruk van de afgelopen 12 uur aflezen ........Pagina 141 Instelling van de luchtdrukweergave ............ Pagina 142 Kanaal instellen ..................Pagina 143 Temperatuur en temperatuurtrend weergeven ........Pagina 144 Luchtvochtigheid en luchtvochtigheidstrend weergeven ...... Pagina 144 Maximale / minimale temperatuur / luchtvochtigheid weergeven ..Pagina 145 Temperatuur- en vorstalarm ..............
-
Page 118: Inleiding
Radioweerstation Inleiding Hartelijk gefeliciteerd met de aankoop van uw nieuwe product. U heeft voor een hoogwaardig product gekozen. De gebruiksaanwijzing is een deel van het pro- duct. Deze bevat belangrijke aanwijzingen voor veiligheid, gebruik en verwijde- ring. Maakt U zich voor de ingebruikname van het product met alle bedienings- en veiligheidsvoorschriften vertrouwd. -
Page 119: Onderdelenbeschrijving
Onderdelenbeschrijving Weerstation: Datumweergave Binnentemperatuur (°C / °F) Maandweergave Batterij-indicator Alarm 1 Luchtvochtigheidstrend (buiten) SNOOZE-weergave Luchtvochtigheid (buiten) Radiomastsymbool Temperatuur- en vorstalarm DST-weergave (zomertijd) (maximaal / minimaal) Tijdweergave Temperatuurtrend (buiten) Alarm 2 Buitentemperatuur (°C / °F) Weekdag-indicatie Batterij-indicatie (buitensensor) Zonsopgang / tijd van de Gekozen kanaal zonsopgang Luchtdruk balkweergave... -
Page 120: Technische Gegevens
HISTORY ABS / REL-toets Batterijcompartiment CITY-toets Buitensensor: Controle-LED Kanaal-keuzeschakelaar Ophanginrichting Batterijcompartiment RESET-toets Technische gegevens Weerstation: Temperatuurmeetbereik: 0 tot +50 °C +32 tot +122 °F Temperatuurresolutie: 0,1 °C Meetbereik luchtvochtigheid: 20–95 % Resolutie luchtvochtigheid: Radiosignaal: Batterij: 3 x AA, 1,5 V (gelijkstroom) Luchtdrukbereik: 850–1050 hPa... -
Page 121: Leveringsomvang
Meetbereik luchtvochtigheid: 20–95 % Resolutie luchtvochtigheid: HF overdrachtssignaal: 433 MHz HF overdrachtsreikwijdte: max. 30 meter (buitenshuis) Batterij: 2 x AA, 1,5 V (gelijkstroom) Beschermingsgraad: IPX4 (spatwaterdicht) Leveringsomvang 1 Weerstation 2 Batterijen AA, 1,5 V (reeds geïnstalleerd) 1 Buitensensor 3 Batterijen AA, 1,5 V 1 Gebruiksaanwijzing (reeds geïnstalleerd) Veiligheid... -
Page 122: Algemene Veiligheidsinstructies
BEWAAR ALLE VEILIGHEIDSTECHNISCHE INSTRUCTIES EN AANWIJZIN- GEN OM DEZE EVENTUEEL LATER TE KUNNEN RAADPLEGEN! Algemene veiligheidsinstructies Kinderen onderschatten de gevaren vaak. Houd kinderen steeds verwijderd van het product. Dit product kan door kinderen vanaf 8 alsmede door personen met vermin- derde fysieke, sensorische of mentale vaardigheden of een gebrek aan erva- ring en kennis worden gebruikt, als zij onder toezicht staan of geïnstrueerd werden met betrekking tot het veilige gebruik van het product en zij de hieruit... -
Page 123: Veiligheidsinstructies Voor Batterijen / Accu's
Veiligheidsinstructies voor batterijen / accu‘s LEVENSGEVAAR! Houd batterijen / accu‘s buiten het bereik van kinderen. Raadpleeg bij inslikken onmiddellijk een arts! EXPLOSIEGEVAAR! Laad niet oplaadbare batterijen nooit op. Sluit de batterijen / accu‘s niet kort en/of open deze niet. Daardoor kan de batterij oververhit raken, in brand vliegen of exploderen. -
Page 124: Voor De Ingebruikname
Gebruik alleen batterijen / accu‘s van hetzelfde type. Gebruik nooit nieuwe en oude batterijen / accu‘s door elkaar! Verwijder de batterijen / accu‘s, als u het product gedurende een langere periode niet gebruikt. Risico op beschadiging van het product Gebruik uitsluitend het aangegeven type batterij / accu! Let bij het plaatsen op de juiste polariteit! Deze wordt aangegeven in het batterijvakje! Reinig indien nodig de contacten aan de batterij en in het batterijvak voor het... -
Page 125: Buitensensor In Gebruik Nemen
Plaats de apparaten niet in de buurt van hittebronnen, bijv. verwarmingen. In het andere geval dreigt gevaar voor schade aan de apparaten. Plaats de apparaten niet zonder een geschikte bescherming op waardevolle of gevoelige oppervlakken. In het andere geval zouden deze beschadigd kunnen raken. -
Page 126: Weerstation In Gebruik Nemen
Buitensensor monteren: Opmerking: voor deze werkzaamheden hebt u een boormachine nodig. Zoek een geschikte plaats voor de buitensensor. Opmerking: denk eraan, de buitensensor binnen een cirkel van 30 m rond het weerstation te monteren. Waarborg dat er zich geen storende hindernissen tussen buitensensor en weerstation bevinden. - Page 127 Opmerking: verander de standplaats van het weerstation niet tijdens de ontvangst van het radiografische signaal. Anders kan dit tot ontvangststoringen leiden. Weerstation met de buitensensor en het DCF-signaal verbinden: Na het verwijderen van de isolatiestrook tussen de batterijen zoekt het weerstation contact met de buitensensor.
-
Page 128: Bediening
Radiografisch signaal (DCF): Het DCF-signaal (tijdsignaalzender) bestaat uit tijdimpulsen, die van een van de nauwkeurigste klokken ter wereld, in de buurt van Frankfurt am Main, Duitsland, worden aangegeven. Uw weerstation ontvangt deze signalen onder optimale omstandigheden tot een afstand van ca. 2000 km rondom Frankfurt / Main. De ontvangst van het radiografische signaal duurt normaal gesproken ca. - Page 129 Opmerking: in gebouwen van staalbeton kan de ontvangst van het radiosignaal negatief worden beïnvloed (zie “Apparaten plaatsen”). Om eventuele afwijkingen met de exacte tijd te corrigeren, voert het weerstation dagelijks om 1:00, 2:00 en 03:00 uur automatisch een synchronisatie met het DCF-radiosignaal uit.
-
Page 130: 24-Uur Formaat / °C / °F / Hpa / Inhg / Tijdzone / Tijd / Datum / Taal Handmatig Instellen
12- / 24-uur formaat / °C / °F / hPa / inHg / Tijdzone / Tijd / Datum / Taal handmatig instellen De ontvangst van het DCF-signaal kan op de standplaats van het weerstation gestoord resp. onderbroken zijn. In dit geval hebt u de mogelijkheid, het apparaat handmatig in te stellen. - Page 131 Opmerking: wanneer u in een land bent waar weliswaar nog steeds het DCF-signaal ontvangen wordt, maar de actuele tijd afwijkt, kunt u de tijdzone- instelling gebruiken om het product op de actuele tijd in te stellen. Wanneer u bijvoorbeeld in een land bent waar de lokale tijd een uur voor de Midden-Eu- ropese tijd (MET) ligt, stelt u de tijdzone in op + 01.
-
Page 132: Wektijd Instellen
8. Bevestig de invoer door op de MODE-toets te drukken. De maandaanduiding van de datumweergave knippert. Druk op de + of – -toets om de gewenste waarde in te stellen. 9. Bevestig de invoer door op de MODE-toets te drukken. De dagaanduiding van de datumweergave knippert. -
Page 133: Wekfunctie Activeren / Deactiveren
5. Bevestig de invoer door op de MODE-toets te drukken. Tip: houd de + of – -toets ingedrukt. Op deze wijze activeert u de functie voor het snelle instellen van de waarden. De functie voor het snelle instellen kunt u ook voor de volgende instelprocessen gebruiken. -
Page 134: Alarmsignaal Uitschakelen
Alarmsignaal uitschakelen Druk, m.u.v. de SNOOZE- / LIGHT-toets op een willekeurige toets om het alarmsignaal te stoppen. U hoeft het alarm niet opnieuw te activeren. Het alarm schakelt in de al ingestelde alarmtijd automatisch in. Opmerking: het alarmsignaal klinkt gedurende ca. 2 minuten. SNOOZE-functie Druk op de SNOOZE- / LIGHT-toets , om in de SNOOZE-modus te komen,... - Page 135 Het weerstation toont de volgende weersymbolen: zonnig licht bewolkt bewolkt regenachtig NL/BE...
-
Page 136: Standplaats Kiezen
regen + sneeuw De weersymbolen tonen de weersveranderingen in de komende acht uur en niet het actuele weer. Het weerstation kan de luchtdruktrend weergeven. De volgende weergaven zijn mogelijk: De luchtdruk zal stijgen. De luchtdruk blijft constant. De luchtdruk zal dalen. Standplaats kiezen Druk op de CITY-toets . -
Page 137: Standplaats Handmatig Kiezen
Druk op de + of – -toets om uw standplaats te selecteren. Druk op de CITY-toets om uw invoer te bevestigen. Wanneer de afkorting voor uw standplaats niet op het display verschijnt, dan kunt u de standplaats zelf in- voeren (zie “Standplaats handmatig selecteren“). Na een korte tijd toont het weerstation de tijden voor de zonsopgang en -onder- gang, de maanfasen alsmede de getijden eb (TIDE LO), gemiddelde waterstand (TIDE MID) en vloed (TIDE TH). - Page 138 Na een korte tijd toont het weerstation de tijden voor de zonsopgang en -onder- gang, de maanfasen alsmede de getijden eb (TIDE LO), gemiddelde waterstand (TIDE MID) en vloed (TIDE TH). U kunt kiezen uit de volgende landen en steden: Germany Berlin München...
- Page 139 Denmark Alborg Rouen Turin (DK) Strasbourg Venice Copenha- Toulouse Verona Greece Athens Liechten- Vaduz Odense (GR) stein (LI) Finland Helsinki Hungary Budapest Luxem- Lussem- (FI) (HU) burg (LU) burgo France Ajaccio Ireland Dublin Monaco Monte (FR) (IE) (MC) Carlo Biarritz Italy (IT) Ancona Nether-...
- Page 140 Poznan Leon United Aberdeen Kingdom Warsaw Madrid (GB) Portugal Faro Malaga Belfast (PT) Palma de Birming- Lisbon Mallorca Porto Salamanca SAL Cardiff Russian St. Peter- Sevilla Glasgow Federa- sburg Valencia tion (RU) Londra Zaragoza Serbia Belgrade Manche- Sweden Gothenburg GOT (RS) ster (SE)
-
Page 141: Maanfasen
Maanfasen Het weerstation beschikt over een weergave die automatisch de actuele maan- stand toont. Nieuwe maan Wassende Halve maan Wassende halve maan volle maan Volle maan Afnemende Halve maan Afnemende volle maan halve maan Luchtdruk van de afgelopen 12 uur aflezen Druk opnieuw op de HISTORY-ABS / REL-toets , om de luchtdrukwaarden van de afgelopen 12 uur te kunnen lezen. -
Page 142: Instelling Van De Luchtdrukweergave
Instelling van de luchtdrukweergave De weersvoorspelling van dit weerstation berust op een analyse van de verande- ring van de luchtdruk. De luchtdrukweergave is vanaf fabriek op de absolute luchtdruk ingesteld. Om- dat de luchtdruk in het algemeen met de hoogte boven NAP daalt, wordt door de openbare meteorologische dienst normaal gesproken de zogenoemde relatieve luchtdruk vermeld. -
Page 143: Kanaal Instellen
Als u wilt, dat het weerstation de absolute luchtdruk weergeeft, dient u als volgt te werk te gaan: Druk de HISTORY ABS / REL-toets en houdt deze gedurende ca. 3 seconden ingedrukt. Druk vervolgens op de + of - -toets, om naar de absolute luchtdruk- weergave te wisselen. -
Page 144: Temperatuur En Temperatuurtrend Weergeven
Temperatuur en temperatuurtrend weergeven De actuele binnentemperatuur en de temperatuurtrend (binnen) worden in het LC-Display weergegeven. Na een succesvolle verbinding met de buitensensor wordt de buitentemperatuur en de temperatuurtrend (buiten) weergegeven. De volgende weergaven zijn mogelijk: De temperatuur stijgt. De temperatuur blijft constant. De temperatuur daalt. -
Page 145: Maximale / Minimale Temperatuur / Luchtvochtigheid Weergeven
= Luchtvochtigheid > 70 % Na een succesvolle verbinding met de buitensensor toont het weerstation de lucht- vochtigheidstrend (buiten) alsmede de luchtvochtigheid (buiten) op het LC- Display. Maximale / minimale temperatuur / luchtvochtigheid weergeven De minimale / maximale temperatuur en de luchtvochtigheid worden na het plaatsen van de batterijen voor het eerst gemeten en in het weerstation opgeslagen. -
Page 146: Temperatuur- En Vorstalarm
Temperatuur- en vorstalarm Het temperatuuralarm is een kort geluidssignaal, dat te horen is, zodra de buiten- temperatuur het aangegeven temperatuurbereik over- of onderschrijdt. Ga voor het instellen van het gewenste temperatuurbereik als volgt te werk: Druk op de – -toets , om de modus van het temperatuur alarm te kiezen. -
Page 147: Achtergrondverlichting
symbool naast de buitentemperatuur. Het alarmsignaal klinkt bij de ingestelde waarden. Wanneer de temperatuur- en vorstalarmen zijn geactiveerd, dan verschijnen beide symbolen op het display. Achtergrondverlichting Druk op de SNOOZE / LIGHT-toets . De achtergrondverlichting brandt gedurende 5 seconden. Batterij-indicator De batterij-indicator verschijnt in het LC-Display van het weerstation wanneer de batterijen bijna leeg zijn. -
Page 148: Storingen Verhelpen
Open het batterijvakje aan de achterzijde van het weerstation. Neem de gebruikte batterijen eruit. Plaats 3 nieuwe batterijen van het type AA, 1,5 V. Opmerking: let daarbij op de juiste polariteit. Deze staat in het batterijvakje aangegeven. Sluit het batterijvakje. Buitensensor: Vervang de batterijen wanneer de batterij-indicatie verschijnt. -
Page 149: Reiniging En Onderhoud
Verwijder dergelijke apparaten uit de reikwijdte van het weerstation / de buiten- sensor of verwijder kortstondig de batterijen uit het weerstation / de buitensensor als het display storingen weergeeft. Hindernissen zoals bijv. betonnen muren kunnen tot gevolg hebben, dat de ont- vangst duidelijk wordt verstoord. -
Page 150: Verwijdering
Reinig het product alleen aan de buitenzijde met een zachte, droge doek. Spuit de buitensensor in géén geval af met bijv. een tuinslang. De buitensensor is alleen bestand tegen regen van boven. Verwijdering De verpakking bestaat uit milieuvriendelijke grondstoffen die u via de plaatselijke recyclingcontainers kunt afvoeren. -
Page 151: Garantie
Gooi het afgedankte product omwille van het milieu niet weg via het huisvuil, maar geef het af bij het daarvoor bestemde depot of het ge- meentelijke milieupark. Over afgifteplaatsen en hun openingstijden kunt u zich bij uw aangewezen instantie informeren. Defecte of verbruikte accu’s moeten volgens de richtlijn 2006/66/EG of aanpas- singen hierop worden gerecycled. -
Page 152: Informatie
Op dit product verlenen wij 3 jaar garantie vanaf aankoopdatum. De garantieperi- ode start op de dag van aankoop. Bewaar de originele kassabon alstublieft. Dit document is nodig als bewijs voor aankoop. Wanneer binnen 3 jaar na de aankoopdatum van dit product een materiaal- of productiefout optreedt, dan wordt het product door ons –... - Page 153 1999 / 5 / EG. Deze documenten kunnen desgewenst worden gedownload van www.owim.com. NL/BE...
- Page 154 Úvod ....................... Strana 156 Použití ke stanovenému účelu..............Strana 156 Popis dílů ....................Strana 157 Technické údaje ..................Strana 158 Rozsah dodávky ..................Strana 159 Bezpečnost ..................Strana 159 Všeobecné bezpečnostní pokyny ............Strana 160 Bezpečnostní pokyny pro baterie ............Strana 160 Před uvedením do provozu ..........
- Page 155 Načtení tlaku vzduchu uplynulých 12 hodin ........Strana 177 Nastaení zobrazení tlaku vzduchu ............Strana 178 Nastavení kanálu ................... Strana 179 Zobrazení teploty a trendu teploty ............Strana 180 Zobrazení vlhkosti vzduchu a trendu vlhkosti vzduchu ....... Strana 180 Zobrazení maximální / minimální teploty / vlhkosti vzduchu ....Strana 181 Alarm pro výstrahu před teplotou a mrazem ........
-
Page 156: Použití Ke Stanovenému Účelu
Bezdrátová meteostanice Úvod Blahopřejeme Vám ke koupi nového výrobku. Rozhodli jste se pro kvalitní produkt. Návod k obsluze je součástí tohoto výrobku. Obsahuje důležité pokyny pro bez- pečnost, použití a likvidaci. Před použitím výrobku se seznamte se všemi pokyny k obsluze a bezpečnostními pokyny. Používejte výrobek jen popsa ným způsobem a na uvedených místech. -
Page 157: Popis Dílů
Popis dílů Meteorologická stanice: Zobrazení data Trend vlhkosti vzduchu (venku) Zobrazení měsíce Vlhkost vzduchu (venku) Alarm 1 Alarm pro výstrahu před teplotou a Indikace funkce SNOOZE mrazem (maximum / minimum) Symbol rozhlasového vysílače Trend teploty (venku) Zobrazení DST (letní čas) Venkovní teplota (°C / °F) Zobrazení... -
Page 158: Technické Údaje
Tlačítko CITY Schránka na baterie Venkovní čidlo: Kontrolní LED Volič kanálu Závěs Schránka na baterie Tlačítko RESET Technické údaje Meteorologická stanice: Rozsah měření teploty: 0 až +50 °C +32 až +122 °F Rozlišení teploty: 0,1 °C Rozsah měření vlhkosti vzduchu: 20–95 % Rozlišení vlhkosti vzduchu: 1 % Rádiový... -
Page 159: Rozsah Dodávky
Rozlišení vlhkosti vzduchu: 1 % VF přenosový signál: 433 MHz VF dosah přenosu: maximálně 30 metrů (ve volném terénu) Baterie: 2 x AA, 1,5 V (stejnosměrný proud) Stupeň krytí: IPX4 (ochrana před stříkající vodou) Rozsah dodávky 1 meteorologická stanice 2 baterie AA, 1,5 V (předinstalované) 1 venkovní... -
Page 160: Všeobecné Bezpečnostní Pokyny
Všeobecné bezpečnostní pokyny Děti často podcení nebezpečí. Chraňte vždy výrobek před dětmi. Tento výrobek mohou používat děti od 8 let, osoby se sníženými fyzickými, smyslovými nebo duševními schopnosti nebo s nedostatečnými zkušenostmi a znalostmi, jestliže budou pod dohledem nebo byly poučeny o bezpečném používání... -
Page 161: Před Uvedením Do Provozu
Vybité baterie ihned z vyjměte z výrobku. Jinak hrozí zvýšené nebezpečí, že baterie vytečou! Baterie nepatří do domovního odpadu! Každý spotřebitel je ze zákona povinen baterie náležitě zlikvidovat! Chraňte baterie před dětmi, neodhazujte baterie do ohně, nezkratujte je a nerozebírejte je. Vyměňujte vždy všechny baterie současně. -
Page 162: Uvedení Venkovního Čidla Do Provozu
POZOR! Při volbě místa instalace se ujistěte, že zařízení nejsou vystavena pří- mému slunečnímu záření, vibraci, prachu, horku, chladu a vlhkosti. Zařízení neumisťujte do blízkosti tepelných zdrojů, např. topných těles. Jinak hrozí poškození zařízení. Zařízení nestavte bez vhodné ochrany na cenné nebo citlivé povrchy. Nedodr- žíte-li tento pokyn, může dojít k jejich poškození. -
Page 163: Uvedení Meteorologické Stanice Do Provozu
Najděte vhodné místo pro venkovní čidlo. Upozornění: Dbejte na to, aby venkovní čidlo bylo namontováno v okruhu 30 m od meteorologické stanice. Ujistěte se, že se mezi venkovním čidlem a meteorologickou stanicí nenacházejí žádné rušivé překážky. Jinak může být rušen přenos dat. Montáž... - Page 164 Spojení meteorologické stanice s venkovním čidlem a rádiovým signálem DCF: Meteorologická stanice se po odstranění pojistného proužku baterie pokusí o navá- zání spojení s venkovním čidlem. Tento postup může trvat několik minut. Symbol -bliká několik minut. V případě úspěšného spojení s venkovním čidlem se na displeji LC zobrazí...
-
Page 165: Obsluha
Rádiový signál (DCF): Signál DCF (vysílač časového signálu) se skládá z časových impulzů, které vysílají nejpřesnější hodiny na světě umístěné v blízkosti Frankfurtu nad Mohanem v Ně- mecku. Vaše meteorologická stanice přijímá tyto signály za optimálních podmínek až na vzdálenost cca 2000 km od Frankfurtu nad Mohanem. Příjem rádiového signálu trvá... -
Page 166: Ruční Nastavení 12 / 24Hodinového Formátu Času / °C / °F / Hpa / Inhg / Časového Pásma / Času / Data / Jazyka
Za účelem opravy případných odchylek od přesného času provádí meteorologická stanice denně v 1:00, 2:00 a 3:00 hodiny automatickou synchronizaci s rádiovým signálem DCF. Příjem rádiového signálu DCF lze na meteorologické stanici spustit také ručně. Stiskněte současně tlačítko + a – . Meteorologická stanice se pokusí při- jmout rádiový... - Page 167 Postupujte následujícím způsobem: 1. Stiskněte tlačítko MODE a držte je stisknuté po dobu cca 3 vteřin. Na dis- pleji bliká „12 Hr“ nebo „24 Hr“. Pro volbu formátu stiskněte tlačítko + nebo – Upozornění: Symbol AM v časovém zobrazení označuje ve 12 hodino- vém formátu času dopoledne.
- Page 168 Poznámka: čas a datum se nastaví automaticky jakmile začne meteorologická stanice přijímat DCF rádiový signál. Jestliže stanice signál nepřijímá nastavte čas a datum manuálně. Tip: Držte stisknuté tlačítko + nebo –. Docílíte tak rychlejšího nastavení hodnot. Rychlé nastavování můžete použít i při úpravě následujících hodnot. Nestisk- nete-li po dobu 20 vteřin žádné...
-
Page 169: Nastavení Času Buzení
Nastavení času buzení 1. Stiskněte krátce tlačítko MODE , abyste se dostali do režimu buzení. Na LC displeji se objeví aktuálně nastavený čas buzení. 2. Stiskněte tlačítko MODE a držte je stisknuté po dobu cca 2 vteřin. Začne blikat zobrazení hodin. 3. -
Page 170: Aktivace / Deaktivace Funkce Buzení
Aktivace / deaktivace funkce buzení 1. Stiskněte jednou nebo dvakrát krátce tlačítko MODE , abyste přešli do režimu ALARM 1 nebo ALARM 2. 2. Stiskněte tlačítko + . Na LC displeji se objeví symbol alarmu 1 nebo symbol alarmu 2 . Alarm je aktivován. 3. -
Page 171: Uvedení Předpovědi Počasí Do Provozu
Uvedení předpovědi počasí do provozu Upozornění: Prosíme, dbejte současně na předpověď počasí místní meteorolo- gické služby. V případě, že dojde k nesrovnalostem mezi předpovědí výrobku a místní meteorologické služby, řiďte se přednostně podle předpovědí místní meteo- rologické služby. Předpověď počasí se vypočítává na základě vyhodnocení výkyvů tlaku vzduchu a může se od skutečného počasí... - Page 172 deštivo déšť + sníh Symboly počasí zobrazují posuny počasí pro příštích osm hodin, nikoliv aktuální počasí. Meteorologická stanice může zobrazit trend tlaku vzduchu Jsou možná následující zobrazení: Tlak vzduchu bude stoupat. Tlak vzduchu zůstává konstantní. Tlak vzduchu bude klesat. 172 CZ...
-
Page 173: Volba Stanoviště
Volba stanoviště Stiskněte tlačítko CITY . Zobrazení stanoviště bliká a zobrazí stupeň ze- měpisné délky a zeměpisné šířky. Stiskněte tlačítko + nebo – pro výběr svého stanoviště. Stiskněte tlačítko CITY pro potvrzení zadání. Pokud se zkratka pro vaše stanoviště neobjeví na displeji, můžete stanoviště zadat ručně (viz „Ruční volba stanoviště“). Po chvíli meteorologická... - Page 174 Po chvíli meteorologická stanice zobrazí časy východu a západu slunce, fáze měsíce a odliv (TIDE LO), střední stav vody (TIDE MID) a příliv (TIDE TH). Lze zvolit následující země a města: Germany Berlin Nürnberg Vienna (DE) Osnabrück OSN Villach Bremen Passau Wels Köln...
- Page 175 Odense Greece Athens Liechten- Vaduz (GR) stein (LI) Finland Helsinki Hungary Budapest Luxem- Lucembur- (FI) (HU) burg (LU) France Ajaccio Ireland Dublin Monaco Monte (FR) (IE) (MC) Carlo Biarritz Italy (IT) Ancona Nether- Amsterdam AMS Bordeaux lands (NL) Bari Brest Arnhem Bolzano Cherbourg-...
- Page 176 Lisbon Palma de Cardiff Mallorca Porto Glasgow Sala- Russian St. Peter- Londýn manca Federa- sburg Manches- Sevilla tion (RU) Serbia Belgrade Valencia Newcastle (RS) Zaragoza upon Tyne Slovakia Bratislava Sweden Gothen- Plymouth (SK) (SE) burg United Los Ange- Kosice Karlstad States Slovenia Ljubliana...
-
Page 177: Fáze Měsíce
Fáze měsíce Meteorologická stanice má k dispozici indikaci, která automaticky zobrazuje aktuální fázi měsíce Dorůstající Poslední čtvrť Dorůstající srpek měsíc Úplněk Couvající Poslední čtvrť Ubývající měsíc srpek Načtení tlaku vzduchu uplynulých 12 hodin Stiskněte opakovaně tlačítko HISTORY-ABS / REL , pro odečtení hodnot tlaku vzduchu za posledních 12 hodin. -
Page 178: Nastaení Zobrazení Tlaku Vzduchu
Nastaení zobrazení tlaku vzduchu Předpověd‘ počasí této stanice je založená na vyhodnocení změny tlaku vzduchu. Zobrazení tlaku vzduchu je z výroby nastavené na absolutní tlak vzduchu. Protože tlak vzduchu klesá se stoupající nadmořskou výškou, udává veřejná meteo- rologická služba tzw. relativní tlak vzduchu. Pro dosažení srovnatelných hodnot se tento relativní... -
Page 179: Nastavení Kanálu
Jestliže chcete, aby ukazovala meteorologická stanice absolutní tlak vzduchu, postupujte následujícím způsobem: Stiskněte a přidržte tlačítko HISTORY ABS / REL na dobu cca 3 vteřin. Potom stiskněte tlačítko + nebo – pro přechod k zobrazení absolutního tlaku vzduchu. Potvrďte Vaše zadání stisknutím tlačítka HISTORY ABS / REL. Nastavení... -
Page 180: Zobrazení Teploty A Trendu Teploty
Zobrazení teploty a trendu teploty Aktuální vnitřní teplota a trend teploty (uvnitř) jsou zobrazeny na LC displeji. Po úspěšném spojení s venkovním čidlem se zobrazí venkovní teplota a trend teploty (venku) . Jsou možná následující zobrazení: Teplota stoupá. Teplota zůstává konstantní. Teplota klesá. -
Page 181: Zobrazení Maximální / Minimální Teploty / Vlhkosti Vzduchu
Po úspěšném spojení s venkovním čidlem zobrazí meteorologická stanice na LC dis- pleji trend vlhkosti vzduchu (venku) i vlhkost vzduchu (venku) Zobrazení maximální / minimální teploty / vlhkosti vzduchu Minimální / maximální teplota / vlhkosti vzduchu se poprvé změří po vložení baterií a uloží... -
Page 182: Alarm Pro Výstrahu Před Teplotou A Mrazem
Alarm pro výstrahu před teplotou a mrazem Teplotní alarm je krátký signál, který zazní jakmile venkovní teplota podkročí nebo překročí nastavený teplotní rozsah. Pro nastavení požadovaného teplotního rozsahu postupujte následujícím způsobem: Stiskněte tlačítko – , abyste se dostali do režimu alarmu pro výstrahu před teplotou. -
Page 183: Podsvícení Displeje
Je-li aktivován alarm pro výstrahu před mrazem, objeví se příslušný symbol vedle zobrazení venkovní teploty. Signál alarmu zazní při teplotách od –1 °C do + 3 °C. Je-li aktivován alarm pro výstrahu před teplotou, objeví se příslušný symbol vedle zobrazení venkovní teploty. Signál alarmu zazní při dosažení nastavených hodnot. Pokud jsou aktivovány alarmy pro výstrahu před teplotou a mrazem, zobrazí... -
Page 184: Odstranění Poruch
Odstraňte kryt schránky na baterie na zadní straně meteorologické stanice. Vyjměte opotřebované baterie. Vložte 3 nové baterie typu AA, 1,5 V. Upozornění: Dbejte přitom na správnou polaritu. Polarita je zobrazena ve schránce na baterie Zavřete schránku na baterie. Venkovní čidlo: Vyměňte baterie, pokud se zobrazí... -
Page 185: Čistění A Ošetřování
Taková zařízení odstraňte z dosahu meteorologické stanice / venkovního čidla nebo krátkodobě vyjměte baterie z meteorologické stanice / vnějšího čidla, pokud se poruchy zobrazí na displeji LC. Překážky, jako například betonové stěny, mohou vést ke znatelnému rušení příjmu. V tomto případě zvolte jiné stanoviště (např. v blízkosti okna). Dbejte na umístění venkovního čidla v okruhu maximálně... -
Page 186: Likvidace
Likvidace Obal se skládá z ekologických materiálů, které můžete zlikvidovat pro- střednictvím místních sběren recyklovatelných materiálů. Zelený bod neplatí pro Německo. Při třídění odpadu se řiďte podle označení obalových materiálů zkrat- kami (a) a čísly (b), s následujícím významem: 1–7: umělé hmoty / 20–22: papír a lepenka / 80–98: složené... -
Page 187: Záruka
Vadné nebo vybité akumulátory se musí, podle směrnice 2006 / 66 / ES a přísluš- ných změn této směrnice, recyklovat. Baterie nebo přístroj odevzdejte zpět do nabí- zených sběren. Ekologické škody v důsledku chybné likvidace baterií! Baterie se nesmí likvidovat v domovním odpadu. Mohou obsahovat jedovaté těžké kovy a musejí... -
Page 188: Informace
Pokud se do 3 let od data zakoupení tohoto výrobku vyskytne vada materiálu nebo výrobní vada, výrobek Vám – dle našeho rozhodnutí – bezplatně opravíme nebo vyměníme. Tato záruka zaniká, jestliže se výrobek poškodí, neodborně pou- žil nebo neobdržel pravidelnou údržbu. Záruka platí... - Page 190 Introducción ..................Página 192 Uso adecuado ..................Página 192 Descripción de las piezas ..............Página 193 Características técnicas ................. Página 194 Volumen de suministro ................Página 195 Seguridad ..................Página 195 Indicaciones generales de seguridad ........... Página 196 Indicaciones de seguridad sobre pilas ..........Página 196 Antes de la puesta en servicio ..........
- Page 191 Consultar la presión atmosférica de las últimas 12 horas ....Página 214 Ajuste del indicador de presión ............Página 215 Ajustar canal ..................Página 216 Mostrar la temperatura y la tendencia de temperatura ...... Página 217 Mostrar la humedad del aire y la tendencia de humedad ....Página 217 Visualizar la temperatura / humedad máxima / mínima ......
-
Page 192: Introducción
Estación meteorológica inalámbrica Introducción Enhorabuena por la adquisición de su nuevo producto. Ha optado por un pro- ducto de alta calidad. El manual de instrucciones forma parte de este producto. Contiene importantes indicaciones sobre seguridad, uso y eliminación. Antes de usar el producto, familiarícese con todas las indicaciones de manejo y de seguri- dad. -
Page 193: Descripción De Las Piezas
Descripción de las piezas Estación meteorológica: Indicación de fecha Temperatura interior (°C / °F) Indicación de mes Indicación del estado de las pilas Alarma 1 Tendencia de la humedad del aire Indicación SNOOZE (exterior) Símbolo de torre Humedad del aire (exterior) Indicación DST (horario de verano) Alarma de temperatura y heladas Indicación de la hora... -
Page 194: Características Técnicas
Tecla MODE Tecla HISTORY ABS / REL Tecla + Tecla CITY Tecla – Compartimento de las pilas Tecla de canal (CH) Sensor exterior: LED de control Selector de canal Dispositivo para colgar Compartimento de las pilas Tecla RESET Características técnicas Estación meteorológica: Rango de temperaturas: 0 hasta +50 °C... -
Page 195: Volumen De Suministro
Sensor exterior: Rango de medición de temperaturas: –20 hasta +65 °C –4 hasta +149 °F Rango de medición de la humedad del aire: 20 – 95 % Resolución de la humedad del aire: Alcance de transmisión HF: 433 MHz Alcance de transmisión HF: máx. -
Page 196: Indicaciones Generales De Seguridad
¡GUARDAR TODAS LAS ADVERTENCIAS E INDICACIONES DE SEGURIDAD PARA FUTURAS CONSULTAS! Indicaciones generales de seguridad Los niños subestiman a menudo los peligros. Manténgalos siempre alejados del producto. Este producto puede ser utilizado por niños mayores de 8 años, así como por personas con capacidades físicas, sensoriales o mentales reducidas o que cuenten con poca experiencia y/o falta de conocimientos, siempre y cuando se les haya enseñado cómo utilizar el producto de forma segura y hayan com-... - Page 197 Retire las pilas del producto si no va a utilizarlo durante un periodo de tiempo prolongado. ¡CUIDADO! ¡PELIGRO DE EXPLOSIÓN! ¡No recargue nunca las pilas! ¡Cuando coloque las pilas, observe la polaridad correcta! Ésta se indica en el compartimento de las pilas. En caso necesario, limpie los contactos de la pila y del aparato antes de introducir las pilas.
-
Page 198: Antes De La Puesta En Servicio
Antes de la puesta en servicio Colocación de los dispositivos Coloque primero las pilas en el sensor externo y después en la estación meteorológica. ¡PRECAUCIÓN! Al elegir un lugar donde colocar los dispositivos, asegúrese de que éstos no están expuestos directamente a radiaciones solares, vibraciones, polvo, calor, frío o humedad. -
Page 199: Puesta En Marcha Del Sensor Exterior
Puesta en marcha del sensor exterior Retire la tapa del compartimento de las pilas en la parte trasera del sensor exterior. Retire la cinta de seguridad de la pila. El sensor exterior ahora está listo para funcionar y el LED de control se ilumina brevemente. -
Page 200: Puesta En Funcionamiento De La Estación Meteorológica
Puesta en funcionamiento de la estación meteorológica Quitar la cinta de seguridad de la pila: Abra la tapa del compartimento de las pilas en la parte trasera de la esta- ción meteorológica. Retire la cinta de seguridad de la pila. A continuación vuelva a cerrar el compartimento de las pilas. - Page 201 Si no se puede ajustar una conexión automática, puede hacerlo de forma manual: 1. Pulse la tecla canal (CH) . El símbolo del canal seleccionado parpadea en la pantalla LCD. 2. Pulse la tecla RESET del sensor externo. En cuanto la estación meteorológica se conecta con el sensor exterior, comienza a recibir automáticamente la señal de radiofrecuencia DCF.
-
Page 202: Manejo
La recepción puede verse considerablemente influenciada por ciertos impedimentos (por ej. por paredes de hormigón) o fuentes de interferencias (por ej. otros apara- tos eléctricos). Cambie la ubicación de la estación meteorológica (p. ej., cerca de una ventana) si se producen problemas de recepción. Manejo Recepción de la señal de radiofrecuencia DCF El reloj de la estación meteorológica comienza a buscar una señal de radiofre-... -
Page 203: Ajuste Manual De Formato De Hora 12 / 24 / °C / °F / Hpa / Inhg / Idioma / Zona Horaria / Hora / Fecha
Pulse simultáneamente la tecla + y – . La estación meteorológica intenta detectar la señal de radiofrecuencia DCF. Esta operación puede durar algunos minutos y en el display LC se muestra el símbolo de la torre de comunicaciones parpadeando. Si no se logra captar la señal de radiofrecuencia DCF, la búsqueda se interrumpe. Nota: Si el reloj de la estación meteorológica no puede recibir la señal debido a algún error, a que se encuentra a demasiada distancia del emisor, o similares, usted puede configurar la hora manualmente. - Page 204 el formato 12 horas y significa “por la mañana”. El símbolo PM en el indicador de la hora sólo está disponible para el formato 12 horas y significa “por la tarde / noche”. 2. Confirme su entrada pulsando la tecla MODE. Aparecerá en la pantalla la unidad de temperatura „ºC“...
-
Page 205: Configurar El Despertador
los siguientes ajustes. Si durante 20 segundos no se presiona ninguna tecla, la pantalla LCD vuelve automáticamente a la visualización estándar. 6. Confirme su entrada pulsando la tecla MODE. El minutero del indicador hora- rio parpadea. Ajuste el valor deseado pulsando la tecla + o –. 7. -
Page 206: Activar / Desactivar La Función De Despertador
3. Pulse la tecla + o – , para ajustar el valor deseado. 4. Confirme su entrada pulsando la tecla MODE. Empezará a parpadear la indi- cación de los minutos. Repita el paso 3 para ajustar los minutos. 5. Confirme su entrada pulsando la tecla MODE. Consejo: mantenga pulsada la tecla + o –. -
Page 207: Desconexión De La Señal De Alarma
Desconexión de la señal de alarma Pulse una tecla cualquiera, a excepción de SNOOZE / LIGHT para detener la alarma. No es necesario que vuelva a activar la alarma. Ésta se activará automáticamente con la hora ajustada. Nota: la señal de alarma se repite durante aprox. 2 minutos. Función SNOOZE Pulse la tecla SNOOZE / LIGHT , para acceder al modo SNOOZE, mien-... - Page 208 La estación meteorológica muestra los siguientes símbolos: soleado ligeramente nublado nublado lluvioso 208 ES...
- Page 209 lluvia + nieve Los símbolos muestran la evolución del tiempo en las últimas ocho horas y no el tiempo actual. La estación meteorológica puede indicar la tendencia de la presión atmosférica Se pueden observar las siguientes indicaciones: La presión atmosférica va a aumentar. La presión atmosférica se mantiene constante.
-
Page 210: Elegir La Ubicación
Elegir la ubicación Pulse la tecla CITY . La indicación de la ubicación parpadea y se mues- tran los grados de longitud y latitud. Pulse la tecla + o – , para seleccionar su ubicación. Pulse la tecla CITY para confirmar su entrada. Si no se muestra la abreviatura de su localidad puede especificarla manualmente (véase “Indicación manual de la ubicación“). - Page 211 Tras breves instantes se muestran los tiempos de la salida y puesta del sol, las fa- ses lunares, marea baja (TIDE LO), nivel medio del mar (TIDE MID) y marea alta (TIDE TH). Puede seleccionar entre los siguiente países y ciudades: Germany Berlin München...
- Page 212 Denmark Alborg Perpignan Triest (DK) Rouen Turin Copenha- Strasbourg Venice Toulouse Verona Odense Greece Athens Liechtens- Vaduz Finland Helsinki (GR) tein (LI) (FI) Hungary Budapest Luxem- Luxem- France Ajaccio (HU) burg (LU) burgo (FR) Ireland Dublin Monaco Monte Biarritz (IE) (MC) Carlo Bordeaux...
- Page 213 Gdansk Las Palmas United Aberdeen Kingdom Poznan Leon (GB) Warsaw Madrid Belfast Portugal Faro Malaga Birmin- (PT) Palma de gham Lisbon Mallorca Cardiff Porto Salamanca SAL Glasgow Russian St. Peters- Sevilla London Federa- burg Valencia Manches- tion (RU) Zaragoza Serbia Belgrade Sweden Gothen-...
-
Page 214: Fases Lunares
Fases lunares La estación meteorológica posee una indicación de la fase lunar actual. Luna nueva Media luna Media luna Luna llena creciente creciente Luna llena Luna llena Media luna Media luna menguante menguante Consultar la presión atmosférica de las últimas 12 horas Pulse varias veces la tecla HISTORY ABS/REL para consultar los valores de presión atmosférica de las últimas 12 horas. -
Page 215: Ajuste Del Indicador De Presión
Ajuste del indicador de presión El pronóstico del tiempo de esta estación se basa en el análisis de los cambios de la presión atmosférica. El indicador de presión viene ajustado de fábrica a la presión absoluta. Puesto que en general la presión atmosférica disminuye a medida que aumenta la altura con respecto al nivel del mar, normalmente en los servicios meteorológicos públicos se utiliza la llamada presión relativa. -
Page 216: Ajustar Canal
Si desea que su estación meteorológica muestre la presión absoluta, proceda del siguiente modo: Mantenga pulsada la tecla HISTORY ABS / REL durante aprox. 3 segundos. A continuación pulse la tecla „+“ o „-“ para cambiar al indicador de presión absoluta. -
Page 217: Mostrar La Temperatura Y La Tendencia De Temperatura
Mostrar la temperatura y la tendencia de temperatura La temperatura interior actual y la tendencia de temperatura se muestra en la pantalla. Una vez que se produce la conexión con el sensor exterior se muestra la tempera- tura exterior y la tendencia de temperatura (exterior) . -
Page 218: Visualizar La Temperatura / Humedad Máxima / Mínima
Están disponibles las siguientes categorías: = Humedad del aire < 40 % COMFORT = Humedad del aire 40–70 %, temperatura interior 20 °C–28 °C = Humedad del aire > 70 % En cuanto el sensor exterior se conecta, la estación meteorológica muestra en panta- lla la tendencia de humedad del aire (exterior) y la humedad del aire (exterior) Visualizar la temperatura / humedad máxima / mínima... -
Page 219: Alarma De Temperatura Y Helada
Alarma de temperatura y helada La alarma de temperatura es una corta señal que suena en cuanto la temperatura exterior sobrepasa o desciende los niveles establecidos. Para ajustar los niveles de temperatura deseados proceda del siguiente modo: Pulse la tecla – para acceder al modo de alarma de temperatura. -
Page 220: Iluminación De Fondo
Si se encuentra activada la alarma de helada se mostrará el símbolo respectivo junto a la temperatura exterior. La señal de alarma suena cuando la temperatura se encuentra entre -1 °C y +3 °C. Si se encuentra activada la alarma de temperatura se muestra el símbolo respectivo junto a la temperatura exterior. -
Page 221: Cambiar Pilas
Cambiar pilas Estación meteorológica: Cambie las pilas cuando la pantalla se vuelva ilegible o se muestre el símbolo de la pila Retire la tapa del compartimento de las pilas de la parte trasera de la estación meteorológica. Retire las pilas agotadas. Introduzca 3 pilas nuevas del tipo 1,5 V / AA. -
Page 222: Eliminar Errores
Eliminar errores Nota: El producto contiene componentes electrónicos. Por ello podría sufrir interferencias por otros equipos de radiotransmisión que se encuentren en las proximidades. Retire este tipo de aparatos del alcance de la estación meteorológica / del sensor exterior, o retire brevemente las pilas de la estación meteorológica / del sensor exterior, cuando la pantalla muestre fallos. -
Page 223: Limpieza Y Mantenimiento
Limpieza y mantenimiento En ningún caso utilice líquidos o productos limpiadores, ya que estos podrían dañar el producto. Limpie el producto solo por fuera con un paño suave y seco. No salpique nunca el sensor externo con agua, p. ej. con la manguera del jardín. - Page 224 Para obtener información sobre las posibilidades de desecho del producto al final de su vida útil, acuda a la administración de su comunidad o ciudad. Para proteger el medio ambiente no tire el producto junto con la basura doméstica cuando ya no le sea útil. Deséchelo en un contenedor de reciclaje.
-
Page 225: Garantía
Garantía El producto ha sido fabricado cuidadosamente siguiendo exigentes normas de calidad y ha sido probado antes de su entrega. En caso de defecto del producto, usted tiene derechos legales frente al vendedor del mismo. Nuestra garantía (abajo indicada) no supone una restricción de dichos derechos legales. Este producto dispone de una garantía de 3 años desde la fecha de compra. -
Page 226: Información
Información Declaración de conformidad Nosotros OWIM GmbH & Co. KG, Stiftsbergstraße 1, DE-74167 Neckarsulm, GERMANY, declaramos en responsabilidad única que el producto: Estación meteorológica inalámbrica, modelo n.° Z31915, versión: 02 / 2017, al que esta declaración hace referencia, cumple con todas las normas / los documentos nor- mativos de 1999 / 5 / CE. - Page 227 Introdução ..................Página 229 Utilização correcta................. Página 229 Descrição das peças ................Página 230 Dados técnicos ..................Página 231 Material fornecido ................. Página 232 Segurança ..................Página 223 Indicações gerais de segurança ............Página 233 Indicações de segurança referentes às pilhas ........Página 234 Antes da colocação em funcionamento ....
- Page 228 Consultar a pressão atmosférica das últimas 12 horas ...... Página 252 Ajuste da pressão atmosférica .............. Página 253 Configurar o canal ................. Página 254 Visualizar a temperatura e tendência de temperatura ......Página 255 Visualizar a humidade do ar e tendência da humidade do ar ..Página 255 Visualizar a temperatura / humidade do ar máxima / mínima....
-
Page 229: Introdução
Estação meteorológica sem fios Introdução Damos-lhe os parabéns pela aquisição do seu novo produto. Acabou de adquirir um produto de grande qualidade. O manual de instruções é parte integrante deste produto. Contém indicações importantes referentes à segurança, utilização e eliminação. Familiarize-se com todas as indicações de utilização e de segurança do produto. -
Page 230: Descrição Das Peças
funções de alarme diferentes. Este produto destina-se apenas ao uso privado e não comercial. Descrição das peças Estação meteorológica: Indicação da data Tendência da humidade do ar Indicação do mês (interior) Alarme 1 Humidade do ar (interior) Indicação SNOOZE Indicador de conforto (máximo / Símbolo da emissora mínimo) Indicação DST (horário de Verão) -
Page 231: Dados Técnicos
Indicador de barras da pressão Botão SNOOZE / LIGHT atmosférica Botão MODE Indicador da pressão atmosférica Botão + na última hora Botão – Pressão atmosférica absoluta / Botão de canal (CH) relativa Botão HISTORY ABS / REL Tendência da pressão atmosférica Botão CITY Previsão meteorológica Compartimento de pilhas... -
Page 232: Material Fornecido
Pilha: 3 x AA, 1,5 V (corrente contínua) Gama da pressão atmosférica: 850 - 1050hPa Sensor exterior: Área de medição da temperatura: –20 a +65 °C –4 a +149 °F Amplitude de medição da humidade do ar: 20 – 95% Resolução da humidade do ar: Sinal de transmissão HF: 433 MHz... -
Page 233: Segurança
Segurança Leia todas as indicações de segurança e instruções. A inobservância das indica- ções de segurança e instruções pode ter como consequência choques eléctricos, incêndios e / ou ferimentos graves. GUARDE TODAS AS INDICAÇÕES DE SEGURANÇA E INSTRUÇÕES PARA FUTURA CONSULTA! Indicações gerais de segurança As crianças frequentemente subestimam os perigos. -
Page 234: Indicações De Segurança Referentes Às Pilhas
Indicações de segurança referentes às pilhas PERIGO DE MORTE! As pilhas podem ser engolidas, o que constitui perigo de morte. Se uma pilha for engolida, deve procurar imediatamente ajuda médica. Retire as pilhas do produto, se este não for utilizado durante muito tempo. CUIDADO! PERIGO DE EXPLOSÃO! Nunca recarregue as pilhas! Ao colocar as pilhas, tenha em atenção a polaridade correcta! Esta é... -
Page 235: Antes Da Colocação Em Funcionamento
Antes da colocação em funcionamento Instalar os aparelhos Coloque as pilhas, primeiro, no sensor exterior e depois na esta- ção meteorológica. CUIDADO! Ao escolher o local de instalação, certifique-se de que os apare- lhos não ficam expostos à luz solar directa, vibrações, pó, calor, frio e humidade. Não coloque os aparelhos nas proximidades de fontes de calor, como por ex., aquecedores. -
Page 236: Colocar O Sensor Exterior Em Funcionamento
Colocar o sensor exterior em funcionamento Retire a tampa do compartimento das pilhas na parte traseira do sensor exterior. Retire a fita de segurança das pilhas. O sensor exterior está agora operacional e o LED de controlo acende-se brevemente. Feche a tampa do compartimento das pilhas. Montar o sensor exterior: Nota: necessita de um berbequim para efectuar este passo. -
Page 237: Colocar A Estação Meteorológica Em Funcionamento
Colocar a estação meteorológica em funcionamento Retirar a fita de segurança das pilhas: Abra o compartimento das pilhas na parte traseira da estação meteorológica. Retire a fita de segurança das pilhas. Volte a fechar o compartimento das pilhas. Assim que a fita de segurança das pilhas for retirada, a estação meteorológica ini- cia a recepção do sinal de radiofrequência. - Page 238 Não consegue fazer uma conexão automática, pode ser feito manualmente da seguinte maneira: 1. Prima a tecla canal (CH) . O símbolo do canal escolhido pisca no visor LC. 2. Prima então a tecla RESET do sensor externo. Assim que a estação meteorológica tiver estabelecido uma ligação com o sensor exterior, esta começa a receber automaticamente o sinal de radiofrequência DCF.
-
Page 239: Utilização
Em condições ideais, a sua estação meteorológica recebe estes sinais até uma dis- tância de aprox. 2000 km de Frankfurt / Main. Normalmente, a recepção do sinal de rádio tem uma duração de aprox. 3–10 minutos. A recepção pode ser limitada de forma significativa por obstáculos (por ex. pare- des em betão) ou fontes de interferência (por ex. - Page 240 Para ajustar eventuais desvios da hora exacta, a estação meteorológica efectua diariamente à 01:00, às 02:00 e às 03:00 horas, e de modo automático, uma sincronização com o sinal de radiofrequência DCF. A recepção do sinal de radiofrequência DCF pode também ser iniciada manual- mente na estação meteorológica.
-
Page 241: Ajustar Manualmente O Formato De 12 / 24 Horas / °C / °F / Hpa / Inhg / Fuso Horário / Hora / Data / Idioma
Ajustar manualmente o formato de 12 / 24 horas / °C / °F / hPa / inHg / fuso horário / hora / data / idioma A recepção do sinal de radiofrequência DCF pode sofrer interferências e / ou in- terrupções no local de instalação da estação meteorológica. - Page 242 Nota: Caso se encontre num país em que ainda receba o sinal de radiofre- quência DCF, mas cuja hora real é divergente, pode utilizar o ajuste do fuso horário para configurar a hora real no produto. Caso se encontre por exem- plo num território cuja hora local seja uma hora antes do fuso horário do cen- tro da Europa (FCE), ajuste o fuso horário a + 01.
-
Page 243: Definir A Hora De Despertar
10. Confirme a sua introdução, premindo o botão MODE. Em vez da indicação do dia da semana , pisca no visor a indicação do idioma. Prima o botão + ou – para selecionar o idioma desejado. Nota: Pode optar entre alemão (GE), inglês (EN), italiano (IT), francês (FR) e espanhol (SP) (alemão está... -
Page 244: Activar / Desactivar As Funções De Despertador
6. Prima o botão MODE duas vezes brevemente quando a estação meteorológica se encontrar na indicação da hora . Prima uma vez brevemente o botão MODE quando a estação meteorológica se encontrar no modo ALARME 1. Acede agora ao modo ALARME 2. 7. -
Page 245: Função Snooze
Função SNOOZE Prima o botão SNOOZE / LIGHT para aceder ao modo SNOOZE enquanto toca o sinal de alarme. O sinal de alarme é emitido novamente após aprox. 5 minutos. Ligar a previsão meteorológica Nota: tenha adicionalmente em atenção a previsão meteorológica do serviço de previsão meteorológica da sua região. - Page 246 ligeiramente nublado nublado chuvoso chuva + neve Os símbolos meteorológicos indicam as alterações meteorológicas das próximas oito horas e não as condições actuais. 246 PT...
-
Page 247: Seleccionar A Localização
A estação meteorológica pode indicar a tendência da pressão atmosférica São possíveis as seguintes indicações: A pressão atmosférica vai aumentar. A pressão atmosférica permanece constante. A pressão atmosférica vai diminuir. Seleccionar a localização Prima o botão CITY . A indicação da localização pisca e é... -
Page 248: Seleccionar Manualmente A Localização
Seleccionar manualmente a localização Prima e mantenha premido o botão CITY durante aprox. 2 segundos. Prima o botão + ou – , para seleccionar a letra inicial da sua localização. Prima o botão CITY para confirmar a sua introdução. Configure a 2ª e 3ª le- tras da mesma forma. - Page 249 Regens- Liege Lyon burg Bosnia & Sarajevo Marseille Rostock Herzego- Metz vina (BA) Saarbrü- Nantes cken Croatia Split Nice (HR) Stuttgart Orleans Zagreb Paris Czech Brno Würzburg (CZ) Perpignan Australia Canbera Prague Rouen (AU) Denmark Alborg Strasbourg Melbourne MEL (DK) Toulouse Sidney Copenha-...
- Page 250 Milan Wellington Spain Alicante Zealand (ES) Naples (NZ) Andorra Palermo Norway Bergen Badajoz Parma (NO) Barcelona Perugia Lilleham- Bilbao Rome Cordoba Oslo San Remo Eivissa Poland Cracow Triest Ibiza (PL) Turin La Coruna Gdansk Venice Las Palmas Poznan Verona Leon Warsaw Liechtens- Vaduz...
- Page 251 Switzer- Basel United Los Angeles LAX land States (CH) (US) Berne Nova Iorque Chur Washington WAS Geneva Lucerne Lugano Sion St. Gallen Zurich United Aberdeen Kingdom (GB) Belfast Birmin- gham Cardiff Glasgow Londres Manches- Newcastle upon Tyne Plymouth...
-
Page 252: Fases Da Lua
Fases da lua A estação meteorológica possui uma indicação que mostra automaticamente a fase actual da lua Lua nova Quarto Meia-lua Quarto cre- crescente (minguante) scente (quase lua cheia) Lua cheia Quarto mingu- Meia-lua Quarto ante (quase (minguante) minguante lua cheia) Consultar a pressão atmosférica das últimas 12 horas Prima de forma repetitiva o botão HISTORY-ABS / REL para poder consultar... -
Page 253: Ajuste Da Pressão Atmosférica
Ajuste da pressão atmosférica A previsão do tempo desta estação meteorológica baseia numa avaliação da alteração da pressão atmosférica. A indicação da pressão atmosférica está ajustada pela fábrica na pressão atmosférica absoluta. Como a pressão atmosférica em geral desce com a altura acima do nível do mar, o serviço meteorológico público indica geralmente a cha- mada pressão atmosférica relativa. -
Page 254: Configurar O Canal
Se quiser que a estação meteorológica indique a pressão atmosférica absoluta, proceda da seguinte maneira: Prima e mantenha premido o botão HISTORY ABS / REL durante aprox. 3 segundos. Prima depois o botão + ou - para alternar entre a indicação da pressão atmosférica relativa ou absoluta. -
Page 255: Visualizar A Temperatura E Tendência De Temperatura
Visualizar a temperatura e tendência de temperatura A temperatura interior actual e a tendência da temperatura (interior) são indicadas no visor LCD. Após a ligação com sucesso ao sensor exterior, a temperatura exterior tendência de temperatura (exterior) são indicadas. São possíveis as seguintes indicações: A temperatura aumenta. -
Page 256: Visualizar A Temperatura / Humidade Do Ar Máxima / Mínima
= Humidade do ar < 40 % COMFORT = Humidade do ar 40–70 %, temperatura interior 20 °C–28 °C = Humidade do ar > 70 % Após a ligação com sucesso ao sensor exterior, a estação meteorológica mostra a tendência da humidade do ar (exterior) e a humidade do ar (exterior) visor LCD. -
Page 257: Alarme De Temperatura E Gelo
Alarme de temperatura e gelo O alarme de temperatura é um sinal acústica curto que soa assim que a tempera- tura exterior subir acima ou descer abaixo da gama de temperaturas ajustada. Para o ajuste da gama de temperaturas desejada proceda da seguinte maneira: Prima o botão –... -
Page 258: Iluminação De Fundo
peratura exterior. O sinal de alarme soa com os valores configurados. Se o alarme de temperatura e gelo estiverem activos, surgem ambos os símbolos no visor. Iluminação de fundo Prima o botão SNOOZE / LIGHT . A iluminação de fundo acende-se du- rante 5 segundos. -
Page 259: Eliminar Erros
Retire a tampa do compartimento das pilhas na parte traseira da estação me- teorológica. Retire as pilhas gastas. Coloque 3 pilhas novas do tipo AA, 1,5 V. Nota: tenha em atenção a polaridade correcta. Esta é indicada no comparti- mento das pilhas Feche o compartimento das pilhas. -
Page 260: Limpeza E Conservação
Retire estes aparelhos do alcance da estação meteorológica / do sensor exte- rior, ou remova momentaneamente as pilhas da estação meteorológica / do sensor exterior se o visor apresentar interferências. Obstáculos como, p. ex., paredes de betão, também podem provocar a perturbação da receção. -
Page 261: Eliminação
Eliminação A embalagem é feita de materiais não poluentes que podem ser eliminados nos contentores de reciclagem locais. O ponto verde não vale para a Alemanha. Esteja atento à especificação dos materiais da embalagem para a separação de lixo. Estas são identificadas com abreviações (a) e núme- ros (b) com o seguinte significado: 1–7: Plásticos / 20–22: Papel e papelão / 80–98: Materiais compostos. -
Page 262: Garantia
As pilhas avariadas ou gastas têm de ser recicladas de acordo com a iretiva 2006 / 66 /CE e as suas alterações. Devolva as pilhas e/ou o aparelho nos locais específicos destinados à sua recolha. Danos ambientais devido à eliminação incorrecta das pilhas! As pilhas não podem ser eliminadas no lixo doméstico. -
Page 263: Informações
Caso num espaço de tempo de 3 anos a partir da data da compra deste producto surja um erro de material ou de fabrico, o producto será reparado ou substituído por nós – segundo a nossa escolha – e sem qualquer custo. Esta garantia expira se o producto estiver danificado, se não for devidamente utilizado ou se não for efec- tuada a devida manutenção. - Page 264 normativos da Directiva 1999 / 5 / CE. Se necessário, pode descarregar estes documentos em www.owim.com. 264 PT...
- Page 267 Version: 02 / 2017 Stand der Informationen · Last Information Update · Version des informations · Stand van de informatie · Stav informací · Estado de las informaciones · Estado das informações: 01 / 2017 · Ident.-No.: Z31915012017-8 IAN 282650...
Need help?
Do you have a question about the 282650 and is the answer not in the manual?
Questions and answers