
Related Manuals for Ropox FlexiBasic 30-63 Series


Summary of Contents for Ropox FlexiBasic 30-63 Series
- Page 1 Ropox FlexiBasic 30-63XXX User manual Mounting instruction This folder must always be kept with the product! PA 2004 00634 PDF 5996 / 28.05.2019...
-
Page 2: Table Of Contents
Content: INTRODUKTION ..............................3 COMPLIANCE WITH EU-DIRECTIVES ......................3 APPLICATION ..............................3 TEKNICAL DATA FLEXIBASIC ........................4 SUPPLY POINTS, WATER SUPPLY AND WASTE ..................5 Tips og tricks ..............................6 5.1.1 Tension in upper bolts of Flexi frames ......................6 MOUNTING INSTRUCTIONS, ILLUSTRATIONS .................. -
Page 3: Introduktion
Introduktion You have chosen FlexiBasic, the multi-flexible, height-adjustable, easy-to-mount frame. The frame may be used separately or in combination with Verti or Diagonal, the adjustable system for wall cupboards. The frame has no inconvenient fascia and, consequently, the adjustment of the working height from 65 to 95 cm + worktop thickness may be fully utilised. -
Page 4: Teknical Data Flexibasic
Chromite, Powder coating, Standard RAL 9010, mat white Max. load of frame: 150 kg evenly distributed over the entire worktop Temperature: 5-45°C Air humidity: 5-85% (non-condensing) Complaints: See complaints, page 20. Manufacturer: Ropox A/S, DK-4700 Naestved, Tel.: +45 55 75 05 00 Side 4... -
Page 5: Supply Points, Water Supply And Waste
Supply points, water supply and waste L = 60-300 cm B = MAX 200 cm A = MAX 50 cm MAX 50 cm = C Length of Aluminum profile = Length of worktop minus 5 cm It is important to use flexible hoses for water supply and waste to ensure that the FlexiBasic will move freely without obstacles within the height adjustment range 65-95 cm. -
Page 6: Tips Og Tricks
Tips og tricks 5.1.1 Tension in upper bolts of Flexi frames Calculation has been done for ONE leg, which will be worst case. Worktop 62 cm deep. Max. Permissible load at the Flexi frame is 150 Kg, evenly distributed. In this example we have put the max. 62 cm 150 Kg Load in the front of the worktop. -
Page 7: Mounting Instructions, Illustrations
Mounting instructions, illustrations The equipment should always be assembled by competent personnel. Prior to assembly check that all parts have been provided. See list of components, from page15. See also mounting instructions page 11. 9 cm – Max 50 cm 2,5 -43,5cm 6.1.1 6.1.2... - Page 8 6.5.1 6.4.2 2,5 cm 6.5.2 6.5.3 6.6.1 6.6.2 6.8.1 6.7.1 Side 8...
- Page 9 6.9.1 6.8.2 6.11.1 6.10.1 6.11.3 6.11.2 6.11.4 Side 9...
- Page 10 6.12.1 6.12.2 6.13.1 6.13.2 Upper consealment panel L= Length of Worktop 6.14.1 6.14.2 L= Length of Worktop L= Length of Worktop Lower consealment panel Lower consealment panel in case of supporting feet 8 cm 8 cm Distance between feet 6.14.3 6.14.4 Side 10...
-
Page 11: Mounting Instructions, Descriptions
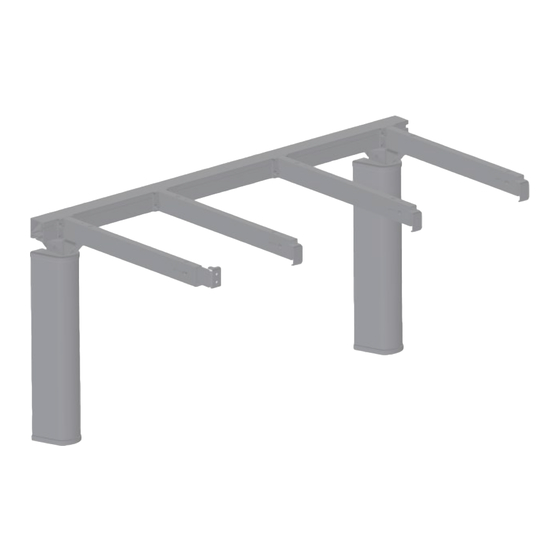
Mounting instructions, descriptions The equipment should always be assembled by competent personnel. Prior to assembly check that all parts have been provided. See list of components, from page 15. See also mounting drawings page 7. Assembly of frame 6.1.1 Push the legs into the groove of the lower side of the aluminium profile. 6.1.2 Position the adjustable legs on the aluminium profile, 2,5 cm from the left edge. -
Page 12: Mounting The Worktop
6.4.2 On the outermost support arms we recommend pointing the front fascia fittings towards the middle of the frame to prevent them from conflicting with the side fascia. Mounting the worktop 6.5.1 Place the tabletop on the frame. The maximum permissible distance from the back of the tabletop to the wall is 0.5 cm. -
Page 13: Adjusting The Height Of The Worktop, By Using The Jack-Up Unit
Now press in the snap lock to lock it. 6.14 Mounting the concealment panels Option: Fittings for mounting the concealment panels (panels not supplied by Ropox) For three-legged frames use two sets of fittings. 6.14.1 Inside/lower concealment panels: Fasten the Z-fittings to the wall in the middle between the legs. -
Page 14: Performance Test
6.14.2 Dimension sketch outside/upper concealment panel. The length is identical with the length of the worktop. The height must be 45 cm. 6.14.3 Dimension sketch inside/lower concealment panel. The length is identical with the length of the worktop. The height must be 40 cm. 6.14.4 Inside/lower concealment panel (in case of supporting feet). - Page 15 Support arm for worktop depth 70-72 cm 30-67621: Length of worktop = 60-104 cm 2 pcs. Length of worktop = 105-204 cm 4 pcs. Length of worktop = 205-254 cm 5 pcs. Length of worktop = 255-300 cm 7 pcs. Support arm for worktop depth 58-60 cm 30-67624: Length of worktop = 60-104 cm 2 pcs.
-
Page 16: Safety In Use
If the Flexi frame has not been installed in accordance with these mounting instructions, the guarantee may become void. ➢ Only use Ropox original spare parts as replacement parts. If other spare parts are used, the guarantee may become void. Cleaning and maintenance 11.1 Cleaning... -
Page 17: Service Schedule, Operation And Maintenance
11.3 Service schedule, operation and maintenance Service and maintenance Serial Service and maintenance Serial No.: No.: Date: Date: Sign: Sign: Remarks: Remarks: Service and maintenance Serial Service and maintenance Serial No.: No.: Date: Date: Sign: Sign: Remarks: Remarks: Side 17... -
Page 18: Trouble Shooting
Trouble shooting a) The frame seems loose or unstable The screws assembling the frame have not been securely tightened. Tighten all screws, cf. mounting instructions. b) The worktop is not horizontal in relation to the wall After installation of the frame the worktop will be loaded. This deflection may be balanced by repeating item 6.8 ”Adjusting the Support arms”... -
Page 19: Ce-Marking
CE – Declaration of conformity I, the undersigned, hereby declare that the following products: Ropox FlexiBasic incl. Jack-up unit 30-63xxx-x Declared products belong to risk class 1 cf. rule 4.1 of Annex 8 of Regulation (EU) 2017/745 of the European... -
Page 20: Complaints
Complaints We refer to our general Terms of sale and delivery on our homepage www.ropox.com ROPOX A/S Ringstedgade 221 DK – 4700 Næstved Tel.: +45 55 75 05 00 Fax.: +45 55 75 05 50 E-mail: info@ropox.dk www.ropox.com Side 20...
Need help?
Do you have a question about the FlexiBasic 30-63 Series and is the answer not in the manual?
Questions and answers