
Related Manuals for biodex NxSTEP 950-485


Summary of Contents for biodex NxSTEP 950-485
- Page 1 NxSTEP™ UNWEIGHING SYSTEM INSTRUCTIONS FOR USE AND ASSEMBLY 950-485 945-480 FN: 16-136CLR Rev C 5/19...
-
Page 2: Contact Information
950-485 and 945-480. Additional information and resources are available upon request or directly from the Biodex website, www.biodex.com. If the desired information is not found, please feel free to contact a local distributor or Biodex directly at supportservices@biodex.com Thank you, Biodex Medical Systems, Inc. -
Page 3: Table Of Contents
NxStep Unweighing System Operation ................12 The Hand-Held Controller .................... 16 The Battery Pack ......................16 Positioning NxStep for Use with the Biodex Gait Trainer or Treadmill ......17 Free Wheeling ......................18 Jogging ........................18 ... -
Page 4: Definition Of Symbols
Definition of Symbols The following symbols and their associated definitions are used and implied throughout this manual. -
Page 5: Before Proceeding
Biodex personnel is detected during inspection. CAUTION: Ensure that the support rope safety stop does not come in contact with the support bar pulley when either a Biodex supplied harness or other manufacturer’s harness is used to support the patient. -
Page 6: Product Certifications And Classifications
60601-2 EMC Standard. NOTE: Complete information on the Electromagnetic Compatibility for the NxStep system can be found in the Compliance Supplement located on the Biodex website (www.biodex.com) or can be obtained by contacting Biodex Customer Service (see Contact information). Authorized European Community Representative:... -
Page 7: Important Safety Information
WARNING: Use approved wall pack adapters. User Capacity • Height: up to 78 inches (6 ft, 3 in) (191 cm) • Weight: up to 400 lb Biodex Warranty Refer to the warranty card included with the product or contact Biodex Support Services. -
Page 8: Introduction
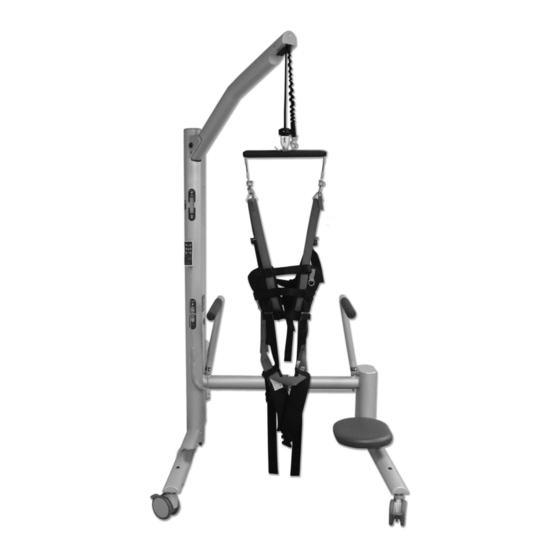
1. Introduction Intended Use The NxStep Unweighing System is used for Partial Body-Weight Support with the • capability to unload up to 30-40 percent weight bearing for patients with gait impairments. It is a versatile product, providing capabilities for patients with lower extremity •... - Page 9 Figure 1.1. The NxStep Unweighing System parts and adjustments include: Standard Parts and Adjustments: 13. Hand-Held Controller 1. Safety Tether 14. Therapist Stool 2. Support Bar with Donut 3. Main Column Not shown: 4. Allen Wrench (stored in slot near battery pack) Battery Pack 5.
- Page 10 Training Biodex supplements on-site training with many training resources. For detailed information on the NxStep System: Visit www.biodex.com and register for the NxStep eLearning course by navigating to: • Physical Medicine/Education & Training/Training: Interactive eLearning. https://www.biodex.com/physical-medicine/biodex- university/training-interactive-elearning NOTE: There are also courses for clinical applications of Biodex products for Stroke, Parkinson’s, and Peripheral Neuropathy.
-
Page 11: Assembly Instructions
Ensure that the NxStep will be assembled on a level surface. Ensure that there is enough room to easily move around the NxStep frame during installation. Figure 2.1. The Biodex NxStep in the fully compressed Assembly Procedure position. -
Page 12: Nxstep Unweighing System Operation
CAUTION: The system uses a special harness to support the patient. It is vital that the harness fits properly on the patient. Refer to the video available on the Biodex website. Straight Hanger Bar with Quick Disconnect The straight hanger bar is illustrated in Figure 3.1 below. - Page 13 Figure 3.2. Quick Disconnect Apparatus Illustrating Quick Release Pin. Reconnect to the Single Point harness either directly or using a carabiner. Figure 3.3. Direct Connection to a Single Point Harness.
- Page 14 Steering Casters The NxStep has four locking casters. The rear casters have two lever positions: Lever down: the wheel is locked. • Lever up: wheel is unlocked and rolls and swivels in any direction. • The front casters have three lever positions: Lever down: the wheel is locked.
- Page 15 Installing and Removing the Handrails Figure 3.5. The handrail release button. The handrails can be used to assist the patient, or removed to provide more of a challenge. To install or remove the handrails, push in on the appropriate handrail release button. The Therapist Stool NOTE: Setting up the Therapist Stool, Hand-Held Controller, and Battery Pack, are all fully explained in the Preparing the NxStep for First Use segment of the NxStep eLearning Course.
-
Page 16: The Hand-Held Controller
The Hand-Held Controller The hand-held controller is used to easily raise or lower the patient harness bar, adjust the amount of weight to unload from the patient, or to turn the auto unload feature ON or OFF for unweighing activities. The controller is magnetic, allowing for easy-to-reach positioning anywhere along the main column when not being held by the therapist. -
Page 17: Positioning Nxstep For Use With The Biodex Gait Trainer Or Treadmill
Therapist Stool are detailed in the Clinical Applications Overview: Treadmill Training segment of the NxStep eLearning course. Figure 3.8. The NxStep ready for use with the Biodex Gait Trainer. The NxStep can be positioned for use with treadmills to 38" w and 13.5'' h (97 x 34 cm). -
Page 18: Free Wheeling
Free Wheeling Figure 3.9. The NxStep ready for free-wheeling across the floor. The NxStep can be used over the floor or with other exercise devices. Be aware of the adjustments required when moving from one device to another. For example, when stepping down from a treadmill, the step-up height of the treadmill must be taken into account;... -
Page 19: Pelvic Stabilization Straps (Retention Cords)
Pelvic Stabilization Straps (Retention Cords) NOTE: Using the Biodex Standard Unweighing Harness for additional pelvic support is covered in a video that is offered at www.biodex.com/harness. If desired, use the two included pelvic stabilization straps for additional support during partial body weight support activities. -
Page 20: Safety Tether Operation
Standing Harness Application NOTE: Applying the harness while the patient is in a standing position is covered in the NxStep eLearning course and a video that is offered at www.biodex.com/harness. Sitting Harness Application NOTE: Applying the harness while the patient is in a seated position is covered in the NxStep eLearning course and a video that is offered at www.biodex.com/harness. -
Page 21: Determination Of Body Weight Support
NOTE: Instructions for unloading patient weight are detailed in the Using the Unweighing System segment of the NxStep eLearning course. To watch the video detailing the process, please go to www.biodex.com/elearning. The patient unweighing load can set either manually or using the Auto Unload feature. - Page 22 Figure 3.12. The Unweighing Load Range Scale is Located on the Main Column. NOTE: To view a video detailing harness fitting and adjustment, visit: www.biodex.com/harness. 5. Using the hand-held controller, set the unweigh load for the patient with the UNWEIGH LOAD <UP>...
- Page 23 CAUTION: Do not let the patient harness bar touch the pulley or support bar. CAUTION: Ensure the safety tether is connected before the patient starts to exercise. To ensure patient safety, the safety tether must be connected whenever unweighing activities are conducted. 7.
-
Page 24: Maintenance And Safety Inspection
4. Maintenance and Safety Inspection NOTE: The Maintenance and Safety Inspection Information is detailed in the Maintenance and Safety Inspection segment of the NxStep eLearning course. Disposal An appropriate waste disposal company is to be contacted (i.e., the local collection point for waste separation). -
Page 25: References And Bibliography
5. References and Bibliography For a sampling of specific applications and biographical references, please visit the applications tab at www.biodex.com. Use the chart below as a quick reference for determining unweighing percentages:... -
Page 26: Specifications
6. Specifications Dimensions: Operational: I.D. 38.8" w x 48" depth x 94" h (99 x 122 x 239 cm) O.D. 47.5" w x 48" depth x 94" h (121 x 122 x 239 cm) Suitable for use with 8' ceilings (244 cm) or higher. Retracted (not for operation): O.D.
Need help?
Do you have a question about the NxSTEP 950-485 and is the answer not in the manual?
Questions and answers