Table of Contents
Advertisement
Quick Links
Advertisement
Table of Contents

Related Manuals for biodex ATOMLAB 960


Summary of Contents for biodex ATOMLAB 960
- Page 1 ATOMLAB 960 (PC) MEDICAL SPECTROMETER OPERATION/SERVICE MANUAL 187-600 187-601 IODEX Biodex Medical Systems, Inc. 20 Ramsey Road, Shirley, New Y ork, 11967-4704, Tel: 800-224-6339 (Int’l 631-924-9000), Fax: 631-924-9241, Email: info@biodex.com, www.biodex.com FN: 12-227 Rev E 4/15...
- Page 2 Atomlab 960 (PC) Medical Spectrometer This manual contains installation and operation procedures for the following products: 187-600 120 VAC, Mobile, Thyroid Uptake System, Atomlab 960 187-601 230 VAC, Mobile, Thyroid Uptake System, Atomlab 960 ATOMLAB 960 MEDICAL SPECTROMETER...
-
Page 3: Table Of Contents
International Date/Time/Number Format Settings ..........2-10 3 - COMPUTER PRELIMINARIES ......................3-1 Windows Format ...................... 3-1 Touch Screen And Keyboard Operation ..............3-1 The Atomlab 960 Home Page ................... 3-1 System-Wide Icons ....................3-2 Turning The System Off ................... 3-3 Locking the Panel ..................... 3-4 4 - UTILITIES ............................. - Page 4 Delete an Isotope from Staff Member ..............4-35 SYSTEM MAINTENANCE ..................... 4-36 Checkpoint Database ..................... 4-37 Backup Database (USB flash drive) ................4-38 Restore Database ....................4-39 5 - QUALITY ASSURANCE ........................5-1 QUALITY ASSURANCE INFORMATION ................5-2 CALIBRATION/CONSTANCY FIXTURES ................5-3 ATOMLAB 960 MEDICAL SPECTROMETER...
- Page 5 Count In Manual Mode ..................... 7-1 8 – WIPE TESTING ........................... 8-1 Wipe Introduction ..................... 8-1 Perform A Wipe Test ....................8-2 9 – PERFORMING BIOASSAY ....................... 9-1 Perform A Bioassay Test ................... 9-1 Biodex Medical Systems, Inc. © 2014...
- Page 6 APPENDIX B – SPECIFICATIONS ......................B-1 APPENDIX C – ELECTROMAGNETIC COMPATIBILITY ............... C-1 APPENDIX D – ERROR AND INFORMATION MESSAGES ............D-1 APPENDIX E – DECAY CALCULATIONS ..................E-1 APPENDIX F – FORMULAS ........................F-1 APPENDIX G – SCHEMATICS ....................... G-1 ATOMLAB 960 MEDICAL SPECTROMETER...
-
Page 7: Definition Of Symbols
Dangerous Voltage “On” Power “Off” Power Earth (ground) Alternating Current Fuse USB Connector/Cable Waste in Electrical Equipment Date of Manufacture Type B Applied Part CE Mark CE Mark Certified for Safety by ETL Intertek Biodex Medical Systems, Inc. © 2014... -
Page 8: Before Proceeding
100 to 240 volts input current. The uptake stand has a low leakage transformer that operates at 120 volt or 230 volt operation. The transformer is tapped at the factory for operation. The Atomlab 960 Thyroid Uptake System is designed for use with specific printers. Contact Biodex for compatible printers. - Page 9 • Weight: up to 500 lb • Age: infants to adults Nuclear Technologist: This product accommodates nuclear technologists fitting the following profile: • 5th percentile female, 20-65 years of age to 95th percentile male, • 20-65 years of age Biodex Medical Systems, Inc. © 2014...
-
Page 10: Product Certifications And Classifications
Product Certifications and Classifications The Atomlab 960 Thyroid Uptake System has received the following certifications, and falls within the following classifications: ETL Listed Electrical Equipment, Laboratory Use; Part 1, General Requirements for Safety • conforms to IEC 60601-1-6, IEC 60601-1-6 2... -
Page 11: Important Safety Information
Proceeding section of this manual. This product should be used only as specified in the operation manual. The Atomlab 960 Mobile Thyroid Uptake System is designed for use in a patient environment. Le système de captation Atomlab 960 Mobile thyroïde est conçu pour une utilisation dans un environnement de patient. - Page 12 One person can move the product. ATTENTION: Le produit est voulu rester dans un emplacement pendant l'opération. Le produit est fourni avec les roues pour la relocalisation, et devrait être utilisé en exécutant cette opération. Une personne peut déplacer le produit. ATOMLAB 960 MEDICAL SPECTROMETER...
-
Page 13: Unpacking Instructions
• Medium Phillips Head Screwdriver The Biodex Thyroid Uptake System you have purchased is shipped in a box on a pallet that contains a ramp as part of the packing material. This ramp can be easily assembled to make it possible to remove the system from the shipping pallet. - Page 14 Lift up slightly, and remove this block. Using two people, grab the handles on the upper rack to remove unit. Using a person on each side, lift the unit slightly while rolling towards and then down the ramp. ATOMLAB 960 MEDICAL SPECTROMETER...
-
Page 15: Warranty
INDIRECT DAMAGES INCLUDING LOSS OF USE, SALES, PROFITS OR BUSINESS INTERRUPTION. B. This warranty does not apply if the product, as determined by BIODEX MEDICAL SYSTEMS, INC., is defective due to abuse, misuse, modification or service performed by other than a BIODEX MEDICAL SYSTEMS, INC. authorized repair and calibration facility. - Page 16 1. Check to see that the problem occurs more than once. 2. Refer to the instruction manual and operations procedure. If you still think you have a service problem, call BIODEX MEDICAL SYSTEMS, INC., Service Department at (800) 224-6339. Keep yourself and the phone next to the equipment.
-
Page 17: Introduction
(cpm), using a 1024 channel multi-channel analyzer. The counting spectrum is displayed during counting. The Atomlab 960 can be used to perform thyroid uptake studies, manual mode counting, wipe testing, and bioassay measurements. Each detector is connected to a multi-channel analyzer. The detectors are used to count radiation that hits the detector for the various functions they are used for. -
Page 18: General Cleaning Instructions
User-defined uptake protocols can be initiated. The self-contained Atomlab 960 system is configured on a compact mobile platform with locking casters and a base that measures only 26" w by 34" l (66 x 86.4 cm). An upper shelf supports the flat panel PC with touch-screen display and keyboard. -
Page 19: Components And Parts
Components and Parts The following list shows all components available for the Atomlab 960 System. Before beginning to setup and position your new Atomlab 960 Uptake System, check to ensure that you have received each of the components and parts ordered. -
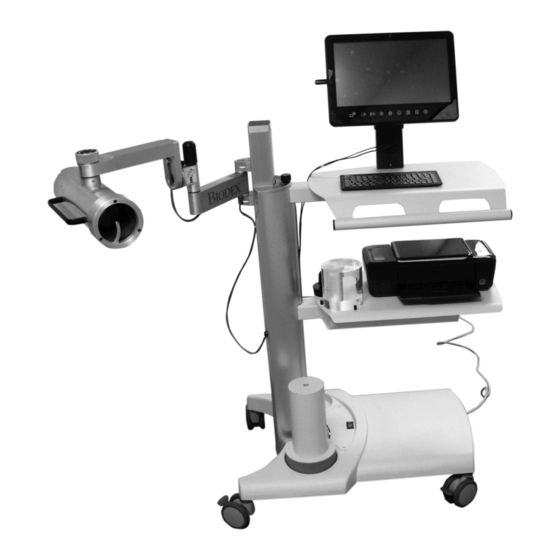
Page 21: Assembly And Uptake Stand Operation
PRINTER COLLIMATOR HANDLE NECK PHANTOM PRINTER SHELF TARGET LED HANDLE CALIBRATION FIXTURE POWER CORD BASE WELL COUNTER IN RECESS CASTER LOCK POWER SWITCH Figure 2.1. The Atomlab 960 MCA Uptake Stand. ATOMLAB 960 MEDICAL SPECTROMETER ASSEMBLY AND STAND OPERATION 2-1... -
Page 22: Assembly
10. The collimator is pre-wired for the uptake arm. If using a well counter, connect the power and signal cables to the well counter. The cables are in the column. The Atomlab 960 is now fully set up and ready for operation. HP Printer Setup (included with system) Upon power up, you will find that the system defaults to the Microsoft XPS document writer. -
Page 23: Relocating The Thyroid Uptake Stand
Roll the stand to the desired position and lock at least two casters to keep it from moving. Figure 2.2. Relocating the Thyroid Uptake Stand. ATOMLAB 960 MEDICAL SPECTROMETER ASSEMBLY AND STAND OPERATION 2-3... -
Page 24: Thyroid Uptake Stand Operation
à angle droit avec le fantôme de cou et de la thyroïde afin qu'il soit positionné correctement pour le comptage pour conserver la géométrie correct e The Atomlab 960 is now fully set up and ready for operation. 2-4 ASSEMBLY AND STAND OPERATION... -
Page 25: Power-Up And Self-Test
Turn on all components, including the printer. The system may immediately advance to the Atomlab 960 program. If not, select the <Atomlab960> icon from the system desktop. Once the Atomlab 960 program is activated, the system immediately performs a self-test. -
Page 26: How To Change The Date/Time And Time Zone
“Biodex”.) NOTE: When performing this operation, we recommend connecting a USB mouse to the panel. 1. Exit out from the Atomlab 960 Application by selecting the (X) button from the Home screen. Figure 2.4. The Atomlab 960 Home page. - Page 27 Figure 2.6. Desktop screen with <Change date and time settings> button highlighted. 5. On the next screen, to change the Date and time, select the “Change Date and Time” button. Or, to change the time Zone select the “Change Time Zone” button. ATOMLAB 960 MEDICAL SPECTROMETER ASSEMBLY AND STAND OPERATION 2-7...
- Page 28 Figure 2.8. Date and Time Settings window with calendar and time field highlighted. 8. When finished changing the time settings, select <OK>. 9. To change the time zone, select <Change time zone>. 2-8 ASSEMBLY AND STAND OPERATION Biodex Medical Systems, Inc. © 2014...
- Page 29 Automatically adjust clock for Daylight Saving Time check box is selected. 11. Select <OK> button at the bottom of the Date and Time screen to return to the desktop. ATOMLAB 960 MEDICAL SPECTROMETER ASSEMBLY AND STAND OPERATION 2-9...
-
Page 30: International Date/Time/Number Format Settings
Atomlab 960 software to be changed from the English Date format to the Swedish Date format. Regional Settings of the Panel From the Main Menu screen of the Atomlab 960 software, select the <X> mark from the top right corner of the screen. Then select the <Exit to Desktop> option. This will bring up the desktop screen on the Panel. - Page 31 (United States). Make the changes as required for Date and Time from the screen on next page (Fig 3.4). Click on “Additional Settings” button for number format on that screen. In this example, we are changing the settings to “Swedish” (Sweden). ATOMLAB 960 MEDICAL SPECTROMETER ASSEMBLY AND STAND OPERATION 2-11...
- Page 32 Format”. Underneath the format textbox, it will display the date format with an example. For this example, we changed the Date format in Regional Settings to “yyyy-MM-dd”. Now, in the Atomlab 960 software, we matched and set the same date format (yyyy-MM-dd). The software now displays the current date using the specified format.
- Page 33 Once the changes are finalized, select the <Accept> button. It will prompt with a confirmation screen. Select <Accept> one more time. Exit the software and restart the Atomlab 960 software. The system will be using the recently configured Date/Time/Number format throughout the entire program.
-
Page 35: Computer Preliminaries
3. Computer Preliminaries Figure 3.1. The Atomlab 960 allows users to select options using both the keyboard and touch screen operation. Data is generally entered in appropriate fields via the keyboard. Windows Format The Atomlab 960 is a personal computer based system. All menus and screens function in standard Windows fashion. -
Page 36: System-Wide Icons
System-Wide Icons (See Figure 3.2.) Figure 3.2. The Atomlab 960 features a variety of icons that are used throughout the system, including <Back>, <Add>, <Edit> and <Delete> as shown on the Select An Isotope screen. Several functions used on numerous pages throughout the program are represented by icons located at the bottom of the screens to which they apply. -
Page 37: Turning The System Off
1. Return to the Home screen by either selecting the <Home> icon or selecting <Back> to take your back to the Home page. 2. At the Home page, select <X> from the upper right corner to close the Atomlab 960 program. -
Page 38: Locking The Panel
Locking the Panel 1. From the Home screen select <x> from the upper right corner to close the Atomlab 960 program. 2. Select <Lock the Panel> to close Atomlab and lock the panel. The screen will require the user to re-enter the Password to use the system. -
Page 39: Utilities
Selecting the <Utilities> icon from the bottom right corner of the Home screen allows access to the Utilities Menu. Utilities Menu options include: • System Setup • Detectors • Procedures • Staff Members • Isotopes • Wipe Setup • Bioassay Setup • System Maintenance ATOMLAB 960 MEDICAL SPECTROMETER UTILITIES 4-1... -
Page 40: System Setup
1. From the <Home> screen, select the <Utilities> icon. The Utilities Menu is now displayed. 2. Select <System Setup>. (The screen defaults to the General tab.) General Screen (See Figure 4.2.) Figure 4.2. The System Setup screen. 4-2 UTILITIES Biodex Medical Systems, Inc. © 2014... - Page 41 NOTE: You can select <Accept> to save at any time, or you may continue to enter setup functions information for additional tabs and save all entered parameters at one time by selecting <Accept> when finished. ATOMLAB 960 MEDICAL SPECTROMETER UTILITIES 4-3...
-
Page 42: Thyroid Uptake Screen
Both Biological Half-Life and Effective Half-Life are considered to be estimates and not exact values. 4-4 UTILITIES Biodex Medical Systems, Inc. © 2014... -
Page 43: Wipe Parameter Screen
6. Select the default units for Wipe Test results (DPM = Disintegrations per Minute, µCi = Microcuries, Cnts = Counts per Minute) NOTE: If your system is set to Bequerels, the choice will be: DPM, Bqs, Cnts ATOMLAB 960 MEDICAL SPECTROMETER UTILITIES 4-5... - Page 44 10. Select <Accept> to apply the wide window settings and return to the Wide Window Isotope Setting screen. Select <Accept> to return to the System Setup Wipe screen. Select <Accept> again to return to the Utilities menu. 4-6 UTILITIES Biodex Medical Systems, Inc. © 2014...
-
Page 45: Bioassay Screen
NOTE: If your system is set to Bequerels, the choice will be: DPM, Bqs, Cnts NOTE: See Chapter 4, section titled “Efficiency For The Selected Detector” for details on setting detector efficiency. 7. Select <Accept> to apply the Bioassay settings and return to the Utilities Menu. ATOMLAB 960 MEDICAL SPECTROMETER UTILITIES 4-7... -
Page 46: Spectrum Graph Screen
System Setup screen to enter additional information before selecting <Accept> to save all data. Select <Cancel> to return to the System Setup screen without saving the color customizations entered. 4-8 UTILITIES Biodex Medical Systems, Inc. © 2014... -
Page 47: Constancy Screen
2. Enter data in the appropriate fields and select <Accept> to save, or choose another tab at the top of the System Setup screen to enter additional information before selecting <Accept> to save all data. Select <Cancel> to return to the System Setup screen without saving the constancy information entered. ATOMLAB 960 MEDICAL SPECTROMETER UTILITIES 4-9... -
Page 48: Detectors
In addition to viewing detector specifics on the Detectors screen, you can: • Add a detector • Edit a selected detector • Delete a selected detector and its accompanying information 4-10 UTILITIES Biodex Medical Systems, Inc. © 2014... -
Page 49: Add A Detector
4. If desired, enter the location to be displayed for the new detector. 5. Enter the outside diameter of the new detector. The default value for the probe is 5.08 cm 6. For the well, enter the inside diameter. The default value is 1.905 cm. ATOMLAB 960 MEDICAL SPECTROMETER UTILITIES 4-11... -
Page 50: Edit A Detector
For the well it is the inside diameter, which on the well shipped by Biodex, is 1.905cm. Factory set well depth is 2.54cm. This depth in the well would be indicative of many wipes which is the center of the activity or where the wipe would be located when lowered into the well. -
Page 51: Procedures
1. From the <Home> screen, select the <Utilities> icon. The Utilities Menu is now displayed. 2. Select <Procedures>. The Thyroid Uptake Procedures screen is now displayed. The procedure description, isotope, correction, count type and count time are shown. ATOMLAB 960 MEDICAL SPECTROMETER UTILITIES 4-13... -
Page 52: Add A New Procedure
7. Enter the count time desired in seconds in count time field. Default value is 60 seconds. 8. Select/De-select Use Standard Multiplier. 4-14 UTILITIES Biodex Medical Systems, Inc. © 2014... -
Page 53: Edit A Thyroid Uptake Procedure
2. Select <Accept> to delete the currently selected thyroid uptake procedure and return to the Thyroid Uptake Procedures screen, or <Cancel> to return to the Thyroid Uptake Procedures screen without making any deletions. ATOMLAB 960 MEDICAL SPECTROMETER UTILITIES 4-15... -
Page 54: Staff Members
3. Select <Accept> to add the staff member and return to the Select or Add Staff Member screen or <Cancel> to return to the Select or Add a Staff Member screen without adding staff. 4-16 UTILITIES Biodex Medical Systems, Inc. © 2014... -
Page 55: Edit Staff Members
2. Select <Delete>, a warning screen is displayed that you are about to permanently delete the staff selected. Select <Accept> to delete the staff member and return to the Select or Add Staff Member screen or <Cancel> to return to the Select or Add Staff Member screen without deleting. ATOMLAB 960 MEDICAL SPECTROMETER UTILITIES 4-17... -
Page 56: Isotopes
The user also selects if a specific isotope can be used for Wipe testing. The Atomlab 960 isotope list comes with 29 preset isotopes. For these factory isotopes, Lower Level Discriminator (LLD), Upper Level Discriminator (ULD), and Range are factory preset and cannot be changed. -
Page 57: Select An Isotope
Enter the regulatory package level. The standard level is 6,600 DPM based on a wipe area of 10cm When all fields are completed, select <Accept> to save the data and select the current isotope. ATOMLAB 960 MEDICAL SPECTROMETER UTILITIES 4-19... -
Page 58: Edit An Isotope
Tc-99m has a peak energy of 140 keV according to the radionuclide decay scheme. The Atomlab 960 uses a default of +/- 15% energy window around the peak energy. These values calculate to be 119 keV to 162 keV and are displayed on the Isotope Editing page. When either the probe or well is selected, the ROI channels are calculated based upon the Cs-137 calibration results for that particular detector. - Page 59 B. Upper Level Discriminator (ULD) = 1.15 times the Max keV of interest. NOTE: Some isotope ROIs are preset so they are not ±15%. Using an isotope sample the ROIs were determined for those isotopes. ATOMLAB 960 MEDICAL SPECTROMETER UTILITIES 4-21...
-
Page 60: Efficiency For The Selected Detector
WARNING: If the efficiency is less than 1.0 it must be entered in decimal format (i.e., 0.1, 0.2, etc.). AVERTISSEMENT: Si le rendement est inférieur à 1,0 elle doit être entrée au format décimal (p. ex., 0,1, 0,2, etc.). 4-22 UTILITIES Biodex Medical Systems, Inc. © 2014... - Page 61 The set distance at which the standard will be counted, along with the geometric efficiency, are also displayed. To change the geometric distance and geometric efficiency, select the <Detector> icon on the left side of the screen. The Detector Measurements screen is now displayed. ATOMLAB 960 MEDICAL SPECTROMETER UTILITIES 4-23...
- Page 62 The system shows the elapsed and remaining time. 13. Select <Analysis> to review the spectrum screen if desired, or <Next> to return to the Measure Efficiency screen. Isotope efficiency is now displayed. Select <Accept> or <Cancel>. 4-24 UTILITIES Biodex Medical Systems, Inc. © 2014...
- Page 63 Efficiency % field of the selected isotope on the Select An Isotope list. 5. Select <Back> to return to the Utilities screen when you are done with the options available on the Select An Isotope screen. ATOMLAB 960 MEDICAL SPECTROMETER UTILITIES 4-25...
-
Page 64: Bioassay Isotope Setup
Isotope Efficiencies and set the Trigger Level for each of these isotopes. NOTE: When setting up the isotope, the keV range for Bioassay is determined at 0-750 keV. Figure 4.21. The Isotope Management screen. 4-26 UTILITIES Biodex Medical Systems, Inc. © 2014... -
Page 65: Wipe Setup
2. To add a wipe area, select <Add> under the Areas Section. The Add Wipe Area screen is now displayed. 3. Enter an Area Name and select the area type: Restricted, Unrestricted, Sealed Source or Packages. ATOMLAB 960 MEDICAL SPECTROMETER UTILITIES 4-27... - Page 66 Wipe Location screen displayed. To delete any location, simply highlight the desired entry in the Location field and select <Delete>. The selected location will be removed from the Location list. 4-28 UTILITIES Biodex Medical Systems, Inc. © 2014...
- Page 67 <Select> to highlight the isotope you want to not count for this area and <Select> <Delete> to remove the highlighted isotope from this area. Figure 4.25. The Select Isotope screen. ATOMLAB 960 MEDICAL SPECTROMETER UTILITIES 4-29...
- Page 68 Select <Back> again to return to the <Home> screen. NOTE: You can also select the Home icon in the upper left corner of the screen to return to the <Home> screen. 4-30 UTILITIES Biodex Medical Systems, Inc. © 2014...
-
Page 69: Bioassay Setup
2. Select <Bioassay Setup>. The Bioassay Setup screen is displayed. This page allows you to add staff for Bioassay and add or delete the isotopes to be assayed for each person. Figure 4.27. The Bioassay Setup screen. Figure 4.28. Add Staff Member screen. ATOMLAB 960 MEDICAL SPECTROMETER UTILITIES 4-31... -
Page 70: Add A Staff Member
NOTE: Now you can add your staff and the isotope you are going to perform a Bioassay test for. You select which isotopes for each person to be tested. 4-32 UTILITIES Biodex Medical Systems, Inc. © 2014... -
Page 71: Add Isotope For Staff Member
3. Select the isotopes to be assigned to the staff member by clicking in the appropriate checkboxes to the left of the Isotope name. NOTE: Each staff member can be setup with different isotopes listed. NOTE: You can chose multiple isotopes by selecting each isotope. ATOMLAB 960 MEDICAL SPECTROMETER UTILITIES 4-33... - Page 72 5. Click the <Cancel> icon to exit back to the Bioassay Setup menu without assigning any isotopes to the staff member. 6. The system returns to the Bioassay Setup screen displaying the selected isotopes that have been established for the staff member. 4-34 UTILITIES Biodex Medical Systems, Inc. © 2014...
-
Page 73: Delete An Isotope From Staff Member
3. Select the <Delete> icon. NOTE: Delete is an immediate action from this screen. There is no opportunity to cancel the function if <Delete> is selected by mistake. 4. The isotope is deleted from this patient. ATOMLAB 960 MEDICAL SPECTROMETER UTILITIES 4-35... -
Page 74: System Maintenance
System Maintenance main menu. On the System Maintenance main menu you will see buttons for the three configurations related to System Maintenance: Checkpoint Database Backup Database Restore Database Figure 4.34. System Maintenance main screen. 4-36 UTILITIES Biodex Medical Systems, Inc. © 2014... -
Page 75: Checkpoint Database
Checkpoint Database The Checkpoint Database function creates a backup database of current Atomlab 960 data on the local hard drive. Selecting the <Checkpoint Database> button on the System Maintenance menu will bring you to this screen: Figure 4.35. Database Backup screen. -
Page 76: Backup Database (Usb Flash Drive)
Backup Database (USB flash drive) The Backup Database function creates a backup database of the current Atomlab 960 data on a USB flash drive. Insert a USB flash drive into the USB port. Selecting the <Backup Database> button on the System Maintenance menu will bring you to this screen: Figure 4.37. -
Page 77: Restore Database
Select the database that you would like to have restored as the Atomlab’s current data set, and then select the <Restore Selected Database> button. The resulting screen will ask you to confirm the restore action. ATOMLAB 960 MEDICAL SPECTROMETER UTILITIES 4-39... - Page 78 “.biodb” filename extension. Software versions beginning with v1.0.75 produce backup files with the “.bak” filename extension. The v1.0.93(+) software can restore backup files with either the “.biodb” or “.bak” filename extensions. 4-40 UTILITIES Biodex Medical Systems, Inc. © 2014...
-
Page 79: Quality Assurance
Utilities, it will be noted on the daily calibration button as shown. If you have not selected to perform constancy, only the words "Daily Calibration" will show on the button. Figure 5.2. The Quality Assurance Menu screen two. Those programs are for Chi-Square and MDA. ATOMLAB 960 MEDICAL SPECTROMETER QUALITY ASSURANCE 5-1... -
Page 80: Quality Assurance Information
Quality Assurance Information (See Figure 5.1.) Before using the Atomlab 960 for counting purposes, it is important that you take a few minutes to prepare the system for operation. The following functions are accessed from the Quality Assurance Menu: • Calibration/Constancy Fixtures •... -
Page 81: Calibration/Constancy Fixtures
If you are using a rod source for your well counter, the well fixture helps center the rod source. There are pins on the printer shelf that hold the fixtures onto the shelf for storage. ATOMLAB 960 MEDICAL SPECTROMETER QUALITY ASSURANCE 5-3... -
Page 82: High Voltage Adjustment
NOTE: If a probe and well are both used the high voltage adjustment must be set independently for each detector. The system must be ON and warmed-up prior to setting the high voltage. 5-4 QUALITY ASSURANCE Biodex Medical Systems, Inc. © 2014... -
Page 83: Perform A High Voltage Adjustment
3. Select <Accept> to delete the noted High Voltage Adjustment and return to the High Voltage History, or <Cancel> to return to the High Voltage History without deleting. 4. Select <Back> to return to the <Quality Assurance> page. ATOMLAB 960 MEDICAL SPECTROMETER QUALITY ASSURANCE 5-5... - Page 84 2. Select the printer icon at the top of the screen to open a print range selection screen. You can adjust the date range that you wish to print using the two calendars “from” and “to”. Figure 5.6. Calendar “from” and “to” screen. Figure 5.7 Date screen. 5-6 QUALITY ASSURANCE Biodex Medical Systems, Inc. © 2014...
-
Page 85: Daily Calibration/Constancy
NOTE: The system must be allowed to warm up and stabilize before performing a calibration. Calibration Information A daily system calibration must be performed each day the Atomlab 960 is to be used. Separate calibrations are performed for the probe and well. The system keeps an internal listing of its last calibration date and prompts when calibration is needed. - Page 86 Spectrum Analysis icon. The multi-channel analyzer in the Atomlab 960 has several fixed precision ranges and a regulated high voltage supply. The pulse shapes are digitized and then processed by a high speed digital signal processor.
-
Page 87: Perform A Daily Calibration
Calibration Information displayed, or <Cancel> to return to the Select Detector screen without saving the calibration. 8. If the Daily Calibration Information is acceptable, select <Accept> to accept the daily calibration results and return to the Quality Assurance screen. ATOMLAB 960 MEDICAL SPECTROMETER QUALITY ASSURANCE 5-9... -
Page 88: View, Print Or Save A Daily Calibration Report
View, Print or Save A Daily Calibration Report (See Figure 5.10.) Figure 5.10. The Daily Calibration History screen. Figure 5.11. The Daily Calibration Constancy History screen. 5-10 QUALITY ASSURANCE Biodex Medical Systems, Inc. © 2014... - Page 89 NOTE: If you wish to print a specific calibration spectrum, see steps 5 through 8, above. 9. On the Daily Calibration History screen select <Reports> to view and select the type of Daily Calibration Report to View or Print. Choose from <Single Detail>, or <Summary History>. ATOMLAB 960 MEDICAL SPECTROMETER QUALITY ASSURANCE 5-11...
- Page 90 10. Select <Back> twice to return to the Daily Calibration History screen from any of the reports. Figure 5.13. Daily Calibration Details screen printout. Figure 5.14. Calibration Information For Probe/Detector report. 5-12 QUALITY ASSURANCE Biodex Medical Systems, Inc. © 2014...
-
Page 91: Delete A Daily Calibration
Daily Calibration Report. Select <Accept> to delete the report and return to the Daily Calibration History screen, or <Cancel> to return to the Daily Calibration History screen without making a deletion. ATOMLAB 960 MEDICAL SPECTROMETER QUALITY ASSURANCE 5-13... -
Page 92: Chi-Square
Chi-Square can be performed as frequently as desired, but is generally performed quarterly. A daily calibration must be performed before Chi Square can begin. If a daily calibration has not been performed, the system switches to daily calibration. 5-14 QUALITY ASSURANCE Biodex Medical Systems, Inc. © 2014... -
Page 93: Perform Chi-Square
Chi Square. 8. If the Chi Square Information is acceptable, select <Accept> to accept the Chi-Square results and return to the Quality Assurance screen. Figure 5.17. A Chi-Square counting screen showing that Chi-Square passed. ATOMLAB 960 MEDICAL SPECTROMETER QUALITY ASSURANCE 5-15... -
Page 94: View, Print Or Save A Chi-Square Report
3. Select <Accept> to delete the report and return to the Chi Square History screen, or <Cancel> to return to the Chi Square History screen without making a deletion. 5-16 QUALITY ASSURANCE Biodex Medical Systems, Inc. © 2014... -
Page 95: Mda (Minimum Detectable Activity)
Bioassay or Wipe Counting. NOTE: Isotopes that have an Efficiency, but are not checked for Bioassay or for Wipe Counting will NOT be used when performing MDA calculations. ATOMLAB 960 MEDICAL SPECTROMETER QUALITY ASSURANCE 5-17... - Page 96 <Cancel> to discard the MDA results. 11. If you selected to save the MDA results, select <Accept> to return to the MDA verification screen with the new MDA results now displayed. 5-18 QUALITY ASSURANCE Biodex Medical Systems, Inc. © 2014...
- Page 97 “Detail History” selections display the Date Range screen for the user to set the date range to view and print. 14. Select <Back> to return to the Quality Assurance screen. NOTE: You can print the MDA Report from the <Reports> function on the Home screen ATOMLAB 960 MEDICAL SPECTROMETER QUALITY ASSURANCE 5-19...
-
Page 99: Thyroid Uptake
6.2 hours because the system will calculate for the elapsed time. Each of the data sets that are counted are displayed in the status window on the Thyroid Uptake screen. ATOMLAB 960 MEDICAL SPECTROMETER THYROID UPTAKE 6-1... -
Page 100: Thyroid Uptake Information
NOTE: If you have not yet calibrated your Atomlab 960 on this day, the system will prompt you to calibrate before proceeding with the Thyroid Uptake or any other test procedure selected. High Voltage must also be set before using the system for the first time. -
Page 101: Perform A Thyroid Uptake On A New Patient
Perform A Thyroid Uptake On A New Patient: Select <Testing> from the Atomlab 960 Home Page. The Testing Menu is now displayed. Select <Thyroid Uptake>. The Select or Add A Patient screen is now displayed. Add a patient for which the thyroid study will be performed. - Page 102 NOTE: Procedures must be added in the Procedures section of the Utilities program. Figure 6.5. The Study Selection screen. The Study Selection screen is now displayed for the selected patient. Highlight the desired study and select <Next>. Figure 6.6. The Add Study screen. 6-4 THYROID UPTAKE Biodex Medical Systems, Inc. © 2014...
- Page 103 The message “Counting Complete” is displayed at the bottom of the screen. Select <Next> to return to the Thyroid Uptake screen. NOTE: If you wish to perform a spectrum analysis, select the <Analysis> icon before selecting <Next>. ATOMLAB 960 MEDICAL SPECTROMETER THYROID UPTAKE 6-5...
- Page 104 11. Select <Count Lab Bkg>. The system prompts to position the probe to count background. You should count with the neck phantom in front of the collimator without the source in it. 6-6 THYROID UPTAKE Biodex Medical Systems, Inc. © 2014...
- Page 105 14. The Thyroid Uptake screen is now displayed. Review the results. NOTE: If you are not satisfied with the results for dose or lab background, select the item you wish to recount and recount the standard or lab background before saving. ATOMLAB 960 MEDICAL SPECTROMETER THYROID UPTAKE 6-7...
- Page 106 Dose Administration Time. Figure 6.10. The Thyroid Uptake Settings screen. Note that the Date Administration Time area is read-only. This becomes editable once the patient record has been saved. 6-8 THYROID UPTAKE Biodex Medical Systems, Inc. © 2014...
- Page 107 24. When the counting is complete, the message “Counting Complete” is displayed at the bottom of the screen. Select <Next> to return to the Thyroid Uptake screen. NOTE: If you wish to perform a spectrum analysis, select the <Analysis> icon before selecting <Next>. ATOMLAB 960 MEDICAL SPECTROMETER THYROID UPTAKE 6-9...
- Page 108 NOTE: You can print the Uptake Report from the Study Selection screen by highlighting the desired study and selecting <Reports>. This will display the report. Select the <Printer> icon to print. 6-10 THYROID UPTAKE Biodex Medical Systems, Inc. © 2014...
-
Page 109: Perform A Thyroid Uptake On A New Patient When Recounting A Standard
Perform A Thyroid Uptake On A New Patient When Recounting A Standard: Select <Testing> from the Atomlab 960 Home Page. The Testing Menu is now displayed. Select <Thyroid Uptake>. The Select or Add A Patient screen is now displayed. Add a patient for which the thyroid study will be performed. - Page 110 à angle droit par rapport à la cuisse du patient afin qu'il soit positionné correctement pour le comptage pour conserver la géométrie correcte. Assurez-vous que la barre d'écartement et positionnement de la lumière ne sont pas dans le champ de comptage. 6-12 THYROID UPTAKE Biodex Medical Systems, Inc. © 2014...
- Page 111 24. When the counting is complete, the message “Counting Complete” is displayed at the bottom of the screen. Select <Next> to return to the Thyroid Uptake screen. NOTE: If you wish to perform a spectrum analysis, select the <Analysis> icon before selecting <Next>. ATOMLAB 960 MEDICAL SPECTROMETER THYROID UPTAKE 6-13...
- Page 112 32. When lab background counting is finished, a “Counting Complete” message is displayed at the bottom of the screen. Select <Next> to return to the Thyroid Uptake screen. NOTE: If you wish to perform a spectrum analysis, select the <Analysis> icon before selecting <Next>. 6-14 THYROID UPTAKE Biodex Medical Systems, Inc. © 2014...
- Page 113 Select <Accept> to return to the Select or Add a Patient screen. Select <Next> to advance to the Study Selection screen. Select <Add Study> to advance to the Add Study screen. ATOMLAB 960 MEDICAL SPECTROMETER THYROID UPTAKE 6-15...
- Page 114 à angle droit avec le fantôme de cou et de la thyroïde afin qu'il soit positionné correctement pour le comptage pour conserver la géométrie correcte. Assurez-vous que la barre d'écartement et positionnement de la lumière ne sont pas dans le champ de comptage. 6-16 THYROID UPTAKE Biodex Medical Systems, Inc. © 2014...
- Page 115 20. When the patient returns at the specified time, select <Testing> and then <Thyroid Uptake>. 21. Highlight the patient on the Select or Add a Patient screen and select <Next>. ATOMLAB 960 MEDICAL SPECTROMETER THYROID UPTAKE 6-17...
- Page 116 LED back to the retracted position and move the distance bar to the bottom of the collimator out of the field before counting. Select <Accept> to begin counting the patient thyroid. 6-18 THYROID UPTAKE Biodex Medical Systems, Inc. © 2014...
-
Page 117: When Recounting A Standard
NOTE: To view a previous study, highlight the previous test and select the <Report> icon at the bottom of the screen. The results for the previous test are displayed after you select the report type. ATOMLAB 960 MEDICAL SPECTROMETER THYROID UPTAKE 6-19... - Page 118 11. Select <Count Lab Bkg>. The system prompts to position the probe to count background. You should count with the neck phantom in front of the collimator without the source in it. 6-20 THYROID UPTAKE Biodex Medical Systems, Inc. © 2014...
- Page 119 LED back to the retracted position and move the distance bar to the bottom of the collimator out of the field before counting. Select <Accept> to begin counting the patient thyroid. ATOMLAB 960 MEDICAL SPECTROMETER THYROID UPTAKE 6-21...
- Page 120 33. The Thyroid Uptake Results are displayed. NOTE: If you are not satisfied with the results for the recount standard, lab background, thyroid or patient background, select the item you wish to recount and recount that item. 6-22 THYROID UPTAKE Biodex Medical Systems, Inc. © 2014...
-
Page 121: Perform A Thyroid Uptake With Multiplier
Perform A Thyroid Uptake With Multiplier: Select <Testing> from the Atomlab 960 Home Page. The Testing Menu is now displayed. Select <Thyroid Uptake>. The Select or Add A Patient screen is now displayed. Add a patient for which the thyroid study will be performed. - Page 122 Vous devez également vous assurer que le collimateur est à angle droit avec le fantôme de cou et de la thyroïde afin qu'il soit positionné correctement pour le comptage pour conserver la géométrie correcte . 6-24 THYROID UPTAKE Biodex Medical Systems, Inc. © 2014...
- Page 123 17. When the patient returns at the specified time, select <Testing> and then <Thyroid Uptake>. 18. Highlight the patient on the Select or Add a Patient screen and select <Next>. ATOMLAB 960 MEDICAL SPECTROMETER THYROID UPTAKE 6-25...
-
Page 124: Perform A Thyroid Uptake With Multiplier When Recounting A Standard
The procedure to perform a thyroid uptake with multiplier when recounting a standard follows the same procedure as used for performing a thyroid uptake with multiplier except it is necessary to add the recounting standard and lab background. 6-26 THYROID UPTAKE Biodex Medical Systems, Inc. © 2014... -
Page 125: Manual Mode
This allows the user to view current results stored and results from other detectors. • <Measure>: Use this icon to begin the count for the isotope and detector selected. Count In Manual Mode (See Figure 7.1.) Figure 7.1. The Manual Mode screen. ATOMLAB 960 MEDICAL SPECTROMETER MANUAL MODE 7-1... - Page 126 History or select <Reports> to enter a Data Range and select <Accept> to advance to the Manual Mode Report. You can now select the <Printer> icon and the report will print. 13. Select <Back> to return to the Manual Mode screen. 7-2 MANUAL MODE Biodex Medical Systems, Inc. © 2014...
-
Page 127: Wipe Testing
The Atomlab 960 Well Counter is designed to use a Cs-137 rod source to perform the daily automatic calibration function. A series of initial setup functions must be performed before the well counter can be used. -
Page 128: Perform A Wipe Test
Select <Accept> to go to the specific isotope window to enter efficiency for each missing isotope as previously described in the Chapter 4 section titled “Efficiency For The Selected Detector.” 8-2 WIPE TESTING Biodex Medical Systems, Inc. © 2014... - Page 129 Figure 8.2. The Wipe Error screen notifies the user the wide window efficiency setting is missing. Figure 8.3. The Wipe Efficiencies Required screen notifies the user that wipe efficiences for some isotopes are missing. ATOMLAB 960 MEDICAL SPECTROMETER WIPE TESTING 8-3...
- Page 130 Count screen. The display shows the full spectrum counts. Select <Analysis> if you wish to perform a spectrum analysis before proceeding or select <Next> to advance to the Background Results screen. 8-4 WIPE TESTING Biodex Medical Systems, Inc. © 2014...
- Page 131 <Cancel> to return to the Wipe Test screen. 10. The system now counts the wipe that is in the well counter. When the count is complete, the Wipe Results screen for the selected wipe location just counted will be displayed. ATOMLAB 960 MEDICAL SPECTROMETER WIPE TESTING 8-5...
- Page 132 Wipe Test screen without saving wipe. NOTE: Full spectrum results will only be displayed in counts. All other isotopes including the wide window can be displayed in dpm, µCi or counts. 8-6 WIPE TESTING Biodex Medical Systems, Inc. © 2014...
- Page 133 13. After all the desired wipe testing is completed select <History> to display the Wipe History screen. Select a specific wipe performed and select <View Data> to show the specific wipe results for the selected wipe location. Figure 8.8. The View Wipe Details screen ATOMLAB 960 MEDICAL SPECTROMETER WIPE TESTING 8-7...
- Page 134 NOTE: Selecting <Last Full Month> will prompt the system to display the last full month completed, plus any additional days from the current month. There are a number of choices you can select. 8-8 WIPE TESTING Biodex Medical Systems, Inc. © 2014...
- Page 135 Fail Tc-99m 1,178 DPM 241 DPM 1,704.0 2,095 DPM 20,000 DPM Pass Comments : Signature : Date Signed : Software Ver: 1.0.66.0 Page 1 of 1 Figure 8.10. Individual Wipe Test Report printout. ATOMLAB 960 MEDICAL SPECTROMETER WIPE TESTING 8-9...
- Page 136 Wipe Test Detail Report. The Wipe Test Detail Report shows all the isotopes in each wipe for the selected options. 19. Select <Back> twice to return to the Wipe History screen from any of the reports. 8-10 WIPE TESTING Biodex Medical Systems, Inc. © 2014...
- Page 137 Tc-99m 969 DPM 225 DPM -62.0 -76 DPM 20,000 DPM Pass Comments : Signature : Date Signed : Software Ver: 1.0.61.0 Page 1 of 1 Figure 8.12. A sample single wipe printed report. ATOMLAB 960 MEDICAL SPECTROMETER WIPE TESTING 8-11...
- Page 138 -84.0 -0.0001 uCi Pass clyde smith 1:55 PM Comments : Signature : Date Signed : Software Ver: 1.0.61.0 Page 1 of 2 Figure 8.13. A sample wipe test summary history report. 8-12 WIPE TESTING Biodex Medical Systems, Inc. © 2014...
- Page 139 1,082 DPM 298 DPM -728.6 341 DPM 20,000 DPM Pass Comments : Signature : Date Signed : Software Ver: 1.0.61.0 Page 1 of 5 Figure 8.14. A sample wipe test detail history report. ATOMLAB 960 MEDICAL SPECTROMETER WIPE TESTING 8-13...
- Page 141 NOTE: The MDA must be below the trigger level. A short counting time raises the MDA. Performing A Bioassay Test: 1. From the <Home> page select <Testing>. The Testing screen is now displayed. Select <Bioassay). The Bioassay screen is now displayed. Figure 9.1. Testing Home screen. ATOMLAB 960 MEDICAL SPECTROMETER PERFORMING A BIOASSAY 9-1...
- Page 142 6. Select <Accept> to save the background results currently displayed, or <Cancel> to return to the Bioassay Test screen. 7. After saving the background, you can select the staff member you want to perform the Bioassay for and then select <Measure>. 9-2 PERFORMING A BIOASSAY Biodex Medical Systems, Inc. © 2014...
- Page 143 18.50cm. It is important to use the correct distance (Geometry). 9. Once the counting is finished, the Bioassay Results screen is now shown. Figure 9.4. Bioassay Counting Results screen for Staff Member. ATOMLAB 960 MEDICAL SPECTROMETER PERFORMING A BIOASSAY 9-3...
- Page 144 History screen. Select a specific Bioassay performed and select <View Data> to show the specific Bioassay results for the selected Bioassay. 13. From the Bioassay History screen, see Bioassay Facility Summary Report. Figure 9.5. Bioassay History screen. 9-4 PERFORMING A BIOASSAY Biodex Medical Systems, Inc. © 2014...
- Page 145 Figure 9.6. Bioassay History screen showing Bioassay results for a selected Bioassay. Figure 9.7. Navigation sequence for Bioassay Facility Summary Report screen (Testing>Bioassay>History>Print). ATOMLAB 960 MEDICAL SPECTROMETER PERFORMING A BIOASSAY 9-5...
- Page 146 This screen allows the user to select a specific “Staff Type”, specific “Staff Name” or “All”, and the “Date Range” to be displayed for the results of the testing on the Bioassay History screen. 9-6 PERFORMING A BIOASSAY Biodex Medical Systems, Inc. © 2014...
- Page 147 To delete a specific Bioassay test from the Bioassay History screen, highlight the Bioassay to delete and select <Delete>. Select <Accept> to confirm the deletion on the warning screen. Figure 9.10. Choose Type of Bioassay Report to print. ATOMLAB 960 MEDICAL SPECTROMETER PERFORMING A BIOASSAY 9-7...
- Page 148 Test Detail Report shows all the Bioassay tests for the person in the Date Range selected. 18. Select <Back> twice to return to the Bioassay History screen from any of the reports. 9-8 PERFORMING A BIOASSAY Biodex Medical Systems, Inc. © 2014...
- Page 149 Figure 9.11. Single Detail Test Report. ATOMLAB 960 MEDICAL SPECTROMETER PERFORMING A BIOASSAY 9-9...
- Page 150 Figure 9.12. Individual Detail History Report. 9-10 PERFORMING A BIOASSAY Biodex Medical Systems, Inc. © 2014...
- Page 151 Figure 9.13. Bioassay Summary History Report. ATOMLAB 960 MEDICAL SPECTROMETER PERFORMING A BIOASSAY 9-11...
-
Page 153: Dicom (Optional)
DICOM system to the Atomlab 960 software. Once its available to the Atomlab 960 software, the thyroid uptake operation can be performed and the test result can be uploaded/ sent back to the DICOM system. The following describes the setup procedure as well as how to use DICOM with Atomlab 960 software. Prerequisite: This Flat Panel PC will have to be connected to a Hospital/Facility Network (preferably wired connection). - Page 154 “X DICOM Not Activated”. Contact the Biodex Service Department, Software Support ext. 2120, with the “License Number” information. Based on that information, Biodex will generate and provide a “Key” number to the customer. Upon receipt of the “Key”, type the number provided in the “Key” text box; Select the <Activate DICOM>...
- Page 155 If the license key does not match it will display error message on the screen. Figure 10.3. If the “License Number” and the “Key” match, the Atomlab 960 software will display the message “DICOM Activated” and the <Activate DICOM > button will be grayed out.
-
Page 156: Dicom Setup/Configuration
DICOM Setup/Configuration Once the DICOM licensing part is complete, Atomlab 960 software will then display more setup options. Follow the steps below to complete the DICOM Setup/ configuration of the servers. Setup Procedure: Atomlab 960 software will display the following screen. The user must provide the necessary information. - Page 157 You may leave it as is unless the server setting is different. DICOM features – select the type of server, whether it’s a C-Store or Worklist Provider. Figure 10.6. Once all the information has been provided, it will look like the following screen. ATOMLAB 960 MEDICAL SPECTROMETER DICOM (OPTIONAL) 10-5...
- Page 158 DICOM Server Management screen. Then select the <Accept> button again to save the entered value for DICOM server. Once it’s saved in the database, this will bring you back to the System Setup screen with the summary information for the servers. 10-6 DICOM (OPTIONAL) Biodex Medical Systems, Inc. © 2014...
- Page 159 Figure 10.9. Repeat steps 4 to 7 to add the c-store provider and any additional servers. The screen will look as follows with multiple servers in the list. ATOMLAB 960 MEDICAL SPECTROMETER DICOM (OPTIONAL) 10-7...
- Page 160 Delete will prompt the user with a confirmation message to that item. 10. Once everything mentioned above is complete, select the <Accept> button to save to the database. Figure 10.10. 10-8 DICOM (OPTIONAL) Biodex Medical Systems, Inc. © 2014...
-
Page 161: Add Patient From Worklist Server And Create A Study
Procedure To Add Patient From Worklist: Select <Home> screen of Atomlab 960 software. Then select <Testing>. Select <Thyroid Uptake> button. This will bring up the existing list of Patients in the Atomlab 960 software. To add a patient from the Worklist, select the <Add From Worklist> button. - Page 162 NOTE: Selecting the <Cancel> button on “Add Study” screen will take you back to the Worklist screen and no patient/study will be added to the Atomlab 960 database. It has to complete the cycle – add patient from Worklist and then add study for that patient and procedure to be listed in the Atomlab 960.
- Page 163 At this point, the Patient was downloaded from the Worklist and is now ready for the thyroid uptake procedure. Please refer to the Atomlab 960 user manual to perform a thyroid uptake procedure. ATOMLAB 960 MEDICAL SPECTROMETER DICOM (OPTIONAL) 10-11...
-
Page 164: Send Uptake Report To Storage Server
Procedure: Go to Home screen of Atomlab 960 software. Then select <Testing>. Select <Thyroid Uptake> button. This will bring up the existing list of Patients stored in the Atomlab 960 software. Select and highlight the Patient from the list that was added from the Worklist. Any patient downloaded from Worklist will be marked as “Yes”... - Page 165 <Accept> button. This will display the preview of the thyroid uptake report in DICOM format. Figure 10.19. Confirm the report on the DICOM Report preview. Then select the <Send to DICOM > button to send it to the DICOM system. ATOMLAB 960 MEDICAL SPECTROMETER DICOM (OPTIONAL) 10-13...
- Page 166 Figure 10.20. Once uploaded, the Atomlab 960 software will display a confirmation message. If any error occurs, a message will be displayed stating the problem. 10-14 DICOM (OPTIONAL) Biodex Medical Systems, Inc. © 2014...
- Page 167 Upon entering the “Key” value on the screen, if the <Accept> button is pressed before selecting <Activate DICOM > button, Atomlab 960 software will display the following error message stating that “You have not activated DICOM, are you sure you want to close this screen?”...
- Page 168 Deleting a patient from the Atomlab 960 software will delete Dicom patient? No. If any patient is deleted from the Atomlab 960 software, it will only delete the information from the Atomlab database and NOT from DICOM system. Once the patient is deleted from the Atomlab 960 software, it will delete all the associated study/test results of that patient in the Atomlab system.
- Page 169 Check the value in the Modality Filter. If its set to wrong value, Patient list will be filtered accordingly. Also, check the Search filter option on “Worklist Patient Search” Screen. Make sure Name, Procedure Date, Worklist Provider, Accession Number are set accordingly. ATOMLAB 960 MEDICAL SPECTROMETER DICOM (OPTIONAL) 10-17...
-
Page 171: 11. Reports
Offers four different reports you can print. They consist of the following function: QA, Staff List, Wipe (includes wipe test results) and Isotope List (includes the information for each specific isotope by detector). Figure 11.1. Administrative or Clinical Reports screen. ATOMLAB 960 MEDICAL SPECTROMETER REPORTS 11-1... - Page 172 Figure 11.2. Administrative Reports screen. QA Reports QA Reports offer several sub-reports for printing which include Daily Calibration/Constancy, High-Voltage, Chi-Square, MDA and Background. Figure 11.3. The QA Reports screen. 11-2 REPORTS Biodex Medical Systems, Inc. © 2014...
- Page 173 Software Ver: 1.0.56.0 Page 1 of 1 Figure 11.4. Daily Calibration Spectrum Report from the QA Mode. NOTE: You can view and print the Calibration, Calibration/Constancy History from the QA Calibration/Constancy button in the QA Mode. ATOMLAB 960 MEDICAL SPECTROMETER REPORTS 11-3...
- Page 174 Probe (S/N:121) 3/20/2013 10:15:43 AM 7.16 42831 5.88 % yank yank Comments : Signature : Date Signed : Software Ver: 1.0.66.0 Page 1 of 2 Figure 11.6. Constancy Report. 11-4 REPORTS Biodex Medical Systems, Inc. © 2014...
-
Page 175: Print High Voltage Report
Well - 122 (Well) 3/8/2013 3:08:22 PM 1,104 Tom Test Probe - 121 (Probe) 3/8/2013 3:04:28 PM 1,070 Comments : Signature : Date Signed : Software Ver: 1.0.66.0 Page 1 of 1 Figure 11.7. High Voltage Report. ATOMLAB 960 MEDICAL SPECTROMETER REPORTS 11-5... -
Page 176: Print Chi-Square Report
Page 1 of 1 Figure 11.8. Chi-Square Summary Report. NOTE: You can also print the Chi-Square Summary Report and the Chi-Square Detail Report from the QA Mode using the Chi-Square History button 11-6 REPORTS Biodex Medical Systems, Inc. © 2014... - Page 177 0.50 8.34 0.10 14.68 (Upper Limit) 16980 0.05 16.92 16717 0.01 21.67 17142 16988 16823 17056 Comments : Signature : Date Signed : Software Ver: 1.0.66.0 Page 1 of 1 Figure 11.10. Chi-Square Report. ATOMLAB 960 MEDICAL SPECTROMETER REPORTS 11-7...
-
Page 178: Print Mda Report
Date Signed : Software Ver: 1.0.66.0 Page 1 of 1 Figure 11.11. MDA Report for the probe. NOTE: You can also print the MDA Reports from the QA Mode using the MDA History Button. 11-8 REPORTS Biodex Medical Systems, Inc. © 2014... - Page 179 3:01 PM 4/19/2013 Probe (Probe) anna marie 2:58 PM 4/15/2013 Probe (Probe) anna marie 3:05 PM Comments : Signature : Date Signed : Software Ver: 1.0.66.0 Page 1 of 1 Figure 11.13. MDA Summary Report. ATOMLAB 960 MEDICAL SPECTROMETER REPORTS 11-9...
-
Page 180: Print Spectrum Analysis Report
ROI Counts ROI CPM Cursor (keV) Cursor Counts 420-600 1,906 3,812 976-1,119 1,039 52-117 Comments : Signature : Date Signed : Software Ver: 1.0.66.0 Page 1 of 1 Figure 11.15. Spectrum Analysis Report. 11-10 REPORTS Biodex Medical Systems, Inc. © 2014... -
Page 181: Print Staff List
PHILLPS Other 23344 NEIGHBORS JANET Technologist 783789 SIMPSON THOMAS Other hgtg456778 SMITH SOPHIE Technologist 7452673 Comments : Signature : Date Signed : Software Ver: 1.0.57.0 Page 1 of 1 Figure 11.16. Staff Member Report. ATOMLAB 960 MEDICAL SPECTROMETER REPORTS 11-11... -
Page 182: Print Wipe Reports
Wipe Test Detail Report. The Wipe Test Detail Report shows all the isotopes in each wipe for the selected options. Select <Back> twice to return to the Wipe History screen from any of the reports. 11-12 REPORTS Biodex Medical Systems, Inc. © 2014... - Page 183 Tc-99m 969 DPM 225 DPM -62.0 -76 DPM 20,000 DPM Pass Comments : Signature : Date Signed : Software Ver: 1.0.61.0 Page 1 of 1 Figure 11.18. Single detail wipe report. ATOMLAB 960 MEDICAL SPECTROMETER REPORTS 11-13...
- Page 184 -84.0 -0.0001 uCi Pass clyde smith 1:55 PM Comments : Signature : Date Signed : Software Ver: 1.0.61.0 Page 1 of 2 Figure 11.19. Wipe test summary history report. 11-14 REPORTS Biodex Medical Systems, Inc. © 2014...
- Page 185 Pass Tc-99m 1,082 DPM 298 DPM -728.6 341 DPM 20,000 DPM Pass Comments : Signature : Date Signed : Software Ver: 1.0.61.0 Page 1 of 5 Figure 11.20. Wipe test detail history report. ATOMLAB 960 MEDICAL SPECTROMETER REPORTS 11-15...
-
Page 186: Print Isotope List
2000/200/6600 DPM Pd-103 0 - 64 17 - 27 16.97 Days 20000/2000/6600 DPM Comments : Signature : Date Signed : Software Ver: 1.0.57.0 Page 1 of 2 Figure 11.21. Isotope List Report. 11-16 REPORTS Biodex Medical Systems, Inc. © 2014... -
Page 187: Clinical Reports
6. The report is now displayed. Select the <printer> icon to print the report. 7. Select <back> to return to Study Selection. Select <back> to return to the Select A Patient screen. Select <back> to return to the Clinical Reports screen. (See reports below.) ATOMLAB 960 MEDICAL SPECTROMETER REPORTS 11-17... - Page 188 Phillpsq Bulb Normal Ranges 4 hours 6% to 12% 24 hours 10% to 20% Comments : Signature : Date Signed : Software Ver: 1.0.56.0 Page 1 of 1 Figure 11.23. Uptake Report. 11-18 REPORTS Biodex Medical Systems, Inc. © 2014...
- Page 189 <Next>. Then highlight the study for the patient you desire and select <Reports>. Then select the type of test you want and select <Accept>. The selected report is displayed and can be printed. ATOMLAB 960 MEDICAL SPECTROMETER REPORTS 11-19...
-
Page 190: Print Manual Mode Report
Figure 11.25. Manual Mode Report. Print Bioassay Reports 1. To print Bioassay Reports from the Clinical Reports Screen, select <Reports>. Select <Clinical>. Select <Bioassay>. 2. Choose from <Single Detail>, <Summary History> or <Detail History> as follows: 11-20 REPORTS Biodex Medical Systems, Inc. © 2014... - Page 191 2. The report is now displayed. Select the <printer> icon to print the report. 3. Select <back> to return to the Bioassay screen. Select <back> to return to the Clinical Reports screen. (See reports below.) ATOMLAB 960 MEDICAL SPECTROMETER REPORTS 11-21...
- Page 192 Figure 11.26. Single Detail Test Report. 11-22 REPORTS Biodex Medical Systems, Inc. © 2014...
- Page 193 Figure 11.27. Individual Detail History Report. ATOMLAB 960 MEDICAL SPECTROMETER REPORTS 11-23...
- Page 194 Figure 11.28. Bioassay Summary History Report. 11-24 REPORTS Biodex Medical Systems, Inc. © 2014...
-
Page 195: 12. Spectrum Analysis
ROI. These three cursors display the channel number, energy in KeV, and the counts for the specific channel. 3. To move any ROI cursor, select the <left>, <data> or <right> cursor and then select the spectrum screen where you want the cursor. ATOMLAB 960 MEDICAL SPECTROMETER SPECTRUM ANALYSIS 12-1... - Page 196 Select <printer> icon and the report will print. 7. Select <cancel> to return to the counting screen you came from and proceed with the procedure you were working on. Figure 12.2. Spectrum Analysis Report. 12-2 SPECTRUM ANALYSIS Biodex Medical Systems, Inc. © 2014...
-
Page 197: Appendix A - Isotope Efficiency Calculation
A. Appendix A Isotope Efficiency Calculation Your new Atomlab 960 features a 2" x 2" Tube Assembly configuration. The Operations Manual provides examples of geometric efficiency in Appendix A are based on a tube assembly diameter of 1.75". For the new 2" diameter Tube Assembly, the example values provided for geometric efficiency should read as follows: If the wipe or calibration source is placed 1/2"... - Page 198 X = Depth into the well, measured from the top surface Example: The Biodex Nal well dimensions have an I.D. = 0.75 inches and a well depth of 1.432 inches. When the wipe (or calibration source) is placed in the well, the isotope emitting radiation will not be at the very bottom.
- Page 199 Hamilton Co., P.O. Box 10030, Reno, Nevada, 89520. Phone: 800-648-5950. After the source preparation, the efficiency can be measured by counting the source in the Administration Mode “Isotope Efficiency” page of the Atomlab 960. ATOMLAB 960 MEDICAL SPECTROMETER APPENDIX A A-3...
- Page 200 The set distance at which the standard will be counted, along with the geometric efficiency, are also displayed. To change the geometric distance and geometric efficiency, select the <Detector> icon on the left side of the screen. The Detector Measurements screen is now displayed. A-4 APPENDIX A Biodex Medical Systems, Inc. © 2014...
- Page 201 The system shows the elapsed and remaining time. 12. Select <Analysis> to review the spectrum screen if desired, or <Next> to return to the Measure Efficiency screen. Isotope efficiency is now displayed. Select <Accept> or <Cancel>. ATOMLAB 960 MEDICAL SPECTROMETER APPENDIX A A-5...
- Page 202 10 for Manual Calculation.) 14. Select <Accept> and the system will automatically calculate and display the isotope detector efficiency. NOTE: Total efficiency is a combination of the geometric and detector efficiencies. A-6 APPENDIX A Biodex Medical Systems, Inc. © 2014...
- Page 203 D.E. = (G.E. * D.E.) * 100% G.E. Note that the two terms (D.E. * G.E.) and G.E. are both calculated as percents in the earlier expressions and the above result preserves D.E. as a percentage. ATOMLAB 960 MEDICAL SPECTROMETER APPENDIX A A-7...
- Page 204 The ROI is set to integrate the photo peak of 59.5 keV. Therefore, we would expect a detector efficiency to be a little less than photon intensity at 59.5 keV which it is. A-8 APPENDIX A Biodex Medical Systems, Inc. © 2014...
- Page 205 96.816% = 13.04% A.) If the detector counts 54 cpm that is equivalent to the following dpm for the parameters listed above. Probe: 54 cpm/.02741% = 197,008 dpm Well: 54 cpm/13.04% = 414 dpm ATOMLAB 960 MEDICAL SPECTROMETER APPENDIX A A-9...
- Page 206 You must use the empirical method for these isotopes. You may have to create a custom version of the isotope with a different ROI to properly count the isotope in the well. A-10 APPENDIX A Biodex Medical Systems, Inc. © 2014...
- Page 207 70.70 Tl-201 3.046 days 56.60 51.50 Yb-169 32.022 days Wide Window (Cs-137) 30 years 68.60 35.90 NOTE: It is recommended that users use the Empirical testing procedures for setting detector efficiency. Rev 5/27/13 ATOMLAB 960 MEDICAL SPECTROMETER APPENDIX A A-11...
-
Page 209: Appendix B - Specifications
Arm: Counterbalanced, two section arm, moves 24.5" (62.2 cm) vertically and extends 31" (78.7 cm) horizontally from stand's vertical column. Casters: 4" Total locking Weight: 280 lb (127 kg) Combined weight with Well Counter: 330 lb (150 kg) Warranty: Two year parts and labor ATOMLAB 960 MEDICAL SPECTROMETER APPENDIX B B-1... - Page 210 Certification: ETL Listed to UL 60601-1 Std. and CAN CSA C22.2 No. 601.1-M90, 2 and 3 editions, and CE marked. Authorized European Community Representative: Emergo Europe Molenstraat 15 2513 BH, The Hague The Netherlands B-2 APPENDIX B Biodex Medical Systems, Inc. © 2014...
-
Page 211: Appendix C - Electromagnetic Compatibility
The Atomlab 960 Thyroid Uptake System should not be used adjacent to or stacked with other equipment. If the Atomlab 960 Thyroid Uptake System is used while positioned adjacent to other equipment, it should be observed to verify normal operation in the configuration in which it will be used. -
Page 212: Declaration Of Conformity
Manufacturer’s declaration electromagnetic emissions The Atomlab 960 Thyroid Uptake System is intended for use in the electromagnetic environment specified below. The customer or the user of the Atomlab 960 Thyroid Uptake System should assure that it is used in such an environment... - Page 213 Manufacturer’s declaration electromagnetic immunity The Atomlab 960 Thyroid Uptake System is intended for use in the electromagnetic environment specified below. The customer or the user of the Atomlab 960 Thyroid Uptake System should assure that it is used in such an environment.
- Page 214 RF transmitters, an electromagnetic site survey should be considered. If the measured field strength in the location in which the Atomlab 960 Thyroid Uptake System is used exceeds the applicable RF compliance levels above, the Atomlab 960 Thyroid Uptake System should be observed to verify normal operation.
-
Page 215: Recommended Separation Distances
The Atomlab 960 Thyroid Uptake System is intended for use in the electromagnetic environment in which radiated RF disturbance are controlled. The customer or the user of the Atomlab 960 Thyroid Uptake System can help prevent electromagnetic interference by maintaining a minimum distance... -
Page 217: Appendix D - Error And Information Messages
<Search> icon to rescan for the correct com port. • HV calibration failed. Confirm the Cs-137 source is properly positioned. If failure persists, please contact your service representative for assistance. ATOMLAB 960 MEDICAL SPECTROMETER APPENDIX D D-1... -
Page 219: Appendix E - Decay Calculations
5. Calculate the elapsed time (t) in the same units as the (T ) that will elapse between when the calibrated activity measurement was made and when you wish to know what the decayed activity of your radioisotope will be. ATOMLAB 960 MEDICAL SPECTROMETER APPENDIX E E-1... - Page 220 5. Calculate the elapsed time (t) in the same units as the (T ) that will elapse between when the calculated activity measurement was made and when you wish to know what the decayed activity of your radioisotope will be. E-2 APPENDIX E Biodex Medical Systems, Inc. © 2014...
- Page 221 5. Look up X n (N) in Table 1. 6. Look up X r (R) in the Decay Factor Chart. 7. Calculate A f = A i x X n (N) x X r (R). ATOMLAB 960 MEDICAL SPECTROMETER APPENDIX E E-3...
- Page 222 (.410) = .75262. 7. A (N) x X (R) = 43 mCi x (0.03125) x (.75262) = 1.01 mCi. (N) = 2 0.25 0.125 0.0625 0.03125 0.01563 0.007813 0.003906 0.001953 0.000977 Table 1 E-4 APPENDIX E Biodex Medical Systems, Inc. © 2014...
- Page 223 .72347 .72297 .72247 .72196 .72146 .72096 .72047 .71997 .71947 .71897 .71847 .71797 .71747 .71698 .71648 .71598 .71549 .71499 .71450 .71400 .71351 .71301 .71252 .71203 .71153 .71104 .71055 .71005 .70956 .70907 .70858 .70809 .70760 ATOMLAB 960 MEDICAL SPECTROMETER APPENDIX E E-5...
- Page 224 .51051 .51015 .50980 .50945 .50909 .50874 .50839 .50803 .50768 .50733 .50698 .50663 .50628 .50593 .50558 .50523 .50488 .50453 .50418 .50383 .50348 .50313 .50278 .50243 .50208 .50174 .50139 .50104 .50069 .50035 .50000 E-6 APPENDIX E Biodex Medical Systems, Inc. © 2014...
- Page 225 = 0.693 / T where = half life specific to the radioisotope. So, using a calculator with the ex function, decay calculations can easily be performed, as shown in the first section of this appendix. ATOMLAB 960 MEDICAL SPECTROMETER APPENDIX E E-7...
- Page 226 This expression is used to generate the Decay Factor Chart for values of R from 0.001 to 0.999. For the above example (5) = 0.03125 (0.410) = 0.75262 = X A = [X (N) x X (R)] A = [0.03125 x 0.75262] 43 mCi = 1.01 mCi E-8 APPENDIX E Biodex Medical Systems, Inc. © 2014...
-
Page 227: Appendix F - Formulas
4. The probability is that it should fail 20% of the time: 10% high and 10% low. This Chi-Square result should be between 4.168 and 14.684. ATOMLAB 960 MEDICAL SPECTROMETER APPENDIX F F-1... - Page 228 Thyroid Uptake There are several methods that can be used in the Atomlab 960 a) Thyroid Uptake when recounting a standard !"#$%&' !"#!!"#$%&# !"#$% !"# Uptake % = x 100 !"#$%&'"( !"#$%#&%!!"# !"#$%&'()* b) Thyroid Uptake with decay correction of the dose !"#$%&' !"#!!"#$%&# !"#$% !"#...
- Page 229 S ystem D isplays A s 1 62.3 d pm ATOMLAB 960 MEDICAL SPECTROMETER...
-
Page 231: Appendix G - Schematics
G. APPENDIX G – SCHEMATICS Schematics provided on the following pages include: • Monitor Stand Assembly • Stand Drawing (2 pgs.) • Block Diagram MCA • Well Counter Drawing ATOMLAB 960 MEDICAL SPECTROMETER APPENDIX G G-1... - Page 232 G-2 APPENDIX G Biodex Medical Systems, Inc. © 2014...
- Page 233 ATOMLAB 960 MEDICAL SPECTROMETER APPENDIX G G-3...
- Page 234 G-4 APPENDIX G Biodex Medical Systems, Inc. © 2014...
- Page 235 ATOMLAB 960 MEDICAL SPECTROMETER APPENDIX G G-5...
- Page 236 G-6 APPENDIX G Biodex Medical Systems, Inc. © 2014...
- Page 237 ATOMLAB 960 MEDICAL SPECTROMETER APPENDIX G G-7...
- Page 238 G-8 APPENDIX G Biodex Medical Systems, Inc. © 2014...
- Page 239 ATOMLAB 960 MEDICAL SPECTROMETER APPENDIX G G-9...
- Page 240 G-10 APPENDIX G Biodex Medical Systems, Inc. © 2014...
- Page 241 ATOMLAB 960 MEDICAL SPECTROMETER APPENDIX G G-11...
- Page 242 G-12 APPENDIX G Biodex Medical Systems, Inc. © 2014...
- Page 243 ATOMLAB 960 MEDICAL SPECTROMETER APPENDIX G G-13...
- Page 244 G-14 APPENDIX G Biodex Medical Systems, Inc. © 2014...
-
Page 245: Block Diagram
Nios II To D/A Const Peak Spectrum from A/D Line Embedded Scope Pulse Detector Memory Converter Restore Proc output Processor To USB Short Time Interface Const Pulse Processor To RS- Live Time Clock Interface ATOMLAB 960 MEDICAL SPECTROMETER APPENDIX G G-15... - Page 246 G-16 APPENDIX G Biodex Medical Systems, Inc. © 2014...
- Page 247 ATOMLAB 960 MEDICAL SPECTROMETER APPENDIX G G-17...
- Page 248 IODEX Biodex Medical Systems, Inc. G-18 APPENDIX G Biodex Medical Systems, Inc. © 2014 20 Ramsey Road, Shirley, New Y ork, 11967-4704, Tel: 800-224-6339 (Int’l 631-924-9000), Fax: 631-924-9241, Email: info@biodex.com, www.biodex.com...
Need help?
Do you have a question about the ATOMLAB 960 and is the answer not in the manual?
Questions and answers
Is Atomlab 960 EOL. out service