Table of Contents
Advertisement
Quick Links
Advertisement
Table of Contents

Related Manuals for Mikroe Codegrip


Summary of Contents for Mikroe Codegrip
- Page 1 C O D E G R I P U S E R M A N U A L...
- Page 2 Thank you for choosing Mikroe! We present you the ultimate debugger and programmer over USB/WiFi solution for embedded development. Elegant on the surface, yet extremely powerful on the inside, we have designed it to inspire outstanding achievements. And now, it’s all yours.
-
Page 3: Table Of Contents
Ta b l e o f c o n t e n t s Introduction 4. CODEGRIP Suite overview 1. Installing CODEGRIP Suite 4.1 Menu section 2. CODEGRIP 4.2 Menu item section 2.1 USB connectivity 4.3 Shortcuts bar 2.2 WiFi connectivity 4.4 Status bar section... -
Page 5: Introduction
MCUs might be added in the future, along with some new functionalities. The graphical user interface (GUI) of the CODEGRIP Suite is clear, intuitive, and easy to learn, offering a very pleasant user Thanks to some advanced and unique features such as experience. -
Page 6: Installing Codegrip Suite
1. Installing CODEGRIP Suite The installation process is easy and straightforward. Download CODEGRIP Suite software application from the link www.mikroe.com/setup/codegrip and follow the steps below. Start the Select the installation destination folder Select the License components agreement to install C O D E G R I P U S E R M A N U A L... - Page 7 Select the Start the start menu installation shortcuts process Installation Finish the progress installation process C O D E G R I P U S E R M A N U A L...
-
Page 8: Codegrip
2. CODEGRIP The CODEGRIP device offers a set of unique and innovative functionalities, some of which have never been used before on a similar device. These functionalities include wireless programming and debugging, power monitoring, advanced debugging options with the SWO support, and more. -
Page 9: Usb Connectivity
filtering option. 2.2 WiFi connectivity The CODEGRIP device can be linked with the CODEGRIP Suite over the WiFi network, allowing it to program and debug the target MCU wirelessly. This is a revolutionary new feature, which allows some unique usage scenarios, currently not available on any other programming/debugging solution in the world. -
Page 10: Target Connector
The CODEGRIP device is based on the powerful 32-bit MCU, which utilizes a programming and debugging operations, to provide the power supply for the target MCU, and to be used as the power input when the CODEGRIP complex firmware to provide all the required functionalities. The firmware will be continuously improved so that additional optimizations, functions, device is powered from the connected development board. -
Page 11: Codegrip Adapters
2.4 CODEGRIP adapters JTAG/SWD programming/debugging headers may vary across different hardware applications. To ensure compatibility with various header configurations there is a set of different adapters available as an additional purchase option. -
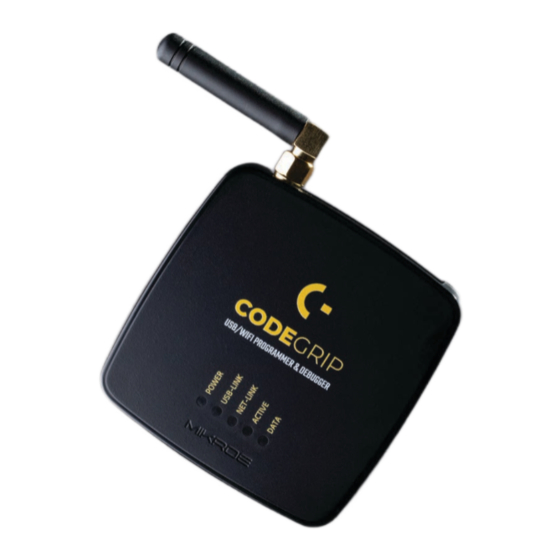
Page 13: Led Indicators
2.5 LED indicators There are five LED indicators on the CODEGRIP device, used to indicate different states of the device, providing visual feedback to the user. POWER Indicates the presence of the power USB-LINK supply Indicates that the connection has been... -
Page 14: Codegrip Link Structure
CODEGRIP Suite applications, while CODEGRIP Suite can have a link to only a single CODEGRIP device at time. Still, it can easily switch the link to any The link is Blocked: this state indicates that the link was blocked because CODEGRIP device detected during the scanning process. -
Page 16: Codegrip Suite Overview
4. CODEGRIP Suite overview The graphical user interface (GUI) of CODEGRIP Suite is clear, intuitive, and easy to use, which ensures a fluid workflow. The main window is divided into several sections, which are used to display and organize all information, tools, and options in a consistent and comprehensible manner. -
Page 17: Menu Section
The Shortcuts bar is another persistent section of the CODEGRIP of the CODEGRIP Suite GUI. By clicking a Menu button, one or more Menu Suite GUI, containing controls for the most commonly used commands. It items are unfolded. Menu items are grouped by the type of the function appears on the top of the Menu item section, just below the title bar. -
Page 18: Status Bar Section
Update availability indicator: As a part of the startup procedure, will highlight it (yellow), indicating that it is clickable. CODEGRIP Suite checks if there is a software update available. If a new Two actions will be performed when clicking the message in the Selected update is available, it will display a notification icon on the status bar,... -
Page 19: Codegrip Suite Explained
5.1 Target MCU Menu items used to interact with the target MCU (the selected MCU upon which the CODEGRIP device performs various programming/debugging tasks) are folded under this Menu button. The Menu button is labeled dynamically, according to the selected target MCU. This allows the user to always be aware of which MCU is set as the target MCU, regardless of the currently selected Menu item. - Page 20 5.1.1 Programming the selected MCU vendor, the programming protocol, connection speed, the flash size of the target MCU, the connection type, and the reset type. Below is the interface used to select and display the program file .bin or .hex file, ready to be uploaded to the target MCU or examined by using a set of options, accessible by clicking the FLASH button.
- Page 21 [Ctrl+O]. Finally, the drag & drop functionality from the The ERASE button is used to erase the entire flash memory content of the target MCU. host OS is also supported by CODEGRIP Suite. The right-click menu is supported. There are Copy File Name, Copy Full BLANK button Path, and Remove File options.
- Page 22 READ button Find READ button performs a reading of the target MCU flash memory content. This function is used to search for an occurrence of the value specified in The content of the memory is then available for the FLASH button related the textbox.
- Page 23 SWO (Serial Wire Output) trace is used to display various SWO-related Monitoring Status messages in the Menu item section of the CODEGRIP Suite. The ARM SWO trace port uses a single pin to stream out data packets over 32 different Options: Paused, Active ports, using the specified clock rate.
- Page 24 5.1.3 Options Set Filters This button opens a new window, which contains five checkboxes, used to manage the incoming SWO messages. There are three message categories, depending on the SWO port they are sent through: Info, Warning, and Error messages. When the specific checkbox is ticked, messages corresponding to that category will be displayed.
- Page 25 MCU, without modifying the state of the RESET line. of MCUs available from the selected vendor. The Under Reset option will set CODEGRIP Suite to hold the target MCU in Typing in this textbox will dynamically filter the MCU list, showing only the reset whenever the connection is attempted.
- Page 26 Target Browse window By clicking the browse button next to the MCU selection dropdown menu, the Target Browse window will pop up. The Target Browse window contains a vendor drop down menu and MCU textbox. Typing in this textbox will dynamically filter the MCU list, showing only the MCU names that contain the characters typed so far.
- Page 27 Dark or Light..it’s your choice!
-
Page 28: Codegrip
USB LINK button Serial number This button is used to create or destroy the USB link to a specific CODEGRIP device. This is a unique serial number associated with the CODEGRIP device. Every device has its own serial number, which is used for the identification. This information cannot be modified by the user. - Page 29 WiFi network for this option to work (more information can be found in the Configuration Menu item description, in this chapter). SCAN DEVICES button This button will start the scanning process. CODEGRIP Suite will try to detect all the CODEGRIP devices visible through USB/WiFi interfaces. Options tab This tab is divided into two subsections, labeled as Scan interface and Remote Scan.
- Page 30 This tab contains some general information about the linked CODEGRIP device. Device Name The name of the currently linked CODEGRIP device can be set here, allowing it to be easily identified by the user. It can consist of up to 32 printable ASCII characters. Hardware version...
- Page 31 The Available Licenses subsection displays all licenses currently available for purchase. The license activation process itself is explained in the in the chapter 5.2.3. Licenses can be purchased at the Mikroe store in the same way as any other item: For WiFi license, please visit www.mikroe.com/codegrip-wi i-license...
- Page 32 AP Mode will configure the WiFi module to work as an access point. The AP Mode the Antenna option is set to “External”, but no external antenna is allows the host PC to establish a direct WiFi connection with the CODEGRIP actually attached) signal strength might be significantly degraded.
- Page 33 This field is used to specify the WiFi link password, which is stored on the CODEGRIP device. CODEGRIP Suite will have to provide this password in order to access the WiFi link to this specific CODEGRIP device. Next to this field, there is a checkbox used to enable or disable this option.
- Page 34 Country Code settings. If used outside of these regions, please set up the WiFi signal parameters When used in the Access Point (AP) mode, the CODEGRIP device will N O T E manually (Channel and Tx level), according to your local radio-frequency have a fixed IP address (192.168.1.1), with the DHCP protocol enabled.
- Page 35 IP Address The IP address of the CODEGRIP device can be set here. Care should be taken not to have two devices with the same IP on the same WiFi network.
- Page 36 5.2.3 License License Menu item offers a set of options that are used to activate a license and enter user information, allowing personalization of the CODEGRIP device. When the License Menu item is clicked, the Menu item section displays two subsections. The subsection labeled as User information contains text boxes which allow some general user information to be entered, including a user name, email, company, and so on.
- Page 37 When a valid code is entered, it can be confirmed and stored by clicking the OK button. CODEGRIP Suite offers multiple codes to be added, allowing simultaneous activation of all available features. All stored codes are displayed on the panel below the buttons.
-
Page 38: Power
This text field is used to display the actual voltage value on the target MCU connector. The CODEGRIP device is not only able to power up the target MCU, but it can also be powered by the target MCU. This field will display... - Page 39 Options: Disabled, Enabled Options: Verify by CRC, Verify by Readback If Enabled, CODEGRIP Suite will check if there is a new version available for If the Verify after Write option is Enabled, the verification method can be download each time it starts.
-
Page 40: Help
5.5 HELP HELP Menu button reveals two Menu items when clicked: About and Updates. These Menu items contain some general information about the CODEGRIP, along with the CODEGRIP Suite update and firmware update tools. 5.5.1 About By clicking on About Menu item, some general information that covers the current version of the release, the development team, and links to the site and email address will be displayed in the Menu item section. - Page 41 CHECK FOR UPDATES button on the bottom is clicked, CODEGRIP Suite will check if there is a more recent version available. A new window will pop up, displaying whether the CODEGRIP Suite is up to date, or there is a new version available.
-
Page 42: Troubleshooting
Check the communication with the CODEGRIP device and the connection Operation failed (VERIFY, READ) between the CODEGRIP device and the MCU. CODEGRIP Suite lost the connection to the CODEGRIP device before the Disconnect from target failed operation was completed. Interface to target currently being used Make sure there is no Debug or SWO process in progress. - Page 43 D I S C L A I M E R All the products owned by MikroElektronika are protected by copyright law and international copyright treaty. Therefore, this manual is to be treated as any other copyright material. No part of this manual, including product and software described herein, must be reproduced, stored in a retrieval system, translated or transmitted in any form or by any means, without the prior written permission of MikroElektronika.
- Page 44 If you want to learn more about our products, please visit our website at www.mikroe.com If you are experiencing some problems with any of our products or just need additional information, please place your ticket at www.mikroe.com/support If you have any questions, comments or business proposals, do not hesitate to contact us at...
Need help?
Do you have a question about the Codegrip and is the answer not in the manual?
Questions and answers