Advertisement
Quick Links
Advertisement

Related Manuals for Flycam FLCM-5000-Q


Summary of Contents for Flycam FLCM-5000-Q
- Page 1 5000 Handheld Video Stabilizer (FLCM-5000-Q) Instruction Manual...
-
Page 2: Table Of Contents
At Flycam, our goal is to ensure 100% Customer Satisfaction in all that we do. We back our sales with a 1 year warranty from the date of purchase and work hard to resolve any problems in the unlikely event one should arise. -
Page 3: Foreword
On behalf of all the people that work so hard to provide you with the most up-to-date, flexible and cost-efficient production gear, we would like to welcome you into the Flycam family. By purchasing your 5000 Handheld Video Stabilizer , you have just joined a host of designers, engineers, machinists, assembly, customer service and office staff that take great pride in all that they do. -
Page 4: Introduction
Introduction Flycam 5000 is a precise camera stabilizer which helps you in getting the stable and smooth gliding movements with absolutely zero shakes. It allows you to make fast moves while following quick actions. Thus it is easy to operate and best for travel shooting, events, and video productions. -
Page 5: Safety Hints
Quick release Lever to remove / adapter attach the quick release Quick release Table Clamp Unico Quick Release Adapter Note: A locking pin located at the front prevents camera rotation. V-shape Adapter (to attach Camera to Head Plate) Storage Bag Safety Hints ATTENTION: PLEASE READ THIS BEFORE USING TO PREVENT SERIOUS DAMAGE TO THE GEAR! -
Page 6: Assembling
ADULT SUPERVISION IS RECOMMENDED Minors using this product should have adult supervision. FOLLOWING THESE GUIDELINES WILL PROVIDE BETTER SHOTS AND TROUBLE-FREE OPERATION. SHOULD YOU NEED ADDITIONAL INFORMATION, TECHNICAL ASSISTANCE IS AVAILABLE ‘ONLINE’ BY CONTACTING YOUR SALES REPRESENTATIVE Assembling A threaded stud is located in the center of Base Platform for attaching Central Post. Securely tighten the adjustment knob on telescoping clamp by rotating it clockwise. - Page 7 Remove Head Plate by unscrewing the four side knobs to mount Quick Release Adapter Loosen allen bolt at the bottom of Quick Release Adapter and attach it to Head Plate. Then attach Head Plate to stabilizer with appropriate fore & aft positioning and tighten all four side knobs, as shown.
- Page 8 Open the lever and remove Quick Release Plate from Adapter. Then attach it with your camera with the help of screw driver. Insert your camera setup with Quick Release Plate into the Adapter and tighten the lever back. NOTE: If you wish to bypass Quick Release Plate, the camera can be directly attached to Head Plate by following this assembly sequence: ...
- Page 9 Keep the camera in center of Head Plate and secure it properly.Do not over tighten this adjustment as it can break the threaded insert. The many slots located on Head Plate and Bottom Plate allows you to easily adjust X & Y Axis for perfect balance.Place the assembly in line with the center of stabilizer post and tighten the side adjusters, as shown.
- Page 10 Adding Weights & Positioning for Proper Balance Continuing the assembly and balance requirements to make your Flycam Handheld Video Stabilizer fully functional you will note that the base platform has a provision to mount the balance weights in their cups via a slot found on both sides of the post.
-
Page 11: Balancing
& upright, with Central Post in a perfect vertical position. NOTE: If you do not have enough weight on Base Platform the entire Flycam could flip upside down. If this movement starts to happen, be ready to catch the sled before a complete 180°... - Page 12 NOTE: The stability of Flycam Stabilizer depends on it being slightly bottom heavy. If it is top heavy, it will tilt more. If it is too bottom heavy, it will be sluggish and hard to aim.
- Page 13 Make sure that everything is tight. Grasp Central Post near the base and move it from vertical to horizontal. Hold it there. Be sure that it will not hit the stand when you drop it. Keep your free hand to catch the central post when it drops.
- Page 14 Holding your Flycam Stabilizer When handling your Flycam 5000 Stabilizer, one hand holds onto the handle while other is used to gently guide the camera in direction you wish to shoot and frame shot. For normal shooting, hold the handle in middle.
- Page 15 NOTE: Flycam 5000 Stabilizer doesn’t work under water, nor is it waterproof. Avoid direct exposure to rain, water spray or any harsh environment. The bearings are not sand proof. Avoid getting dirt or sand in them. Practice Makes You Perfect - Walking the Line Practice this simple exercise to master your Flycam Handheld stabilizer with professional results.
-
Page 16: Warranty
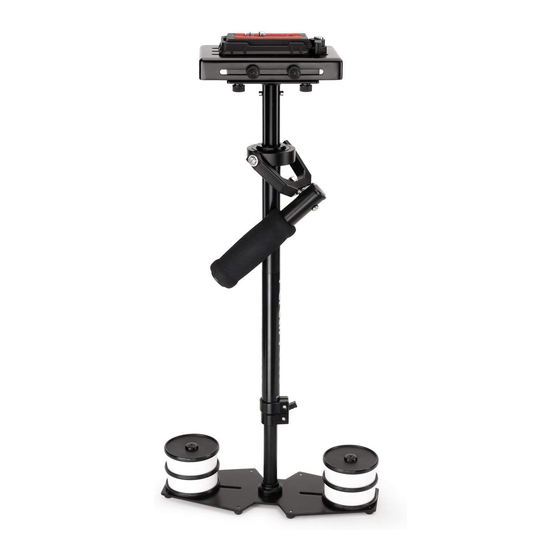
YOUR FLYCAM 5000 HANDHELD VIDEO STABILIZER ALL DRESSED UP AND READY TO GO! (SHOWN WITH OPTIONAL ACCESSORIES) WARRANTY We offer a one year warranty for our products from the date of purchase. We will repair or replace your product, free of charge, in the event of a defect in materials or craftsmanship obtained during normal use or handling based on the user manual.
Need help?
Do you have a question about the FLCM-5000-Q and is the answer not in the manual?
Questions and answers