Table of Contents
Advertisement
HPE StoreEver LTO-8 Ultrium 30750 SAS
Tape Drive User Guide
Abstract
This document provides information about installing, operating, and troubleshooting an HPE
StoreEver LTO-8 Ultrium 30750 Tape Drive. This guide is intended for system administrators
and other users who need physical and functional knowledge of the tape drive. Installing an
internal tape drive requires experience with installing server components.
Part Number: BC023-60004a
Published: February 2018
Edition: 2
Advertisement
Table of Contents
Troubleshooting

Related Manuals for HPE StoreEver LTO-8 Ultrium 30750


Summary of Contents for HPE StoreEver LTO-8 Ultrium 30750
- Page 1 Abstract This document provides information about installing, operating, and troubleshooting an HPE StoreEver LTO-8 Ultrium 30750 Tape Drive. This guide is intended for system administrators and other users who need physical and functional knowledge of the tape drive. Installing an internal tape drive requires experience with installing server components.
- Page 2 © Copyright 2018 Hewlett Packard Enterprise Development LP Notices The information contained herein is subject to change without notice. The only warranties for Hewlett Packard Enterprise products and services are set forth in the express warranty statements accompanying such products and services. Nothing herein should be construed as constituting an additional warranty. Hewlett Packard Enterprise shall not be liable for technical or editorial errors or omissions contained herein.
-
Page 3: Table Of Contents
Contents Overview....................5 Installation requirements.......................5 Rackmount drives.......................5 Server requirements........................5 Cable requirements........................5 About using hardware encryption....................7 When to use encryption..................... 7 About managing encryption keys..................7 About enabling encryption....................8 Diagnostic, management, and support tools.................8 Installing drivers and backup software..........9 Tape drivers...........................9 For Windows........................ - Page 4 The cartridge is jammed....................28 The drive will not accept the cartridge (or ejects it immediately)........30 Methods for troubleshooting encryption..................30 Replacing a tape drive................31 Disconnecting the tape drive.......................31 Replacing an existing SAS hard drive cable........32 Support and other resources...............35 Accessing Hewlett Packard Enterprise Support.................
-
Page 5: Overview
All non Hewlett Packard Enterprise servers require an additional HBA. Hewlett Packard Enterprise recommends purchasing and installing one of the supported HBAs to connect the tape drive to the server. For compatibility information, see the HPE Data Availability, Protection, and Retention Compatibility Matrix at: http://hpe.com/storage/DAPRcompatibility. - Page 6 NOTE: Power for the tape drive is supplied through the SAS cable. Figure 1: SAS cable supplied with the internal tape drive 1. Mini SAS connector to server (remove cover) 2. Unused second branch on supplied cable 3. Mini SAS connector on second branch (unused, 4.
-
Page 7: About Using Hardware Encryption
If the server has a different type of SAS port, either purchase the appropriate cable, or purchase and install a recommended HBA and associated drivers before installing the tape drive. For current information about supported cables and HBAs, see the HPE Data Availability, Protection, and Retention Compatibility Matrix at: http://hpe.com/storage/DAPRcompatibility. -
Page 8: About Enabling Encryption
If you wish to use the encryption capability, you must enable this feature through the backup software application. See the application documentation for information and instructions on enabling encryption. For a list of applications that support hardware encryption, see the HPE Data Availability, Protection, and Retention Compatibility Matrix at: http://hpe.com/storage/DAPRcompatibility. -
Page 9: Installing Drivers And Backup Software
NOTE: The HPE Tape driver is suitable for use in most applications. To ensure that you are using the recommended driver, refer also to the documentation of your software application. -
Page 10: Installing An Internal Tape Drive
Installing an internal tape drive Verifying the server SAS connector type The cable supplied with the product connects to a Mini SAS (SFF-8087) connector on a dedicated HBA or host SAS controller. This is a split cable, but the second branch is not normally required. Do not remove the plastic cover on the spare connector. -
Page 11: Connecting The Cable
Example: Attaching server rails 2. If the server or enclosure rails are less than 1.5 mm thick, use the washers from the GENERAL MOUNTING SCREWS screw pack for a proper fit. Connecting the cable If you are installing the tape drive in an enclosure using the cable that came with the enclosure, skip this section. -
Page 12: Securing The Drive
Securing the drive Procedure 1. Slide the tape drive fully into the drive bay. 2. If the drive is secured with clips, verify that they are engaged and that the drive is secure. If the drive is secured with fasteners, use a PoziDrive #1 screwdriver to secure the 4mm M3 screws provided with the tape drive. -
Page 13: Installing An External Tape Drive
If the server has a different type of SAS port, either purchase the appropriate cable, or purchase and install a recommended HBA and associated drivers before installing the tape drive. For current information about supported cables and HBAs, see the HPE Data Availability, Protection, and Retention Compatibility Matrix at: http://hpe.com/storage/DAPRcompatibility. - Page 14 5. Connect the power cord to the tape drive. 6. Connect the other end of the power cord to a grounded power outlet. WARNING: The supplied power cord is approved for your specific geographic region. Use of a non Hewlett Packard Enterprise approved power cord can result in: •...
-
Page 15: Verifying The Installation
Follow the on-screen instructions to search for the required driver on the server. If necessary, download the driver from the support website: http:// www.hpe.com/support/hpesc c. If tape drivers are not installed (other operating systems) Drivers are included with the operating system and will be loaded automatically. - Page 16 L&TT is available without charge at: http://www.hpe.com/support/tapetools 3. Download and install any operating system upgrades necessary for the backup application. 4. Conduct a backup and restore test to verify that the drive can write data to tape. Use a blank cartridge.
-
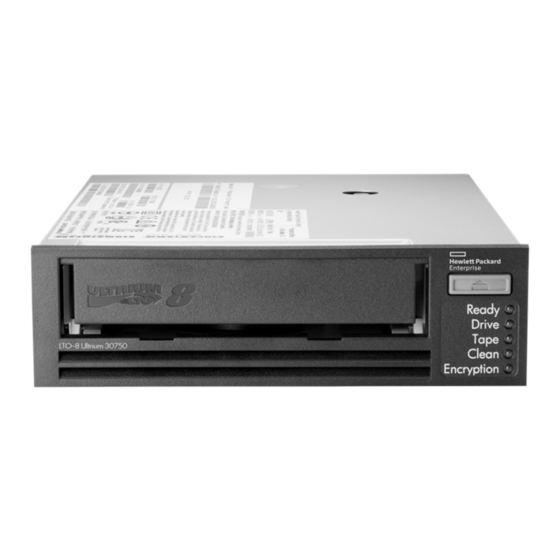
Page 17: Operating The Tape Drive
Operating the tape drive Front panel overview Figure 3: Tape drive front panel (external drive) 1. Eject button 2. Ready LED 3. Drive LED 4. Tape LED 5. Clean LED 6. Encryption LED 7. Power button (external drives only) Understanding the LEDs Figure 4: Tape drive front panel (internal drive) 1. -
Page 18: Data And Cleaning Cartridges
Flashing: encryption or decryption error Data and cleaning cartridges Always use Hewlett Packard Enterprise storage media to prolong the life of the tape drive. To learn more about, or to purchase media, visit the storage media website: http://www.hpe.com/storage/ storagemedia Tape drive... - Page 19 Tape drive LTO-3 LTO-4 LTO-5 LTO-6 LTO-7 LTO-7 LTO-8 model Type M 800 GB 1.6 TB 3 TB 6.25 TB 15 TB 30 TB 2, 3 22.5 TB cartridge cartridge cartridge cartridge cartridge cartridge cartridge LTO-6 read only read/write, read/write Ultrium supported WORM...
- Page 20 WORM data cartridges are clearly identified by their distinctive, two-tone cartridge color. They can only be used with LTO Ultrium tape drives that support the WORM feature. To verify that your backup or archive software application supports WORM cartridges, see the HPE Data Availability, Protection, and Retention Compatibility Matrix at: http://hpe.com/storage/...
-
Page 21: Loading A Cartridge
LTO Ultrium tape drives do not require regular cleaning. An Ultrium universal cleaning cartridge should only be used when the orange Clean LED is flashing. You must use the Ultrium Universal Cleaning cartridge, (C7978A), with HPE LTO Ultrium tape drives, as other cleaning cartridges will not load and run. - Page 22 Procedure 1. Insert the Ultrium Universal Cleaning cartridge. NOTE: If the drive ejects the cleaning cartridge immediately with the Tape LED on, the cleaning cartridge has expired. The drive performs its cleaning cycle, which can take up to 5 minutes. During the cleaning cycle, the orange Clean LED will be on solidly and the green Ready LED will flash.
-
Page 23: Troubleshooting
Troubleshooting NOTE: HPE Library & Tape Tools can be used to help diagnose many problems, see Diagnostic, management, and support tools on page 8. For comprehensive troubleshooting information, see the detailed troubleshooting guide at: http://www.hpe.com/support/storage General troubleshooting procedure If a problem occurs, the first step is to try to establish whether the problem lies with the cartridge, the drive, the host computer and connections, or the way the system is being operated. -
Page 24: Led Sequences
5. Clean the tape heads with the cleaning cartridge, see Cleaning the tape drive on page 21. Verify that you are using the HPE Ultrium Universal cleaning cartridge, C7978A. 6. If the Tape LED is flashing, the cartridge is probably faulty. Try using a different cartridge. - Page 25 1. Ready: green 2. Drive: amber 3. Tape: amber 4. Clean: amber 5. Encryption: blue The following table shows the meaning of different LED patterns. Table 2: LED troubleshooting Cause Action required LED Sequence Drive might not have Make sure that the drive is powered on. The power, may be faulty, or power on/off switch on an external drive may have been power...
- Page 26 Cause Action required LED Sequence The drive is ready for None. This is normal. operation. Ready is ON. The drive is carrying out a None. normal activity (read, If the drive is upgrading firmware, do not reset or write). power cycle it. Ready FLASHES.
- Page 27 Cause Action required LED Sequence Firmware is being None. reprogrammed. Do not reset or power cycle the drive. Ready is OFF, others are ON. The drive requires Load the Ultrium cleaning cartridge. For cleaning. supported cartridges and instructions, see Data and cleaning cartridges on page 18.
-
Page 28: Problems With Cartridges
The write-protect switch is fully operational. It will move from side to side with a positive click. • The support website for additional troubleshooting information: http://www.hpe.com/support/storage The cartridge is jammed If the cartridge is jammed or the backup application is unable to eject it, you can force eject the cartridge. - Page 29 Press the Eject button on the front of the tape drive. Sometimes it is necessary to use the Eject button instead of software to unload a tape because software can lose communication with the product or a rogue application can prevent the software from unloading the tape.
-
Page 30: The Drive Will Not Accept The Cartridge (Or Ejects It Immediately)
Before calling customer service, verify that the tape drive is responding. Methods for troubleshooting encryption • Ensure that you are using an LTO-8 tape drive and an HPE LTO-7 or LTO-8 data cartridge. • Verify that your application software supports the LTO-8 tape drive. If not, update the application software. -
Page 31: Replacing A Tape Drive
If you are not replacing an internal tape drive immediately, insert a blanking plate into the empty bay. Replace the cover on the server and secure with screws, as appropriate. See the complete Hewlett Packard Enterprise limited warranty statement at: http://www.hpe.com/support/Storage-Warranties Disconnecting the tape drive Procedure 1. -
Page 32: Replacing An Existing Sas Hard Drive Cable
The following instructions are valid for some HPE ProLiant servers. This installation uses the HPE SAS split cable to replace one of the existing SAS cables from the host SAS controller to the server's SAS hard disk drive bays. The SAS data cable has four datapaths; this configuration diverts the wiring from one of the hard disk drive bays to the tape drive. - Page 33 1. Host SAS controller (HBA) 3. Rear of server 2. Cable to be removed 4. Front of server 4. Connect the replacement cable supplied with the tape drive to the host SAS controller, as illustrated in the following diagram. Figure 7: Cable routing with replacement SAS cable 1.
- Page 34 Connect a spare power cable from the server's internal power supply to the power connector on the SAS data cable. 6. If the server lost the use of a disk bay, apply the supplied sticker to the blanking plate of the disk bay to show that it is disconnected.
-
Page 35: Support And Other Resources
Support and other resources Accessing Hewlett Packard Enterprise Support • For live assistance, go to the Contact Hewlett Packard Enterprise Worldwide website: http://www.hpe.com/assistance • To access documentation and support services, go to the Hewlett Packard Enterprise Support Center website: http://www.hpe.com/support/hpesc Information to collect •... -
Page 36: Customer Self Repair
IMPORTANT: Access to some updates might require product entitlement when accessed through the Hewlett Packard Enterprise Support Center. You must have an HPE Passport set up with relevant entitlements. Customer self repair Hewlett Packard Enterprise customer self repair (CSR) programs allow you to repair your product. If a CSR part needs to be replaced, it will be shipped directly to you so that you can install it at your convenience. -
Page 37: Regulatory Information
Documentation Feedback (docsfeedback@hpe.com). When submitting your feedback, include the document title, part number, edition, and publication date located on the front cover of the document. For online help content, include the product name, product version, help edition, and publication date located on the legal notices page. -
Page 38: Warranty And Regulatory Information
Warranty and regulatory information For important safety, environmental, and regulatory information, see Safety and Compliance Information for Server, Storage, Power, Networking, and Rack Products. The information is available at http:// www.hpe.com/support/Safety-Compliance-EnterpriseProducts. Table 3: Regulatory model numbers Product Regulatory Model Number...
Need help?
Do you have a question about the StoreEver LTO-8 Ultrium 30750 and is the answer not in the manual?
Questions and answers