Table of Contents
Advertisement
Quick Links
Advertisement
Table of Contents

Related Manuals for Zanussi ZCG64396XA


Summary of Contents for Zanussi ZCG64396XA
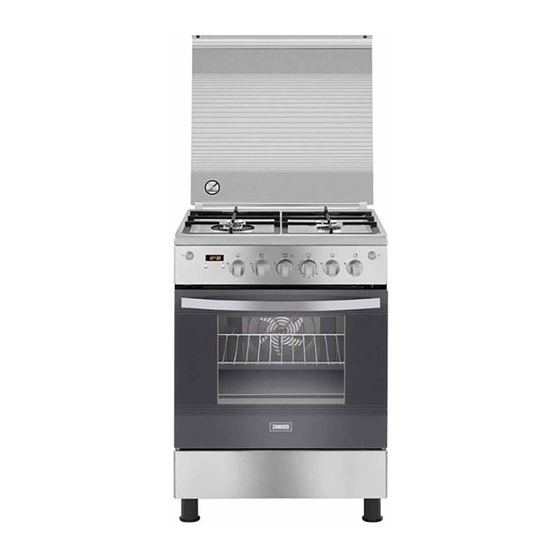
- Page 1 User Manual GETTING STARTED? EASY. ZCG64396XA EN User Manual Cooker...
-
Page 2: Safety Information
SAFETY INFORMATION Before the installation and use of the appliance, carefully read the supplied instructions. The manufacturer is not responsible for any injuries or damages that are the result of incorrect installation or usage. Always keep the instructions in a safe and accessible location for future reference. - Page 3 Do not install the appliance behind a decorative door in order to • avoid overheating. Do not install the appliance on a platform. • Do not operate the appliance by means of an external timer or • separate remote-control system. WARNING: Unattended cooking on a hob with fat or oil can be •...
-
Page 4: Safety Instructions
guards incorporated in the appliance. The use of inappropriate guards can cause accidents. SAFETY INSTRUCTIONS • The shock protection of live and insulated parts This appliance is suitable for the following markets: must be fastened in such a way that it cannot be removed without tools. -
Page 5: Care And Cleaning
• Do not let the appliance stay unattended during • Cookware made of cast iron, aluminium or with operation. a damaged bottom can cause scratches. • Deactivate the appliance after each use. Always lift these objects up when you have to •... -
Page 6: Product Description
• Glass lid can shatter, when heated (if • Do not leave the appliance unattended during applicable). grilling. Accessible parts become hot. • Keep children away when the grill is in use. • Do not put the oven shelf with food on the highest shelf level. -
Page 7: Cooking Surface Layout
COOKING SURFACE LAYOUT Auxiliary burner Steam outlet - number and position depend on the model Semi-rapid burner Semi-rapid burner Triple Crown burner ACCESSORIES WARNING! The storage compartment can become hot • Wire shelf when the appliance operates. For cookware, cake tins, roasts. •... -
Page 8: Hob - Daily Use
HOB - DAILY USE BURNER OVERVIEW WARNING! Refer to Safety chapters. IGNITION OF THE HOB BURNER Always light the burner before you put on the cookware. WARNING! Be very careful when you use open fire in the kitchen environment. The manufacturer declines any responsibility in case of the flame misuse. -
Page 9: Hob - Hints And Tips
HOB - HINTS AND TIPS DIAMETERS OF COOKWARE WARNING! Refer to Safety chapters. WARNING! Use cookware with diameters applicable to the size of burners. COOKWARE WARNING! Do not put the same pan Diameter of cookware on two burners. Burner (mm) WARNING! Do not put unstable or damaged pots on the burner to Triple Crown... -
Page 10: Oven - Daily Use
OVEN - DAILY USE WARNING! Refer to Safety chapters. OVEN FUNCTIONS Oven function Application Off position The oven is off. MIN - Heat settings Range of temperature adjustment. 240°C Grilling To grill flat food in the middle of the grill. To make toast. -
Page 11: Oven - Clock Functions
Do not put the meat directly on the tray or pan. CAUTION! Do not put the meat on the highest shelf level. There is a risk of fire. 1. Open the oven door. 2. Ignite the grill burner. • For manual ignition hold a flame near the 3. -
Page 12: Oven - Using The Accessories
OVEN - USING THE ACCESSORIES WARNING! Refer to Safety chapters. CAUTION! The maximum weight permitted on the turnspit is 4.5 kg. INSERTING THE ACCESSORIES Wire shelf: A. Support hook B. Forks C. Spit D. Handle Put the shelf on the correct shelf position. Make sure it does not touch the back wall of the oven. -
Page 13: Oven - Hints And Tips
8. Put the front part of the spit on the support hook. 9. Remove the turnspit handle. 10. Light the grill. Refer to "Oven - Daily use" chapter. 11. Press the turnspit button 12. Make sure that turnspit rotates. 13. Close the oven door. The turnspit does not stop if you open the oven door. -
Page 14: Cooking Tables
COOKING TABLES Casseroles Food Quantity (kg) Temperature (°C) Time (min) Shelf position 1.5 - 2.5 45 - 50 Lasagna Cannelloni 1.5 - 2.5 45 - 50 Potato gratin 1.5 - 2.5 33 - 40 Macaroni oven 1.5 - 2.5 45 - 50 Kebab Hala 1.5 - 2.5 35 - 40... - Page 15 Food Quantity (kg) Temperature (°C) Time (min) Shelf position Thick 1.4 - 1.5 25 - 30 Calzone 1.4 - 1.5 30 - 35 1) Preheat the oven for 10 minutes. Cakes Food Quantity (kg) Temperature (°C) Time (min) Shelf position Flat cake 0.6 - 1.0 25 - 35...
-
Page 16: Oven - Care And Cleaning
Revolving frying Food Quantity (kg) Grill position Time (min) Shelf position Sheep on 1.5 - 2.0 max. 100 - 120 Turnspit skewer Chicken on 1.2 - 1.8 max. 120 - 140 Turnspit skewer OVEN - CARE AND CLEANING WARNING! Refer to Safety chapters. Do not loosen the screws. - Page 17 Avoid placing the levers in the vertical position and make sure both of them are pulled maximally towards you. 6. Use a spatula made of wood or plastic (or equivalent) to open the inner door. Hold the outer door, and push the inner door against the top edge of the door.
-
Page 18: Replacing The Lamp
REPLACING THE LAMP Make sure the slot in the hinge A rests on the edge of the hinge support B WARNING! Risk of electric shock. before releasing the oven door. The lamp can be hot. 1. Turn off the oven. Wait until the oven is cooled down. - Page 19 WHAT TO DO IF... Problem Possible cause Remedy There is no spark when you try The hob is not connected to an Check if the hob is correctly to activate the spark generator. electrical supply or it is con- connected to the electrical nected incorrectly.
-
Page 20: Service Data
Problem Possible cause Remedy The display shows an error There is an electrical fault. Deactivate the oven with the code that is not in this table. house fuse or the safety switch in the fuse box and activate it again. If the display shows the error code again, contact the Cus- tomer Care Department. -
Page 21: Bypass Diameters
TECHNICAL DATA Voltage 220 - 240 V Dimension Frequency 50 - 60 Hz Width Appliance class Depth Dimension Height 850 - 870 OTHER TECHNICAL DATA Appliance category: II2H3B/P LPG: G30 (3B/P) 28-30 mbar Natural Gas: G20 (2H) 20 mbar BYPASS DIAMETERS BURNER Ø... -
Page 22: Normal Power
GAS BURNERS FOR LPG G30 28-30 mbar NORMAL POWER REDUCED POWER INJECTOR MARK BURNER GAS RATE g/h 1/100 mm Triple Crown 290.8 1.80 Semi-rapid 145.4 0.43 Auxiliary 72.7 0.35 Oven 2.25 163.6 Grill 145.4 GAS CONNECTION FLEXIBLE NONMETAL PIPES CONNECTION If you have an easy access to the connection, you WARNING! Before you connect the can use a flexible pipe. -
Page 23: Adjusting The Minimum Gas Level On The Hob Burner
You can find this plate in the bag WARNING! Before you replace the supplied with the appliance. injectors, make sure that the gas knobs are in the Off position. If the supply gas pressure is not constant or it is Disconnect the appliance from the different from the necessary pressure, install an electrical supply. -
Page 24: Adjusting The Minimum Gas Level On The Oven Burner
2. Carefully remove from the burner the Assemble the burner in a revers sequence. thermocouple A. Next remove the spark plug B. Replace the gas type sticker near the gas supply ramp with the one related to the new gas type. ADJUSTING THE MINIMUM GAS LEVEL ON THE OVEN BURNER 1. -
Page 25: Gas Grill Injector Replacement
3. Assemble the burner in a reverse sequence. WARNING! Put the mains plug Before you fix the screw, make sure that the into the mains socket only if all burner is pushed correctly to the back panel. parts are back into their initial Test the grill injectors. -
Page 26: Electrical Installation
This appliance is supplied with a main plug and a main cable. WARNING! The power cable must not touch the part of the appliance shaded in the illustration. To install all the accessories, do the first step in an opposite sequence. ELECTRICAL INSTALLATION WARNING! The manufacturer is not responsible if you do not follow the... - Page 28 WWW.ZANUSSI.COM/SHOP...
Need help?
Do you have a question about the ZCG64396XA and is the answer not in the manual?
Questions and answers