Table of Contents
Advertisement
Instructions for the User
Warnings
-
-
-
CONTENTS
38
40
41
42
42
43
45
46
48
49
How to read the instruction book
The symbols below will guide you when reading the
instruction book
Safety instructions
Step by Step Operation
Advice and recommendations
Environmental Information
Change of gas
50
50
50
52
37
Advertisement
Table of Contents

Related Manuals for Zanussi ZCG 551GW


Summary of Contents for Zanussi ZCG 551GW
-
Page 1: Table Of Contents
CONTENTS Instructions for the User Instructions for the Installer Warnings Safety Advice Technical Features Installation Description of the appliance Gas connections Using the appliance Change of gas Using the Oven Using the Hob Advice for use Maintenance and Cleaning Something Not Working Guarantee Conditions How to read the instruction book The symbols below will guide you when reading the... - Page 2 WARNINGS • An intensive and prolonged use of the It is very important that this instruction book should be kept safety for future consultation. If it cooker could necessitate a supplementary should be sold or given to another person, please airing by opening the window, or a more ensure that the booklet goes together with it, so effective ventilation by increasing the...
- Page 3 • Ensure that children do not handle the knobs of the appliance, • For reasons of good culinary results, hygiene and safety this appliance must always be kept clean, the fat sprinklers could give off unpleasant smells, • Clean your cooker after each use for guaranteeing a right functioning, •...
-
Page 4: Technical Features
TECHNICAL FEATURES Free standing Class 1 Painted Pan support Enamelled Front right burner Rapid 2,60 kW Back right burner Auxiliary 1,00 kW Front left burner Semirapid 2,00 kW Oven Oven 2,60 kW Oven burner power manual Cleaning Chromed Accessories Oven grid Enamelled Dripping pan Dimensions... -
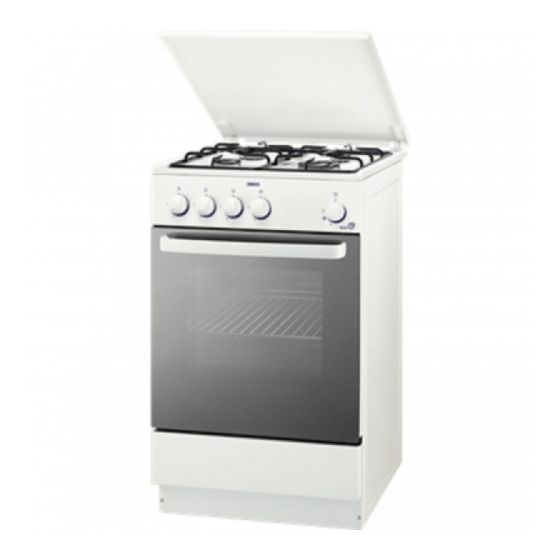
Page 5: Description Of The Appliance
DESCRIPTION OF THE APPLIANCE Control panel Model : ZCG 551GW 1. Oven burner control knob 3. Back right burner control knob 2. Front left burner control knob 4. Front right burner control knob 1000W 2000W 2600W 1. Front left burner (semirapid) 2. -
Page 6: Using The Appliance
USING THE APPLIANCE Before the First Use of the Cooker Remove all packaging both inside and outside of the cooker, before using it. Before first use, the oven should be heated without food. During this time, an unpleasant odour may be emitted. This is quite normal. 1. -
Page 7: Using The Hob
Ignition • Open the oven door and lift the small lid on the bottom of the cavity, push and turn the control knob to the left to the maximum position , and hold a flame near the hole in the bottom;... - Page 8 Ignition of the burners • Push the knob and turn it left to the symbol “big flame” and ignite with a match. • Release the knob after 10 seconds (until the safety valve automatically keeps the burner lit) and check that the burner is ignited. •...
-
Page 9: Advice For Use
ADVICE FOR USE Condensation and steam Oven Cooking • Turn off the oven 5 minutes before the end of When food is heated it produces steam in the same way as a boiling kettle. The oven vents cooking time, and use residual heat to allow some of this steam to escape. -
Page 10: Maintenance And Cleaning
MAINTENANCE AND CLEANING The oven should be kept clean at all times. A build-up of fats or other foodstuffs could result in a fire. Before cleaning, ensure all control knobs are in the OFF position, and the appliance has cooled completely. Cleaning materials Before using any cleaning materials on your oven, check that they are suitable and that their... - Page 11 Oven Cavity The enamelled oven cavity is best cleaned whilst the oven is still warm. Wipe the oven over with a soft cloth soaked in warm soapy water after each use. From time to time it will be necessary to do a more thorough cleaning, using a proprietary oven cleaner.
-
Page 12: Something Not Working
SOMETHING NOT WORKING If the appliance is not working correctly, please carry out the following checks, before contacting your local Service Force Service Centre. IMPORTANT: If you call out an engineer to a fault listed below, or to repair a fault caused by incorrect use or installation, a charge will be made even if the appliance is under guarantee. -
Page 13: Guarantee Conditions
GUARANTEE CONDITIONS Guarantee stipulated in the contract 2 years starting from setting into function the manufacturer will replace the damaged parts except cases mentioned chapter “Reserves”. Conditions for applying For applying this guarantee you have to direct to the distributor who sold you the appliance and submit to him your Guarantee Certificate. -
Page 14: Instructions For The Installer
INSTRUCTIONS FOR THE INSTALLER Connection to gas supply. Safety advice • Check that the gas flow and the diameter of the Before installation ensure that the local supply pipe is sufficient to supply all the distribution conditions (gas type appliances of the installation. pressure) pre-setting appliance are consistent. - Page 15 If the appliance is supplied with Butane or Propane gas check that from the pressure regulator, the pressure for Butane is 28 mbar and for Propane is 37 mbar. Fitting Connection using a rigid pipe or a flexible pipe (class 1). Connection 1.
- Page 16 CHANGE OF GAS Your cooker is foreseen to work with natural gas, Stick the label delivered with the propane or butane. It is not foreseen for butane appliance (spare nozzles, corresponding to or propane air. the type of gas used). For changing the gas type it is necessary to: •...
- Page 17 Replace the nozzles of the hob burners Every appliance has spare nozzles for every type of gas. The whole length of every nozzle is marked in millimetres on the nozzle. Hob burners • Remove the pan support; • Remove the caps and the burner crowns; •...
- Page 18 Air adjustment Oven burner The burner is correctly adjusted when the flame is stable, silent and goes out without any noise. • When the flames are too short, the nozzle is whistling or the flames have the tendency to detach from the burner, it means that there is too much air in the valve.
Need help?
Do you have a question about the ZCG 551GW and is the answer not in the manual?
Questions and answers