Table of Contents
Advertisement
Quick Links
Advertisement
Table of Contents

Related Manuals for Zanussi ZCG92396


Summary of Contents for Zanussi ZCG92396
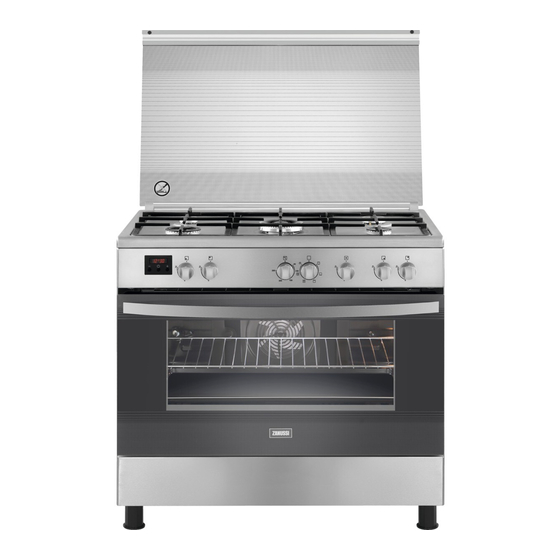
- Page 1 User Manual Cooker ZCG92396...
-
Page 2: Table Of Contents
Cleaning and user maintenance shall not be made by children • without supervision. General Safety Only a qualified person must install this appliance and replace • the cable. Do not operate the appliance by means of an external timer or • separate remote-control system. www.zanussi.com... -
Page 3: Safety Instructions
Always wear door or the window is opened. safety gloves. • Do not pull the appliance by the handle. • The kitchen cabinet and the recess must have suitable dimensions. www.zanussi.com... -
Page 4: Electrical Connection
• This appliance is not connected to a device, – do not put water directly into the hot which evacuates the products of appliance. combustion. Make sure to connect the www.zanussi.com... -
Page 5: Care And Cleaning
• Keep children away when the grill is in use. Authorised Service Centre. • Do not put the oven shelf with food on the • Be careful when you remove the door from highest shelf level. the appliance. The door is heavy! www.zanussi.com... -
Page 6: Product Description
Hob integrated ignition on the control knob Hob ignition on the spark generator button Oven integrated ignition on the control knob Oven ignition on the spark generator button Hob thermocouple Oven thermocouple Enamel Oven cleaning Catalytic Enamel Pan support Cast iron www.zanussi.com... -
Page 7: Before First Use
For roasting larger joints of meat and poultry. • Storage compartment The storage compartment is below the oven cavity. To use the compartment, lift the lower front door then pull it down. Before first use WARNING! Refer to Safety chapters. www.zanussi.com... -
Page 8: Hob - Daily Use
Ignition of a hob burner with the try to light the burner again after thermocouple minimum 1 minute. • For manual ignition put the flame near the burner. Push the knob for the hob down and turn it counterclockwise to the maximum gas flow position www.zanussi.com... -
Page 9: Hob - Hints And Tips
Do not put unstable or damaged pots on the burners to prevent from spill and injury. Cookware CAUTION! WARNING! Make sure that pot handles are not Do not put the same pan on two burners. above the front edge of the cooktop. www.zanussi.com... -
Page 10: Hob - Care And Cleaning
Cleaning the spark plug This feature is obtained through a ceramic ignition candle with a metal electrode. Keep www.zanussi.com... -
Page 11: Oven - Daily Use
1. Open the oven door. 2. Ignite the oven gas burner. • For integrated ignition on the control knob turn the knob for the oven functions counterclockwise to the maximum heat settings and push it to light the burner. www.zanussi.com... -
Page 12: Oven - Clock Functions
Press This function has no effect on the any button to stop the signal. operation of the appliance. Oven - Using the accessories Inserting the accessories WARNING! Refer to Safety chapters. Wire shelf: www.zanussi.com... - Page 13 There is a risk of injury. WARNING! Use oven gloves when you remove the turnspit. The turnspit and the grill are hot. There is a risk of burns. CAUTION! The maximum weight permitted on the turnspit is 4.5 kg. www.zanussi.com...
-
Page 14: Oven - Hints And Tips
• Do not put the objects directly on the Baking cakes appliance floor and do not put aluminium foil on the components when you cook. This can • Do not open the oven door before 3/4 of the set cooking time is up. www.zanussi.com... -
Page 15: Cooking Times
2.0 - 3.5 90 - min. 90 - 100 90 - 100 Duck 2.4 - 3.6 80 - 90 80 - 90 Goose 5.0 - 6.0 80 - 90 80 - 90 Rabbit 2.0 - 3.0 90 - 90 - 120 www.zanussi.com... - Page 16 1.2 - 1.5 30 - 35 Flat cake 2.4 - 3.0 25 - 30 2 and 4 Sponge cake 3.0 - 3.5 90 - 100 Feter Mshalted 2.5 - 3.0 35 - 40 Salty cake 3.0 - 3.5 50 - 60 www.zanussi.com...
-
Page 17: Oven - Care And Cleaning
• To clean metal surfaces, use a usual edged objects or a dishwasher. It can cause cleaning agent. damage to the nonstick coating. • Clean the appliance interior after each use. Fat accumulation or other food remains may result in a fire. www.zanussi.com... - Page 18 To install the oven door, do the above steps in the opposite sequence. 3. Close the oven door to the first opening position (halfway). Then pull forward and remove the door from its seat. www.zanussi.com...
-
Page 19: Troubleshooting
The flame can look orange or yel- low. low in some areas of the burner. This is normal. The oven does not heat up. The oven is deactivated. Activate the oven. The lamp does not operate. The lamp is defective. Replace the lamp. www.zanussi.com... -
Page 20: Installation
Keep a distance of about 1 cm between the appliance and the back wall to make sure that the lid opens. For minimal distances for fitting check the table. www.zanussi.com... - Page 21 Depth Minimum distances Appliance class Dimension Other technical data Appliance category: II2H3B/P LPG: G30 (3B/P) 28-30 mbar Natural Gas: G20 (2H) 20 mbar Bypass diameters BURNER Ø BYPASS 1/100 mm Auxiliary 29 / 30 Semi-rapid Rapid Dual Oven Grill www.zanussi.com...
- Page 22 Use a fixed connections or use a flexible stainless steel pipes in compliance with the regulation in force. If you use flexible metallic pipes, make sure they do not come in touch with mobile parts and they are not squeezed. www.zanussi.com...
- Page 23 If the supply gas pressure is not constant or it is The gas rate is adjusted to suit. different from the necessary pressure, install an applicable pressure adjuster on the gas supply pipe. www.zanussi.com...
- Page 24 7. Screw on slowly the bypass screw till the burner. flame becomes minimum and stable. 8. Put the knob for the hob back on. Oven injector replacement 1. Remove the bottom plate of the oven cavity to get access to the oven burner . www.zanussi.com...
- Page 25 Gas grill injector replacement 2. Remove the knob for the oven functions. If there is no access to the bypass screw 1. Release the screws which keep the grill dismount the control panel before burner in position A. adjustment start. www.zanussi.com...
-
Page 26: Electrical Installation
To install all the accessories, do the first step in an opposite sequence. Electrical installation WARNING! The manufacturer is not responsible if you do not follow the safety precautions from Safety chapters. www.zanussi.com... -
Page 27: Environment Concerns
Dispose all electrical goods via symbol . Dispose of all packaging materials applicable local authority collections, or at local appropriately and help to protect the authority or, commercial recycling centres. environment, and future generations. Do not dispose of electrical equipment marked with the www.zanussi.com... - Page 28 www.zanussi.com/shop...
Need help?
Do you have a question about the ZCG92396 and is the answer not in the manual?
Questions and answers