Advertisement
Quick Links
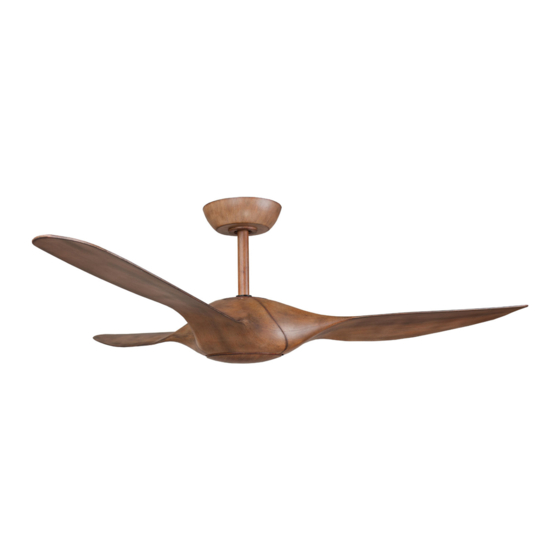
ORIGIN 56" DECORATIVE DC CEILING FAN
YOUR FANCO 56" ORIGIN DC CEILING FAN:
Congratulations on the purchase of your new quality Fanco 56" Origin DC Ceiling Fan. Before
installation, it is most important that you read and follow the instructions in this use and care
booklet, even if you feel you are quite familiar with this type of product.
Find a safe place and keep this booklet handy for future reference.
THIS PRODUCT MUST BE INSTALLED BY A QUALIFIED ELECTRICIAN
Installation Manual
CFFCOR4WH – White
Remote control included
CFFCOR4KO – Dark Koa
Remote control included
THIS IS NOT A DIY PRODUCT.
1
Advertisement

Related Manuals for Fanco ORIGIN CFFCOR4KO


Summary of Contents for Fanco ORIGIN CFFCOR4KO
- Page 1 Remote control included YOUR FANCO 56” ORIGIN DC CEILING FAN: Congratulations on the purchase of your new quality Fanco 56” Origin DC Ceiling Fan. Before installation, it is most important that you read and follow the instructions in this use and care booklet, even if you feel you are quite familiar with this type of product.
- Page 2 IMPORTANT SAFEGUARDS: Read all instructions carefully, even if you feel you are quite familiar with this type of appliance. When using electrical appliances, in order to reduce the risk of fire, electric shock, and/or injury, these basic safety precautions should always be followed: 1.
- Page 3 PREPARATION: 1. Unpack your ceiling fan carefully, then remove all parts and components, and lay on a cloth or soft surface to avoid damage. DO NOT lay the motor housing on its side, the housing may get damaged. 2. Before commencing installation, check that all parts are included. NB: You may need to remove all foam packaging material to ensure there are no missing components.
- Page 4 INSTALLATION AND ASSEMBLY CAUTION: Before installing the fan make sure you have turned OFF the electricity supply. SELECTING A LOCATION: 1. Choose a location for mounting the fan where the blades will have at least 2.1 metres of clearance from the floor. 2.
- Page 5 DISSAMBLEY OF ROD AND BALL Assembly of Fan STEP 1: From one end of the downrod (A), unscrew the holding screw (B), slide the ball down (C) remove the ball-pin (D). STEP 2: Slide the ball up and totally off the downrod. Keep all pieces to reassemble later. STEP 3: From the other end of the downrod , remove the cotter-pin (F), and slide out the cross-pin (G).
-
Page 6: Table Of Contents
STEP 8: Turn the motor housing upside down to install the blades. STEP 9: Align the first blade onto the lower (H) mounting holes and secure blade loosely with two screws and washers. STEP 10: Repeat with the remaining two blades. STEP 8,9,10 STEP 12 STEP 12: With all blades fitted loosely, ensure they are aligned correctly. -
Page 7: Step
STEP 15: Lift the whole motor assembly into the hanger bracket (O) and rotate the downrod and ball until the ball falls into it groove (P) and prevents the downrod from rotating further . STEP 15, 16, 17 STEP 16: Firmly align and connect the quick connector plugs between the bracket and the motor . STEP 17: Firmly align and connect the quick connector earth plug between the bracket and the ball. -
Page 8: Step
INSTALLING THE BOTTOM COVER STEP 20: Attach the bottom cover by aligning the three slots in the rear of the bottom cover with the 3 pins in the mounting bracket under the fan. STEP 21: Push up and twist to secure. The cover will sit flush with the blades STEP 22: Align the three screw holes in the light base with the screws on the bottom of the fan, twist together and tighten the screws firmly, taking sure not to pinch the light plugs and cables . - Page 9 REVERSE FUNCTION: The “Summer / Winter” reverse function is included in the remote control to make the fan rotate in an anti-clockwise direction during summer. In winter, this can be reversed, so that the blades now move in a clockwise direction. CARE &...
-
Page 10: Step
NOTE: The Hand Held Remote Control System is equipped with a learning frequency function which has code combinations to prevent potential interference from other remote units. The frequency on your Receiver and Transmitter units have been preset at the factory. If the remotes need programming please following these instructions and use a small size tool to change the code switch setting for each remote see FIG (3). -
Page 11: Step
The cost of repairs and / or service call arising from incorrect installation, not due to faulty material or workmanship in accordance with the Fanco warranty, will be payable by the purchaser at the time of repair. -
Page 12: Step
The original purchaser of this Fanco Ceiling Fan is provided with the following warranty subject to the following conditions. Fanco warrants this ceiling fans motor for a period of 5 years from the date of purchase, the first 2 years are covered by an in-home warranty. All parts deemed defective in workmanship or materials will be replaced free of charge.
Need help?
Do you have a question about the ORIGIN CFFCOR4KO and is the answer not in the manual?
Questions and answers