Table of Contents
Advertisement
Quick Links
Advertisement
Table of Contents

Related Manuals for RGBlink C1US


Summary of Contents for RGBlink C1US
- Page 1 C1US USER MANUAL RGB-RD-UM-C1US E001 Article No: V1.0 Revision No:...
-
Page 2: Table Of Contents
3.2 Understanding the MENU Structure......17 3.3 Using the Menu............18 3.3.1 Default Menu..........18 3.3.2 Main Menu.............20 3.3.3 INPUT.............21 3.3.4 OUTPUT............23 3.3.5 TRANSITION..........26 3.3.6 SPLIT..............27 3.3.7 SYSTEM............28 3.3.8 FACTORY RESET........30 3.4 Output Resolution Setting........31 C1US User Manual... - Page 3 3.19【LOAD】Recall Saved Settings......57 CHAPTER 4 ORDERING CODES..........58 4.1 PRODUCT..............58 4.2 OPTIONS..............58 4.2.1 Input Options..........58 CHAPTER 5 Support .............. 59 5.1 Contact Us..............59 CHAPTER 6 APPENDIX............60 6.1 Specification..............60 6.2 Upgrade Device............69 6.3 Terms & Definitions.............70 C1US User Manual...
-
Page 4: Declarations
Operation of this equipment in a residential area may cause harmful interference, in which case the user will be responsible for correcting any interference. Guarantee and Compensation C1US User Manual... - Page 5 RGBlink. If the purchaser or a third party carries out modifications or...
-
Page 6: Operators Safety Summary
Normal wear as well as normal maintenance are not subject to the guarantee provided by RGBlink either. The environmental conditions as well as the servicing and maintenance regulations specified in this manual must be complied with by the customer. - Page 7 To avoid fire hazard, use only the fuse having identical type, voltage rating, and current rating characteristics. Refer fuse replacement to qualified service personnel. Do Not Operate in Explosive Atmospheres To avoid explosion, do not operate this product in an explosive atmosphere. C1US User Manual...
-
Page 8: Installation Safety Summary
Cord. The AC Socket-outlet should be installed near the equipment and be easily accessible. Unpacking and Inspection Before opening C1US processor shipping box, inspect it for damage. If you find any damage, notify the shipping carrier immediately for all claims adjustments. As you open the box, compare its contents against the packing slip. -
Page 9: Chapter 1 Your Product
Chapter 1 Your Product 1.1 In the Box AC Power Cord DVI to HDMI USB Cable Cord Note: AC Power Cable supplied as standard according to destination market. C1US User Manual... -
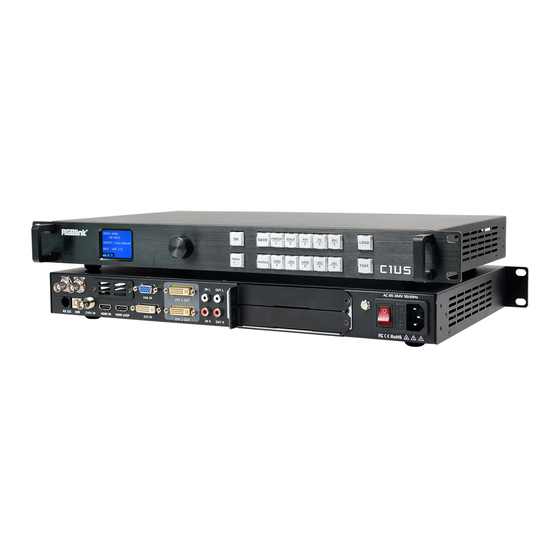
Page 10: Product Overview
1.2 Product Overview C1US is a multiple outputs video process that accepts a wide variety of video signals, including DVI, VGA, HDMI, CVBS and SDI. It also supports an optional input to meet users’ actual need. Its front panel is easy and convenient to operate and rear panel is equipped with two sending card slots for flexible sending card installation. -
Page 11: Rear Panel
1.2.1 Rear Panel INPUT CONNECTORS SDI in and SDI loop Optional input module area VGA/YP Input DB15 port Audio input CVBS input BNC port HDMI and HDIMI loop DVI input C1US User Manual... - Page 12 OUTPUT CONNECTORS DVI output DVI-I port Audio output CONTROL PORT USB-A RS232 OTHERS Sending card slots POWER Power switch Power IEC-3 C1US User Manual...
-
Page 13: Front Panel
Freeze current screen Select HDMI input signal SACL Scale Select DVI input signal Picture in picture Select SDI input signal Full screen Switch mode Numeral button , for Image adjustment scaling and self-defined Load the saved setting C1US User Manual... -
Page 14: Dimension
1.2.3 Dimension Following is the dimension of C1US for your reference: : C1US User Manual... -
Page 15: Chapter 2 Installing Your Product
Turn the power switch on the rear to ON position. TST screen shows as below,meanwhile the device enter initializing state after that,the device will load the previously saved setting. On delivery, the default input is HDMI at resolution 1920x1080@60. INPUT: HDMI NO INPUT OUTPUT:1920x1080@60 VER:1.38 C1US User Manual... -
Page 16: Chapter 3 Using Your Product
The symbol >indicate that the item is selected. Push the knob or【OK】button to confirm the operation. The symbol* means the selected item is under editing state, ready to be set or checked The operation diagram is as follows: C1US User Manual... -
Page 17: Understanding The Menu Structure
3.2 Understanding the MENU Structure The MENU structure is shown in the figure below: C1US User Manual... -
Page 18: Using The Menu
3.3 Using the Menu Use the menu system for convenient and intuitive operation. C1US TST display shows the menu items. The TST display will show the default state when the menu is not in use, or the operation has timed out. Using the 【 MENU 】 button and rotary knob in the front panel, the TST display will show the corresponding menus according to user selections. - Page 19 Show the format and resolution of currently selected input source. OUTPUT Show current output resolution. Users can select Show current software of the device ICON Show the current setting of the device, such as freeze, picture in picture,splitting C1US User Manual...
-
Page 20: Main Menu
Turn the rotary knob, and select any menu above, push the rotary knob or 【OK】 button to confirm, the TST display will show the sub-menu. If push the【MENU】 button, it will return to the last level menu. C1US User Manual... -
Page 21: Input
POS,V POS and do MASK TOP, MASK BOTTOM, MASK LEFT, MASK RIGHT. Parameter can be recovered by RESET SIZE and RESET MASK if the operation is improper. USB CONTROL Optional module,applied to ajust USB Port,PLAY MODE, PLAY FILE, PLAY C1US User Manual... - Page 22 CLOCK, PHASE or choose AUTO AJUST. ADC ADJUST Choose ADC AUTO AJUST or ADC RESET. DESTINATION PORT Select the destination port, HDMI or MODULE EDID MANAGE EDID SOURCE Select the EDID source, RGB DVI, RGB HDMI, OUT_DVI1, OUT_DVI2, FOLLOW, USER DEFINE C1US User Manual...
-
Page 23: Output
DVI mode, bit depth and data OUTPUT range, or set DE. If image quality distorts ADJUST by improper operation, it can be recover by reset. H SIZE Set the horizontal pixels of screen SCREEN V SIZE C1US User Manual... - Page 24 TEXT OVERLAY top and is non-transparent, background transparency is controlled by double-image transparency; MODE 2: Graphic content is controlled by double-image transparency, the background is completely transparent. BLEND LEVEL Blend level setting, the adjustment range is 0~15. C1US User Manual...
- Page 25 TEST PATTERN DISPLAY MODE Support signal test and auto switch SOLID COLOR Set the color threshold of red, green and blue. Adjust from 0 to 255. Gamma GAMMA select LINEAR, sRGB, -1.2, 1.2, -1.4, 1.4, -1.6 or 1.6. C1US User Manual...
-
Page 26: Transition
Transition time select from 0 to 3s ALPHA Transparency, select from 0 to 16 Select ON or OFF to enable or shut down DEINTERLACE the deinterlacing function IMAGE Image enhancement function, select ON ENHANCE or OFF TAKE Select ON or OFF C1US User Manual... -
Page 27: Split
V POS screens Set the horizontal pixels this device will H SIZE provide Set the vertical pixels this device will V SIZE provide. If image quality distorts by improper RESET operation, it can be recover by reset. C1US User Manual... -
Page 28: System
User can also change the date and time. Lock front panel function. If the key is LOCK FRONT locked, the equipment will remind: PANEL "Buttons are locked! Push MENU button for 3s unlock button!" C1US User Manual... - Page 29 User can enable or disable the hot backup function. Select “ON” to set the HOT BACKUP backup signal for BACKUP_1 to BACKUP_5. It will switch to the backup signal if interrupt signal. DEPLAY RECALL Delay output time setting. C1US User Manual...
-
Page 30: Factory Reset
3.3.8 FACTORY RESET >FACTORY RESET FACTORY RESET Select “YES” or “NO”. Select “YES” to restore default settings. C1US User Manual... -
Page 31: Output Resolution Setting
>OUTPUT >> TRANSITION >> SPLIT >> SYSTEM >> 2. Rotate the knob, select <OUTPUT FORMAT> OUTPUT INFO >> >OUTPUT FORMAT >> OUTPUT ADJUST >> SCREEN >> RATIO NORMA 3. Rotate the knob, select <STANDARD> >STANDARD >> CUSTOMIZED C1US User Manual... -
Page 32: Customize Output Resolution
1.Push 【MENU】button, enter the main menu as below and select <OUPUT> INPUT >> >OUTPUT >> TRANSITION >> SPLIT >> SYSTEM >> 2.Rotate the knob, select <OUTPUT FORMAT> OUTPUT INFO >> >OUTPUT FORMAT >> OUTPUT ADJUST >> SCREEN >> RATIO NORMAL C1US User Manual... - Page 33 5.Key in the needed pixels of resolution by using the numeral buttons on front panel and then Push【OK】 For example key in pixels 1536: CUSTOMIZE *1536 Key in the needed pixels of resolution in the same way C1US User Manual...
- Page 34 【OK】,for example key in pixels 1000 CUSTOMIZE *1536x1000 Key in the needed refresh rate and 【OK】 E.g. key in refresh rate 60: CUSTOMIZE *1536x1000@60 8.After resolution key in the device takes 5~10s to finish setting C1US User Manual...
-
Page 35: Scale
V SIZE: set the vertical pixels of output image H POS: set the horizontal position of image V POS: set the horizontal position of image RESET: If operation is not proper, turn knob to <RESET> and start over. C1US User Manual... -
Page 36: Input Sizing Adjust
V SIZE:set the vertical pixels of input image to zoom or scale the input signal H POS:set the horizontal position of image; V POS:set the horizontal position of image; RESET SIZE:If the size is not proper, turn knob to RESET SIZE and Push 【OK】 C1US User Manual... -
Page 37: C1Us User Manual
MASK BOTTOM:crop the bottom of image MASK LEFT:crop the left part of image MASK RIGHT:crop the right part of image RESET MASK:If the crop not proper, turn knob to RESET MASK and push 【OK】 C1US User Manual... -
Page 38: Single Picture Switching
3.7 Single Picture Switching When C1US powers on, system default is HDMI input signal. To switch signal, push 【CVBS】 , 【 VGA】 , 【 DVI】 or 【SDI】 . For example, to switch to VGA, Push 【VGA】button and【HDMI】 button light goes off. If the VGA signal is invalid or not available, the button flashes, otherwise the button constant light. -
Page 39: Pip】Picture In Picture
L+B, PIP R+B, PIP CENTER, PBP L+R and PBP T+B. Here are 3 examples: PIP L+T PBP L+R PBP T+B SWAP IMAGE: Select ON or OFF to switch the main picture and secondary picture (the small one). C1US User Manual... - Page 40 Image transparency setting, the adjustment range is 0 to 16 SECLECT: Select IMAGE A or IMAGE B For example, select image B, the settings such as scaling and sizing ajust will be available for image B. LAYOUT PIP L+T SWAP IMAGE ALPHA >SELECT IMAGE B C1US User Manual...
-
Page 41: Split Setting
3.9 SPLIT Setting C1US can be used in multiple cascade mode to finish split. When do cascade, connect the signals to the signal distributor first, and then connect from the outputs of the signal distributor to each input of C1US. User can also do cascade via HDMI LOOP port. - Page 42 V POS:select the total number of vertical screens H SIZE:set the horizontal pixels this device will provide. V SIZE: set the vertical pixels this device will provide. Reset: If image quality distorts by improper operation, it can be recover by reset. C1US User Manual...
-
Page 43: Text Overlay Setting
2. Push 【DVI】to check DVI input, LCD shows the DVI input. 3.Push 【PIP】, make sure VAG is the small picture and DVI the big picture, if not, turn the <SWAP PICTURE> “ON” in 【PIP】menu. LAYOUT PIP L+B >SWAP PICTURE ALPHA SELECT IMAGE A C1US User Manual... - Page 44 >> V SIZE >> H POS >> V POS >> RESET If there is black rim on top, bottom, left or right of the VGA picture, use <MASK TOP>,<MASK BOTTOM>,<MASK LEFT><MASK RIGHT> to crop the black rim. C1US User Manual...
- Page 45 7.Push 【SAVE】 to save the TEXT OVERLAY as preset. Next time to use, just 【LOAD】 the save, the preset TEXT OVERLAY setting can be used directly. SAVE TO >SAVE1 KEY ON FOR EMPTY FLASH IS FOR USED C1US User Manual...
-
Page 46: Screen Size Setting
H SIZE and V SIZE. V POS:vertical position, default 0, set the value as the way of H SIZE and V SIZE. MODE-- Mode option, select SCREEN SIZE. RESET:If image quality distorts by improper operation, it can be recover by reset. C1US User Manual... - Page 47 H POS V POS MODE FULL SIZE Note: Users can also set <SCREEN> by【FS】 . Push FS, button light on, Led display image in screen size, Push 【FS】again, button light off, Led display image in full size. C1US User Manual...
-
Page 48: Take】Button
【VGA】 signal, push 【VGA】 and button light flashes. The LCD shows the selected signal as follows: INPUT: HDMI NO INPUT TAKE:VGA 1920x1080@60 OUTPUT:1920x1080@60 3.Push 【TAKE】, the selected signal will be switched as set in TRANSITION C1US User Manual... -
Page 49: Tranisition
WIPE BOTTOM LEFT IN, WIPE BOTTOM LEFT OUT, WIPE BOTTOM RIGHT IN, WIPE BOTTOM LEFT OUT, WIPE LEFT IN, WIPE LEFT OUT, WIPE RIGHT IN, WIPE RIGHT OUT, WIPE TOP IN, WIPE TOP OUT, WIPE BOTTOM IN and WIPE BOTTOM OUT C1US User Manual... - Page 50 ALPHA:set the image transparency ranging from 0 to 1S by rotating the knob and Pushing 【OK】. DEINTERLACE:select ON or OFF to enable or shut down the deinterlacing function IMAGE ENHANCE:Image enhancement function, for image edge sharpening, color reduction and image scaling. C1US User Manual...
-
Page 51: Audio Setting
AUDIO IN IMAGEA HDMI INTERNAL MUTE:Select ON or OFF Volume:adjustment range from 0 to 100 AUDIO IN:select the source of the input audio from IMAGE A or IMAGE B HDMI:select internal or external audio for HMDI input C1US User Manual... -
Page 52: Black Out Setting
3.15 BLACK OUT Setting Black out descriptions: Black signal realizes one-key-touch to a black screen. C1US provides black effect processing for output with cut black effect. Operation is as below: Push【MENU】,select <OUTPUT>,push 【OK】; Turn knob to seclect<DISPLAY MODE>, push 【OK】;... - Page 53 C1US User Manual...
-
Page 54: Freeze
Push 【 FREEZE 】 button on the front panel,it will freeze the current playing image. If under TAKE state, the frozen image is from the input about to switch. INPUT: CVBS OUTPUT: 1920X1080@60 DISPLAY MODE:FREEZE IMAGE > > C1US User Manual... -
Page 55: Bri】Image Adjustment
SHAPRNESS:range from 38 to 62 RED:range from 0 to 100 GREEN:range from 0 to 100 BLUE:range from 0 to 100 RESET:If image quality distorts by improper operation, it can be recover by reset *BRIGHTNESS CONTRAST SATRUATION SHARPNESS GREEN BLUE RESET C1US User Manual... -
Page 56: Save】Save Settings
FLASH IS FOR USED Saving to flashing positions will overwrite previously saved settings. For example, button 1 is flashing, after Pushing button 1, LCD shows.Push OK to confirm, MENU to cancel. SAVE 1 used,overwrite Yes<OK>, No <MENU> C1US User Manual... -
Page 57: Load】Recall Saved Settings
1 light is on, Push button 1 to load <save1> LCD shows below: LOAD FROM >SAVE1 FINISHED! KEY ON FOR ALL SAVES FLASH IS CURRENT SET Push MENU to exit LOAD, the button lights go out. C1US User Manual... -
Page 58: Chapter 4 Ordering Codes
DVI Input-1xDVI 190-0001-06-1 HDMI Input/Loop Out 1xHDMI (with loop) 190-0001-07-1 3G-SDI Input/Loop Out 1xSDI (with loop) 190-0001-09-1 CVBS In/Backup 1×CVBS + CVBS BACKUP 190-0001-10-1 USB In/Backup 1×USB + USB BACKUP 190-0001-03-1 Display Port Input (DP1.1)1 × Display Port C1US User Manual... -
Page 59: Chapter 5 Support
CHAPTER 5 Support 5.1 Contact Us C1US User Manual... -
Page 60: Chapter 6 Appendix
CHAPTER 6 APPENDIX 6.1 Specification CVBS Input Number of Inputs Connector Interface Appearance Supported PAL/NTSC Standard Signal Level 1Vpp±3db (0.7V Video+0.3v Sync ) 75 ohm Supported 480i | 576i Resolution C1US User Manual... - Page 61 Connector DB15 Interface VGA-UXGA Appearance Supported Standard Signal Level R G B Hsync Vsync:0 to1Vpp±3dB (0.7V Video+0.3v Sync ) 75 ohm black level: 300mV Sync-tip: 0V Supported VGA-UXGA 800×600@60 | 1024×768@60 Resolution 1280×1024@60 | 1440×900@60 | 1600×1200@60 C1US User Manual...
- Page 62 1280×768@60 | 1280×1024@60 | 1600×1200@60 | 1920×1080@60 Signal Level TMDS pwl, single pixel input,165MHz bandpixels Supported HDMI 1.3 Standard HDMI Loop Out Number of Loop Out Connector HDMI-A Supported SMPTE 625/25/50 PAL, 525/29.97/59.94 Resolution NTSC, 720p50/59.94/60 | C1US User Manual...
- Page 63 1080i50/59.94/60 | 1080P50/59.94/60 VESA 800×600@60 | 1024×768@60 | 1280×768@60 | 1280×1024@60 | 1600×1200@60 | 1920×1080@60 Supported HDMI 1.3 Standard C1US User Manual...
- Page 64 Inputs Connector DVI-I Interface Appearance Supported SMPTE 480i NTSC,576i PAL, Resolution 720p50/59.94/60 | 1080i50/59.94/60 | 1080p50/59.94/60 VESA 800×600@60 | 1024×768@60 | 1280×768@60 |1280×1024@60 | 1600×1200@60 | 1920×1080@60 Signal Level TMDS pwl, single pixel input, 165MHz band width C1US User Manual...
- Page 65 SMPTE 296M (HD) 1280×720/50 (1:1) Resolution | 1280×720/50 (1:1) SMPTE 125M (SD) 1440×487/60 (2:1) | 525-line 487 generic SMPTE ITU-R BT.656 1440×576/50 (2:1) | (SD) 625-line generic Balance Belden 1694A cable 150m at 2.97Gb/s | 250m at 1.485Gb/s | C1US User Manual...
- Page 66 Resolution | 1280×720/50 (1:1) SMPTE 125M (SD) 1440×487/60 (2:1) | 525-line 487 generic SMPTE ITU-R BT.656 1440×576/50 (2:1) (SD) | 625-line generic Balance Belden 1694A cable: 150m at 2.97Gb/s | 250m at 1.485Gb/s | 480m at 270Mb/s C1US User Manual...
- Page 67 1920×1080@30 VESA 800×600@60 | 1024×768@60 | 1024×768@75 | 1280×720@60 | 1280×720@50 | 1280×768@60 | 1280×800@60 | 1280×1024@60 | 1360×768@60 | 1366×768@60 | 1400×1050@60 | 1440×900@60 | 1600×1200@60 | 1680×1050@60 | 1920×1080@60|1920×1080@50 | 1920×1200@60|2048×1152@60 | 2560×812@60 | 2560×816@60 C1US User Manual...
- Page 68 Delay EDID Management ‘Sending card Built-in slots for 2 sending cards (support one big card) Accessories and Operating Condition Communication RJ11/RS232 USB 2.0 Input Voltage AC100-240V/50-60HZ Max Power Working 0°C~45°C Temperature Working 10%~85% Humidity Warranty 3 Years C1US User Manual...
-
Page 69: Upgrade Device
We offer upgrade software pack and tool on our website. 1. Download firmware and upgrade tool package https://rgblink.com/product-detail?id=758 Upzip the the file Follow the C1US Upgrade Guide to install the Upgrade Tool, connect computer and C1US and upgrade C1US. C1US User Manual... -
Page 70: Terms & Definitions
Baudot telegraph code. The number of the electrical oscillations per second, called baud rate. Related to, but not the same as, transfer rate in bits per second (bps). “Blackburst”: The video waveform without the video elements. It includes the vertical sync, horizontal sync, C1US User Manual... - Page 71 In NTSC video, the most commonly used color bars are the SMPTE standard color bars. In PAL video, the most commonly used color bars are eight full field bars. In the computer, the most commonly used color C1US User Manual...
- Page 72 DDWG (Digital Display Work Group). This connection standard offers two different connectors: one with 24 pins that handles digital video signals only, and one with 29 pins that handles both digital and analog video. C1US User Manual...
- Page 73 The difference between what you should have and what is actually output is known as gamma. “HDMI” - High – Definition Multimedia Interface: An interface used primarily in consumer electronics for the C1US User Manual...
- Page 74 “MPEG”: Motion Picture Expect Group. A standard committee under the auspices of the International Standards Organization working on algorithm standards that allow digital comPushion, storage and transmission of moving image information such as motion video, CD-quality audio, and control data at CD-ROM C1US User Manual...
- Page 75 “PIP”: Picture-in-Picture. A small picture within a larger picture created by scaling down one of the images to make it smaller. Each picture requires a separate video source such as a camera, VCR, or computer. Other forms of PIP displays include Picture-by-Picture (PBP) and C1US User Manual...
- Page 76 CCITT V.24 standard. “Saturation”: Chroma, chroma gain. The intensity of the color, or the extent to which a given color in any image is free from white. The less white in a color, the truer the C1US User Manual...
- Page 77 “SMPTE”: Society of Motion Picture and Television Engineers. A global organization, based in the United States, that sets standards for baseband visual communications. This includes film as well as video and television standards. “S-Video”: A composite video signal separated into the C1US User Manual...
- Page 78 USB hub, which may be conveniently located in a keyboard or monitor. USB devices can be attached or detached without removing computer power. The number of devices being designed for USB continues to grow, from C1US User Manual...
- Page 79 640×480 with a color palette of 16 bits and 256,000 colors. “YCrCb”: Used to describe the color space for interlaced component video. “YPbPr”: Used to describe the color space for progressive-scan (non-interlaced) component video. C1US User Manual...
Need help?
Do you have a question about the C1US and is the answer not in the manual?
Questions and answers