Table of Contents
Advertisement
Quick Links
- 1 Figure 1-1. the Bd Accuri C6 Flow Cytometer System
- 2 Bd Accuri C6 Flow Cytometer Specifications
- 3 Safety and Limitations Manual
- 4 Figure 3-2. In-Line Sheath Filter
- 5 Installing Bd Accuri C6 Software
- 6 Figure 3-7 Sip and Sample Stage
- 7 Maintenance
- 8 Troubleshooting and Technical Support
- Download this manual
Advertisement
Table of Contents

Related Manuals for BD Accuri C6


Summary of Contents for BD Accuri C6
-
Page 3: Table Of Contents
4.3.2 Running an Extended Clean of the Flow Cell ..........15 Decontamination Fluid Cycle ................... 15 Cleaning Fluid Cycle ....................15 Purging Air from the BD Accuri C6 Flow Cytometer ..........16 Emptying the Waste Container ................16 Filling the Fluid Bottles ..................... 17 Replacing the Fluidic Bottle Filters ................ - Page 4 Table 1-3. BD Accuri C6 Flow Cytometer Specifications ............2 Table 2-1. Approved Reagents ....................3 Figure 3-1. BD Accuri C6 Flow Cytometer Optics and Fluidics (Top View, Lid Open) ....5 Figure 3-2. In-line Sheath Filter ....................7 Figure 3-3. Interference Filter ....................7 Figure 3-4.
-
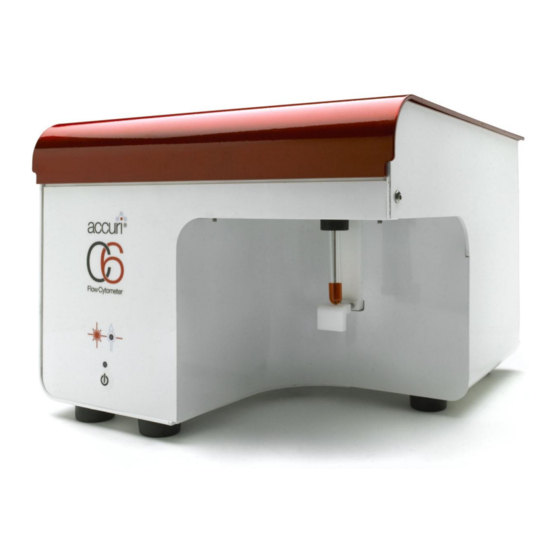
Page 5: Figure 1-1. The Bd Accuri C6 Flow Cytometer System
C6 flow cytometer offers an entirely new vision for the role of flow cytometry in life science research. Designed from the ground up to be compact and easy to use, the BD Accuri C6 flow cytometer fits in any lab and is readily accessible to all researchers—experts and novices alike. -
Page 6: Bd Accuri C6 Flow Cytometer Specifications
BD Accuri C6 Flow Cytometer Instrument Manual Table 1-3. BD Accuri C6 Flow Cytometer Specifications Laser Excitation 488 nm (rated at 20,000 hr life) 640 nm (rated at 20,000 hr life) Laser Profile 10 x 75 µm Laser Power 14.7 mW 640 nm Diode Red Laser... -
Page 7: Safety And Limitations Manual
BD Accuri C6 Flow Cytometer Instrument Manual Refer to the BD Accuri C6 Safety and Limitations Manual (PN 7820091) for complete safety information. When setting up the cytometer, note the details in the following sections to maximize the instrument’s performance. - Page 8 BD Accuri C6 Flow Cytometer Instrument Manual To obtain an MSDS, visit www.AccuriCytometers.com or contact: In the USA: Email TechSupport@AccuriCytometers.com Call Accuri Technical Support at 1.734.994.8000 Outside the USA Visit www.AccuriCytometers.com for country-specific contact information. 7820018-01 Rev-2...
-
Page 9: Figure 3-1. Bd Accuri C6 Flow Cytometer Optics And Fluidics (Top View, Lid Open)
Optical assembly In-line sheath filter Figure 3-1. BD Accuri C6 Flow Cytometer Optics and Fluidics (Top View, Lid Open) Set up the computer, monitor, keyboard, and mouse according to manufacturer’s ® instructions. Computers come preinstalled with Windows 7 Professional. Contact Accuri Technical Support for assistance with other operating systems. -
Page 10: Changing The Workstation Computer Settings For Windows ® 7
Select “Apply”, then select “OK” and close the Personalization window. To view hidden file extensions which distinguish BD Accuri C6 Software files (.c6) from BD Accuri C6 Software template files (.c6t): 1. Click on the Windows Start button and select Control Panel from the pop-up menu. -
Page 11: Figure 3-2. In-Line Sheath Filter
BD Accuri C6 Flow Cytometer Instrument Manual 6. Select “Apply,” then “OK” to save changes and close dialog box. 1. Remove the cytometer and other components from the shipping boxes. 2. With the front of the cytometer facing toward you, lift the top cover. -
Page 12: Figure 3-4. Fluidics Harness
BD Accuri C6 Flow Cytometer Instrument Manual 6. Gently close the cytometer cover. Make sure the cover is securely positioned. If the cover is not closed securely, the cytometer will not function. 7. Place the fluidics bottle tray in a convenient location near the perimeter of the cytometer. -
Page 13: Figure 3-5. Proper Attachment Of Fluidics Lines
BD Accuri C6 Flow Cytometer Instrument Manual Figure 3-5. Proper Attachment of Fluidics Lines 1. Plug the cord from the power supply into the back of the cytometer. Power jack USB port BD CSampler serial cable (used with BD CSampler only) Figure 3-6. -
Page 14: Figure 3-7 Sip And Sample Stage
BD Accuri C6 Flow Cytometer Instrument Manual This section provides details on installing BD Accuri C6 Software and the BD Accuri C6 flow cytometer driver. In most cases, BD Accuri C6 Software will be pre-installed. If software is installed, skip to section 3.5. -
Page 15: Figure 3-8. Improper Shut Down Message
5. When the BD Accuri C6 Software Traffic Light turns green and BD Accuri C6 Software displays the message C6 is connected and ready, run 0.22 µm filtered, DI water for at least 15 minutes before processing samples. - Page 16 BD Accuri C6 Flow Cytometer Instrument Manual NOTE: It is not necessary to exit BD Accuri C6 Software or turn off the computer before turning off the cytometer. 7820018-01 Rev-2...
-
Page 17: Maintenance
An automated notification and reminder system is contained in the BD Accuri C6 Software to alert the user to perform the recommended preventive maintenance as described in this manual. This includes removal and replacement of the peristaltic pump tubing, in-line sheath filter and the fluidic bottle filters. -
Page 18: Figure 4-1. Automated Preventive Maintenance Notification Window
BD Accuri C6 Flow Cytometer Instrument Manual BD Accuri C6 Software will trigger the notification based on the volume of sheath run through the system or on the date since maintenance was last performed. BD Accuri C6 Software will display this notification based on whichever trigger is reached first. -
Page 19: Decontamination Fluid Cycle
6. Run 0.22 µm filtered, DI water for 10 minutes on fast speed. 7. Operate the cytometer as usual. The BD Accuri C6 automatically runs the decontamination fluid cycle when the system is shut down normally. The decontamination fluid cycle lasts about 15 minutes. - Page 20 6. Repeat step 5 two more times to purge bubbles from the system. Empty the waste bottle daily or when prompted by BD Accuri C6 Software to prevent spillover. Biological samples are potentially dangerous and/or life threatening. Adhere to proper handling procedures for samples and reagents at all times.
-
Page 21: Figure 4-2. Waste Line Quick Disconnect
NOTE: BD Accuri C6 Software displays a message when the fluid bottles need attention or if a bottle level sensor is improperly connected. Each of the sheath, cleaner, and decontamination bottles contain a disk filter. -
Page 22: Figure 4-3. In-Line Sheath Filter
BD Accuri C6 Flow Cytometer Instrument Manual 6. Place a tube with 2 mL of 0.22 µm filtered, DI water on the SIP and run for one minute. Check the cytometer periodically to ensure there are no fluid leaks or crimped lines. -
Page 23: Figure 4-4. Peristaltic Pumps And Luer Locks
BD Accuri C6 Flow Cytometer Instrument Manual 8. Gently close the cytometer cover. 9. Place a sample tube with 2mL of 0.22 µm filtered, DI water on the SIP. 10. Plug in and turn on the cytometer. 11. Purge any air from the instrument (see section 4.6). -
Page 24: Figure 4-6. Sliding Luer Lock Fittings Off Of Pump Head
BD Accuri C6 Flow Cytometer Instrument Manual 5. Pull the luer lock connectors outward and slide the luer lock fittings off the pump head. Figure 4-6. Sliding Luer Lock Fittings Off of Pump Head 6. Remove the peristaltic pump tubing and discard according to standard laboratory protocols and regulations. -
Page 25: Troubleshooting And Technical Support
2. Switch the USB cable to a different port on the computer. 3. Make sure the BD Accuri C6 flow cytometer driver was properly installed on the computer by doing the following, in order: ... -
Page 26: Figure 5-1. Browse For Folder Dialog Box
BD Accuri C6 Flow Cytometer Instrument Manual Navigate to the location of the driver software and specify the following path: C:\Program Files\BD Accuri\BD Accuri C6 Software\libraries Then click on the OK button to enter the selected path into the Browse window. -
Page 27: Figure 5-3. Windows Security Window
Figure 5-4. Update Driver Software – Cytometer, Successfully updated your driver software With the C6 driver installed and the USB cable properly connected, BD Accuri C6 Software will indicate that it recognizes the C6 by displaying a green traffic light and the message “C6 is connected and ready”. - Page 28 1. Pause and restart the sample. 2. Run a backflush or unclog (see sections 4.2 and 4.3.1). 3. Run the validation beads (PN 653144 or 653145) (see the BD Accuri C6 Software User Guide for details). If the beads look acceptable, there may be a problem with the sample.
-
Page 29: Limited Warranty
4. From the Instrument menu in BD Accuri C6 Software, activate the manual decontamination fluid cycle by selecting “Run Decontamination Fluid Cycle”. 5. When the Decontamination Fluid Cycle is complete, turn off the BD Accuri C6 6. Remove tube of 0.22 µm filtered, DI water from SIP. - Page 30 BD Accuri C6 Flow Cytometer Instrument Manual Europe, Middle East and Africa BD Biosciences Erembodegem-Dorp 86 9320 Erembodegem Belgium Phone: +32 53 720 882 Customer Support: bd_accuri@europe.bd.com Technical Support: techsupport@europe.bd.com Canada BD Biosciences 2100 Derry Rd West, Suite 100...
- Page 31 For Research Use only. Not for diagnostic or therapeutic procedures. Class 1 Laser Product. BD Accuri, BD Accuri C6 Software, BD Accuri CSampler Software, BD CSampler, and “Science is hard. Flow cytometry should be easy.” are trademarks of Becton Dickinson and Company. ©2012...
Need help?
Do you have a question about the Accuri C6 and is the answer not in the manual?
Questions and answers