Advertisement
Quick Links
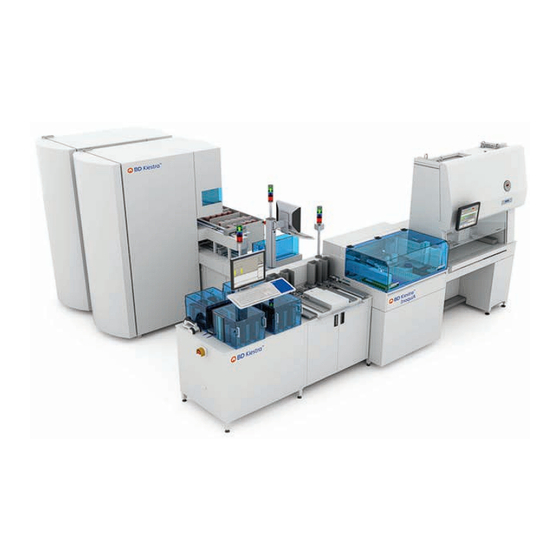
Kiestra™ Work Cell Automation
User's Manual
BD Kiestra B.V.
Marconilaan 6
9207 JC Drachten, The Netherlands
BD Switzerland Sàrl
Terre Bonne Park – A4
Route de Crassier 17
1262 Eysins, Switzerland
Australian and New Zealand Sponsors:
Becton Dickinson Pty Ltd.
66 Waterloo Road
Macquarie Park NSW 2113, Australia
Becton Dickinson Limited
14B George Bourke Drive
Mt. Wellington Auckland 1060, New Zealand
L011039(07) 2022-10
447202, 447206
English
bd.com/e-labeling
Advertisement

Subscribe to Our Youtube Channel
Related Manuals for BD Kiestra Work Cell Automation


Summary of Contents for BD Kiestra Work Cell Automation
- Page 1 Kiestra™ Work Cell Automation User's Manual BD Kiestra B.V. Marconilaan 6 9207 JC Drachten, The Netherlands BD Switzerland Sàrl Terre Bonne Park – A4 Route de Crassier 17 1262 Eysins, Switzerland Australian and New Zealand Sponsors: Becton Dickinson Pty Ltd.
- Page 2 2022-10 Updated for InoqulA+™ refactoring. BD, the BD Logo, BACTEC, BBL, BD Kiestra Optis, ESwab, InoqulA, Kiestra, ReadA, Synapsys, and Vacutainer are trademarks of Becton, Dickinson and Company or its affiliates. All other trademarks are the property of their respective owners. © 2022 BD. All rights reserved.
- Page 3 Limited warranty Conventions Notes, cautions, and warnings Symbols glossary Solution description Intended use System Control Unit SorterA-BarcodA InoqulA+™ FA/SA ReadA™ Compact ProceedA BD Synapsys™ Informatics Solution Components 2.8.1 Common components 2.8.2 SorterA-BarcodA components 2.8.3 InoqulA+™ FA components 2.8.4 InoqulA+™ SA components 2.8.5 Biological Containment Cabinet components 2.8.6...
- Page 4 BD Kiestra™ WCA User's Manual 5.2.1 Destacker overview 5.2.2 BarcodA overview 5.2.3 Stackers overview 5.2.4 Accessing plate logs Preparation for processing 5.3.1 Select the SorterA template 5.3.2 Fill the SorterA boxes with plates 5.3.3 Scan media batch or lot numbers Verifying the SorterA-BarcodA settings 5.4.1...
- Page 5 7.5.2 End of run cleanup Status overview Reprinting labels Secondary inoculation Secondary inoculation from broth tubes Secondary inoculation from plates or BD BACTEC™ bottles InoqulA+™ troubleshooting Protocol for resolving errors Responding to warnings and errors InoqulA+™ warnings 9.3.1 Dishes not present 9.3.2...
- Page 6 BD Kiestra™ WCA User's Manual 11.2 Main window toolbar options 11.2.1 Process Vision overviews 11.2.2 Process Vision tools menu options 11.3 Main window button bar options 11.4 Main window tabs 11.4.1 Machine tab 11.4.2 Logging tab 11.4.3 Debug Log tab 11.4.4 Sensor Charts tab 11.4.5 CSA tab...
- Page 7 20.6 Configuring programs 20.6.1 Program execution 20.6.2 Program templates 20.6.3 Create a new program 20.6.4 Edit incubation step 20.6.5 Edit imaging step: BD Kiestra™ Optis™ images 20.6.6 Edit destination step 20.6.7 Edit vortex step 20.6.8 Add workflow condition 20.6.9 Edit workflow condition 20.6.10 Delete process steps and workflow conditions...
- Page 8 20.9 Frequently used workflows 20.9.1 Adding a new specimen type and specimen group 20.9.2 Synchronization with BD Synapsys™ Informatics 20.9.3 Creating a new barcode label in BD Synapsys™ Informatics 20.9.4 Creating a protocol for AST disk diffusion 20.9.5 Creating a protocol for other tests 20.9.6 Generating configuration notes...
- Page 9 24.3.1 Plate required for calibrating the ReadA™ Compact v1.1 24.3.2 Procedure Overview of supporting applications 25.1 ReadA Overview 25.1.1 Testing and checking programs 25.2 Management Information System 25.3 Reporting errors to BD ArchivA 26.1 Backing up files 26.2 Deleting archived files 26.3 Restoring archived files ArchivA Viewer 27.1 Starting the ArchivA Viewer...
- Page 10 BD Kiestra™ WCA User's Manual 28.3.3 Adjusting print placement 28.3.4 Setting the cutting parameters 28.3.5 Printer configurations 28.3.6 Design the label layout with Label Profiles Editor Contacts Glossary Index...
- Page 11 Before using the product, it is recommended that all users become thoroughly familiar with the contents of the instructions for use as well as the BD Kiestra™ Safety User’s Manual. The Safety User’s Manual includes important instructions and directions to prevent physical injury and damage to the product.
- Page 12 BD or the failure of the owner to maintain reasonable care and precautions in the operation and maintenance of the module will void this warranty and terminate the obligations of the manufacturer as stated herein.
- Page 13 1 - Introduction US Customers only: For symbols glossary, refer to bd.com/symbols-glossary. Symbol Meaning CE marking; Signifies European technical conformity In vitro diagnostic medical device This only applies to US: “Caution: Federal Law restricts this device to sale by or on the order of a licensed practitioner.”...
- Page 14 BD Kiestra™ WCA User's Manual Symbol Meaning Class 2 laser Low clearance Moving parts - pinch point Pinch point Refer to accompanying documentation Sharp point UV lamp Indicates internal high voltage cables that remain powered after the power switch is turned off...
- Page 15 For information on optional components to the solution, refer to the specific component instructions for use. Contact your local BD representative for information on the optional components used for automated ID preparation and imaging. Intended use The BD Kiestra™ Work Cell Automation (WCA) solution which contains in vitro diagnostic medical devices, automates specimen processing as well as transport, incubation, and digital imaging of plates.
- Page 16 SCU by BD. The SCU is installed during installation of the solution, and does not require user intervention. Contact BD in case of problems relating to the SCU. CAUTION Please observe the following precautions to ensure proper operation of the SCU: Do not place any objects on the SCU.
- Page 17 When connected to a BD Kiestra™ Lab Automation Solution, the BD Synapsys™ Informatics Solution enables staff to read plate images remotely, mark colonies for workup, and order reflex tests from anywhere at any time. The BD Synapsys™ Informatics Solution supports an interface with Laboratory Information Systems, providing additional data to support decision making, and improving sample traceability and documentation efficiency.
- Page 18 BD Kiestra™ WCA User's Manual Solution also provides on- demand analytics and lean reports from the BD Kiestra™ Lab Automation Solution. Refer to the BD Synapsys™ Informatics Solution instructions for use. Components WARNING ELECTRIC SHOCK HAZARD AN INTERNAL BATTERY-OPERATED HIGH VOLTAGE POWER SUPPLY REMAINS ACTIVE WHEN THE POWER SWITCH IS TURNED OFF.
- Page 19 2 - Solution description Signal column and beeper near SorterA boxes between the InoqulA+™ FA and SA submodules next to the ProceedA monitor Green, blue, and red lights indicate the status of the solution or any of the modules: green = normal operation blue = warning that requires user attention red = error/malfunction, or a ReadA™ Compact is not in operation mode...
- Page 20 BD Kiestra™ WCA User's Manual BarcodA printer Prints information on the barcode label; the applicator applies the printed label to the side of the plate base. Stackers Sort and store plates according to pre-defined conditions; pushes the stack onto the stacker buffer...
- Page 21 2 - Solution description Rack sensors A sensor under each rack position detects the presence of a rack. Plate barcode scanner Reads the barcode label applied to the plate by the BarcodA Specimen barcode scanner Scans barcode labels on specimen containers and broth tubes Left arm Left arm gripper The left arm moves the left arm gripper.
- Page 22 BD Kiestra™ WCA User's Manual Pipet After picking up a pipet tip from the pipet tip rack, the pipet aspirates the liquid from the specimen container in the clamp, and dispenses the liquid onto plates, broth tubes, and/or slides. It discards the used pipet tip into the pipet tip waste container.
- Page 23 2 - Solution description Drip trays Catch excess specimen material The rear drip tray contains the shaker. The front drip tray contains the clamp. Exhaust unit with HEPA filter Extracts aerosols from the inoculation area Bead dispenser Dispenses a bead (or two beads when using bi-plates) onto the plate prior to inoculation Lifting and rotating cylinder Lifts and rotates plates to enable barcode reading, and to allow...
- Page 24 BD Kiestra™ WCA User's Manual Foot pedal Tapping the pedal allows the user to continue SA inoculation and spreading. Slide dispenser Dispenses slides for manual inoculation; the dispenser is heated for fixation of the inoculum Shifter Moves plates from the front of the SA submodule to the back, for spreading and bead removal.
- Page 25 2 - Solution description 2.8.5 Biological Containment Cabinet components Power switch Located on the right rear of the cabinet Operation control buttons A: LED indicator lights B: Fluorescent light on / off C: Blower on / off D: Alarm mute / reset BCC pressure monitor A: Red LCD digital display indicates cabinet differential pressure...
- Page 26 The numbers on the bottom of the tag (5) indicate the rows included in the rack Contact BD to request incubator rack identification tags if necessary. Manipulator Transports plates to and from rack positions...
- Page 27 2 - Solution description 2.8.7 ProceedA components Output stacker Collects stacks of plates that have been processed; collects defective or unreadable plates Lower track (to incubator infeed) Transports inoculated plates from the InoqulA+™ to the ReadA™ Compact Lower track (to output stackers) Transports plates to the designated stacker Upper track Transports inoculated plates from the ReadA™ Compact outfeed to...
- Page 28 BD Kiestra™ WCA User's Manual WCA input lane For manual feed of plates into the ProceedA. Destacks plates that are placed in the WCA solution manually prior to their placement on the track to the ReadA™ Compact. Each plate leaving the WCA input lane is scanned.
- Page 29 2 - Solution description Plated media are stacked and placed on conveyor belts (A) that transport the stacks of plates toward the central conveyor belt (B). When a plate is requested, the SorterA determines which box contains the corresponding media. The destacker moves a plate from the bottom of the stack onto the central SorterA-BarcodA conveyor belt.
- Page 30 BD Kiestra™ WCA User's Manual Via the rear conveyor belt (H), the plate is transported to the lane shifter at the beginning of the ProceedA, or to an output stacker on the BarcodA submodule. 2.9.3 InoqulA+™ SA plate path The plate arrives at the plate barcode scanner (A) from the SorterA-BarcodA. The scanner reads the plate barcode label and identifies the plate being transported.
- Page 31 2 - Solution description 2.9.4 ProceedA plate path Lower ProceedA The lane shifter at the beginning of the ProceedA (A) shifts the plate to the beginning of the ProceedA conveyor. The ProceedA transports the plate past the manual infeed lane (B) to the scanner position (C).
- Page 32 BD Kiestra™ WCA User's Manual Storage in an incubator The plate is transported by the Lower ProceedA (A) to the input lane of the ReadA™ Compact (B). The ReadA™ Compact scans the plate barcode to assign a storage location. The manipulator (C) places the plate in a storage location (D).
- Page 33 2 - Solution description From incubator to output stacker The plate is transported by the Upper ProceedA (A) to the return lift (B). The return lift transports the plate to the Lower ProceedA (C, rear conveyor). The Lower ProceedA transports the plate to the lane shifter (D). The lane shifter shifts the plate to the output stacker conveyor (E, front conveyor).
- Page 34 BD Kiestra™ WCA User's Manual...
- Page 35 3 - Specifications of the solution Specifications of the solution This section covers the following topics: 3.1 WCA solution specifications 3.2 Disposables specifications 3.3 Specimen processing requirements 3.4 Computer and software connection requirements WCA solution specifications Utility requirements Voltage 100–240 VAC ± 10% Current max.
- Page 36 BD Kiestra™ WCA User's Manual Physical dimensions Weight 1,350 kg (2,975 lb) Height 2,234 mm (88.0 in) InoqulA+™ Width 4,503 mm (177.3 in) (including BCC) Depth 978 mm (38.5 in) Clearance 800 mm (31.5 in) on all sides Weight 700 kg (1,543 lb) Height 1,975 mm (77.8 in)
- Page 37 Additionally, BD maintains a separate, complete list of all specimen containers, carriers, and specimen types that can be used. Only items from these lists may be used on the InoqulA+™. Contact BD for an updated list or for information regarding the use of other specimen containers.
- Page 38 BD Kiestra™ WCA User's Manual Fully automated processing specimen container specifications Specimen container length 60–125 mm Specimen container diameter 10–50 mm diameter 10–54 mm height 11–30 mm Slide specifications Thickness 1 mm Size 25–25.8 x 76 mm Material Glass without a frosted portion Ordering information Epredia™...
- Page 39 4 - InoqulA+™ InoqulA+™ This section covers the following topics: 4.1 Module startup 4.2 User log in or log out 4.3 Module shutdown 4.4 Emergency stop Module startup Prepare an empty, clean work area and place all required plates within reach. Ensure that the SorterA-BarcodA and InoqulA+™ hand scanner are present. Ensure that the InoqulA touchscreen stylus is present.
- Page 40 BD Kiestra™ WCA User's Manual Use either the virtual or physical keyboard to enter your username and password. Use the handheld barcode scanner to scan your personal barcode (if the solution has been configured for scanning personal barcodes). When running in SA mode, the InoqulA+™ is started after pressing Add specimens to batch in the Batch Prepare tab.
- Page 41 4 - InoqulA+™ 4.3.1 InoqulA software shutdown 1. Select x at the upper right of the display. A pop-up window appears, asking you to confirm shutting down the application. Select OK to continue. 2. Depending on your settings, a pop-up window might appear, asking you to push the stacks before closing the software.
- Page 42 BD Kiestra™ WCA User's Manual 8. Select Reset error(s) [F5] from the BarcodA main menu, and then select Start [F2] to restart operation. Uninterruptible power supply Both the InoqulA PC and the BarcodA (server) PC are connected to an uninterruptible power supply (UPS).
- Page 43 5 - SorterA-BarcodA SorterA-BarcodA This section covers the following topics: 5.1 BarcodA main menu 5.2 Status overviews 5.3 Preparation for processing 5.4 Verifying the SorterA-BarcodA settings 5.5 Operation BarcodA main menu The field in the middle of the display (A) shows the BarcodA worklist. It lists all plates to be processed.
- Page 44 BD Kiestra™ WCA User's Manual Status overviews To access the process status overviews for the destackers, BarcodA, and the stackers: 1. Select Process Vision from the menu bar at the top of the display, then select the desired overview. 2. Press the appropriate function key: [F10] for the Destacker Overview, [F11] for the BarcodA Overview, or [F12] for the Stackers Overview.
- Page 45 5 - SorterA-BarcodA 5.2.3 Stackers overview This window shows an overview of plate processing by the stackers. When a plate is received at the stacker, the field on the right side of the display is green (A). When the plate is lifted and added to the stack, the circle on the left side is yellow (B). Additionally, you may view the number of plates that have been added to the stack (C).
- Page 46 Obtain a sufficient number of plates from your laboratory’s storage location. Allow any plates that are stored refrigerated to come to room temperature before use. Once removed from their storage location, BD recommends maintaining plates with the lids upright so that moisture does not form on the lids.
- Page 47 By scanning media batch or lot numbers, the BarcodA software can verify that the correct media are entered in a SorterA box and that the expiry date is still valid. BD recommends allowing the SorterA box to run empty before adding new media and scanning the batch and/or lot codes.
- Page 48 BD Kiestra™ WCA User's Manual Verifying the SorterA-BarcodA settings This section covers the following topics: 5.4.1 Verifying the carbon and label rolls 5.4.1 Verifying the carbon and label rolls Before starting operation, check the supply of labels in the BarcodA printer. The number of labels used is shown on the right side of the BarcodA main window, in the Labels used from roll field.
- Page 49 5 - SorterA-BarcodA 4. During operation, the status of the requests is continually updated and presented on the display: True – indicates that the plates have been transported to the next component. False – indicates that the request has been recreated. 5.5.1 Adding plates during operation When a SorterA box is low on plates, but not yet empty, you may add more stacks of plates to...
- Page 50 BD Kiestra™ WCA User's Manual...
- Page 51 6 - Fully automated specimen processing procedure Fully automated specimen processing procedure This section covers the following topics: 6.1 Preparing for fully automated operation 6.2 Use of specimen containers and specimen racks 6.3 Use of broth tubes 6.4 Use of pipet tips 6.5 Using the slide preparation submodule 6.6 Using beads 6.7 Starting fully automated processing 6.8 Completing fully automated processing...
- Page 52 BD Kiestra™ WCA User's Manual 14. Empty the bead disposal containers if necessary. 15. The shifter cover is connected to the printer cover and the bead disposal drawer. To enable changing the printer label roll or emptying the bead disposal containers during processing, select Unlock printer cover and bead disposal drawer under System Menu.
- Page 53 6 - Fully automated specimen processing procedure 3. Fill racks starting with row A, number 1. After completely filling row A, continue with row B, number 1, etc. 4. Do not leave any spaces between specimen containers. 6.2.2 Placing specimen container racks in the rack holder 1.
- Page 54 BD Kiestra™ WCA User's Manual 6.2.3 Defining specimen container racks in the InoqulA software 1. Select Rack Holder Overview from the main menu. 2. Select the rack to be identified. Rack holders that contain a rack have a green dot and a yellow background.
- Page 55 6 - Fully automated specimen processing procedure confirmation is displayed and rack information is retained. If you continue with the Clear rack action, all rack information resets. 5. Use the hand scanner to scan the barcode of the specimen container rack placed in the selected rack holder, or type the rack barcode number in the field and press Enter.
- Page 56 BD Kiestra™ WCA User's Manual 1. Select Rack Holder Overview from the main menu. The six rack holder positions are presented across the display (A). Rack holder positions with no rack have a red dot (B). Rack holder positions with a rack have a green dot.
- Page 57 6 - Fully automated specimen processing procedure The display shows the specimen containers in the rack and their status. Each specimen container is represented by a circle. Green indicates that the specimen container has been processed (A). Red indicates that an error has occurred for that specimen (B). Select the red circle to view the cause of the error, shown on the right side of the display (F).
- Page 58 BD Kiestra™ WCA User's Manual 3. In the Number of labels field, enter the number of barcode labels needed for broth tubes. Select +1, −1, +10, −10, +100, and −100 to increase or decrease the number of labels to the correct amount.
- Page 59 6 - Fully automated specimen processing procedure 4. Ensure that the rack legs are positioned on the blue sensor in the rack holder. Click the rack firmly into position. 5. On the InoqulA display, a green dot indicates where racks have been placed, and the rack position has a yellow background.
- Page 60 BD Kiestra™ WCA User's Manual 4. If any existing rack information needs to be deleted, select Clear rack. The information in the Rack code field (A) resets. 5. Use the hand scanner to scan the barcode of the broth tube rack placed in the selected rack holder, or type the rack barcode in the field and press Enter.
- Page 61 6 - Fully automated specimen processing procedure The broth tube rack barcodes are linked to the diameter of the broth tubes. When a particular broth tube rack and barcode are reused, the InoqulA software must be updated with data for new tubes. 12.
- Page 62 BD Kiestra™ WCA User's Manual 2. From the Rack Holder Overview display, select the desired broth tube rack to view detailed information about processing status and individual broth tubes. 3. The detailed display shows the broth tubes in the rack and their status. Each broth tube is represented by a circle: White indicates an unused broth tube.
- Page 63 6 - Fully automated specimen processing procedure 3. The pipet tip rack holder can hold up to three pipet tip racks: If your InoqulA+™ is configured with a slide preparation module, that module takes the place of one of the pipet tip racks, and the other two spaces are used for the pipet tips. If your InoqulA+™...
- Page 64 BD Kiestra™ WCA User's Manual 3. Select Edit rack. A yellow background appears on the graphic. 4. Select Reset rack. The InoqulA software resets the rack to the number of pipets indicated. The number of tips in the rack can be adjusted by selecting +10 / −10 / +1 / −1.
- Page 65 6 - Fully automated specimen processing procedure A green background indicates a rack is completely filled with unused pipet tips. An orange background (A) with no yellow, indicates a rack in which most of the pipet tips have been used. A red background indicates an empty rack.
- Page 66 BD Kiestra™ WCA User's Manual 3. Detailed information on the status of the pipet tip supply is shown. A green background indicates a rack that is completely filled with unused pipet tips. An orange background indicates a rack in which most of the pipet tips have been used.
- Page 67 6 - Fully automated specimen processing procedure 4. When the correct number is selected, select Print. The desktop printer prints the requested number of barcode labels. Tear off the labels from the roll. The printer can also be set to automatically cut each label. 5.
- Page 68 BD Kiestra™ WCA User's Manual 6.5.3 Defining slides in the InoqulA software 1. Select Rack Holder Overview from the main menu. 2. Select the slide rack graphic on the right side of the display. The Slide Rack Overview detail is displayed. Changes to the rack are entered using this display.
- Page 69 6 - Fully automated specimen processing procedure 5. Select – or + to change the number of slides. 6. Select −10 or +10 to change the number of slides in units of ten. 7. Select Undo changes to undo any incorrect changes that have been made. The incorrect settings are deleted and you exit the Slide Rack Overview.
- Page 70 BD Kiestra™ WCA User's Manual Using beads The InoqulA+™ inserts disposable magnetic beads into plates prior to inoculation. Several beads may be required for processing a specimen. Used beads are discarded into containers in the back of the module. This section describes the setup and software entry procedures for magnetic beads.
- Page 71 6 - Fully automated specimen processing procedure 10. Close the drawer. NOTE The bead disposal drawer cannot be closed if one of the bead disposal containers is missing. A special locking mechanism detects missing containers to prevent dropping contaminated beads into the InoqulA+™. The following message is displayed, indicating that the bead disposal drawer has been opened.
- Page 72 To resume operation, select Start FA [F2]. NOTE If plates are manually removed from the solution other than being collected from output stackers, BD Synapsys™ Informatics receives no confirmation of the final destination of these plates. Completing fully automated processing This section covers the following topics: 6.8.1 Viewing a completed batch...
- Page 73 6 - Fully automated specimen processing procedure NOTE During automated specimen processing with dispense verification activated, the module actively monitors whether plate inoculation has been successfully performed. If inoculation was not detected for a certain plate, that plate, and all other plates for the specimen being processed, are sent to the waste stacker.
- Page 74 BD Kiestra™ WCA User's Manual...
- Page 75 7 - Semi-automated specimen processing procedure Semi-automated specimen processing procedure This section covers the following topics: 7.1 Preparing for semi-automated specimen processing 7.2 Setting left- and right-handedness 7.3 Defining a specimen batch in the InoqulA software 7.4 Starting semi-automated processing 7.5 Completing semi-automated processing 7.6 Status overview 7.7 Reprinting labels Preparing for semi-automated specimen processing 1.
- Page 76 BD Kiestra™ WCA User's Manual NOTE The LED indicators for inoculation also depend on a specimen’s spreading pattern and analysis. These conditions always take precedence over the user’s handedness. Defining a specimen batch in the InoqulA software NOTE Emergency specimens may be processed by performing manual inoculation in the SA submodule and then adding the specimens to a batch.
- Page 77 7 - Semi-automated specimen processing procedure 3. Alternatively, select Delete All Samples to delete the entire list of specimens. NOTE BD recommends only adding the number of specimens to a batch that you can complete at one time. 7.3.2 Adding an analysis during batch creation While creating a batch, you may add analyses to a specimen.
- Page 78 BD Kiestra™ WCA User's Manual 2. If a barcode cannot be retrieved, the following message is displayed: Select OK to remove the sample from the batch. 3. Select Main View from the main menu if it is not already selected.
- Page 79 7 - Semi-automated specimen processing procedure Gray indicates that the analysis has been completed. Green indicates that the carrier is currently being processed. White indicates that the carrier is ready for future processing. Blue indicates that the analysis has been canceled by the user. Pink indicates a defective plate or that the plate was contaminated, as determined by the user.
- Page 80 ReadA™ Compact for incubation. NOTE If plates are manually removed from the solution other than being collected from output stackers, BD Synapsys™ Informatics receives no confirmation of the final destination of these plates. 7.4.1 Rejecting a plate during inoculation During inoculation, a plate may be unsuitable for inoculation.
- Page 81 7 - Semi-automated specimen processing procedure 2. Select Defect Media. The plate turns pink on the display. 3. Leave the unused plate with the current group of inoculated plates. The unused plate will automatically be sent to the error stacker and can be removed after the batch is complete. In order to complete analysis for this specimen with a new plate, the InoqulA software recreates the same analysis with a new barcode.
- Page 82 BD Kiestra™ WCA User's Manual 2. Select Cancel Analysis. The plate turns blue on the display. 3. Leave the unused plate with the current group of inoculated plates. The unused plate will be sent to the error stacker and can be removed after the batch is complete.
- Page 83 7 - Semi-automated specimen processing procedure Once processing is complete: No new carriers are being transported. There are no plates along any point of the ProceedA. All inoculated plates are stored in a ReadA™ Compact, or are sorted into one of the ReadA™ Compact output stackers.
- Page 84 BD Kiestra™ WCA User's Manual Reprinting labels If no labels are dispensed from the desktop printer, the roll of labels may have run out during inoculation. In addition, if the carbon roll for the desktop printer is empty, the printer will generate blank labels.
- Page 85 Secondary inoculation from plates or BD BACTEC™ bottles 1. Identify a plate or a BD BACTEC™ bottle for which follow-up analyses are needed. 2. Scan the plate or bottle barcode at the SA submodule. The ID is used to retrieve the follow-up analyses from BD Synapsys™...
- Page 86 BD Kiestra™ WCA User's Manual...
- Page 87 All errors and warnings are handled through an interface called the Incident wizard. Each error or warning is displayed with a resolution description and a unique number. If contact with BD Technical Service and Support is required, this information will be requested. The left panel highlights the location of the incident.
- Page 88 The code or ID of the module, submodule, component or workstation (WSID, for BD Technical Service and Support use). The Incident code (for BD Technical Service and Support use). The bottom panel has the following buttons: More Info displays additional information about the problem.
- Page 89 9 - InoqulA+™ troubleshooting 9.3.1 Dishes not present This warning occurs when a SorterA box runs out of plates during operation. 1. Read the message in the BarcodA software. Note which box is empty. 2. Select Reset warning [F6] to stop the audible alarm. 3.
- Page 90 BD Kiestra™ WCA User's Manual When the ProceedA accepts the stack, the warning disappears and the blue light stops flashing. 9.3.5 Slide buffer full If the slide buffer is full, the InoqulA+™ will stop dispensing slides. 1. Read the warning message.
- Page 91 9 - InoqulA+™ troubleshooting If the BCC is not closed, the message below is shown. After selecting OK, select Continue in the Incident wizard to proceed with SA processing. 9.3.8 Waiting for dish InoqulA+™ will delay specimen aspiration until the first plate arrives at the inoculation station. The "Waiting for dish"...
- Page 92 BD Kiestra™ WCA User's Manual 1. Read the message in the BarcodA software. Note the SorterA box number with the error. 2. Select Reset error(s) [F5] to stop the audible alarm. 3. Remove all plates from the SorterA-BarcodA (all plates found on the central conveyor belt).
- Page 93 InoqulA+™ malfunctions Some conditions may not result in an error or warning but can prevent proper functioning of the module. Contact BD for assistance to perform the following procedures. 9.5.1 Inoperable SorterA box 1. Select Stop [F4] in the BarcodA software.
- Page 94 BD Kiestra™ WCA User's Manual An error message may not be issued when this happens, but the situation can result in other errors because subsequent plates are likely to be obstructed by these beads. 1. Select Pause FA [F3]. 2. Close the InoqulA software by selecting the x at the upper right of the display. If you do not close the software, a sensor will trigger and create an error.
- Page 95 9 - InoqulA+™ troubleshooting Recurring errors If you are unable to clear an error (the same message continuously reappears), or if there is a follow-up error in the same area as the previous error, perform the following steps: 1. Select Pause FA [F3] so that all specimen containers, broth tubes, and slides are replaced in their original position.
- Page 96 BD Kiestra™ WCA User's Manual Clearing and synchronizing If the InoqulA+™ is jammed or an error message appears, you may have to clear and synchronize the module. Clearing: plates are removed manually from the module. Synchronizing: the InoqulA software synchronizes with the clearing steps that have been performed.
- Page 97 9 - InoqulA+™ troubleshooting CAUTION Ensure that all plates have been removed along the dotted line path shown in the Clearing Wizard before selecting OK to confirm plate removal. 3. Select OK. 9.7.2 Synchronizing At the end of the clearing procedure, the InoqulA+™ initializes all components, then asks the user to complete the Clearing Wizard.
- Page 98 BD Kiestra™ WCA User's Manual 9.7.3 Synchronizing errors Under normal conditions, when the correct plates reach the first barcode scanner during plate synchronization, the InoqulA+™ automatically resumes inoculation. However, if synchronization takes longer than two minutes, additional steps are needed.
- Page 99 10 - ReadA™ Compact ReadA™ Compact This section covers the following topics: 10.1 The ReadA™ Compact incubator 10.2 Starting the ReadA Compact application 10.3 User log in and log out 10.4 Using the Stop [F4] button 10.5 Emergency stop 10.6 Restart after an emergency stop 10.1 The ReadA™ Compact incubator The ReadA™ Compact incubator should remain turned on at all times to ensure specimen integrity.
- Page 100 BD Kiestra™ WCA User's Manual To log out: Select Log off. The logged-out user can no longer control the ReadA™ Compact. 10.4 Using the Stop [F4] button In all instances, other than an acute emergency, select Stop [F4] to stop operation. This will stop the ReadA™ Compact in a controlled way.
- Page 101 10 - ReadA™ Compact 8. Select Start [F2] to start operation. Any plates that were still on the camera layer when you pressed the emergency stop are transported back into the incubator to safeguard specimen integrity. 9. Restart the other modules in the solution.
- Page 102 BD Kiestra™ WCA User's Manual...
- Page 103 11 - Using the ReadA Compact application Using the ReadA Compact application This section covers the following topics: 11.1 The ReadA Compact application main window 11.2 Main window toolbar options 11.3 Main window button bar options 11.4 Main window tabs 11.1 The ReadA Compact application main window 1. Toolbar (A): access to a number of tools and commands 2.
- Page 104 BD Kiestra™ WCA User's Manual The following options may appear in images used in this manual; however, these options are only accessible for BD staff: Service Tools PLC IO Manager 11.2.1 Process Vision overviews Process Vision provides four different overviews of the current processes in the ReadA Compact:...
- Page 105 11 - Using the ReadA Compact application Infeed overview Outfeed overview 11.2.2 Process Vision tools menu options Select Tools [F7]. Deregister container from machine: Select to deregister a single plate from the database. If you deregister a container, the incubation time is interrupted. The following dialog appears: Enter the barcode and select Search container.
- Page 106 BD Kiestra™ WCA User's Manual Reset disk space warning & error: Select to modify at what point a warning and/or an error must be generated if available disk space (used for storage of images) approaches a critical level. Force empty reserved racks: Select to automatically empty the reserved racks. The plates are transported to other, non-reserved, rack locations.
- Page 107 11 - Using the ReadA Compact application The racks are represented in blocks. Right-click a rack to toggle the status to: green: available yellow: reserved gray: removed After the rack status has been changed, select Apply changes to save, or select Undo changes to abort.
- Page 108 BD Kiestra™ WCA User's Manual The left side of the window shows the Process overview, a visual representation of the current processes. The middle of the window lists the plates (barcodes) in the transfer queue, at the infeed, at the camera, and at the outfeed.
- Page 109 11 - Using the ReadA Compact application 11.4.4 Sensor Charts tab This tab is only available at supervisor level or above. The tab displays an overview of sensor readings. The progress of the measured temperature and CO (if applicable) are graphically presented. The legend to the right of the graphics indicates which information is provided.
- Page 110 BD Kiestra™ WCA User's Manual Green: plate is incubating Light green: incubation time is near expiration Yellow: incubation time has expired; plate should leave the incubator soon Red: incubation has long expired; plate should leave the incubator immediately...
- Page 111 12 - ReadA™ Compact troubleshooting ReadA™ Compact troubleshooting This section covers the following topics: 12.1 Errors 12.2 Protocol for resolving errors 12.3 Error report 12.4 Restarting after an error 12.5 Error messages 12.1 Errors Errors are issued whenever the ReadA™ Compact cannot properly complete operation due to mechanical, electronic, or software-related problems. When an error is issued, the graphical overview shows the error location.
- Page 112 Reset Error [F5] and the Error Report dialog is displayed. Add information to the error report about the error (type and severity) and the resolution. To help improve the ReadA™ Compact, this information may be sent to BD. Select OK to save any changes you made in the error report.
- Page 113 The following list offers a concise overview of error messages, possible causes, and suggestions for resolution. Contact BD in case of an error that cannot be resolved with the help of this information. When resolving an error, always adhere to the safety precautions and guidelines.
- Page 114 BD Kiestra™ WCA User's Manual Error message Possible cause Recommended action 1. Remove obstruction. Container store: motor z-axis Possible obstruction 2. Select Reset Error [F5]. positioning error, position not reached 3. Select Start [F2] to restart the module. 1. Remove obstruction.
- Page 115 12 - ReadA™ Compact troubleshooting Error message Possible cause Recommended action Container store: 1. Select Reset Error [F5]. Maximum position motor rotate-axis exceeded 2. Select Start [F2] to restart the module. position limit reached 1. Select Reset Error [F5]. 2. Validate the container store (Tools [F7] – Container store: no The location does Start container store validation).
- Page 116 BD Kiestra™ WCA User's Manual Error message Possible cause Recommended action 1. Remove obstruction. Camera infeed: rotation motor Possible obstruction 2. Select Reset Error [F5]. current limit overload 3. Select Start [F2] to restart the module. 1. Remove obstruction. Camera: cylinder not Possible obstruction 2.
- Page 117 12 - ReadA™ Compact troubleshooting Error message Possible cause Recommended action Camera: camera ready to image, Various causes Restart the ReadA Compact application. event timeout 1. Remove the plate from the camera outfeed stopper. Camera outfeed: A plate may have 2. Place the plate onto the middle lane of the possible sticky dish become stuck at the ProceedA.
- Page 118 BD Kiestra™ WCA User's Manual Error message Possible cause Recommended action 1. Remove obstruction. Infeed: receive timeout (dish not Possible obstruction 2. Select Reset Error [F5]. detected) 3. Select Start [F2] to restart the module. 1. Remove obstruction. Infeed: cylinder not Possible obstruction 2.
- Page 119 HEPA filter unit is not replaced in time, HEPA filter warning replaced within 2 the complete solution will shut down. months. 2. Contact BD. 1. The complete solution has shut down. Contact the company responsible for HEPA filter can no HEPA filter error replacement of HEPA filters in your lab.
- Page 120 BD Kiestra™ WCA User's Manual...
- Page 121 13 - BD Kiestra™ Optis™ error messages BD Kiestra™ Optis™ error messages Error messages Recommended action 801: Camera device is not connected 865: Exception while storing container information Contact BD. 900: Fast integrity failed 970: General device error: Camera and or lights are not available 980: Unknown imaging error 806: Missing camera definition &...
- Page 122 ReadA™ Compact. NOTES When an error message is displayed, first perform the recommended action. Contact BD if you experience difficulties in performing the recommended action. If this does not resolve the issue, then restart the computer and check the configuration settings of the ReadA Compact application.
- Page 123 14 - ProceedA software ProceedA software This section covers the following topics: 14.1 Displaying a graphic representation of the ProceedA 14.2 Monitoring the ProceedA activities 14.1 Displaying a graphic representation of the ProceedA The Machine tab in the main window provides a graphic overview of the module. 1.
- Page 124 BD Kiestra™ WCA User's Manual module node A square indicates a module node. The name (Returnlift) and the current status of the component (Preparing) are displayed. Transport node A rectangle with rounded corners indicates a transport section (e.g., a conveyor belt). This is called a transport node.
- Page 125 14 - ProceedA software 14.2 Monitoring the ProceedA activities 1. The main window displays the tasks being performed by the ProceedA. Yellow highlighted messages indicate warnings and red highlighted messages indicate errors. 2. The Reset button may be used to stop the ProceedA. 3.
- Page 126 BD Kiestra™ WCA User's Manual...
- Page 127 15 - Using the ProceedA Using the ProceedA This section covers the following topics: 15.1 Startup 15.2 Log in and log out 15.3 Shutdown 15.4 Temporary stop and restart 15.5 Emergency stop 15.1 Startup 1. Turn on the ProceedA. 2. Press the blue reset button. 3.
- Page 128 BD Kiestra™ WCA User's Manual 3. Shut down Windows in the usual manner. 4. If required, turn off the monitor. Once a week, the ProceedA computer should be restarted as a maintenance procedure. 1. Select Reset. 2. Select the x in the upper right corner of the screen to close the ProceedA software.
- Page 129 16 - ProceedA troubleshooting ProceedA troubleshooting This section covers the following topics: 16.1 Protocol for resolving errors 16.2 ProceedA warnings 16.3 ProceedA warning examples 16.4 ProceedA errors 16.5 ProceedA error examples 16.6 Resolving ProceedA errors 16.7 Viewing error logs 16.1 Protocol for resolving errors 1. Troubleshoot the error. 2.
- Page 130 Action: In most cases the normal procedure for resolving errors can be followed. In the case of worn, jammed or broken parts, contact BD for assistance. Receive timeout errors Error example: ‘ProceedA Upper: Output scanner buffer, receive timeout’ with the hint ‘dish or stack not received at node within time’...
- Page 131 16 - ProceedA troubleshooting Action: Follow the normal procedure for resolving errors. Plate errors Error example: 'sticky dish at stopper' with the hint ‘remove the dish from the stopper’ Cause The sensor next to the stopper may be soiled. Action: 1.
- Page 132 BD Kiestra™ WCA User's Manual During the empty check, the ProceedA verifies if the data in the software matches the actual situation on the module. While nodes are being verified, the nodes are displayed in dark green on the Machine tab.
- Page 133 17 - Cleaning and disinfection Cleaning and disinfection Cleaning/disinfection of the solution helps prevent malfunction and reduces the likelihood of contamination with microorganisms. Possible consequences of improper cleaning are: Error messages resulting from failure to perform or complete movements due to foreign material on the sensors Accelerated wear and tear of modules, submodules, and components Contamination of modules, submodules, and components...
- Page 134 When using a brush, be careful not to move dirt to a clean location. 17.2.2 Cleaners and disinfectants BD recommends the use of a single agent that combines functions to facilitate fast and effective cleaning and disinfection. Any exceptions to that recommendation are specified in this protocol.
- Page 135 No rinsing step is required when using this compound. Laboratories that choose to utilize a cleaning/disinfectant other than the compounds recommended by BD should validate efficacy as well as compatibility with all BD Kiestra™ modules, submodules, and components. 17.2.3...
- Page 136 BD Kiestra™ WCA User's Manual LCD monitors 1. Turn off the monitor. 2. Clean with a microfiber wipe, moistened with water if needed. 3. If microbial contamination occurs or is suspected on the monitor surface, disinfect with the recommended cleaning/disinfecting agent sprayed on a microfiber wipe. Wipe dry with a microfiber wipe.
- Page 137 17 - Cleaning and disinfection Lift components Vacuum to remove loose material. Buffer tables Clean with water. If water is insufficient for adequate cleaning or disinfection, use the recommended disinfectant sprayed onto a clean microfiber wipe. Stackers Clean with water. If water is insufficient for adequate cleaning or disinfection, use the recommended disinfectant sprayed onto a clean microfiber wipe.
- Page 138 BD Kiestra™ WCA User's Manual Bead dispenser Empty the bead dispenser and discard the beads. Disinfect the used bead dispenser utilizing one of the following protocols. Record the sterilization date on the dispenser. Autoclave for 15 min. at 121 °C (not trash cycle).
- Page 139 17 - Cleaning and disinfection 17.3.3 ReadA™ Compact components Humidification pan The bottom plate inside the ReadA™ Compact houses a humidification pan. To empty the humidification pan for cleaning: 1. If applicable, turn off the CO supply. 2. Select Stop [F4] in the ReadA Compact application. 3.
- Page 140 BD Kiestra™ WCA User's Manual 7. Raise the camera unit, making sure the camera is firmly locked into place (push until you hear a click). 8. Remove the gray cover of the camera layer and clean the cover with a microfiber wipe moistened with water.
- Page 141 17 - Cleaning and disinfection 10. If microbial contamination occurs or is suspected in the camera area, disinfect with the recommended cleaner/disinfectant sprayed on a microfiber wipe. Wipe dry with a microfiber wipe. 11. Clean all the components with the recommended cleaning products. 12.
- Page 142 BD Kiestra™ WCA User's Manual 1. Cleaning a whole ReadA™ Compact at one time. This approach can be used if a lab has sufficient capacity of a specific atmosphere (CO or O ) such that a ReadA™ Compact can be completely emptied for cleaning.
- Page 143 17 - Cleaning and disinfection Explanatory notes: 1. One ReadA™ Compact can hold 1,152 plates. There is sufficient storage space to completely empty a ReadA™ Compact if there are 1,152 free storage locations with...
- Page 144 BD Kiestra™ WCA User's Manual suitable environmental conditions at the time of cleaning (this includes the free storage locations in the ReadA™ Compact to be cleaned). 2. There is sufficient capacity to reserve racks if there is enough storage space to store the plates in the racks selected for cleaning and the plates that need to be stored until after cleaning has been completed.
- Page 145 17 - Cleaning and disinfection 5. Wait for all the plates to be removed. It can take up to three hours before a ReadA™ Compact is completely empty. 6. Place the plates on the Lower ProceedA or the manual infeed to have them stored in another ReadA™ Compact.
- Page 146 BD Kiestra™ WCA User's Manual ReadA™ Compact is available, store the plates on a trolley and place them back onto the ProceedA after step 19. 9. Remove all racks from the ReadA™ Compact. 10. Spray the recommended cleaner/disinfectant onto a microfiber wipe and wipe down the inside (top, walls, and bottom).
- Page 147 17 - Cleaning and disinfection 5. Place the door guard over the door seals. 6. In the CSA tab, identify the racks with status Reserved and remove these racks . 7. Spray the recommended cleaner/disinfectant onto a microfiber wipe and wipe down the inside (top, walls, and bottom).
- Page 148 BD Kiestra™ WCA User's Manual Use a dishwasher: Clean the racks in a laboratory dishwasher that includes cleaning and rinsing cycles. If the racks are not completely dry when removed from the dishwasher, dry with a clean paper towel or place on a cart to drain.
- Page 149 17 - Cleaning and disinfection 17.5 Decontamination Decontaminate after spills, splashes, or obvious contamination, and before transporting the equipment out of the laboratory. WARNING CONSIDER ALL ORGANISMS AS POTENTIALLY INFECTIOUS AND HANDLE ACCORDING TO STANDARD MICROBIOLOGICAL PRACTICES, SPECIAL PRACTICES, AND SAFETY EQUIPMENT RECOMMENDED FOR BIOSAFETY LEVEL 2 (BSL-2) CONTAINMENT.* BSL-2 PRACTICES INCLUDE, BUT ARE NOT LIMITED TO THE FOLLOWING: WEAR GLOVES AND LAB COAT WHEN HANDLING POTENTIALLY...
- Page 150 BD Kiestra™ WCA User's Manual CAUTION Do not use abrasive or corrosive cleaners (including bleach) inside the equipment. Do not spray or pour liquid directly on surfaces. Exposure to vaporized decontamination methods is not advised, as this may cause damage to the equipment.
- Page 151 BD. 18.1 Maintenance activities During the installation process, BD personnel work with laboratory staff to assign maintenance roles. The maintenance roles and associated activities are described below. Lab Technician Activities: Removing small obstructions that prevent proper functioning...
- Page 152 Service includes readjustment of electronics and pressure, and replacement of worn parts. If a service contract is in place, BD will contact your laboratory when preventive maintenance is due. If there is no service contract, contact BD to schedule preventive maintenance.
- Page 153 HEPA filters in your lab and inform BD. 18.5 Corrective maintenance Corrective maintenance is performed by BD if a malfunction occurs that cannot be resolved by the laboratory staff. Contact BD if you cannot resolve an error. Resolution may require remote access data analysis or dispatching a service associate.
- Page 154 BD Kiestra™ WCA User's Manual 8. Remove the two carbon rolls. The bottom roll is the new roll, the top roll is the used roll. Push both rolls to the right so the spring compresses and allows the rolls to be removed on the left.
- Page 155 18 - Maintenance 13. The printer needs to be calibrated for the correct position of space between the two labels so it knows where to print the barcodes. Select the feed button on the lid. The printer will automatically calibrate. 14.
- Page 156 BD Kiestra™ WCA User's Manual...
- Page 157 Alarm beeper off 19.2 Ordering information Below is a list of disposables, customer replacement, and spare parts for use with the modules. For product availability, consult the BD product catalog (online) or contact your local distributor or BD representative. Catalog number Name...
- Page 158 BD Kiestra™ WCA User's Manual Catalog number Name 447265 BarcodA Printer Label Roll 447266 BarcodA Printer Carbon Roll 447267 BarcodA Printer Cleaning Cloth 447270 InoqulA Desktop Printer Label Roll 447271 InoqulA Desktop Printer Carbon Roll 447272 BD Kiestra™ InoqulA+™ Magnetic Beads...
- Page 159 19 - Appendices Catalog number Container ® Greiner Vacuette 456007 50004 i2a Eau Physiologique CS6006 ISS™ Plastic Container PBT 255 ISS™ Urine Container 3131-345-008 Labcom Centrifuge Tube Conical MW168S MWE Fecal Transwab MW177S MWE NRS II MW176S ® MWE Sigma Transwab MW177S SN 8760...
- Page 160 BD Kiestra™ WCA User's Manual 19.3 Cleaning Table Cleaning method Cleaning frequency Location followed by Daily Weekly Monthly Quarterly FA – drip collection trays FA – leak trays FA – Stainless steel surface next to the pipet tip waste container FA –...
- Page 161 19 - Appendices Cleaning method Cleaning frequency Location followed by Daily Weekly Monthly Quarterly BarcodA – metal bridge (guide) and Brush, the recess underneath, suction cup microfiber area. wipe BarcodA – sensors Brush InoqulA+™ – white and blue conveyer Vacuum belts InoqulA+™...
- Page 162 BD Kiestra™ WCA User's Manual Cleaning method Cleaning frequency Location followed by Daily Weekly Monthly Quarterly ReadA™ Compact – infeed conveyer Vacuum ReadA™ Compact – outfeed Vacuum conveyer ReadA™ Compact – camera in- and Vacuum outfeed conveyer ReadA™ Compact – sensors on in-, Brush...
- Page 163 19 - Appendices Cleaning method Cleaning frequency Location followed by Daily Weekly Monthly Quarterly ReadA™ Compact – racks ReadA™ Compact – inside panels Comments: 1. It is recommended to clean at the end of a shift/day.
- Page 164 BD Kiestra™ WCA User's Manual...
- Page 165 20 - Configuring the main database Configuring the main database The initial configuration of the solution is performed by a team of BD associates during the installation of the solution. In this section, instructions are provided for configuration changes that can be performed by trained key users. It is essential for proper operation to correctly configure the data in the BDK database according to your laboratory standards.
- Page 166 In all tables, the sort order of the records can be changed by selecting on the column name. 20.2 Configuring users To configure users and set initial access rights, see User configuration in the BD Synapsys™ Informatics Solution instructions for use.
- Page 167 20 - Configuring the main database 20.2.1 Edit user rights 1. From the main menu, select Users. A list of all users is displayed. 2. Select a user from the list and select Edit. 3. Select the radio button to select the default setting of user right- or left-handedness. 4.
- Page 168 9. Select OK. A new medium is defined and a medium ID is automatically assigned. 10. Synchronize with BD Synapsys™ Informatics using the manual refresh option. After synchronization, the media code will display as the media name in BD Synapsys™ Informatics. 20.3.2 Delete media 1.
- Page 169 Additional analysis sets, or changes made to analysis sets are automatically synchronized with BD Synapsys™ Informatics. See File synchronization in the BD Synapsys™ Informatics Solution instructions for use. Analysis sets exported to BD Synapsys™ Informatics are assigned an Order Type in BD Synapsys™ Informatics as described in the following table:...
- Page 170 BAP_35C_CO2_2D. A maximum of 20 characters is allowed. The analysis set code is not linked to the LI(M)S, but is linked to BD Synapsys™ Informatics. The code field is used to populate the LIS code field in BD Synapsys™ Informatics.
- Page 171 20 - Configuring the main database 7. Enter or change the export code. The export code is sent from the BD Kiestra™ solution to the LI(M)S, so the LI(M)S recognizes test results. Contact BD for assistance. 8. Select a spreading pattern. Spreading patterns are pre-defined during the database installation.
- Page 172 BD Kiestra™ WCA User's Manual 20.6 Configuring programs A program is a scheme of process steps and workflow conditions. Contact BD for assistance to standardize and properly configure programs. Process steps are pre-defined and are displayed on the left side of the window.
- Page 173 20 - Configuring the main database 20.6.2 Program templates The BD Kiestra™ solution has program templates that have been optimized to work with BD Synapsys™ Informatics. Users are encouraged to modify pre-defined templates to suit their needs. 1. From the program editor window, select Templates.
- Page 174 BD Kiestra™ WCA User's Manual 1. Enter a description. 2. Select an incubation type from the drop-down menu. 3. Enter the incubation time. Use the arrows to increase or decrease the values. 4. Enter the margin. This is the time allowed to elapse between the end of plate incubation and the photograph.
- Page 175 When the software locates an image linked to the imaging step, this image is displayed. When no BD Kiestra™ Optis™ images are linked to the imaging step, the text No Optis available is displayed. In this case, collect one or more images before proceeding: 1.
- Page 176 Images can be set to system images in programs created for use with BD Kiestra™ Imaging Apps. System images will not be set to Ready for Reading, but are read automatically by the BD Kiestra™...
- Page 177 20 - Configuring the main database In some cases, the technologist may deem it necessary to evaluate an intermediate image. Although system images do not appear in reading worklists, it is possible to view system images by searching for the culture and viewing the plate image in Culture Reading. 20.6.6 Edit destination step 1.
- Page 178 BD Kiestra™ WCA User's Manual After defining all program steps, the program editor window will look similar to the example. The program consists of a number of process steps with empty workflow conditions. 20.6.8 Add workflow condition 1. Select the process step.
- Page 179 20 - Configuring the main database 20.6.11 Edit an existing program 1. From the main menu, select Programs. 2. Select a program from the list and select Edit to open the Program editor window. 3. Edit program steps and/or workflow conditions by double-clicking the icons. 4.
- Page 180 BD Kiestra™ WCA User's Manual 20.8.1 Internal incubation The internal incubation example program is used for normal incubation of plates in a ReadA™ Compact. An image is taken after one and two days of incubation. Plate path for the internal incubation example program 1.
- Page 181 20 - Configuring the main database 20.8.2 External incubation The external incubation example program is used for incubation of plates in an external incubator. Plate path for the external incubation example program 1. The plate is transported to the output stacker that is assigned to the appropriate incubation type for this program.
- Page 182 2. The technician takes the plates to the automated ID processing module. If an error plate is identified on the automated ID preparation module: 1. Take the plate to a BD Synapsys™ Informatics workstation. 2. Scan the plate barcode. 3. Re-order the tests or mark new colonies.
- Page 183 20 - Configuring the main database 20.8.4 Internal incubation with loop externally incubated program The internal incubation with loop externally incubated example program is similar to the internal incubation program except after the first imaging step, the plate is stored in an external incubator until the plate is too old.
- Page 184 3. In the SorterA-BarcodA application, assign a media box to each new media. 4. Restart the SorterA-BarcodA application. Step 2: Add the information of the specimen type to BD Synapsys™ Informatics. 1. Perform a manual synchronization in BD Synapsys™ Informatics: a. Select Media, Tests, and Protocols from the Configuration menu.
- Page 185 Enter the specimen type LIS code in the LIS code field. 7. Assign the tag to the specimen type. Step 3: Create a test specimen in BD Synapsys™ Informatics. 1. In BD Synapsys™ Informatics, open Specimen Management. 2. Create a new specimen for testing. Enter a unique accession code in the Accession number field.
- Page 186 For barcode labels to be printed on plates, a barcode label profile must be defined in BD Synapsys™ Informatics. The barcode label profile must be linked to a media protocol in BD Synapsys™ Informatics in order to print the labels. A single label profile can be used in multiple media protocols.
- Page 187 6. Select the pencil icon to edit a label profile. 7. Select the waste bin icon to delete a label profile. The sample can now be processed in manual inoculation mode in BD Synapsys™ Informatics. NOTE During configuration of tests, it is important to add these tests to a barcode label. If necessary, create a new barcode profile and attach the created tests to the profile.
- Page 188 In addition, a test group can be created and then attached to an organism name or organism group. See Definitions of order type test group and Guided test ordering in the BD Synapsys™ Informatics Solution instructions for use.
- Page 189 ReadA™ Compact stackers for instructions on assigning this skill to a ReadA™ Compact stacker. See the BD Synapsys™ Informatics Solution instructions for use for information on configuring this stacker in the Discard Stackers configuration screen. 1. In the BD Synapsys™ Informatics Culture Reading detail view, select the appropriate Discard to destination that will send the plate to the General Output skill.
- Page 190 BD Kiestra™ WCA User's Manual...
- Page 191 21 - Configuring the SorterA-BarcodA Configuring the SorterA-BarcodA This section covers the following topics: 21.1 Configuring media 21.2 Configuring for scanning media batch or lot barcodes 21.3 Media list configuration 21.4 SorterA configuration templates 21.1 Configuring media Assigning media to a SorterA box Follow the steps below to assign an existing medium to a SorterA box. 1.
- Page 192 BD Kiestra™ WCA User's Manual 1. Select Media Overview, then select Connect. 2. Select the unlock icon. 3. Enter the batch number in the Batchno. field. 4. Enter the expiration date in the Exp. field. 5. Select OK. 21.2 Configuring for scanning media batch or lot barcodes In order to scan media batch or lot numbers, the BarcodA software must be properly configured.
- Page 193 21 - Configuring the SorterA-BarcodA 2. Select View from the main menu at the top of the display, and then Media. The ID column displays the medium ID number. The Code column displays media codes. The Description column displays media names. The Supplier column displays the name of the media supplier.
- Page 194 BD Kiestra™ WCA User's Manual Users may switch between templates to change the configuration of the SorterA boxes. Working with templates saves time when the configuration regularly changes (e.g., a morning shift configuration and an evening shift configuration). Templates for the SorterA configuration may be edited or applied. If a template has been edited, you must restart the InoqulA software.
- Page 195 21 - Configuring the SorterA-BarcodA 4. Select Delete. 5. Select OK. 6. Select the x in the upper right corner to close the window. 21.4.4 Renaming a SorterA configuration template CAUTION Never rename the Standard Template as startup errors will occur. 1.
- Page 196 BD Kiestra™ WCA User's Manual...
- Page 197 22 - Stacker sorting Stacker sorting Plates that need further processing outside the solution, or plates that can be disposed, are normally directed to an output stacker so that they can be conveniently collected by a technician. Output stackers can be configured to collect: plates with identical skill for further processing by a specialized technician plates with identical incubation type for incubation in an incubator not connected to the track plates with identical external workbench for further processing on a workbench not...
- Page 198 The stacker sorting profile name is shown at the top of the display. Stackers can be renamed in the InoqulA software. Stack heights can be set. BD recommends setting the maximum height of all stackers at 15 plates. One stacker can be designated as the Error Stacker for plates that are not properly processed (such as defect plates or canceled analyses).
- Page 199 22 - Stacker sorting 6. Select the option that you want to change. A new display allows adjustment of the associated settings for that option. The following is an example for changing incubation types. 7. Select the desired setting and select OK. This setting is then assigned to the selected stacker.
- Page 200 BD Kiestra™ WCA User's Manual 22.1.3 Select a new profile 1. Select Stacker Configuration from the main menu. 2. Check the Height field at the bottom of each stacker column to see if there are any plates in the stackers. The first number represents the number of plates currently in the stack. The second number shows the limit for the number of plates in that stack.
- Page 201 22 - Stacker sorting 8. Select the desired profile, and then select OK. 9. Restart the InoqulA software after changing profiles. 22.3 Stacker sorting in ProceedA software In the ProceedA software, the output stackers of the ReadA Compacts are configured. The first ReadA™ Compact connected to the WCA track is identified as SelectA, the second ReadA™ Compact as SelectA2, etc.
- Page 202 BD Kiestra™ WCA User's Manual...
- Page 203 23 - Spreading patterns Spreading patterns The purpose of this chapter is to familiarize users with the available magnetic bead spreading patterns and to provide support for selecting the correct patterns for specific applications. The InoqulA+™ has a standard set of five primary spreading patterns and ten secondary spreading patterns.
- Page 204 BD Kiestra™ WCA User's Manual 23.4 Selecting a spreading pattern based on specimen type By selecting a specific spreading pattern, the distribution of the colonies on the plate, and the number of isolated colonies can be optimized for each specimen type. The selection of a spreading pattern is a balance between the expected microbial load (CFU/mL) in the specimen and the time required to complete the pattern.
- Page 205 23 - Spreading patterns Fully automated (FA) mode, single compartment plates Urine specimens should be inoculated with 10 µL using the FA mode. For other liquid specimens, 30 µL is recommended. When processing specimens with high microbial load (e.g., subculture of broth media) it may be necessary to inoculate the plate with 10 µL in order to achieve isolated colonies.
- Page 206 BD Kiestra™ WCA User's Manual 23.6.1 Zigzag pattern 4 Pattern 4 can be used for urine and non-urine specimens when semi-quantitation of the specimen is desired. Description Starts on the left side, makes a few streaks left and right, then zigzags with 2.5 mm separation, and ends with 1 mm separation.
- Page 207 23 - Spreading patterns Plate options Intended for use only with bi-plates. 23.6.3 Quadrant pattern 18 This is an alternative to the manual 4-Quadrant streaking pattern, intended for presumably sterile specimens or specimens with expected low microbial load. Description Starting at the bottom of the first quadrant on the left side, the bead moves in a clockwise direction and sequentially streaks the entire agar surface.
- Page 208 BD Kiestra™ WCA User's Manual Description Starting at the bottom of the first quadrant on the left side, the bead moves in a clockwise direction and sequentially streaks the entire agar surface. Duration of spreading 30 seconds Plate options Intended for use only with single compartment plates; bi-plates should never be used with this pattern.
- Page 209 23 - Spreading patterns Plate options Intended for use only with single compartment plates; bi-plates should never be used with this pattern. 23.7 Secondary patterns NOTE These are visual representations of the different available streaking patterns. These visuals indicate the exact route of the magnetic drivers. Small deviations in the actual bead movement, such as rolling and shaking, are part of the design and are intended to achieve optimal streaking results.
- Page 210 BD Kiestra™ WCA User's Manual Plate options Intended for use only with single compartment plates; bi-plates should never be used with this pattern. 23.7.2 Pattern 5: zigzag 3,5 - 1 InocStreak s200 This pattern is typically used for urine specimens, but can be used for any fluid.
- Page 211 23 - Spreading patterns Duration of spreading 15 seconds Plate options Intended for use only with single compartment plates; bi-plates should never be used with this pattern. 23.7.4 Pattern 8: 3,5 - 1 s200 more growth Pattern 8 is useful when more precise quantitative counts are desired. Description Starting at the bottom of the first quadrant on the left side, the bead moves in a fan-like pattern to spread the inoculum and then in a zigzag manner to the top of the plate.
- Page 212 BD Kiestra™ WCA User's Manual 23.7.5 Pattern 13: Defect media pattern This pattern is used in the SA mode process when the user has marked a plate as ‘defect’. Defect can imply that the plate is contaminated. Description This pattern will prevent automatic removal of the bead and sends the plate to the waste location with the bead remaining inside.
- Page 213 23 - Spreading patterns Description Starting at the bottom, the bead makes a 4 quadrant pattern: 1st quadrant - 2 mm separation; 2nd quadrant - 2 mm separation; 3rd quadrant - 1.5 mm separation; 4th quadrant - 1 mm separation Duration of spreading 20 seconds Plate options...
- Page 214 BD Kiestra™ WCA User's Manual Inoculation Plates can be inoculated on the left indicator light only. 23.7.8 Pattern 9: zigzag 3,5 - 1 s200 more growth This pattern is typically used for urine specimens, but can be used for any fluid.
- Page 215 23 - Spreading patterns Description A zigzag pattern starts with 5 mm separation, then 2.5 mm separation, and ends with 1 mm separation. Duration of spreading 17 seconds Plate options Intended for use only with single compartment plates; bi-plates should never be used with this pattern.
- Page 216 Participants to the Italian BD Kiestra Workshop Tour. (2013) Multicenter evaluation of the rolling-bead automated Inoculation Technology (BD Kiestra InoqulA BT™) For isolation of bacterial cultures. 1. BD Italia, Milano, Italy 2. University of Siena, Siena, Italy 3. Microbiology Laboratory, Humanitas Research Hospital, Rozzano, Italy 4.
- Page 217 24 - Supervisor authorizations for ReadA™ Compact Supervisor authorizations for ReadA™ Compact Apart from the operator functions, a supervisor is authorized to: turn on the ReadA™ Compact modify the configuration settings in the ReadA Compact application modify camera settings 24.1 Turning on the ReadA™ Compact The ReadA™ Compact normally will be turned on at all times.
- Page 218 BD Kiestra™ WCA User's Manual 24.2.1 System tab: configuration of general settings Default Authentication Description setting Check user Select if the password must be checked in LDAP. password in LDAP Fill in the LDAP Internet domain (only if password must Domain be checked in LDAP).
- Page 219 Select to find error recovery information from a debug mode remote location. Show main debug tabs Select to display the main debug tab for more (BD use only) intensive monitoring of the module. Show main log tab Select to show the log list on the tab. Default...
- Page 220 BD Kiestra™ WCA User's Manual 24.2.3 Machine tab: configuration of communications settings Serial Description Default setting communication Define the communication port (COM port) to which the devices are connected. PLC port 0 = no communication will take place with the device.
- Page 221 By priority with time limit order handling by priority; order handling by priority with time limit. Priority settings should only be edited by a BD project Customer-specific. Priority engineer or by a person settings affect general Edit priority settings authorized by BD.
- Page 222 BD Kiestra™ WCA User's Manual Transfer queue Description Default setting Indicate the space that must be kept free for optimization Optimal free space in camera of the process. outfeed part 1 = all full except 1 Container Description Default setting...
- Page 223 24 - Supervisor authorizations for ReadA™ Compact 24.2.4 Camera tab: configuration of camera settings Image Description Default setting storage Enter the IP address of the images server. Server Customer-specific (This is configured in the database). Optis storage Optionally select a different location for the Customer-specific server SHQI raw data files to be stored.
- Page 224 Optis directory Set the path location. BDK-images Set the domain name; if no Domain user is Optis domain available for BD, use the Computer name Customer-specific and a local admin account. Optis server Set the domain user name with read and...
- Page 225 24 - Supervisor authorizations for ReadA™ Compact 24.2.5 Incubator tab: configuration of incubator settings Incubation Description Default setting sensor settings Select the sensor for which you wish to enter Sensor dTRON settings. Enter the Com port for the sensor concerned. 0 = Com port no communication Baud rate...
- Page 226 BD Kiestra™ WCA User's Manual Incubation Description Default setting sensor settings Enter a value for the allowed deviation upward. Customer-specific Error diff high An error message will appear if this value is exceeded. Enter a value for the allowed deviation downward.
- Page 227 24 - Supervisor authorizations for ReadA™ Compact Description Default setting settings List is automatically filled; Read from customer-specific. Select to load the current settings from the PLC. ’M’ stands for marker. Select and press Enter to confirm changed values and send them to the PLC. Write to Customer-specific ReadACompact.ini...
- Page 228 BD Kiestra™ WCA User's Manual Communication Description Default setting Disable ProceedA Select to operate the input ReadA™ Compact standalone. Deny ProceedA Select to block the infeed when the request to send infeed buffer is full. The ProceedA will when the infeed try a different ReadA™ Compact.
- Page 229 24 - Supervisor authorizations for ReadA™ Compact 24.2.8 HMI tab: configuration of human interface settings Machine tab Description Default setting Show the ReadA Compact visual Select to include the Process Overview in the Customer-specific representation interface. (Process overview) Show the Transfer queue and the infeed, camera Select to include these items in the interface.
- Page 230 Workstations tab: configuration of workstation settings Use this tab to link a skill to a plate destination (location where the skill will be performed). 24.3 Camera calibration procedure The pixel calibration plate is used for BD Kiestra™ Optis™ camera calibration of a ReadA™ Compact version 1.1.
- Page 231 24 - Supervisor authorizations for ReadA™ Compact 24.3.1 Plate required for calibrating the ReadA™ Compact v1.1 NOTE Improper placement of the calibration disk negatively influences the camera calibration and pick accuracy when processing samples on the automated ID processing module. Ensure proper placement of the calibration disk with the dots facing up, toward the plate lid: 1.
- Page 232 BD Kiestra™ WCA User's Manual or in the ReadA Compact status screen: If an error is preventing successful completion of the camera calibration procedure, contact NOTE Calibration must be performed each time the camera is cleaned, or when the camera...
- Page 233 InoqulA Depending on the configuration of your solution, approximately 30 to 60 additional applications are installed to guarantee proper operation. These other applications are only accessible by BD associates. 25.1 ReadA Overview The ReadA Overview displays specimen information and allows carrier tracking and tracing. If a problem or error occurs, ReadA Overview can be used for further information.
- Page 234 The Management Information System (MIS) tool generates a report with information about the performance of the solution, for both BD and the customer. The MIS report is a summary generated on a weekly basis (for the previous week’s data) and sent to the customer.
- Page 235 Statistical charts for comparing modules 25.3 Reporting errors to BD To report errors, contact BD using the phone numbers and email addresses are below. Outside North America: BD Kiestra, +31 (0)512 540 623, Lab_Automation_phone_ support@bd.com In North America: BD Technical Service and Support, 1-800-638-8663,...
- Page 236 BD Kiestra™ WCA User's Manual It is strongly advised to maintain an error log in which you document the following data: date and time of occurrence of errors screen prints of error messages possible resolutions comments...
- Page 237 A back-up can be made of all archive files and they can all be deleted with the exception of the most recent (archive folder with the highest number). ArchivA will continue to save data in the most recent folder. 26.3 Restoring archived files If you require data which are stored in archive files, contact contact BD.
- Page 238 BD Kiestra™ WCA User's Manual...
- Page 239 27 - ArchivA Viewer ArchivA Viewer ArchivA Viewer is a software application for viewing archived files. Depending on the configuration, you can view: archived images of specimens (if these were archived with the other specimen information); archived comments on specimens and information about container markings. ArchivA Viewer allows you to open the index file that contains references to all saved ArchivA files.
- Page 240 BD Kiestra™ WCA User's Manual 2. Select Index.txt and select Open. The index file name displays. Once the index file has been selected, you can search and select an archive file using a date or using the LI(M)S ID. NOTE Once the index file has been found and opened, the location is saved by ArchivA Viewer;...
- Page 241 27 - ArchivA Viewer NOTE It is also possible to search on a combination of date and LI(M)S ID. If the search result contains more than 100 items, the following warning appears: You may narrow down your search by entering more LI(M)S ID characters. 27.4 Selecting an archive file The main window of ArchivA Viewer displays:...
- Page 242 BD Kiestra™ WCA User's Manual Section Explanation Allows you to search for a specific line in the displayed log. Search in the Field drop-down menu for the text specified in the Text field; enter text in the Text field and select Search.
- Page 243 27 - ArchivA Viewer 27.5 Output options From Log tab in the main window you may print a complete log of a specimen. 1. Select Print to open the Output Options dialog box. This dialog box allows you to send a report to the standard selected printer, display the report on screen, or save the report to file in the indicated file format.
- Page 244 BD Synapsys™ Informatics. Viewer settings Show region caption in image Obsolete Show vision zone measurements Region viewer settings Select if you wish to use mnemonics. Use separator for Ensure the setting is identical to that in BD Synapsys™ Mnemonic and name Informatics.
- Page 245 The instructions in this chapter pertain to configuration of the desktop label printer on the InoqulA FA/SA workbench. Refer to the BD Synapsys™ Informatics Solution instructions for use for configuration instructions pertaining to the desktop label printer that is used by BD Synapsys™ Informatics. 28.1 Software startup and shutdown 1.
- Page 246 28.2 Printer configuration Printer settings are configured by BD personnel during installation and are adjusted to your solution and type of label printer. Only supervisors or Frontline Support Specialists can change these settings after installation. Always consult BD when altering any printer configurations.
- Page 247 28 - Desktop printer 28.2.1 Printer Configurations window buttons and fields Options Description Ignore Only used for testing, when no printer is attached Simulate Only used for testing, when no printer is attached Printing Field to enter the left margin (in dots) for print placement on the label. The value Left Offset that you can enter in this field depends what is entered for the Label Width field.
- Page 248 BD Kiestra™ WCA User's Manual Options Description Checkbox for identifying printing on square labels Square This box must be selected for square labels, even if you already entered the labels correct dimensions of the label in the Label Width and Label Height fields.
- Page 249 28 - Desktop printer Only Label rotation is selected The barcode is printed normally (the label looks the same as when neither option is selected). 28.3 Custom configurations This section describes various custom configurations for printing broth tube labels with the Brothtube Label Printer software.
- Page 250 The default settings for density, width, height, and placement of the cutting need to be set before making any other adjustments to the label layout. These settings are set by BD and adjusted to your solution and type of label printer.
- Page 251 28 - Desktop printer 2. To set the density (six blinks): a. Press the green feed button on top until six short blinks occur. b. Release the button. c. After a short period of time, several labels will be dispensed and the default density is set.
- Page 252 BD Kiestra™ WCA User's Manual 4. Open the PrintingTest.exe program. On the InoqulA touchscreen, the window of this program is too large and you must change the screen resolution: a. Select Windows. b. Select Start (left bottom corner of the screen).
- Page 253 28 - Desktop printer 4. Select Config in the Table Printer section of the window. 5. The Printer Configurations window opens. 6. Enter data as needed. Printer configurations, test label InoqulA > System Menu > Configuration > Barcoding > Config Select Test to print a test label.
- Page 254 BD Kiestra™ WCA User's Manual Checking the left margin InoqulA > System Menu > Configuration > Barcoding The left margin should measure at least 2.5 mm to prevent scan errors. If the left margin is smaller than this, adjust the printer configuration.
- Page 255 28 - Desktop printer 1. Select the default profile template in the Profiles List. 2. Select a field to adjust settings. Green indicates selected. 3. Adjust the settings at Field Information. The chosen information is presented in the field. 4. Position the fields as described below. 5.
- Page 256 BD Kiestra™ WCA User's Manual 10 x 40 mm label, field positions Field Left (Font) Barcode Specialty label layout InoqulA > System Menu > Configuration > Barcoding One or more specialty labels can be assigned to a certain analysis set or skill (e.g., for quick tests).
- Page 257 28 - Desktop printer 5. To use the predefined options, select from the drop-down menu. 6. To leave a field empty, select Custom value and type a space. 7. Adjust the positioning at Left and Top. 8. Adjust the font size at Font index. 9.
- Page 258 BD Kiestra™ WCA User's Manual The solution always uses the Default profile for printing labels, unless other profiles are added. Select Default profile to see options. Options Description Profiles List Shows all label profiles (designed layouts). Standard with ‘Default profile’...
- Page 259 Config Printer Leads to Printer Configurations. BarcodA Do not alter without consulting BD. Shows all BarcodA label options. Label Profiles Editor: Analysis set options InoqulA > System Menu > Configuration > Barcoding Specialty labels can be assigned to a certain analysis set. Available options depend on the laboratory’s database.
- Page 260 BD Kiestra™ WCA User's Manual General: select from a list of options Sample: select from a list of options Dish: select from a list of options Custom Value: type to enter custom information...
- Page 261 Contacts Becton, Dickinson and Company BD Kiestra B.V. 7 Loveton Circle Marconilaan 6 Sparks, Maryland 21152 USA 9207 JC Drachten, The Netherlands Voice: 1-800-638-8663 Voice: +31 (0)512 540 623 Mail: Technical.Services@bd.com Mail: Lab_Automation_phone_support@bd.com bd.com 2100 Derry Road West Akasaka DS Building...
- Page 262 BD Kiestra™ WCA User's Manual...
- Page 263 Glossary Biological Containment Cabinet: provides HEPA-filtered air flow within the work area and HEPA-filtered exhaust BD Synapsys™ Informatics Solution Laboratory software solution providing data and workflow management functionality across locations where clinical diagnostic activities take place Carbon dioxide Graphical User Interface. A type of software display screen that allows users to interact with electronic devices through icons and visual indicators.
- Page 264 BD Kiestra™ WCA User's Manual Laboratory Information System. Software that tracks patient and associated test order and result data for clinical laboratories. Depending on its configuration, the LIS can query and be queried, and data can be downloaded from it and uploaded to it.
- Page 265 Index Index ArchivA ArchivA Viewer BD Synapsys™ Informatics description Beeper off Biological Containment Cabinet components Brothtube Label Printer 57, 245 10 x 40 mm label 22 x 22 mm label adjusting print placement configuration custom configurations cutting parameters Cleaning decontamination...
- Page 266 BD Kiestra™ WCA User's Manual Database configuration DB Manager analysis set configure programs incubation types main menu users FA specimen processing pipet tip rack display pipet tip supply Rack Holder Overview 53, 56, 59, 61, 63, 68 reprinting labels slide preparation module...
- Page 267 31 - Index description emergency stop error logs errors FA submodule components malfunctions recurring errors refilling beads SA submodule components shutdown startup warnings InoqulA+ spreading patterns by specimen type defect media pattern quadrant pattern 18 quadrant pattern 19 quadrant pattern 20 secondary patterns specimen application zigzag pattern 4...
- Page 268 BD Kiestra™ WCA User's Manual Management Information System (MIS) plate path InoqulA+ FA InoqulA+ SA ProceedA SorterA-BarcodA Preventive maintenance ProceedA clear system components description emergency stop empty check errors warnings ProceedA software color coding of machine and transport nodes Logging tab...
- Page 269 31 - Index emergency stop error messages error report errors ReadA Compact application CSA tab Debug Log tab Logging tab Machine tab main window Sensor Charts tab toolbar options tools ReadA Compact configuration tool Camera tab Debug tab HMI tab Incubator tab Machine tab PLC Settings tab...
- Page 270 BD Kiestra™ WCA User's Manual defining a specimen batch rejecting a plate reprinting labels set left- and right-handedness specimen overview Secondary inoculation Solution components SorterA-BarcodA BarcodA main menu components description operation plate logs preparation for processing printer label count status overviews...
- Page 271 31 - Index Warnings 111, 121 Warranty...
- Page 272 BD Kiestra™ WCA User's Manual...
Need help?
Do you have a question about the Kiestra Work Cell Automation and is the answer not in the manual?
Questions and answers