Table of Contents
Advertisement
DX200 OPTIONS
INSTRUCTIONS
JANCD-YEW01-E BOARD
(INTERFACE BOARD FOR WELDING POWER SOURCE)
Upon receipt of the product and prior to initial operation, read these instructions thoroughly, and
retain for future reference.
MOTOMAN INSTRUCTIONS
MOTOMAN- INSTRUCTIONS
DX200 INSTRUCTIONS
DX200 OPERATOR'S MANUAL (for each purpose)
DX200 MAINTENANCE MANUAL
The DX200 Operator's manual above corresponds to specific usage. Be sure to use the appropriate manual.
Part Number:
167646-1CD
Revision:
1
MANUAL NO.
HW1481264
1
1 of 40
Advertisement
Table of Contents

Related Manuals for YASKAWA JANCD-YEW01-E


Summary of Contents for YASKAWA JANCD-YEW01-E
- Page 1 DX200 OPTIONS INSTRUCTIONS JANCD-YEW01-E BOARD (INTERFACE BOARD FOR WELDING POWER SOURCE) Upon receipt of the product and prior to initial operation, read these instructions thoroughly, and retain for future reference. MOTOMAN INSTRUCTIONS MOTOMAN- INSTRUCTIONS DX200 INSTRUCTIONS DX200 OPERATOR’S MANUAL (for each purpose) DX200 MAINTENANCE MANUAL The DX200 Operator’s manual above corresponds to specific usage.
- Page 2 YASKAWA customers to assist in the operation of Motoman robots, related equipment and software This manual is copyrighted property of YASKAWA and may not be sold or redistributed in any way. You are welcome to copy this document to your computer or mobile device for...
- Page 3 If such modification is made, the manual number will also be revised. • If your copy of the manual is damaged or lost, contact a YASKAWA representative to order a new copy. The representatives are listed on the back cover. Be sure to tell the representative the manual number listed on the front cover.
- Page 4 ALLOW UNTRAINED PERSONNEL TO OPERATE, PROGRAM, OR REPAIR THE EQUIPMENT! We recommend approved YASKAWA training courses for all personnel involved with the operation, programming, or repair of the equipment. This equipment has been tested and found to comply with the limits for a Class A digital device, pursuant to part 15 of the FCC rules.
- Page 5 167646-1CD Notes for Safe Operation Interface Board for Welding Power Supply Notes for Safe Operation Read this manual carefully before installation, operation, maintenance, or inspection of the DX200. In this manual, the Notes for Safe Operation are classified as “DANGER”, “WARNING”, “CAUTION”, “MANDATORY”, or “PROHIBITED”.
- Page 6 167646-1CD Notes for Safe Operation Interface Board for Welding Power Supply PROHIBITED • Do not use or maintain this board under the following conditions: – Direct sunlight – Excessive vibration and shock – High humidity – Proximity to a strong magnetic field source –...
- Page 7 167646-1CD Notes for Safe Operation Interface Board for Welding Power Supply WARNING • Before operating the manipulator, check that servo power is turned OFF when the emergency stop buttons on the front door of the DX200 and the programming pendant are pressed. When the servo power is turned OFF, the SERVO ON LED on the programming pendant is turned OFF.
- Page 8 167646-1CD Notes for Safe Operation Interface Board for Welding Power Supply CAUTION • Perform the following inspection procedures prior to conducting manipulator teaching. If problems are found, repair them immediately, and be sure that all other necessary processing has been performed. –...
- Page 9 Interface Board for Welding Power Supply Definition of Terms Used Often in This Manual The MOTOMAN is the YASKAWA industrial robot product. The MOTOMAN usually consists of the manipulator, the controller, the programming pendant, and manipulator cables. In this manual, the equipment is designated as follows:...
- Page 10 Power Supply Customer Support Information If you need assistance with any aspect of your Interface Board for Welding Power Supply system, please contact YASKAWA Customer Support at the following 24-hour telephone number: (937) 847-3200 For routine technical inquiries, you can also contact YASKAWA Customer Support at the following e-mail address: techsupport@motoman.com...
-
Page 11: Table Of Contents
3.2 Switch Settings ........................3-2 4 Board Installation ..........................4-1 4.1 Opening the Front Door of DX200 ..................4-3 4.2 Checking the Switch Setting of JANCD-YEW01-E Board ..........4-3 4.3 Installing JANCD-YEW01-E Board to DX200 ..............4-3 4.4 Connecting Cables ......................4-4 4.5 Closing the Front Door of DX200.................. -
Page 12: Outline
Interface Board for Welding 1.1 System Configuration Example Power Supply Outline This instruction manual is for JANCD-YEW01-E, a welding power source interface board. This board can connect an arc welding power source of analog command to the DX200. System Configuration Example... -
Page 13: Hardware Specifications
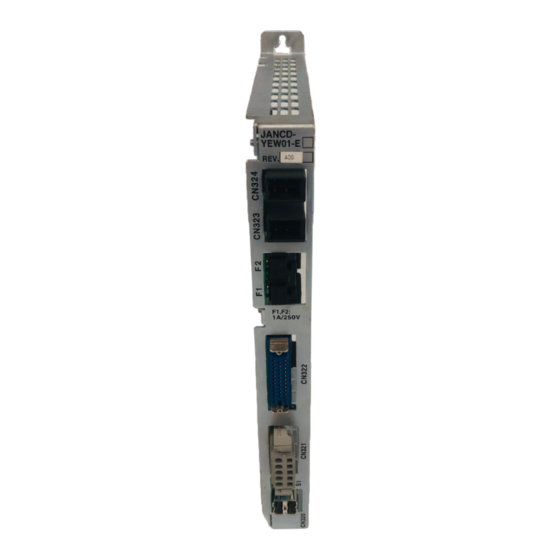
167646-1CD Hardware Specifications Interface Board for Welding 2.1 Board Outline Drawing Power Supply Hardware Specifications Board Outline Drawing JANCD- YEW01-E REV. 24 VDC power input connector CN324 CN323 24 VDC power output connector Fuse (F2) F1 and F2 fuses 1 A, 250 V (fast-acting) Fuse (F1) 217001 (Littelfuse) F1,F2:... -
Page 14: Connector For Welding Power Source (Cn322)
167646-1CD Hardware Specifications Interface Board for Welding 2.3 Connector for Welding Power Source (CN322) Power Supply Connector for Welding Power Source (CN322) Details of connector (view from the fitting surface of the cable connector) Connector type: MR-34MG (soldering type) See Note 1. MRP-34M01 (crimping type insulator) See Note 1. -
Page 15: Function Settings
167646-1CD Function Settings Interface Board for Welding 3.1 Description of Function Setting Switches Power Supply Function Settings Description of Function Setting Switches The names of the switches to set the functions of this board and how each switch works are shown below. Make sure to perform proper settings according to the following description. -
Page 16: Switch Settings
167646-1CD Function Settings Interface Board for Welding 3.2 Switch Settings Power Supply Switch Settings Switch How to set Station setting Sets the station. The relations of the switch settings and the stations are shown below. Set the arrow to the number corresponding to the desired station by using a precision screwdriver (Phillips or flathead). -
Page 17: Board Installation
167646-1CD Board Installation Interface Board for Welding Power Supply Board Installation DANGER • Before wiring or installation, make sure to turn the primary power supply off, and put up a warning sign. (e.g. DO NOT TURN THE POWER ON.) Failure to observe this warning may result in electric shock or personal injury. - Page 18 167646-1CD Board Installation Interface Board for Welding Power Supply CAUTION • Wiring and installation must be performed by authorized or certified personnel. Failure to observe this caution may result in fire or electric shock. • Check to be sure that there is no foreign matter (metal piece, etc.) on the board.
-
Page 19: Opening The Front Door Of Dx200
2. For the switch setting, refer to chapter 3. Installing JANCD-YEW01-E Board to DX200 1. Check to be sure that the main power supply is turned OFF. 2. Securely fix the JANCD-YEW01-E board to the DX200 by tightening the board fixing screws firmly. HW1481264... -
Page 20: Connecting Cables
Interface Board for Welding 4.4 Connecting Cables Power Supply Connecting Cables 1. Connect the 24 VDC power cable to CN324 of the JANCD-YEW01-E board. 2. Connect the I/O communication cable to CN320 of the JANCD-YEW01-E board. Connect the terminal connector which is connected to CN114 of the JZNCD-YIF01-2E board to the unoccupied side of CN320 of the JANCD-YEW01-E board. -
Page 21: Closing The Front Door Of Dx200
167646-1CD Board Installation Interface Board for Welding 4.5 Closing the Front Door of DX200 Power Supply Closing the Front Door of DX200 1. Close the door gently. 2. By using a coin or a flathead screwdriver, rotate the door locks on the front of the DX200 (two places) 90 degrees counterclockwise. -
Page 22: O Signal Allocation
Power Supply I/O Signal Allocation I/O Module Setting To use the JANCD-YEW01-E board on the DX200, the I/O module must be set according to the following procedure. Check to be sure that the power supply of the DX200 is turned OFF. - Page 23 167646-1CD I/O Signal Allocation Interface Board for Welding 5.1 I/O Module Setting Power Supply 4. Select {SETUP}. 5. Select {IO MODULE}. – The current installation status of I/O modules is displayed as shown below. – Press [ENTER] to display the other stations. HW1481264 23 of 40...
- Page 24 (Digital input 40 points, digital output 40 points) This board is fixed to ST#00. ST#01: JANCD-YEW01-E board (16 contact inputs, 16 contact outputs, 2 analog inputs, 2 analog outputs) Note that even though 16 contact inputs and 16 contact outputs are displayed, they cannot be used for external devices because they are used by the system.
- Page 25 (1) Wrong I/O communication setting The setting of SW1 or SW2 of the JANCD-YEW01-E board may be wrong. If so, the board cannot be determined correctly. (2) Wrong station setting S1 may be set to 0, E, or F (not available).
- Page 26 167646-1CD I/O Signal Allocation Interface Board for Welding 5.1 I/O Module Setting Power Supply 9. The EXTERNAL IO SETUP window appears. 10. Select {AUTO} or {MANUAL} in the ALLOCATION MODE. – The selection menu appears after selecting {AUTO} or {MANUAL}. If the allocation mode is changed from {MANUAL} to NOTE {AUTO}, the set allocation data is discarded.
- Page 27 167646-1CD I/O Signal Allocation Interface Board for Welding 5.1 I/O Module Setting Power Supply 11. Select the allocation mode to set up. – Select {AUTO} to allocate I/O signal allocation automatically. Select {MANUAL} to allocate I/O signal allocation manually. – The selected allocation mode is set up. 12.
- Page 28 167646-1CD I/O Signal Allocation Interface Board for Welding 5.1 I/O Module Setting Power Supply 13. Select the external I/O signal number (at the change source) to be changed. – The select menu appears. – Select the {INIT} when add the YEW board to the system, which has already allocated the external I/O allocation manually.
- Page 29 167646-1CD I/O Signal Allocation Interface Board for Welding 5.1 I/O Module Setting Power Supply 18. Press {ENTER}. – Confirmation dialog appears. 19. Select {YES}. – The settings are confirmed, and returns to the SETUP window. HW1481264 29 of 40...
- Page 30 167646-1CD I/O Signal Allocation Interface Board for Welding 5.1 I/O Module Setting Power Supply To add a board when using the YEW board The XEW board and the YEW board (It is called EW board below) do not support external I/O allocation function. NOTE As for the external I/O allocation setting to add a optional board in the system using the EW board, please refer to the...
-
Page 31: Transmission Data
Data transferred from the JANCD-YEW01-E board to the DX200 are 16 contact inputs, 16 contact outputs, and 3 analog outputs (12 bit each). The I/O data of the JANCD-YEW01-E board are allocated to the external I/O signals of the concurrent I/O signals. - Page 32 The allocation of the concurrent I/O is shown above, but note that only the 2 analog inputs, 2 analog outputs, 5 contact inputs, and 4 contact outputs can be used for communication between the JANCD-YEW01-E board and external devices. The contact inputs and outputs other than described above are used by the system, so they cannot be used for communications with external devices.
-
Page 33: Analog I/O Circuit
167646-1CD Analog I/O Circuit Interface Board for Welding 6.1 Analog Output Circuit Power Supply Analog I/O Circuit Analog Output Circuit Two analog output circuits (channel 1 for voltage command, and channel 2 for current command) are available. • When connecting a load to the analog output circuit, the load resistance must be 2 kΩ... -
Page 34: Analog Input Circuit
167646-1CD Analog I/O Circuit Interface Board for Welding 6.2 Analog Input Circuit Power Supply Analog Input Circuit Two analog input circuits (channel 1 for voltage feedback, and channel 2 for current feedback) are available. • The input voltage must be within -5 V to +5 V. NOTE •... -
Page 35: Contact I/O Circuit
167646-1CD Contact I/O Circuit Interface Board for Welding 7.1 Contact Output Circuit Power Supply Contact I/O Circuit Contact Output Circuit Five contact output circuits (4 welding power source specific outputs (arc-ON, wire inching, wire retract inching, starting point detection command (optional function)), and 1 universal output) are available Number of outputs and 5 outputs ARCON... - Page 36 Therefore, periodical replacement is necessary. When replacing the ARCON relay, specialized tool is required. NOTE Contact your Yaskawa representative. Be sure that the output current does not exceed 0.5 A even instantaneously. When there is a possibility of exceeding 0.5 A due to inrush current etc., current limit measures such as installing the resistors in series are required.
-
Page 37: Contact Input Circuit
167646-1CD Contact I/O Circuit Interface Board for Welding 7.2 Contact Input Circuit Power Supply Contact Input Circuit The contact input circuit includes 4 welding power source specific inputs (gas shortage, wire shortage, arc establishment, arc failure). Number of inputs and 4 inputs GASOF Gas shortage detection signal application... -
Page 38: Stick Detection Circuit
167646-1CD Stick Detection Circuit Interface Board for Welding 8.1 Stick Detection Input Circuit Power Supply Stick Detection Circuit Stick Detection Input Circuit Stick detection operates in a state where there is no arc signal. Detection is available under a condition where the ARCON signal is disabled (stick command OFF), and the STICK_EN is enabled. -
Page 39: Example Connection
167646-1CD Example Connection Interface Board for Welding Power Supply Example Connection DX200 MR Connector MS Connector Logical Connector Name Signal number pin No. (gas shortage) Each point DC24V (gas shortage) 5 mA MAX (wire shortage) (wire shortage) (arc establishment) (arc establishment) (Current input) (Voltage input) (arc failure) - Page 40 (INTERFACE BOARD FOR WELDING POWER SOURCE) HEAD OFFICE 2-1 Kurosakishiroishi, Yahatanishi-ku, Kitakyushu 806-0004, Japan Phone +81-93-645-7703 Fax +81-93-645-7802 YASKAWA America Inc. (Motoman Robotics Division) 100 Automation Way, Miamisburg, OH 45342, U.S.A. Phone +1-937-847-6200 Fax +1-937-847-6277 YASKAWA Europe GmbH Robotics Divsion )
Need help?
Do you have a question about the JANCD-YEW01-E and is the answer not in the manual?
Questions and answers