Table of Contents
Advertisement
Advertisement
Table of Contents

Subscribe to Our Youtube Channel
Related Manuals for Dejero LIVE+ EnGo


Summary of Contents for Dejero LIVE+ EnGo
- Page 1 LIVE+ EnGo User Guide 2015 D-UG114-003 www.dejero.com...
- Page 2 Copyright, Trademarks, and Patents Copyright © 2015 Dejero Labs Inc. Dejero and Dejero LIVE+ are trademarks of Dejero Labs Inc. All other trademarks are the property of their respective owners. Dejero products or portions thereof are protected by patents granted and pending.
-
Page 3: Table Of Contents
Contents Warranty and Liability ......................... 4 Safety Warnings and Hazards ....................4 Handling and Operating Conditions .................... 5 About the LIVE+ EnGo ....................... 7 Modes of operation ........................8 Product configurations ....................... 8 What’s included .......................... 9 About LIVE+ Control ........................9 Attaching the EnGo to the camera ..................... -
Page 4: Warranty And Liability
Dejero LIVE+ Platform. Warranty on the Dejero LIVE+ EnGo is voided if the case is opened by anyone who has not been trained and certified by Dejero. For details, see Handling and Operating Conditions below. -
Page 5: Handling And Operating Conditions
You should seek advice from your doctor before operating the LIVE+ EnGo. For personal health and safety, persons concerned about exposure should maintain a minimum distance of 10 mm from the LIVE+ EnGo while it is powered on, except when using the touch screen. - Page 6 Handle Device with Care While the LIVE+ EnGo case is durable, it is possible to damage or knock loose the electronics inside if the device is dropped or thrown. Please handle with care. Damage sustained as the result of mishandling the LIVE+ EnGo renders the warranty null and void.
-
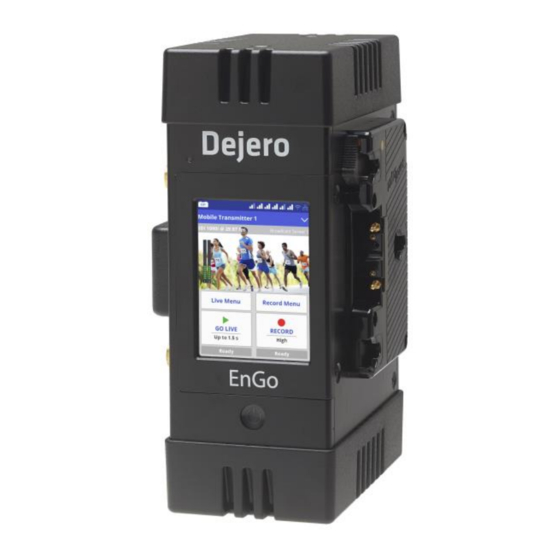
Page 7: About The Live+ Engo
The LIVE+ platform of hardware, software, and cloud-based services helps you capture, transmit, manage, and distribute high-quality live video from virtually anywhere. LIVE+ EnGo is a compact and modular mobile transmitter that encodes H.264 video and transmits it over multiple IP networks. It reliably delivers exceptional picture quality with extremely low latency—even in challenging network conditions. -
Page 8: Modes Of Operation
Wi-Fi/ETH/2-Modem Wi-Fi/ETH/4-Modem Wi-Fi/ETH/6-Modem Each option with cellular modems contains an integrated Radio Frequency (RF) module and is available in North American and international versions. Some functionality only applies to EnGo transmitters with RF modules. LIVE+ EnGo User Guide... -
Page 9: What's Included
Quick Start Guide Camera-mount adapter (optional) About LIVE+ Control When you use the EnGo with Dejero LIVE+ Control, you can: Assign live and recorded video, as well as file transfers, from the EnGo to a LIVE+ server ... -
Page 10: About Connection Ports
EnGo operation. Recommended battery requirements Nominal voltage of 14.4V (operating voltage of 12.0V to 16.8V) 95 WH battery, capable of 8.4A maximum at 12V, is recommended for powering EnGo, camera, and accessories. LIVE+ EnGo User Guide... -
Page 11: Connecting Ethernet
For more information on the LIVE+ Broadcast Server, refer to the LIVE+ Broadcast Server User Guide. Note: Connecting IFB is optional. 1. Connect your audio device (such as an earpiece, headset, or IFB amplifier input) to the 1/8‖ headphone jack on the I/O side of the EnGo. LIVE+ EnGo User Guide... -
Page 12: About The Preview Screen
Below the Record button, the current clip quality appears. When you tap the Record button, the Preview screen shows the clip run time below the button. Above the button, the screen shows the amount of remaining video time that you can record and store in the device storage. LIVE+ EnGo User Guide... -
Page 13: Specifying The Camera Input Type
By default, the transmitter automatically detects HDMI or SDI connections, frame rate, and resolution. If the settings are not detected automatically, you can set them manually. 1. On the Preview screen, tap the menu. 2. Tap Settings. 3. Tap Input. LIVE+ EnGo User Guide... - Page 14 If the conditions worsen during the stream, the transmitter gradually increases the latency up to the maximum latency that you set. When the transmitter reaches the maximum latency, the latency remains fixed at the specified value. LIVE+ EnGo User Guide...
- Page 15 About audio-only mode In areas of poor coverage, when the transmitter’s available bandwidth falls below 100 Kb/s, the transmitter automatically sends only audio to the server and the last good frame of the video LIVE+ EnGo User Guide...
-
Page 16: Configuring The Connection Type
Satellite: This connection type is for high-reliability, high-latency links. It is typical of a portable satellite connection. In Satellite mode, the transmitter accounts for the long latency of the connection, and uses any other available connections (cellular or Wi-Fi) to supplement the LIVE+ EnGo User Guide... - Page 17 3. Tap Connections. 4. Tap Wi-Fi. The current Wi-Fi network is highlighted in green 5. Tap Action. 6. Tap Disconnect. Delete a saved Wi-Fi profile 1. On the Preview screen, tap the Menu. 2. Tap Settings. LIVE+ EnGo User Guide...
-
Page 18: Transmitting Live
Each clip is named with the date and time that the clip finished recording, in the following format: YYYY-MM-DD_hhmmss. Transfer a clip The server that receives the transferred clip is defined in LIVE+ Control. Clips are recorded Store & Forward files. LIVE+ EnGo User Guide... - Page 19 1. On the Preview screen, tap the menu. 2. Tap Transfer. 3. Tap Clips. 4. Tap a clip. 5. Tap Actions. 6. Tap Delete. 7. To delete the clip from the transmitter permanently, tap Yes. 8. Tap Back. LIVE+ EnGo User Guide...
- Page 20 To resume the transmission, tap Record. Transmit live and record a Store & Forward clip 1. On the Preview screen, tap Go Live. 2. Tap Record. The Preview screen shows the video that you are recording. LIVE+ EnGo User Guide...
-
Page 21: Transferring Files
1. On the Preview screen, tap the menu. 2. Tap Error or Warning. Record If an error occurs during recording (such as the EnGo is out of disk space), the error appears in the status area under the Record button. LIVE+ EnGo User Guide... -
Page 22: Using The Remote Control
You can change the EnGo display when wearing the transmitter in the carry case to make sure that you can still read the screen. 1. On the Preview Screen, tap the menu. 2. Tap Settings. 3. Tap Operation. LIVE+ EnGo User Guide... -
Page 23: Viewing Individual Connection Meters
The bitrate at which the video frames are encoded. Excessively low bitrates result in poor quality picture, indicated by blockiness and lack of detail. When neither of these events occurs, the Stream Health indicator appears as Good. LIVE+ EnGo User Guide... -
Page 24: Troubleshooting
EnGo in the carry case or 95Wh when the EnGo is camera mounted. If the EnGo still does not turn on, contact Dejero Support. EnGo does not If you are using AC power, confirm that all cable connections are secure turn on when using and that the power connector is locked firmly into place. - Page 25 EnGo appears on the Preview server output screen. EnGo is disabled Contact Dejero Support. You will need to restart the EnGo after it is re- enabled. Video, audio, or transmission problems Problem Possible solution Preview screen is A camera is not connected to the EnGo.
-
Page 26: Warning And Error Messages
Warning and error messages The following table outlines possible warning or error messages that you might encounter and possible ways to resolve them. You can also find a complete list of errors in the Dejero Support Hub at http://support.dejero.com. Message... - Page 27 Control User Guide. No server response Unable to establish connection with Contact your system the assigned output server. administrator. This error typically occurs because the IP address is not configured properly or the modems on the LIVE+ EnGo User Guide...
- Page 28 Select an input format that is input and output video format compatible with the output or combination is not supported. use Control to select a different output. For more information, see the LIVE+ Control User Guide. LIVE+ EnGo User Guide...
- Page 29 EnGo to a different server. For more information, see the LIVE+ Control User Guide. Output failed Failed to start live stream Contact Dejero Support. Use Control to assign EnGo to a different server. For more information, see the LIVE+ EnGo User Guide...
- Page 30 Contact Dejero Support. Make a support call If you need to make a support call, reference the serial number that appears at the top of Preview screen. If an error appears on the screen, reference the error number. LIVE+ EnGo User Guide...
-
Page 31: Technical Specifications
0° C to +45° C (32° F to 113° F)* qualified operation up to 95% RH (non- Temperature condensing) Connectors SDI (BNC), HDMI 1.3, Mini DisplayPort, 2 x RJ45 Ethernet, 2 x USB 2.0, IFB (3.5 mm audio jack), DC In Key Functions Live Transmit broadcast-quality live video over IP networks LIVE+ EnGo User Guide... -
Page 32: Additional Help
Transfer edited video or other files to LIVE+ servers operating with internal/external battery; up to 40°C with included certified external power adapter. Additional help If you still require assistance operating your LIVE+ EnGo: Visit the Dejero Support Hub online knowledge base at support.dejero.com... - Page 33 Technical Support: support@dejero.com US & Canada (Toll Free): 1 866 808 3665 Europe: +44 20 3519 2665 Australia: +61 2 8015 6803 International: +1 519 772 4824 LIVE+ EnGo User Guide...
Need help?
Do you have a question about the LIVE+ EnGo and is the answer not in the manual?
Questions and answers