Table of Contents
Advertisement
Advertisement
Table of Contents
Troubleshooting

Related Manuals for Leica DVM6


Summary of Contents for Leica DVM6
- Page 1 Leica DVM6 User Manual...
-
Page 2: Table Of Contents
Introduction Instrument Setup Congratulations! Leica DVM6 Packing and Unpacking Switching on the Leica DVM6 Standard Delivery and Accessories Switching on the Computer and Starting the LAS X Software System Overview Placing the Sample and Positioning the Stage Overview of the Instrument... - Page 3 Contents (Continued) Software Application Leica LAS X Basic Functions Service Care, Maintenance, Contact Persons Spare parts Accessories Specifications Specifications Dimensional Drawings Objectives Leica DVM6 C/S/A Leica DVM6 M Terms Used Terms Used Troubleshooting Troubleshooting Leica DVM6 User Manual...
- Page 4 General Instructions Leica DVM6 User Manual General Instructions...
-
Page 5: General Instructions
General Instructions Safety concept Use in clean rooms Servicing Before using your Leica microscope for the first In general, the Leica DVM6 digital microscope Repairs may only be carried out by Leica time, please read the "Safety Concept" brochure can always be used in clean rooms. -
Page 6: Important Safety Notes
Important Safety Notes User manual The Leica DVM6 C/S/A is a standalone product The "Safety Concept" booklet contains addi- In order to maintain the instrument in its origi- and designed as a VDU workstation. It can be tional safety information regarding the service... -
Page 7: Symbols Used
Failure to comply can cause the following: Important information Hazards to personnel Hazards to personnel This symbol indicates additional infor- Functional disturbances damaged Functional disturbances damaged mation or explanations that are intended instruments instruments to provide clarity. Leica DVM6 User Manual General Instructions... -
Page 8: Safety Instructions
All operators have read, have understood and observe this User Manual, and particu- Avoid large temperature fluctuations, The Leica DVM6 and its components must larly the safety regulations. direct sunlight and vibrations. These condi- never be used for medical and/or IVD applica-... - Page 9 The ergonomic optics concept and the design Avoid contact with powered electrical circuits, Refer to "Safety Concept" booklet of the Leica DVM6 digital microscope aim to which can lead to injury. limit the strain on the user to the lowest possi- EC Declaration of Conformity ble level.
-
Page 10: Introduction
Introduction Leica DVM6 User Manual Introduction... -
Page 11: Congratulations
Leica Microsystems. The Your Leica DVM6 digital microscope includes Like every digital camera, the Leica DVM6's special design of the Leica DVM6 makes it a the "Leica Application Suite X" (LAS X) software. integrated camera reacts differently to differ-... -
Page 12: Packing And Unpacking
• 1. Pull up the cardboard sleeve. 3. Reach your hands into the grip cutouts To avoid damaging the Leica DVM6, under the microscope and lift it upwards never hold it by the rocker arm or the 2. Remove the foam. -
Page 13: Standard Delivery And Accessories
Standard Delivery and Accessories Standard delivery and required accessories The standard delivery of the Leica DVM6 digital microscope includes: 1. Zoom module, without objective 2. Leica DVM6 microscope 3. Power supply unit for supplying power 4. USB cable, for connection to the computer 5. - Page 14 2. Diffuser 3. Side light adapter 4. Transmitted light stage 5. Dust cover 6. Flexible Leica LED5000 SLI point light source For information on additional accessories, such as objectives and adapters, illumination or the dust cover for the microscope, please contact your Leica Microsystems authorized dealer.
-
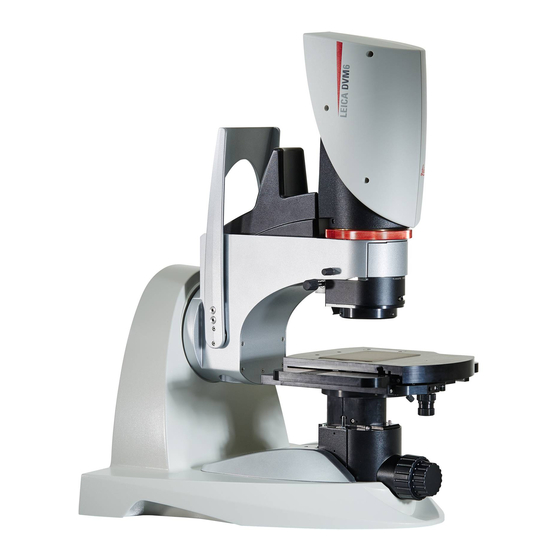
Page 15: System Overview
System Overview This overview shows the Leica DVM6 in an exam- ple application with additional components. 1. Zoom module 2. Tilting stand with rocker arm 3. PlanAPO FOV 12.55 objective 4. XY stage with stage plate 5. Windows computer with LAS X software... -
Page 16: Overview Of The Instrument
13. Focus drive, coarse and fine adjustment, manual 14. Base with tilting stand 15. On/Off switch 16. Power supply connection 17. USB connection 15 16 17 18 18. Connection for Leica LED5000 SLI external illumination Leica DVM6 User Manual Introduction... -
Page 17: Leica Dvm6 C
Leica DVM6 C Leica DVM6 S On the Leica DVM6 C (10 450 701), the focus drive and XY stage are On the Leica DVM6 S (10 450 702), the focus drive is encoded and can be encoded (i.e. equipped with a position measuring system) and can only operated both motorized and manually;... -
Page 18: Leica Dvm6 A
Leica DVM6 A Leica DVM6 M On the Leica DVM6 A (10 450 703), the focus drive and XY stage are The Leica DVM6 M consists of the zoom module and can only be used encoded and can be operated motorized or manually. -
Page 19: Objectives
5 mm 60 mm 60 mm 60 mm The Leica PlanAPO FOV 43.75 (10 450 704) The Leica PlanAPO FOV 12.55 (10 450 705) The Leica PlanAPO FOV 3.60 (10 450 706) objec- tive is the objective for the highest magnifica- objective is the objective for large image fields... -
Page 20: Installation/Assembly
Installation/Assembly Leica DVM6 User Manual Installation/Assembly... -
Page 21: Setting Up Leica Dvm6
Leica DVM6 A with motorized XY stage. 2. Position the Leica DVM6 next to the moni- The Leica DVM6 microscope is designed... -
Page 22: Installing The Planapo Objective
Installing the PlanAPO Objective General instructions Installing the objective According to the order, the Leica DVM6 digital microscope is delivered in a pre- assembled state. The desired objective and optional accessories have to be assembled onsite. Make sure not to touch optical and elec- trical parts. -
Page 23: Cables And Terminals
Please only connect the provided power supply. Using an incorrect voltage can substantially damage the Leica DVM6. 1. Make sure that the Leica DVM6 is switched If you are not using an all-in-one off. computer, connect the monitor and computer to the power supply and connect 2. -
Page 24: Optional Accessories
1. Attach the polarizer so that it perfectly fits light illumination; the analyzer is already onto the objective. installed in the Leica DVM6 zoom module. Rotating the polarizers changes the polariza- tion direction, e.g. to suppress direct reflections. Leica DVM6 User Manual... -
Page 25: Diffuser
XY stage. The diffuser 10 450 709 is not included in the standard delivery of the Leica DVM6. You do not have to switch off the Leica DVM6 or the illumination when ... -
Page 26: Side Light Adapter
You do not have to switch off the Remove the samples from the XY stage 2. Lock the side light adapter on the objective Leica DVM6 or the illumination when to prevent possible damage. Rotate the by turning it slightly until it engages. The installing accessories. -
Page 27: Transmitted Light Stage
The stage plate is secured to the XY stage Please note that the transmitted light by magnets. It may take a certain amount stage is larger and taller than the stage of force to remove them as a result. plate. Leica DVM6 User Manual Installation/Assembly... -
Page 28: Leica Led5000 Sli External Illumination
The spot illumination can be controlled using Leica LAS X software or its own controls. 1. Screw the spot illumination onto the 1. Make sure that the Leica DVM6 is switched adapter. off. The spot illumination 10 450 548 is not 2. -
Page 29: Personalizing The Computer And Installing Software
DVM6 microscope from Leica. order to use the Leica DVM6. The computer also has to have sufficient free hard drive space. For instructions on installing and using the software, refer to the DVD provided 1. - Page 30 The following resolutions can be set for display- output in a 4:3 aspect ratio. ing the camera image: The live display of the Leica DVM6 is set A monitor with a 16:9 or 16:10 aspect to 1,600 × 1,200 pixels (2 megapixels) by ratio is recommended for displaying the default.
-
Page 31: Instrument Setup
Instrument Setup Leica DVM6 User Manual Instrument Setup... -
Page 32: Leica Dvm6
Leica DVM6 Switching on the Leica DVM6 Switching on the Leica DVM6 Ensure that the objective is inserted on the microscope and is securely in place. 1. For the PlanAPO FOV 12.55 and FOV 3.60 objectives: Rotate the relief contrast controller all the way forward (open) and set the contrast dial to the normal position (left stop). -
Page 33: Switching On The Computer And Starting The Las X Software
Switching on the Computer and Starting the LAS X Software General instructions The light from the Leica LED illumina- tion can be very bright. Avoid looking directly into the LEDs. The objective is equipped with a safety shut-off for the integrated illumination. -
Page 34: Placing The Sample And Positioning The Stage
2. Now you can move the stage manually or The LAS X software is used to control a Leica using the LAS X software until the desired 4. Rotate the XY stage in the desired direction. -
Page 35: Focusing
The LAS X software is used to control a focusing drive. Focusing is manual or motor- Leica DVM6 A with a motorized focus ized depending on the instrument version. The drive. The focus can also be adjusted by hand at sample detail is brought into sharp focus as any time despite this. - Page 36 2 mm below 2. Maximum XY stage height adjustment the upper edge of the XY stage. (= focusing range) 3. Focal plane 4. Working distance, for FOV 12.55 planapo- chromatic objective Leica DVM6 User Manual Instrument Setup...
-
Page 37: Changing The Magnification
Changing the Magnification Changing the magnification (zoom) The Leica DVM6 provides you with infi- nitely variable adjustment for changing the magnification level. Parfocality: The Leica DVM6 is parfocally matched. If the sample is in focus at the highest magnification level, this remains true across the entire magnification range. -
Page 38: Using A Tilting Stand
The Leica DVM6 compensates for the weight of the instrument at every tilting angle, which makes it easy and comfortable to control throughout the entire tilting range. - Page 39 Tilting past the zero position moves The warning tone triggers based on the avoids damage to the sample or Leica DVM6 an index pin over a click stop and a quiet assumption that you are using a flat sample.
-
Page 40: Application
Application Leica DVM6 User Manual Application... -
Page 41: Leica Dvm6 Application Example Leica Dvm6
Leica DVM6 Application Example Leica DVM6 General instructions Preparations The Leica DVM6 is designed as a VDU workstation. It is a universal microscope with a wide range of uses. It provides a large working distance, making it ideal for examining even rela-... - Page 42 Initial steps 1. Switch on the Leica DVM6. 6. Set the lowest magnification level. Turn the 10. Tilt the tilting stand as necessary. The zoom ring clockwise as far as it will go. sample stays in focus while tilting and the 2.
-
Page 43: Changing The Objective
(hot swap). You do not need 2. Unscrew the clamping screw. to switch off the Leica DVM6 or the Leica LAS X 7. Attach the sliding guide of the objective to software to change the objective. 3. Remove the objective by pulling it straight the dovetail guide. -
Page 44: Coaxial Illumination
Switching on the coaxial illumination The coaxial illumination illuminates the sample directly from above is switched on and off via the Leica LAS X software and the brightness is adjusted can be adjusted to the reflection properties of the sample using the contrast dial... - Page 45 If, when turning the dial, the image becomes dark for a short period of time, wait a moment until the exposure correction has compensated for the brightness of the image. Leica DVM6 User Manual Application...
- Page 46 1. With the coaxial illumination switched on, bring the sample into focus. 2. Use the control dial to adjust the coaxial illumination until the image shows the desired spatial effect. Leica DVM6 User Manual Application...
-
Page 47: Using Accessories
LED ring light helps generate a meaningful (more visible) illumination. image for highly reflective samples. This can display low-contrast samples with high contrast. Potential material errors or other visible defects can be identified quickly and reliably. Leica DVM6 User Manual Application... -
Page 48: Side Light Adapter, Transmitted Light Stage
Using the side light adapter, light is directed onto the sample at a shallow angle. This The transmitted light stage is also suitable accentuates irregularities on the sample for "backlighting" openings or drilled holes. surface (e.g. waviness or scratches). Leica DVM6 User Manual Application... -
Page 49: Leica Led5000 Sli External Illumination
Leica LED5000 SLI External Illumination General instructions Control unit The Leica LED5000 SLI (10 450 548) is an The Leica LED5000 SLI is controlled using 1. Use the key to switch the illumination optional, external illumination option for the Leica LAS X software. -
Page 50: Software Application
Software Application Leica DVM6 User Manual Software Application... -
Page 51: Leica Las X Basic Functions
Basic functions with the Leica DVM6 The LAS X software provides various functions for the different Leica DVM6 types (C, S, A). These differences are not listed in this User Manual. Image area The current image is shown in the image area. The displayed status indicator on the top right indicates whether a live image ... - Page 52 Leica LAS X Basic Functions (Continued) Left-side toolbar Right-side toolbar Status bar Here, you can prepare image acquisition or Buttons sorted into four groups are located on The current instrument status is shown in the adjust the default values. the right-side toolbar. The buttons slide out status bar.
-
Page 53: Service
Service Leica DVM6 User Manual Service... -
Page 54: Care, Maintenance, Contact Persons
You can find information on worldwide life. Observing the following care and cleaning handling. Leica representatives on the Leica website: tips will ensure that even after years, your Leica www.leica-microsystems.com. microscope will continue to work as well as it did on the very first day. - Page 55 Do not use alcohol. Avoid excessive use of solvents. The lint- free cloth, lens cloth or cotton swab should be soaked with solvent, but not so wet that solvent runs over the lens. Leica DVM6 User Manual Service...
- Page 56 Permitted measures Servicing Some components are made of polymer or are Clean the microscope (or parts of it) Repairs may only be carried out by Leica polymer-coated. They are, therefore, pleasant using warm soapy water, then wipe using Microsystems-trained service technicians.
-
Page 57: Spare Parts
Spare parts Item Leica article number Designation 19 002 518 Power supply 19 005 838 USB3.0 cable (2 m) 19 005 829 Stage plate 10 725 566 Fastening screw for objectives Leica DVM6 User Manual Service... -
Page 58: Accessories
DVM6 PlanAPO FOV 12.55 objective 10 450 706 DVM6 PlanAPO FOV 3.60 objective 10 450 708 Polarizer adapter for DVM6 objective FOV 43.75 & FOV 12.55 objectives 10 450 709 Diffuser adapter for objective FOV 43.75 (provides dome-like illumination when used with FOV 12.55 objective) 10 450 717 Diffuser adapter for objective FOV 12.55 (can also be connected to objective FOV 43.75) 10 450 711... - Page 59 Specifications Leica DVM6 User Manual Specifications...
-
Page 60: Specifications
ü 1) Manual stage positioning possible LAS X software ü ü ü Combinable objectives PlanAPO FOV 43.75 (10 450 704) PlanAPO FOV 12.55 (10 450 705) PlanAPO FOV 3.60 (10 450 706) Transmitted light option (10 450 712) Leica DVM6 User Manual Specifications... - Page 61 Magnification Continuously encoded detection tilting stand Optical correction Apochromatic Iris diaphragm Software-controlled The zoom module is identical for the Leica DVM6 C/S/A. Camera Sensor grade CMOS, 1/2.3" Resolution 3,664 × 2,748 pixels Pixel size 1.67 × 1.67 μm Exposure time 0.5 to 500 ms...
- Page 62 PlanAPO FOV 43.75 PlanAPO FOV 12.55 PlanAPO FOV 3.60 Design engineering Main objective, multi-layered tempered, lead-free Correction Planapochromatic Connection Quick-change system with slide-in mechanism Magnification range Medium High Working distance 60 mm 33 mm 5 mm Leica DVM6 User Manual Specifications...
- Page 63 DIS 18221, at λ=546 nm optical resolution capacity. 4) The perceived depth of field is typically 2) At a viewing distance of 350 mm to 700 mm larger than the specified value since the from the screen Leica DVM6 User Manual Specifications...
- Page 64 15,685 μm 1,238 μm 1) Information in accordance with ISO/ 3) Screen display set to "fit to window" DIS 18221, at λ=546 nm 2) At a viewing distance of 350 mm to 700 mm from the screen Leica DVM6 User Manual Specifications...
- Page 65 Light source Coaxial incident light Integrated Integrated Light source ü ü Contrast dial, λ/4 plate, rotatable Relief contrast ü ü Ring light illumination accessories Diffuser Adapter Polarizer Adapter Dome light Adapter SLow angle illumination Adapter Leica DVM6 User Manual Specifications...
- Page 66 60 mm Explanation of symbols: Drive Manual coarse/fine ü Included in the delivery package Motorized ü ü Available optionally as accessories Resolution 0.5 µm 0.25 µm 0.25 µm --- Not available 1) Manual stage positioning possible Leica DVM6 User Manual Specifications...
- Page 67 -20 °C to +50 °C Power supply Rear side of tilting stand Relative humidity (mode) 10 % to 90 % CTL2, for Leica LED 5000SLI Rear side of tilting stand CE Declaration of Conformity Available Power supply Illumination risk class, according to...
- Page 68 DVM6 A Leica LAS X software ü Included in the delivery package Operating system Windows 7 / 10, 64 bit --- Not recommended Leica LAS X software modules LAS X Core ü ü ü LAS X Live Image Builder XY ü...
-
Page 69: Dimensional Drawings
Dimensional Drawings Objectives Leica PlanAPO FOV 43.75 Leica PlanAPO FOV 12.55 Leica PlanAPO FOV 3.60 Dimensions in mm Leica DVM6 User Manual Specifications... -
Page 70: Leica Dvm6 C/S/A
Leica DVM6 C/S/A - 60 Dimensions in mm Leica DVM6 User Manual Specifications... -
Page 71: Leica Dvm6 M
Leica DVM6 M Dimensions in mm Leica DVM6 User Manual Specifications... - Page 72 Terms Used Leica DVM6 User Manual Terms Used...
-
Page 73: Terms Used
1 mil = 0.001 inch = 25.4 µm object. The resolution capacity is a function of the wavelength of the light used and the numerical aperture. Leica DVM6 User Manual Terms Used... - Page 74 Depth of field (DOF) The depth of field is a measure of the extent of the focal range in an microscope's object space. The higher the magnification is, the lower the depth of field. Leica DVM6 User Manual Terms Used...
- Page 75 It is given in numeric form with a multiplication sign, e.g. 50×. Note: The visual display magnification depends on the viewing distance. Leica DVM6 User Manual Terms Used...
-
Page 76: Troubleshooting
Troubleshooting Leica DVM6 User Manual Troubleshooting... -
Page 77: Troubleshooting
LAS X the LAS X software. software Ensure that the DVM6 is connected to the computer via USB 3.0. You may have to restart the LAS X software after the USB connection has been made. The motorized XY stage cannot... - Page 78 Troubleshooting (Continued) Warnings • If the Leica DVM6 with motorized XY Error Correction stage is re-initialized, the stage moves Uneven image brightness when Set the relief contrast to the OPEN position. Otherwise there to the end position. Ensure that there are no...
- Page 79 CONNECT WITH US! Leica Microsystems (Schweiz) AG · Max-Schmidheiny-Strasse 201 · 9435 Heerbrugg, Switzerland T +41 71 726 34 34 · F +41 71 726 34 44 www.leica-microsystems.com...
Need help?
Do you have a question about the DVM6 and is the answer not in the manual?
Questions and answers