Table of Contents
Advertisement
Advertisement
Table of Contents

Related Manuals for Leica EM TIC 3X


Summary of Contents for Leica EM TIC 3X
- Page 1 From Eye to Insight OPERATING MANUAL EM TIC 3X 167190032 Version 07/17...
- Page 2 Important Note Leica Mikrosysteme GmbH reserves the right to change technical specifications as well as manufacturing processes without prior notice. Only in this way is it possible to continuously improve the technology and manufacturing techniques used to provide our customers with excellent products.
- Page 3 Leica EM TIC 3X Operating Manual Leica EM TIC 3X Serial Number: Date of purchase: For the instrument serial number, please refer to the name type label on the back of the instrument! Please read this operating manual carefully before operating the instrument.
- Page 5 Foreword This operating manual is intended to provide essential information about the proper operation and servicing of the Leica EM TIC 3X Triple Ion Beam Cutter system. The appendix helps with specific processing of solid samples for subsequent investigation with an electron microscope (EM) or light microscope (LM).
-
Page 6: Table Of Contents
3.3 Installing, assembling and commissioning ................19 3.3.1 Unpacking and installing on a table ................. 19 3.3.2 Installing the Leica EM TIC 3X on Leica instrument table ..........23 3.3.3 Installing the arm rests of the Leica instrument table ............24 3.3.4 Clamping device (Argon bottle, LN... - Page 7 3.5 Storage location for the instructions ..................44 4. Operating instructions ......................45 4.1 Introduction ......................... 45 4.2 Main components of the Leica EM TIC 3X Triple Ion Beam Cutter ........45 4.3 Functional description ......................45 4.3.1 Chamber .......................... 45 4.3.2 Vacuum system .......................
- Page 8 5.6.2.10 Instability of the ion source with a high life time and low kV setting......95 5.6.3 Exchanging fuses ......................95 5.7 Cleaning the Leica EM TIC 3X .................... 96 5.8 Maintenance schedule (summary) ..................96 6. Troubleshooting ........................97 6.1 Error messages........................
-
Page 9: Introduction
In order to ensure the safety of service technicians and operators, and to prevent any damage to the Leica EM TIC 3X Triple Ion Beam Cutter system, it is essential to read this manual carefully before beginning any work with the system. - Page 10 Lifting hazard. The volume of the LN Dewar is 25 l. Single person lift could cause injury. Use assistance when moving or lifting the Dewar. Page 6 Leica EM TIC 3X Operating Manual 07/17...
- Page 11 This product been tested requirements of CAN/CSA C22.2 No. 61010-1, second edition, including Amendment 1, or a later version same standard incorporating same level testing requirements. Page 7 Leica EM TIC 3X Operating Manual 07/17...
-
Page 12: Identification
Identification 1.1.1 Product Leica EM TIC 3X Triple Ion Beam Cutter system 1.1.2 Name and address of the manufacturer Leica Mikrosysteme GmbH Hernalser Hauptstrasse 219 A-1170 Vienna Tel.: +43 1 488 99-0 Fax: +43 1 488 99-350 Internet: http:// www.leica-microsystems.com... -
Page 13: Product Description
The operator must ensure that this does not cause the sample's state of aggregation to change. If so, using the cooling stage is recommended. The Leica EM TIC 3X must not be used beyond the limits specified in its technical data sheet. -
Page 14: Instrument Overview
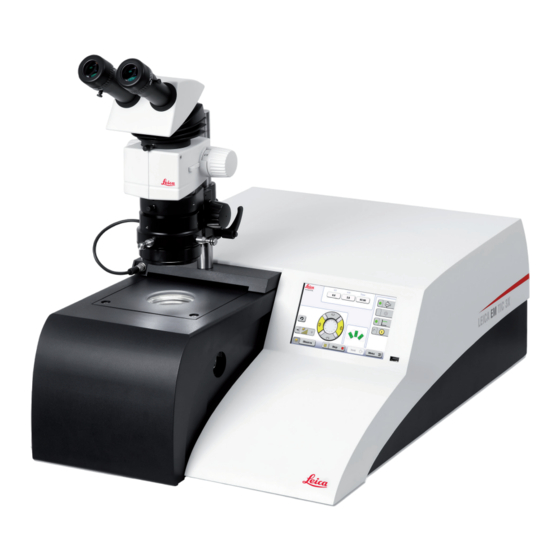
4. Instrument table 5. LN pump (optional) 6. LN Dewar (optional) 7. Microscope support column 8. LED illumination 9. Access to E-W traverse knob. Opposite side is sample Z-movement 10. USB port Page 10 Leica EM TIC 3X Operating Manual 07/17... -
Page 15: Dimensions And Weight
Maximum: 300 W Sound emissions The continuous sound level emitted by the Leica EM TIC 3X Triple Ion Beam Cutter system is about 50 dB (A). IP code of the electrical devices The electrical devices are equipped with housings and covers, and are therefore designed to provide degree of protection IP 20 (contact protection: blocking finger access;... -
Page 16: Safety Information
Safety information 2.9.1 General instructions Danger! The Leica EM TIC 3X Triple Ion Beam Cutter system can be handled safely and easily provided it is operated in accordance with the instructions in this manual. Non-observance of these safety instructions may endanger people and the system. -
Page 17: Safety Measures At The Installation Site
If the Leica EM TIC 3X Triple Ion Beam Cutter system is installed incorrectly, the system may be damaged. 2.9.4 Safety measures before use The Leica EM TIC 3X Triple Ion Beam Cutter system must be installed by authorized staff of Leica representatives. Note! The system should be switched off for maintenance and servicing only, not at the end of a work session. -
Page 18: Residual Hazards
If the Leica EM TIC 3X Triple Ion Beam Cutter system is damaged or malfunctioning, all use of the system should be suspended until the malfunction or damage has been corrected. - Page 19 Full-load values (10 kV, 3.5 mA, -150 °C), room temperature ~25 °C 10 21 31 42 52 62 73 83 94 Size of the room [m Time to achieve critical concentration [h] Page 15 Leica EM TIC 3X Operating Manual 07/17...
- Page 20 (-196 °C) is lower than liquid oxygen’s boiling atmosphere. The boiling point of LN point (-183 °C). When the exchange surfaces are extensive enough, oxygen from the Page 16 Leica EM TIC 3X Operating Manual 07/17...
- Page 21 Burns boils at -196 °C. It is extremely cold and can cause serious burns. Please read the safety instructions provided with all Leica products for the correct handling of liquid nitrogen! Page 17 Leica EM TIC 3X Operating Manual 07/17...
-
Page 22: Installation And Set Up
The Leica TIC 3X must be set up on a stable laboratory workbench with a surface area of at least 800 mm x 900 mm. -
Page 23: Installing, Assembling And Commissioning
Installing, assembling and commissioning 3.3.1 Unpacking and installing on a table The Leica EM TIC 3X Triple Ion Beam Cutter system should be transported with a forklift truck. After selecting the installation location, remove and store the outer packaging. Check the disassembled components that are secured on the housing, to ensure that nothing is missing or damaged. - Page 24 2. Open the crate and remove the packing material. 3. Carefully remove the boxes of the accessories. 4. Remove the inner cover of the packaging. Page 20 Leica EM TIC 3X Operating Manual 07/17...
- Page 25 5. Lift the shipping crate up off the pallet. 6. Remove the foam shipping protection around the Leica EM TIC 3X. 7. Remove the Leica EM TIC 3X from the foam material on the pallet. Grip the instrument from the recesses of the foam.
- Page 26 Slightly lift up the instrument vertically and lower it to its final position again. Now, the feet of the roughing pump should not be in contact with the base plate. Page 22 Leica EM TIC 3X Operating Manual 07/17...
-
Page 27: Installing The Leica Em Tic 3X On Leica Instrument Table
(use spirit level). This adjustment has to be carried out before putting the instrument on the table. 2. The Leica instrument table has four recesses (a) to position the feet of the instrument (a). In addition, four recesses to position the feet of the roughing pump (b). -
Page 28: Installing The Arm Rests Of The Leica Instrument Table
3.3.3 Installing the arm rests of the Leica instrument table 1. When placing the work plate on top of the chamber the stereo microscope of the instrument can be used to manipulate the sample. - Page 29 2. Mount the arm rests in such a manner that the tongue rests on the groove of the guide bar. Clamp the arm rest with the star-handle against the screw nut. 3. Adjustment screws of the arm rest: star handle for longitudinal and lever for height adjustment. Page 25 Leica EM TIC 3X Operating Manual 07/17...
-
Page 30: Clamping Device (Argon Bottle, Ln Pump) Of The Instrument Table
2. Use the safety-belt to clamp the Argon gas bottle. To secure the LN pump, lift up the holder until it securely clamped by the clamping mechanism. Latch the holder with the folding lever. Page 26 Leica EM TIC 3X Operating Manual 07/17... -
Page 31: Assembling The Stereo Microscope S9E
1. Move the clamping ring on the column of the stereo microscope. This ring is used to hold the stereo microscope in its height position when it is swivelled. 2. Move the stereo microscope carrier on the column as shown in the picture. Page 27 Leica EM TIC 3X Operating Manual 07/17... - Page 32 3. Insert the stereo microscope into the carrier. 4. Clamp the microscope with the clamping screw. Page 28 Leica EM TIC 3X Operating Manual 07/17...
- Page 33 6. Place and clamp the ring LED on the stereo microscope. The clamping screw should be located at the 2 o’clock position. Thus the segments of the illumination are in the right position. Page 29 Leica EM TIC 3X Operating Manual 07/17...
-
Page 34: Assembling The Stereo Microscope M80 (With 0.8X Objective)
3.3.6 Assembling the stereo microscope M80 (with 0.8x objective) 1. Move the clamping ring on the column of the stereo microscope. This ring is used to hold the stereo microscope in its height position when it is swivelled. Page 30 Leica EM TIC 3X Operating Manual 07/17... - Page 35 2. Move the stereo microscope carrier on the column as shown in the picture. 3. Insert the stereo microscope into the carrier. Page 31 Leica EM TIC 3X Operating Manual 07/17...
- Page 36 4. Clamp the microscope with the clamping screw. 5. Place the Ergo Wedge onto the microscope body. Page 32 Leica EM TIC 3X Operating Manual 07/17...
- Page 37 6. Clamp the Ergo Wedge with the screw on the front side of the Ergo Wedge. 7. Place the binocular tube onto the Ergo Wedge. Page 33 Leica EM TIC 3X Operating Manual 07/17...
- Page 38 8. Clamp the binocular tube with the screw on the rear side of the binocular tube. 9. Insert the eyepieces. Page 34 Leica EM TIC 3X Operating Manual 07/17...
- Page 39 11. Place and clamp the ring LED on the 0.8x objective. The clamping screw should be located at 2 o’clock position. Thus the segments of the illumination are in the right position. Page 35 Leica EM TIC 3X Operating Manual 07/17...
-
Page 40: Assembling The Stereo Microscope M80 (Highest Magnification)
For doing so please refer to chapter 5.6. Move the clamping ring on the column of the stereo microscope. This ring is used to hold the stereo microscope in its height position when it is swivelled. Page 36 Leica EM TIC 3X Operating Manual 07/17... - Page 41 2. Move the stereo microscope carrier on the column as shown in the picture. 3. Insert the stereo microscope into the carrier. Page 37 Leica EM TIC 3X Operating Manual 07/17...
- Page 42 4. Clamp the microscope with the clamping screw. 5. Place the coaxial LED illumination onto the microscope body and clamp it with the clamping screw. Page 38 Leica EM TIC 3X Operating Manual 07/17...
- Page 43 6. Place the Ergo Wedge onto the coaxial LED illumination and attach the binocular tube. Insert the eyepieces in the binocular tube. 7. Move the movable lens adapter on the microscope body until it touches the end stop. Page 39 Leica EM TIC 3X Operating Manual 07/17...
- Page 44 8. Orientate the lens adapter in such a manner that the set screws are in 3 and 6 o’clock position. Clamp the adapter with the two grub screws. 9. Mount the 1.6x objective onto the moveable lens adapter. Page 40 Leica EM TIC 3X Operating Manual 07/17...
- Page 45 10. Connect the cable on the rear side of the coaxial LED illumination. 11. Connect the other end to the port of the left side of the carrier of the column and finger tighten the screw. Page 41 Leica EM TIC 3X Operating Manual 07/17...
-
Page 46: Assembling The Movable Lens Adapter For M80 Objectives
1. Move the movable lens adapter on the microscope body until it touches the end stop. 2. Orientate the lens adapter in such a manner that the set screws are in 3 and 6 o’clock positions. Clamp the adapter with the two grub screws. Page 42 Leica EM TIC 3X Operating Manual 07/17... -
Page 47: Safe Storage Of The Packing Material
3.3.9 Safe storage of the packing material The packing material for the Leica EM TIC 3X Triple Ion Beam Cutter system should be retained for future use in case the instrument needs to be transported. Damage to the system may occur if it is not transported in the original packaging. The packaging material is designed for transportation of the instrument. -
Page 48: Initial Operation
Danger may be caused by commissioning the system incorrectly. This may cause personal injury and damage to the system. The Leica EM TIC 3X Triple Ion Beam Cutter system must not be commissioned by anyone except employees of Leica representatives and specially trained and authorized technicians. -
Page 49: Operating Instructions
Main components of the Leica EM TIC 3X Triple Ion Beam Cutter The Leica EM TIC 3X Triple Ion Beam Cutter system includes the following main functional units:... -
Page 50: Vacuum System
0 to 5 mm and from 5 to10 mm. The maximum sample size is 50 x 50 mm. Table flange with standard sample stage and displacement paths: vertical 2 mm lateral 10 mm Page 46 Leica EM TIC 3X Operating Manual 07/17... - Page 51 6 mm distance between sample and mask is set using the center set screw Please refer to the operating manual of the standard stage for proper usage. Page 47 Leica EM TIC 3X Operating Manual 07/17...
-
Page 52: Multiple Sample Stage (Optional)
(travel range: 4 mm) Please refer to the operating manual of the standard stage for proper usage. Page 48 Leica EM TIC 3X Operating Manual 07/17... -
Page 53: Cooling Stage (Optional)
(travel range: 6 mm) Page 49 Leica EM TIC 3X Operating Manual 07/17... - Page 54 LN pump. Open the shutter by pushing the lever before connecting the hose. Please refer to the operating manual of the standard stage for proper usage. Page 50 Leica EM TIC 3X Operating Manual 07/17...
-
Page 55: Rotary Stage (Optional)
Max. incident angle: 12° Rotation speed: Low (~4 rpm), Medium (~7 rpm), High (~10 rpm) Highest oscillation angle: 45° Please refer to the operating manual of the standard stage for proper usage. Page 51 Leica EM TIC 3X Operating Manual 07/17... -
Page 56: Leica Em Vct500 Docking Port (Optional)
4.3.7 Leica EM VCT500 docking port (optional) The Leica EM TIC 3X can be equipped with a load lock system in order to transfer the prepared sample directly into the coater Leica EM ACE600 (if needed) and subsequently into the (Cryo-) SEM und optimal environmental condition using the transfer shuttle of the Leica EM VCT500 (vacuum/cryo –... -
Page 57: Triple Ion Source
1 …10 kV with source currents from 0.5 … 4.5 mA. Triple ion source in the chamber: Ion gun disassembled from system: Page 53 Leica EM TIC 3X Operating Manual 07/17... -
Page 58: Gas Supply Control
The gas must be 99.999 % pure. 4.3.10 LCD touch control panel The LCD control panel is used for communicating with the Leica EM TIC 3X Triple Ion Beam Cutting system, and for data input and output. LCD control panel: The LCD control panel operates on its own software. -
Page 59: Stereo Microscopes
There are three configurations of the stereo microscope available for observing and adjusting the sample. Highest visual magnification (~230x) can be achieved with the Leica M80 stereo in conjunction with the 1.6x objective, movable lens adapter and coaxial illumination. M80 in conjunction with the 0.8x objective provides about 77x visual magnification. -
Page 60: Principle Operating And Display Functions
The instrument will be delivered with one stage built into the instrument. To exchange the stage please proceed as follows. 1. Open the flange and swivel the stage in its horizontal position. 2. Retract and unhinge the flap damper. Page 56 Leica EM TIC 3X Operating Manual 07/17... - Page 61 The plug is equipped with a locking mechanism. Please do not pull on the cable! Grasp the knurled part of the plug and retract for disconnecting the cable! 4. Slide the preventer until the bearing is completely visible. Page 57 Leica EM TIC 3X Operating Manual 07/17...
- Page 62 6. Turn the stage 90° and withdraw it in the vertical direction. 7. Place the stage into the designated storage box. This is used to protect the flange surface from scratches which might influence the sealing and evacuating the chamber. Page 58 Leica EM TIC 3X Operating Manual 07/17...
- Page 63 8. Insert the other stage in the vertical position. 9. Hinge the stage on its two bearings. Page 59 Leica EM TIC 3X Operating Manual 07/17...
- Page 64 10. Slide the preventer to cover the bearing completely before you make any other connections. 11. Swivel the stage in its horizontal position, slightly retract the flap damper and hinge it. Page 60 Leica EM TIC 3X Operating Manual 07/17...
- Page 65 Initialization must be performed every time the stage or the light has been exchanged if the instrument is switched on. When the instrument is switched off the stage (or light) will be initialized when switching on the instrument. Page 61 Leica EM TIC 3X Operating Manual 07/17...
-
Page 66: User Interface
After switching on the instrument with the mains switch (rear side) the system starts initialization. Switching on the instrument. Initialization screen after switching on the instrument. Layout of the user interface Parameter input line sample information guns status field illumination Command line Page 62 Leica EM TIC 3X Operating Manual 07/17... -
Page 67: Setting The Parameters
100 hours. Each gun can be disabled or enabled by pushing directly on the gun symbol (green arrow). The disabled gun then fades to grey and is set out of operation. Page 63 Leica EM TIC 3X Operating Manual 07/17... -
Page 68: Status Information And Programming
Once the process has started, the sign in the Load-Up line turns to yellow (in progress). It becomes green as soon as the process is finished. Page 64 Leica EM TIC 3X Operating Manual 07/17... - Page 69 (e.g., 1 sample, 3 steps). The last program is active for the next sample process, even when changing the parameters on the main screen. This change will affect the first step only. The instrument will continue according to the program. Page 65 Leica EM TIC 3X Operating Manual 07/17...
- Page 70 (kV, mA, Time) in the parameter input line appears when selecting different gun parameters. The progress of the recipe can be recalled by pushing the Load Up line: yellow sign = in process, green = finished process. Page 66 Leica EM TIC 3X Operating Manual 07/17...
- Page 71 The existing recipe can be up-loaded to a USB data-stick or a recipe from the data- stick can be down-loaded to the instrument. There is no database available in the instrument. Hence, different recipes can only be selected from the USB data-stick. Page 67 Leica EM TIC 3X Operating Manual 07/17...
-
Page 72: Guns Status
Tuned values are related to the internal current of the ion sources and have no significant influence on the milling rate and on the heat impact on the sample. Page 68 Leica EM TIC 3X Operating Manual 07/17... -
Page 73: Illumination
If no process has been started the light can only be switched on and off directly at the coaxial illumination. The brightness needs to be set with the + - button on the coaxial illumination as well. Page 69 Leica EM TIC 3X Operating Manual 07/17... -
Page 74: Command Line, Start/Pump/Vent
(3.3.10 Electrical and gas connection). Using nitrogen for venting helps to improve the vacuum conditions and prolongs the service life of the ion source. Page 70 Leica EM TIC 3X Operating Manual 07/17... -
Page 75: Menu
Press the Start button to perform the purging process. After pushing the button, purging will be done for one minute. You may interrupt the purging process at any time by pushing the button again or when leaving the menu. Page 71 Leica EM TIC 3X Operating Manual 07/17... - Page 76 “process.rcp”. Import this file by using the stylesheet: “TIC3X.xsl”. It might be necessary to change the security settings to execute the macros. The History button is used to recall the complete last process and can be observed directly on the screen. Page 72 Leica EM TIC 3X Operating Manual 07/17...
- Page 77 Calibration is not recommended unless absolutely necessary. Service button in the Menu is used to enter in the service menu. The service menu is password protected and can only be entered by an authorized Leica service engineer. Page 73 Leica EM TIC 3X Operating Manual 07/17...
-
Page 78: Maintenance And Service
Contamination, particularly of the interior (pressurized) surfaces, may cause the vacuum system to malfunction. When working on the interior of the Leica EM TIC 3X Triple Ion Beam Cutter system, it is therefore essential to observe the principles of vacuum hygiene. -
Page 79: Daily Maintenance Activities Before Beginning Work
Daily maintenance activities before beginning work Activities before beginning work with the Leica EM TIC 3X Triple Ion Beam Cutter system: • Check that the argon feed line is open. • Check that the base pressure in the vacuum chamber is < 5E-5 mbar. - Page 80 The system, particularly the vacuum system (vacuum leak), may be damaged. Protect the entire inside surface from scratches or dirt. Always place the cover flange on a soft, dust-free surface. Inside of the cover flange: View port with protective glass Page 76 Leica EM TIC 3X Operating Manual 07/17...
- Page 81 Insert the tool in the groove and carefully lever the snap ring out. Releasing the snap ring: Groove Snap ring 4. Store the snap ring in a clean, safe place. Removing the snap ring: Released snap ring Page 77 Leica EM TIC 3X Operating Manual 07/17...
- Page 82 5. Use a pointed object, e.g. the screwdriver included in the delivery, to carefully pry-out the protective glass. Insert the tool in the groove. Carefully lift-out the protective glass: Groove Protective glass has been removed: Protective glass View port Page 78 Leica EM TIC 3X Operating Manual 07/17...
- Page 83 Replacing the optical grade viewing glass Open all eight hex screws to exchange the optical window. Please make sure the sealing ring is well positioned when mounting the window fitting again. Page 79 Leica EM TIC 3X Operating Manual 07/17...
-
Page 84: Triple Ion Source
Parts of the ion source cartridge: Front Side Cathode 2 - Front Side Wehnelt Cylinder 3 - Ceramic Isolators 4 - Anode 5 - Rear Side Wehnelt Cylinder 6 - Rear Side Cathode Page 80 Leica EM TIC 3X Operating Manual 07/17... -
Page 85: Function
Contaminated or low order process gas (purity less than 5.0) • Long open times with vented chamber • Insufficient basic chamber pressure (residual gas in chamber) • Out gassing sample materials • Sample materials including hydrocarbons, oxygen and water Page 81 Leica EM TIC 3X Operating Manual 07/17... -
Page 86: Replacement Of Ion Source
Do not use ion sources longer than 350 hrs if mainly voltages above 8kV were used. At least check if the rear cathode broken through. Otherwise damages of the system might occur! Page 82 Leica EM TIC 3X Operating Manual 07/17... -
Page 87: Maintenance Of The Ion Source
- as necessary Clean the ion source - if ion source is unstable - in the event of short-circuit Worn cathodes and anode impair the cutting power of the system! Page 83 Leica EM TIC 3X Operating Manual 07/17... -
Page 88: Dismantling The Ion Source
Cover flange removed: Shutter Triple ion source 3. Unscrew the two screws (with a centre hole) on the ion source with a hex screw driver. Place the screws on a clean cloth. Page 84 Leica EM TIC 3X Operating Manual 07/17... - Page 89 Make sure screws with the center hole are used for tightening the ion source. Remove (blow with oil- and water-free air) loose particles from the recess Make sure that no loose particles are into the recess of the HV- connection area (red circles). Page 85 Leica EM TIC 3X Operating Manual 07/17...
-
Page 90: Disassembling And Assembling The Triple Ion Source
All work must be carried out in a clean, dust-free environment. Disassembling the ion source 1. Unscrew the screws on an ion source and remove the spring with tweezers. Place the parts on a clean underlay. Hex screwdriver, size 1.5 Page 86 Leica EM TIC 3X Operating Manual 07/17... - Page 91 Internal construction of the ion source cartridge Front Side Cathode 2 - Front Side Wehnelt Cylinder 3 - Ceramic Isolators 4 - Anode 5 - Rear Side Wehnelt Cylinder 6 - Rear Side Cathode Page 87 Leica EM TIC 3X Operating Manual 07/17...
-
Page 92: Exchange Of The Complete Ion Source
Unpack ion source cartridge of the sealed bag using scissors. Insert cartridges in the ion source housing. Check the right assembling. The edge of rear side cathode must be 1 mm lower than the edge of ion source housing. Page 88 Leica EM TIC 3X Operating Manual 07/17... - Page 93 Unscrew and remove locking screw and insert ion source housing in the instrument. To reinstall the ion source carry out the steps 5.6.2.6 in the reverse order. Reset the operation hour counter of the ion source! Page 89 Leica EM TIC 3X Operating Manual 07/17...
-
Page 94: Cleaning The Ion Source Components
If the contaminations are not completely removed, means residual particles or layers are left on the gun parts; the next maintenance cycle will be shorter. The guns will be contaminated earlier than complete cleaned or new guns. Page 90 Leica EM TIC 3X Operating Manual 07/17... - Page 95 1. Assembly all components of the ion source. Groove of the anode must point to the front cathode! Wehnelt Insulator Front Cathode groove Anode Components should solidly seat to its rest. Page 91 Leica EM TIC 3X Operating Manual 07/17...
- Page 96 3. Turn gun housing in vertical position and check if gas inlet holes are visible. Turn ion source ~120 ° to set gas inlet holes in correct position. Page 92 Leica EM TIC 3X Operating Manual 07/17...
- Page 97 4. Check the right assembling. The edge of the rear side cathode must be 1 mm lower than the edge of the ion source housing. 5. Fit the spring on the mounted ion source. Spring Page 93 Leica EM TIC 3X Operating Manual 07/17...
- Page 98 Once the gun is assembled check the correct fitting by shaking the gun. There must be no rattling noise audible. Page 94 Leica EM TIC 3X Operating Manual 07/17...
-
Page 99: Instability Of The Ion Source With A High Life Time And Low Kv Setting
1. Switch off the system at the main switch and remove the power cable. 2. Use a screwdriver to release the main fuse from its holder, as shown in the illustration. 3. Remove the main fuse and replace it with a new one. Page 95 Leica EM TIC 3X Operating Manual 07/17... -
Page 100: Cleaning The Leica Em Tic 3X
Booster pump Performed by Leica Yearly (monitored by service engineer operating hours counter) - if LN flow is to low Clean valves Pump - if cooling rate becomes too slow. Page 96 Leica EM TIC 3X Operating Manual 07/17... -
Page 101: Troubleshooting
Contaminated gas or gas line Remedy Clean gas line, check gas quality (Ar 5.0) Cause 3 Contamination in ion guns Remedy Clean ion gun Cause 4 Cathodes burned out Remedy Replace cathodes and anode Page 97 Leica EM TIC 3X Operating Manual 07/17... -
Page 102: Servicing And Repair By Customer Service
Servicing and repair by Customer Service The Leica EM TIC 3X is covered by a WARRANTY in accordance with the conditions of sale. If functional errors should occur or if the components of the system sustain damage that is subject to warranty coverage during the warranty period, the manufacturer will repair or replace the faulty components following examination thereof. - Page 103 (RoHS directive) 2011/65/EU (RoHS Richtlinie) Vienna/Wien/Vienna, 21/07/2017 Dr. Paul Wurzinger Entwicklungsleiter/R&D Manager/Chef du service développment Leica Mikrosysteme GmbH · Hernalser Hauptstrasse 219 · A-1170 Wien T +43 1 48899 0 · F +43 1 48899 350 CONNECT www.leica-microsystems.com WITH US!
- Page 104 CONNECT WITH US! Leica Mikrosysteme GmbH | Vienna, Austria T +43 1 486 8050-0 | F +43 1 486 8050-30 www.leica-microsystems.com...
Need help?
Do you have a question about the EM TIC 3X and is the answer not in the manual?
Questions and answers