
Related Manuals for amiad 4" Sigma Pro


Summary of Contents for amiad 4" Sigma Pro
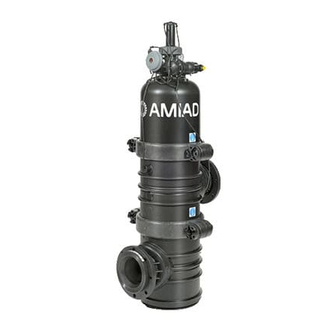
- Page 1 Installation & Operation Manual 6''/ '' 8 Sigma Pro 4" Sigma Pro Installation & Operation Manual | Sigma Pro Ref. 910101-000855 / 05.2018...
- Page 2 Amiad or consult Amiad experts or its authorized representatives if you have any questions. Amiad Water Systems Ltd. D.N. Galil Elyon 1, 1233500, Israel Tel: 972 4 690 9500 | Fax: 972 4 814 1159 Email: info@amiad.com...
- Page 3 Legend Screw Unscrew Push Pull Apply Attention Measure Water pressure Sigma Caution Read Center multi-tool Rotate Installation & Operation Manual | Sigma Pro...
-
Page 4: Technical Specification
Technical Specification General data 4" Sigma Pro 6" Sigma Pro 8" Sigma Pro Max. flow rate* (130μ) 120 m 180 m 280 m in average water quality (528 GPM) (792 GPM) (1233 GPM) Min. operating pressure 1.5 bar (22 psi) - electronic controller when cleaning 2.5 bar (36 psi) - hydraulic controller Max. -
Page 5: General Safety Instructions
General Safety Instructions • Amiad Water Systems Ltd. ("Amiad") filtration products operate as components in a larger system. It is essential for the system designers, installers, and operators to comply with all the relevant safety standards and regulations, including the use and wear of appropriate safety equipment. -
Page 6: Installation
Installation General ➢ Install the filter according to the detailed Installation Instructions provided with the filter by Amiad. ➢ Make sure to leave enough space (height 70 cm/ 27") to enable easy access for future treatments and safe maintenance operations. - Page 7 Hydraulics ➢ The user should install a manual water cut-off valve next to the filter’s inlet port. ➢ In installations where the piping network downstream of the filter is pressurized, an additional manual water cut-off valve should be installed next to the filter's outlet port. ➢...
- Page 8 Changing Installation Configuration Changing the inlet/outlet direction: If the original configuration does not match the required installation position, the lower body can be rotated 360°. In order to change the configuration of the filter, follow these steps: 1. Disassemble the filter according to "Basic Maintenance Disassembly" (on page 13) 2.
- Page 9 5. Make sure that the fittings on the Sigma body are set in place with the lower body Attention 6. Connect the Sigma body to the lower body in the desired position 180° 90° Installation & Operation Manual | Sigma Pro...
- Page 10 7. Connect the clamps and tighten the bolts using the Sigma multi-tool 8. Assemble the filter according to chapter "Basic Maintenance assembly" (on page 21). Installation & Operation Manual | Sigma Pro...
-
Page 11: Initial Operation
Before any maintenance operation, please read the following: ➢ Installation, operation and maintenance should be done by technicians acting strictly in accordance with Amiad's instructions and in accordance with this manual. Other service should only be done by technicians authorized by Amiad. -
Page 12: Maintenance
Before any maintenance operation, please read the following: ➢ Installation, operation and maintenance should be performed by technicians in accordance with Amiad's instructions and in accordance with this manual. Other service should only be done by authorized technicians. ➢ Disconnect the filter from the water system by closing and securing the manual inlet valve. In cases where the downstream piping network is pressurized, close and secure the manual outlet valve. - Page 13 Basic Maintenance - Disassembly 1. Perform manual flush (please see ADI-P manual): a. Close the filter's outlet valve Read b. Perform a manual flushing with the controller Rotate Please note: Always open and close the valves slowly and gradually! The filter enters a flushing mode automatically, without warning. Attention 2.
- Page 14 4. Make sure that the pressure gauge is on zero! Attention 5. Disconnect the command tubes: a. Pull up the command tube Pull Pull Installation & Operation Manual | Sigma Pro...
- Page 15 6. Release the upper clamp: a. Using the Sigma multi-tool, unscrew the bolts at both sides of the clamps Sigma multi-tool Unscrew b. Remove the clamps from the filter Installation & Operation Manual | Sigma Pro...
- Page 16 7. Pull up and remove the filter's lid Pull 8. Pull up and remove the bridge according to the following steps: a. Slide open the bridge clip x5 to disconnect the bridge from the turbine b. Pull up and remove the bridge Open Pull Pull...
- Page 17 9. Remove the turbine from the five suction-scanner's upper shaft Pull 10. Remove the suction-scanner's top plate: a. Place the Sigma multi-tool between the top plate grooves b. Gently press down on the Sigma multi-tool and lift the top plate Push Sigma Multi-tool...
- Page 18 c. Remove suction-scanner's top plate Pull 11. Replace the gaskets if needed a. Remove the used gaskets b. Insert new gaskets, making sure that the open side of the gaskets are turned out as shown Installation & Operation Manual | Sigma Pro...
- Page 19 12. Remove the five suction-scanners out of the screens: Pull 13. Remove the five screen units: Coarse and fine screen together Pull Installation & Operation Manual | Sigma Pro...
- Page 20 Before the re-assembly: a. Make sure that all parts below are undamaged b. Replace dry or damaged gaskets and o-rings c. Make sure that the coarse screen is clean d. Apply silicon grease on the o-rings (760190-000127 – tube of grease PG-21) Clamps Top plate Bridge...
- Page 21 Basic Maintenance - Assembly 1. Insert the five screens into the filter housing: a. Make sure that the o-ring is in place Attention Attention b. Insert the five screens into place Installation & Operation Manual | Sigma Pro...
- Page 22 2. Insert the five suction-scanners into place Make sure that each scanner shaft passes through its socket at the center of its designated coarse screen. Center Installation & Operation Manual | Sigma Pro...
- Page 23 3. Re-install the suction-scanner's top plate: a. Make sure the seal is in place and the open side of the seals turn out as shown b. Apply 760190-000127 grease to the seals c. Make sure the seals are intact Apply Attention d.
- Page 24 f. Make sure that the plate is inserted correctly and creates a caulking between the bottom and the top Attention 4. Install the turbine on the scanners Installation & Operation Manual | Sigma Pro...
- Page 25 5. Install the bridge according to the following steps: a. Insert the bridge on the top plate b. Lock the five bridge clips on the turbine's edges Push to lock 6. Rotate the turbines, making sure that all five turbines rotate freely Rotate Installation &...
- Page 26 7. Lift the bridge up and down to make sure all turbines connect to the bridge and the scanners move freely 8. Re-install the filter cover: Paying attention to not damage the seal during the cover installation Attention Installation & Operation Manual | Sigma Pro...
- Page 27 9. Re-install the upper clamp: Tighten screws gradually Sigma Multi-tool screw Push 10. Connect the command tubes Push Installation & Operation Manual | Sigma Pro...
- Page 28 11. Close the manual drain valve Rotate 12. Open the filter outlet valve 13. Open the filter inlet valve Rotate Rotate Always open and close the valves slowly and gradually! Attention Installation & Operation Manual | Sigma Pro...
- Page 29 14. Operate the Sigma filter See "Initial Operation" (on page 11) Installation & Operation Manual | Sigma Pro...
-
Page 30: Bushing Replacement
Bushing Replacement Following extensive use, the bushings may be worn out and should be replaced. Follow these steps to replace the bushing 1. Disassemble the top plate, see "Basic Maintenance - " (on page 13) Disassembly 2. Hold the lower part of the bushing with one hand and open the ring using the Sigma multi- tool 3. - Page 31 Bill of Materials – 4" Electronic 10.8.4 10.8.3 10.8 10.8.2 10.8.1 10.7.1 10.7 10.6 10.5 10.3 10.2 10.4 10.1 10.4.1 1.1.1 ITEM ITEM PART NUMBER DESCRIPTION PART NUMBER DESCRIPTION COVER W/DRAIN BODY ASSEMBLY F/SIGMA 700190-004220 BODY W/SLEEVE ASSEMBLY F/4" SIGMA/AKF 10.1 700190-004685 4"/6"/8"...
- Page 32 Bill of Materials – 6" Electronic 10.8.4 10.8.3 10.8 10.8.2 10.8.1 10.7.1 10.7 10.6 10.5 10.3 15.1 10.2 10.4 10.4.1 10.1 ITEM ITEM PART NUMBER DESCRIPTION PART NUMBER DESCRIPTION 700190-005116 BODY W/SLEEVE ASSEMBLY F/SIGMA 6"VIC 10.2 700190-000195 ADAPTOR ASSY NUT+SEALS 700190-004877 1"...
- Page 33 Bill of Materials – 8" Electronic 10.8.4 10.8.3 10.8 10.8.2 10.8.1 10.7.1 10.7 10.6 10.3 10.5 10.2 10.4 10.4.1 10.1 ITEM ITEM PART NUMBER DESCRIPTION PART NUMBER DESCRIPTION COVER W/DRAIN BODY ASSEMBLY F/SIGMA 700190-004635 BODY W/SLEEVE ASSEMBLY F/SIGMA 8" ASA 10.1 700190-004685 4"/6"/8"...
- Page 34 Bill of Materials – 4" Hydraulic 10.8.4 10.8.3 10.8 10.8.2 10.8.1 10.7.1 10.7 10.6 13.1 10.3 10.5 10.2 10.4 10.1 10.4.1 1.1.1 ITEM ITEM PART NUMBER DESCRIPTION PART NUMBER DESCRIPTION 700190-004220 BODY W/SLEEVE ASSEMBLY F/4" SIGMA/AKF 10.4.1 700190-003406 1" VACUUM BREAKER STRAIGHT CONNECTOR 1/4"F X8MM BSPT RPP 700190-000227 4"...
- Page 35 Bill of Materials – 6" Hydraulic 10.8.4 10.8.3 10.8 10.8.2 10.8.1 10.7.1 10.7 10.6 13.1 10.3 10.5 10.2 10.4 21.1 10.4.1 10.1 ITEM ITEM PART NUMBER DESCRIPTION PART NUMBER DESCRIPTION STRAIGHT CONNECTOR 1/4"F X8MM BSPT RPP 700190-005116 BODY W/SLEEVE ASSEMBLY F/SIGMA 6"VIC 10.5 720501-000134 BLACK TEFEN...
- Page 36 Bill of Materials – 8" Hydraulic 10.8.4 10.8.3 10.8 10.8.2 10.8.1 10.7.1 10.7 10.6 13.1 10.3 10.5 10.2 10.4 10.4.1 10.1 ITEM NO. PART NUMBER DESCRIPTION ITEM NO. PART NUMBER DESCRIPTION 700190-004635 BODY W/SLEEVE ASSEMBLY F/SIGMA 8" ASA 10.4 700190-004807 POLYMERIC FLUSH VALVE ASSEMBLY 2"NC BSP STD 700190-004636 BODY W/SLEEVE ASSEMBLY F/SIGMA 8"BSTD...
- Page 37 Sigma Pro – Installations of Multiple Units Sigma Pro 8” installation of 4 units with manifold, for flow rates up to 1,120 ³/h (4,932 gpm) Sigma Pro 6” installation of 2 units with manifold, for flow rates up to 360 ³/h (1,584 gpm) Installation &...
- Page 38 Control Schematic - Electronic Model LEGEND: SYMBOLS: PG - PRESSURE GAUGE COMMAND SV - SOLENOID VALVE 12v DC LATCH VENT HV - HYDRAULIC VALVE ELECTRIC - PRESSURE GAUGE - 3-WAY BALL VALVE - 2-WAY HYDRAULIC VALVE - 3/2 SOLENOID VALVE Installation &...
- Page 39 Control Schematic - Hydraulic Model Installation & Operation Manual | Sigma Pro...
- Page 40 Control Schematic - Electronic Model for Multiple Units Installation & Operation Manual | Sigma Pro...
-
Page 41: Troubleshooting
Troubleshooting No. Symptom Possible Causes Required Action High or elevated Coarse or fine screens are 1.Perform automatic flushing pressure differential totally clogged Close the downstream valve between upstream Start a manual flush cycle using the flushing controller. and downstream Verify that the downstream pressure is equal or slightly lower than the upstream pressure If symptom continues and the filter remains clogged, stop the operation and manually clean the fine screen...
Need help?
Do you have a question about the 4" Sigma Pro and is the answer not in the manual?
Questions and answers