
Related Manuals for Sony UP-X898MD


Summary of Contents for Sony UP-X898MD
- Page 1 4-528-688-15 (1) 2018-11 Hybrid Graphic Printer Instructions for Use Before operating the unit, please read this manual thoroughly and retain it for future reference. UP-X898MD © 2014 Sony Corporation...
- Page 2 Indications for Use/Intended Use Symbols on the product The Sony UP-X898MD printer is a compact, medical grade black and white printer designed to be connected Consult the instructions for use to both analog and/or digital radiology imaging systems Follow the directions in the instructions for...
- Page 3 IEC 60601-1 standards. If in doubt, consult qualified Sony service personnel. 3. Connecting the unit to other devices may increase the leakage current.
- Page 4 • Portable RF communications equipment should be used no closer than 30 cm (12 inches) to any part of the UP-X898MD. Otherwise, degradation of the performance of this equipment could result. • If the UP-X898MD will be used adjacent to or stacked with other equipment, normal operation of the UP-X898MD under such configurations should be verified via observation.
- Page 5 Guidance and manufacturer’s declaration – electromagnetic immunity The UP-X898MD is intended for use in the electromagnetic environment specified below. The customer or the user of the UP-X898MD should assure that it is used in such an environment. IEC 60601 Immunity test Compliance level Electromagnetic environment –...
- Page 6 Guidance and manufacturer’s declaration – electromagnetic immunity The UP-X898MD is intended for use in the electromagnetic environment specified below. The customer or the user of the UP-X898MD should assure that it is used in such an environment. IEC 60601 Immunity test Compliance level Electromagnetic environment –...
- Page 7 To assess the electromagnetic environment due to fixed RF transmitters, an electromagnetic site survey should be considered. If the measured field strength in the location in which the UP-X898MD is used exceeds the applicable RF compliance level above, the UP-X898MD should be observed to verify normal operation. If abnormal performance is observed, additional measures may be necessary, such as reorienting or relocating the UP-X898MD.
- Page 8 Guidance and manufacturer’s declaration – electromagnetic immunity The UP-X898MD is intended for use in an electromagnetic environment in which radiated RF disturbances are controlled. Portable RF communications equipment should be used no closer than 30 cm (12 inches) to any part of the UP-X898MD.
- Page 9 Warning on power connections for information and complete terms and conditions of medical use Sony’s limited warranty applicable to this product. Customers in the U.S.A. and Canada should use the For the customers in Canada following type of power cord.
-
Page 10: Table Of Contents
Table of Contents Getting Started Overview ............... 11 Location and Function of Parts and Controls ... 11 Front Panel ............11 Rear Panel ............12 Connections............13 Installing the Printer Driver to the Computer..14 Paper..............14 Paper You Can Use..........14 Loading Paper ............ -
Page 11: Getting Started
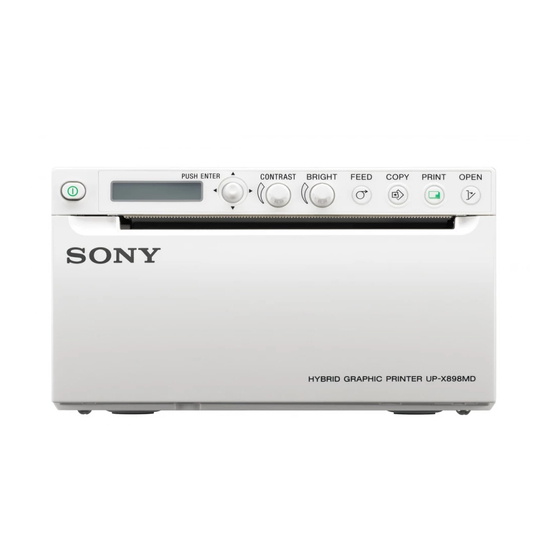
Getting Started Location and Function of Parts and Controls For more details, see the referenced page numbers Overview enclosed in parentheses ( ). This unit is a printer that prints images by heating a thermal head, according to the input image data, and Front Panel pressing the head against special thermal printing paper to print the image on the paper. -
Page 12: Rear Panel
Note PRINT button (25, 30) Do not connect to a USB device other than a Sony Press to print the image currently displayed on the flash memory formatted with FAT16 or FAT32 in video monitor. The image displayed when you 64GB or less. -
Page 13: Connections
Connections Computer WARNING FS-24 RM-91 remote USB cable Using this unit for medical purposes foot switch commander unit (sold The connectors on this unit are not isolated. (sold separately) (sold separately) separately) Do not connect any device other than one which USB flash conforms to IEC 60601-1 standards. -
Page 14: Installing The Printer Driver To The Computer
Installing the Printer Driver to the Paper Computer Use only Sony UPP-110S/110HD/110HG paper When you use Windows XP/Windows Vista: designed for use with this unit. High print quality cannot After connecting this unit to the computer, turn on this be guaranteed if any other paper is used with this unit, unit. -
Page 15: Loading Paper
• To prevent fading, do not stack printouts on or under a Loading Paper diazo copy sheet. • To mount printouts on another sheet of paper, use double-sides tape or a water base adhesive. When loading paper, make sure to follow the notes of the •... - Page 16 Press the power ON/OFF switch to on. When paper is not loaded yet, the back light on the LCD lights in orange and the message “EMPTY” is displayed. Load the paper in the orientation shown in the diagram. Printing is not possible if the paper is reversed.
- Page 17 Close the door panel by pushing it. Notes • Make sure that the paper is loaded straight. If it is skewed, this could cause the paper to jam. • If you did not pull out enough paper in step 3, press the FEED button to feed some more paper out of the unit without pulling out the paper.
-
Page 18: Operation
You can set up the unit according to its intended Operation purpose, connected equipments or your individual preferences. You can store up to three settings as a set of user settings. Adjustments and Settings Using the Menu You can carry out adjustments and settings to meet your requirements. -
Page 19: Menu List
Menu List This section describes the menus displayed as you operate the menu lever. The setting surrounded by indicates the default setting. Item Function Settings HISTORY Displays up to five recently used menus according to the menu operation history. “NO ITEM” is displayed as the default. - Page 20 DIGITAL Displays menu of settings to print -DRIVER Select the printer driver to use for this unit. [DRV:898]: Use the driver for UP-X898MD, UP-D898MD. from computer. DRV:897: Use the driver for UP-897. However, when using the UPA-WU10 Wireless Print System, select DRV:898.
- Page 21 Item Function Settings PRT.MENU Prints current settings by menu MENU:OK Prints by pushing the menu lever. list. PREF. Displays menu to set printout -BACWRD Select whether the top or bottom of the screen is to be printed conditions. first. BACW:ON: Starts to print in the reverse direction (from the top of the screen).
- Page 22 Item Function Settings -PP.TYPE Select paper to use. [P.TYPE:HG]: Use UPP-110HG. P.TYPE:HD: Use UPP-110HD. P.TYPE:S: Use UPP-110S. -LOAD Loads the registered menu settings. LOAD:3: Loads the “SAVE:3” settings registered using the SAVE menu item. LOAD:2: Loads the “SAVE:2” settings registered using the SAVE menu item.
-
Page 23: Basic Menu Operations
c) The print direction of the images printed is as follows. Confirm that “READY” is displayed on the LCD, and push the menu lever. Image displayed on the monitor Printouts The unit enters the menu mode. Menu item is displayed on the LCD. Display “PREF.”... -
Page 24: Registering Menu Settings
“BACW:OFF,” which is the default setting, is Registering Menu Settings displayed on the LCD. “BACW:OFF” is the currently selected setting. You can store up to three sets of settings made using the In this menu operation, you will change the setting menu, and you can load the desired setting when needed. -
Page 25: Printing The Menu List
until you load another set of settings, even if you turn off Printing the unit. When you load another group of settings, the settings loaded previously are cleared. To retain previously loaded settings Printing from the Video Equipment Example: Settings registered as setting 1 are loaded and settings are to be changed. - Page 26 When the message is displayed on the LCD For detailed information on menu operation, see If a problem occurs, the back light on the LCD lights in “Basic Menu Operations” on page 23. orange and the error message stating the problem is displayed on the LCD.
-
Page 27: Printing From The Computer
Selecting the Printing Direction and Check the coordinate value of starting and ending position to print. Image Size You can select the printing direction and image size Display “S.H:” by shifting the menu lever to the using the following “VIDEO” menu items. right when “-START.H”... -
Page 28: Cutting The Printed Paper
Starting a Print Job UPP-110S Press the power ON/OFF switch to on. The back light on the LCD lights in green, and UPP-110HD “READY” is displayed on the LCD. UPP-110HG Cutting the Printed Paper Operate the computer by using the application Cutting using the upper paper cutter software. -
Page 29: Canceling A Print Job
• When cutting using the lower paper cutter, the paper Adjusting the Contrast and may not be cut cleanly if holding the center of the front Brightness edge of the paper. You can adjust the contrast and brightness of the unit using the CONTRAST control and BRIGHT control. -
Page 30: Storing Images On A Usb Flash Drive
Folder which the image is saved into in the USB flash drive. While it is being written in The image file will be saved into the \\SONY\UP- the USB flash drive, “STORING” is displayed and X898\SN.[Serial Number of this device] folder on the the USB connector (type A) lamp flashes at high USB flash drive. - Page 31 • The image can be saved on the USB flash drive, but the saved image cannot be read nor deleted. Use on the connected computer to read or delete it. • Backup files of the USB flash drive to your computer before using the USB flash drive with this device.
-
Page 32: Others
Do not carry or move the unit when the paper roll is guaranteed. For details on part replacement, contact placed in the unit. Doing so may cause a malfunction. Sony service or your dealer. On Installation Cleaning the Cabinet • Place the unit on a level and stable surface. -
Page 33: Cleaning The Thermal Head
• Do not keep the printer surface in contact with a rubber or vinyl resin product for a long period of time. The surface finish may deteriorate or the coating may come off. Cleaning the Thermal Head If the printout is dirty or white stripes appear on the printouts, clean the thermal head using the cleaning sheet supplied. -
Page 34: Cleaning The Platen Roller
Clean the platen roller gently using a soft cloth Cleaning the Platen Roller moistened with ethanol. When the surface of the platen roller gets dirty, the paper will not be fed smoothly, resulting in paper jams and inconsistent print quality. Press the power ON/OFF switch to on, and then press the FEED button for about one second to feed some more paper out of the unit. -
Page 35: Specifications
Service Contact List (1) (when “DIGITAL” is selected) USB flash drive ex cable 1-848-418-11 Max. 320 × 100 mm (Sony) (1) Printing speed About 1.9 sec./image (at standard Thermal Print Media UPP-110HG (1) setting) (when “HI” is selected from Information for Customers in Europe “-SPEED”... - Page 36 OF THIS UNIT OR ITS PRINTING MEDIA, ASSOCIATED SOFTWARE, EXTERNAL STORAGE, OR OTHER EXTERNAL DEVICE. • SONY WILL NOT BE LIABLE FOR DAMAGES OF ANY KIND INCLUDING, BUT NOT LIMITED TO, COMPENSATION OR REIMBURSEMENT ON ACCOUNT OF THE LOSS OF PRESENT OR...
-
Page 37: Troubleshooting
Symptom Causes/remedies Troubleshooting Printouts dirty. • Thermal head dirty? tUse the head cleaning sheet Before you call for service, please check the problems provided with the unit to clean the thermal head. (page 33) and solutions described below. If you cannot solve the •... -
Page 38: Error Messages
USB connector failed to save the Messages appear on the LCD under the following image. • The USB flash drive is not Sony conditions. Take the remedial actions shown next to the product with less than 64 GB. messages to correct the problem. -
Page 39: License
License “zlib”, “The FreeType Project LICENSE” and “The Catharon Open Source LICENSE” software are provided in this unit. We provide this software based on license agreements with their owners of copyright. Based on requests by the owners of copyright of these software applications, we have an obligation to inform you of the following. -
Page 40: Index
from the Video Equipment 25 Index making copies of the last printout 29 starting a print job 25, 28 Cleaning cabinet 32 Specifications 35 platen roller 34 thermal head 33 Cleaning sheet 33 Troubleshooting 37 Connections 13 USB flash drive Error messages 26, 28, 38 storing images 30 Getting Started 11...
Need help?
Do you have a question about the UP-X898MD and is the answer not in the manual?
Questions and answers