Advertisement
Quick Links
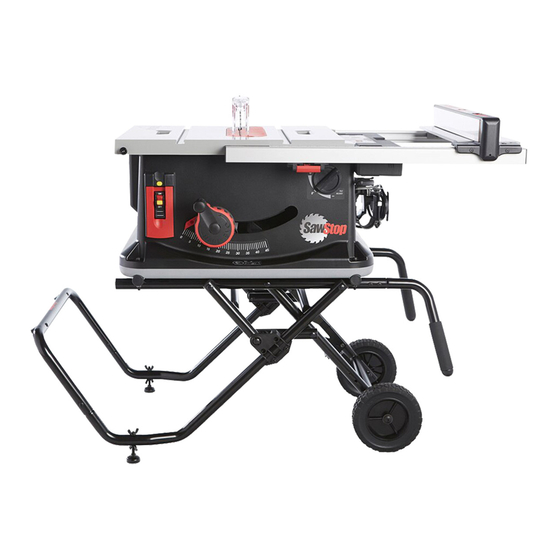
unboxing and assembly
DESCARGARSE Y ASAMBLEA
CART HANDLES
MANIJAS
HARDWARE
HERRAMIENTAS
WHEELS
1
2
RUEDAS
ELEVATION HANDLE
MANIJA DE ELEVACIÓN
Check to make sure you have all the parts. If not, call
Cut both vertical edges of the box on the end near the
us at 503-563-5822.
wheels and fold down. Remove the upper packing tray and
Asegúrese de que tiene todas las partes. Si no, Llámenos
503-563-5822.
Corte en ambos lados verticals de la caja cerca de las ruedas y doble hacia
abajo. Retire la bandeja de envasado superior y dejar de lado.
x2
x2
WASHER
M10 LOCKNUT
x2
4
5
M10 BOLT
Mount the wheels to the cart with the provided bolts,
Once the wheels are mounted, tip the saw and cart to
washers and nuts.
Montar las ruedas para el carro con los tornillos proporcinados,
Una vez que están montadas las ruedas, Inclinar la sierra y el carro a
Arandelas y tuercas.
7
8
Press the elevation handle onto the crank arm until you
Roll the saw off the cardboard. Tip the saw down to rest on the cart handles. Grasp and squeeze the
hear a snap, which indicates that the handle is on and
backplate against the elevation handwheel and swing the handwheel to the right until the red pointer is
ready to use. Do not attempt to elevate the blade until
step 9 is complete.
Rodar loa sierra de la caja. Incline la sierra hacia abajo para retablecer en las manijas del carro. Agarrar y apretar la placa
posterior contra el volante de elevación y gire el volante hacia la derecha hasta que el indicador rojo pase la marca de 45 grados.
Presione la manija de elevación sobre el brazo de la manivela hasta que
escuche una chasquido, Lo que la manija esta lista para usar. No
intente elevar la hoja hasta que el paso 9 este complete.
9
At the back of the saw, reach into the opening and remove a piece of red tape that holds a metal shipping pin in
place. Then pull the metal shipping pin completely out of the saw. This pin holds the elevation mechanism in place
during shipping and can now be discarded.
En la parte posterior de la sierra, En la aperture y extraer un pedazo de cinta roja que sostiene un pedaso de metal. A continuación, sace el
pasador de metal completamente fuera de la sierra. Este pasador es el mecanismo de elevación que detiene en su lugar durante el transporte y
congratulations! !
Y O U R S A W I S N O W A S S E M B L E D
Felicitaciones. Su sierra ahora está ensamblada.
3
Lift and place the saw so it overhangs the bottom packing
tray by about 6 inches. This provides room to attach the
set aside.
wheels to the frame.
Levantar y colocar la sierra de modo que sobresalga de la bandeja inferior
a 6 pulgadas. Esto proporciona espacio para unir las ruedas al base.
x4
M6 LOCKNUT
x4
6
M6 BOLT
Slide the handle marked "L" into the tube nearest the front
the upright position.
of the saw and bolt in place. Tighten the bolt enough to
compress the tubes so the handle does not jiggle. Install
la posición.
the handle marked "R" in the same way in the other tube.
Deslice la manija marcada "L"(Izquierda) en el tubo más próximo al frente
de la sierra y ajuste en su lugar. Apretar rmemente el perno su ciente
para apretar los tubos de modo que la manija no se mueva. Instalar la
minija marcada "R"(Derecho) en la misma manera en el otro tubo.
over the 45 degree mark. Release the backplate to lock the tilt at 45 degrees.
Libere la placa posterior para sejutar la inclinación a 45 grados.
ahora se puede descartar.
Missing Parts? Have Questions?
Our technical support team is standing by
M-F, 7am-5pm PST
to help with whatever you need.
Give us a call at
503.563.5822
Or email us at
jobsite.service@sawstop.com
Piezas que Faltan? ¿Tiene preguntas? Nuestro equipo de soporte técnico está en espera
L-V, 7am-5pm PST
TDP Para ayudar con todo lo que necesiten.
Llámenos al
503.563.5822
o envíenos un correo electronico
jobsite.service@sawstop.com
C O N G R A T U L A T I O N S
LET S GET STARTED
Felicitaciones. Comencemos.
Advertisement

Related Manuals for SawStop Jobsite Saw


Summary of Contents for SawStop Jobsite Saw
- Page 1 Give us a call at 503.563.5822 Or email us at jobsite.service@sawstop.com Piezas que Faltan? ¿Tiene preguntas? Nuestro equipo de soporte técnico está en espera Check to make sure you have all the parts. If not, call Cut both vertical edges of the box on the end near the...
- Page 2 installing the riving knife or blade guard locating the accessories and user guide INSTALACIÓN DEL DIVISOR LOCALIZACIÓN DE LOS ACCERSORIOS Y GUÍA DEL USUARIO Remove the table insert by pulling the Open the clamp by reaching into the Slide the riving knife or blade guard out latch forward and then lifting the insert opening and ipping the red handle up.
Need help?
Do you have a question about the Jobsite Saw and is the answer not in the manual?
Questions and answers