Table of Contents
Advertisement
Quick Links
Download this manual
See also:
User Manual
Advertisement
Table of Contents

Related Manuals for Sangean U4 DBT+


Summary of Contents for Sangean U4 DBT+
- Page 1 U4 DBT+ 中文 Version 1...
- Page 2 ® The Bluetooth word mark and logos are registered trademarks owned by Bluetooth SIG, Inc. and any use of such marks by SANGEAN ELECTRONICS INC. is under license.
-
Page 3: Important Safety Instructions
Important safety instructions Read these instructions. Keep these instructions. Heed all warnings. Follow all instructions. Do not use this apparatus near water. Clean only with dry cloth. Do not block any ventilation openings. Install in accordance with the manufacturer’s instructions. Do not install near any heat sources such as radiators, heat registers, stoves, or other apparatus (including amplifiers) that produce heat. - Page 4 Important safety instructions Apparatus shall not be exposed to dripping or splashing and no objects filled with liquids, shall be placed on the apparatus. Excessive sound pressure on ear- and headphones could impair the hearing ability. Higher setting that idle on the equalizer leads to higher signal voltages on the output for ear and headphones.
- Page 5 Important information on charging and using rechargeable batteries New batteries will only reach their full capacity after some time of use (several charge – discharge cycles). Leave the complete group of batteries in place inside the radio and do not use these batteries or a few of them for other purposes.
-
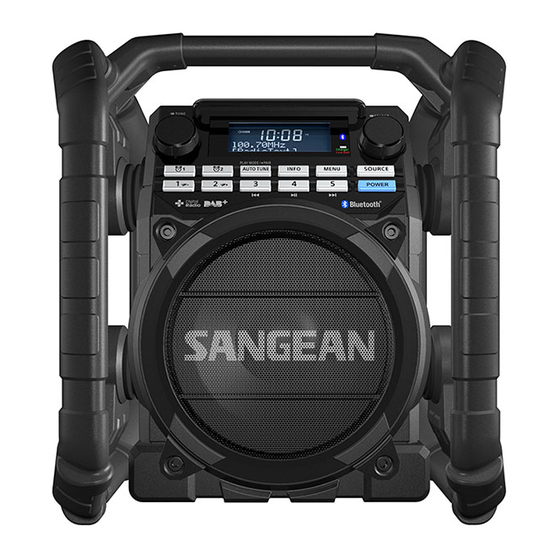
Page 6: Front View
Controls Top view Battery locker NFC detection tag Display protection bar Preset button (Preset 1: Folder down button Preset 2: Folder up button Preset 3: Rewind button Preset 4: Play / Pause button Preset 5: Fast-forward button) Alarm 1 button Volume control / Tone control Alarm 2 button Auto tune button / Bluetooth pair... - Page 7 Controls Right view Auxiliary input socket DC in socket Left view USB socket...
- Page 8 Controls Back view Battery compartment Rod antenna Back view Socket for software upgrade NiMH / Alkaline batteries switch...
-
Page 9: Lcd Display
LCD Display Sleep indicator Stereo indicator Volume indicator USB mode indicator AM / PM time indicator Aux in indicator Clock digits Two line text display FM mode indicator Alarm 1 and 2 indicator DAB mode indicator Snooze indicator... -
Page 10: Power The Radio
Power the radio Battery operation NOTE No batteries are included with this radio. Pull out the battery compartment locker to release battery compartment. Insert 6 x D size (AM-1) battery into the compartment. Ensure the battery is inserted in accordance with the diagram shown. Return the battery locker to the original position. - Page 11 Power the radio Battery operation ● Battery operation using alkaline batteries Before you insert the batteries, if you use non-rechargeable batteries, make sure the NiMH / Alkaline switch which located inside the battery compartment is switched to Alkaline position. If you use rechargeable batteries, make sure to switch NiMH / Alkaline switch to NiMH position.
- Page 12 Power the radio AC operation Before you plug the AC cord into the AC socket, be sure the voltage is correct. If you have batteries in the radio and use the AC power cord, the batteries will automatically be disconnected. AC cable hook is designed to store the cord when the radio is not in use.
-
Page 13: Battery Charging Status Indicator
Battery charging status indicator Please note that the battery charging status detection can only be activated when the radio is in charging mode (i.e. the radio is switched off, the battery switch slides to the NiHM position and it is connected to the AC mains socket). -
Page 14: Selecting A Station - Dab
Using DAB for the first time – DAB Straighten up the antenna. Press the Power button to switch on the radio. If the radio has been used before the last used mode will be selected. Press and release the Source button to select DAB mode. The display will show DAB for a few seconds. -
Page 15: Secondary Services - Dab
Secondary services – DAB Certain radio stations may have one or more secondary services associated with them. If a station has a secondary service associated with it the display will show “>>” next to the station name on the station list. The secondary service will then appear immediately after the primary service as you rotate the Tuning control. -
Page 16: Finding New Stations - Dab
Finding new stations – DAB From time to time, new DAB radio stations may become available. Or you may have moved to a different part of the country. In this case you may need to cause your radio to scan for new stations. Press and release the Menu button until the Advanced DAB menu shows on the display. -
Page 17: Dynamic Range Control (Drc) - Dab
Dynamic Range Control (DRC) – DAB The DRC facility can make quieter sounds easier to hear when your radio is used in a noisy environment. There are three levels of compression: DRC Off: No compression applied. (default) DRC High: Maximum compression applied. DRC Low: Medium compression applied. -
Page 18: Station Order Setup
Station order setup Your radio has 3 station order settings from which you can choose. The station order settings are alphanumeric, ensemble and valid. NOTE The default station order on your radio is alphanumeric. Press the Power button to switch on your radio. Press the Source button as needed to select DAB radio mode. -
Page 19: Prune Stations - Dab
Prune stations – DAB Over time, some DAB services may stop broadcasting, or may change location and then not be able to receive a station. In order to remove such stations from the DAB station list, the Prune stations function will delete the DAB stations from your station list that can no longer be received. Stations which cannot be found or which have not been received for a very long time are shown in the station list with a question mark. -
Page 20: Operating Your Radio - Fm Auto-Tune
Operating your radio – FM auto-tune Straighten up the antenna. Press the Power button to switch on your radio. Press and release the Source button until the FM band is selected. To scan up in frequency, first rotate the Tuning control knob in a clockwise direction and then press the Auto tune button. -
Page 21: Manual Tuning - Fm
Manual tuning – FM Straighten the antenna. Press the Power button to switch on your radio. Press and release the Source button until the FM band is selected. Rotate the Tuning control to tune to a station. The frequency will change in steps of 50kHz. If the radio is tuned to a station of sufficient signal strength with RDS information present, then the display may change to show the station name. -
Page 22: Scan Sensitivity Setting - Fm
Scan sensitivity setting – FM Your radio includes a local / distant option for the auto-scan function. By setting the radio to the 'local' scan option, weaker signals from more distant transmitters can be ignored by the radio, making stronger signals easier to find. Press and release the Power button to switch on your radio. -
Page 23: Recalling A Preset Station - Dab And Fm
Recalling a preset station – DAB and FM Press the Power button to switch on the radio. Press and release the required waveband by pressing the Source button. Press and release the required Preset button to cause your radio to tune to the station stored in preset memory. - Page 24 If ‘U4 DBT+’ shows in your Bluetooth device list but your device cannot connect with it, please delete the Sangean U4 DBT+ item from your list and pair the device with the radio again following the steps described previously.
- Page 25 Listening to music via Bluetooth streaming Playing audio files in Bluetooth mode NOTE That not all player applications or devices may respond to all of these controls. Some mobile phones may temporarily disconnect from your radio when you make or receive calls.
- Page 26 Listening to music via Bluetooth streaming Playing previously-paired devices Alternatively, you can select your required Bluetooth device in the memory, as following: Press and release the Bluetooth pair button to enter the Bluetooth device memory. Then rotate the Tuning control to find the desired memorized Bluetooth device and press the Tuning control to connect to the required Bluetooth device.
- Page 27 Listening to music via Bluetooth streaming Pairing and playing your device via NFC NOTE If you would like to link a different Bluetooth device for the first time via NFC, disconnect the currently- linked Bluetooth device first. The location of the NFC detection area is not the same on all devices. When connecting with other Bluetooth device via NFC, refer to the User guide of your Bluetooth device for more information.
- Page 28 Alarms Setting an alarm Press and release the Alarm 1 button to enter the setting, ‘Alarm 1 Setup’ will show on the display and alarm 1 icon will flash on the display. Or press and release the Alarm 2 button to enter alarm 2 setting.
- Page 29 Alarms Setting an alarm Your alarm can be set to sound once, daily, weekdays and weekends. Once - Will sound at one time only. Daily - Will sound every day. Weekdays - Will sound only on weekdays. Weekends - Will sound only on weekends. Rotate the Tuning control to choose the day option and then press and release the Tuning control to confirm the setting.
-
Page 30: Sleep Function
Snooze When the alarm sounds, press any button other than the Power button will silence the alarm for 5 minutes. Remaining snooze time will show on the display. You can also select your required snooze time, as following: a. Access the menu for the current mode by pressing the Menu button. b. -
Page 31: Automatically Updating The Clock
Automatically updating the clock Press the Power button to switch on your radio. Press and release the Menu button until the Advanced menu of the current mode shows on the display. Rotate the Tuning control until 'System' appears on the display. Press and release the Tuning control. -
Page 32: Setting The Clock Manually
Setting the clock manually Your radio will set its clock automatically using the DAB or FM radio signal. If no signal is available and you need to set the time manually, please follow the procedure shown below. Press the Power button to switch on your radio. Press and release the Menu button until the Advanced menu of the current mode shows on the display. -
Page 33: Setting The Time Format
Setting the time format The display used in standby mode and when the radio is in use can be set to 12 or 24 hour format. The selected format is then also used when setting the alarms. Press the Power button to switch on your radio. Press and release the Menu button until the Advanced menu of the current mode shows on the display. -
Page 34: Language Function
Language function Your radio can be configured to a different language. Press the Power button to switch on your radio. Press the Menu button until the Advanced menu of the current mode shows on the display. Rotate the Tuning control until 'System' appears on the display. Press and release the Tuning control. - Page 35 Set up my EQ profile If you find the preset equalizer functions not to your liking, you may set up a custom treble and bass as following: Press the Volume control to enter EQ menu. Rotate the Tuning control until ‘My EQ...’ is shown on the display. Press the Tuning control to enter the adjustment mode.
-
Page 36: Software Version
For more information, please contact our Head Office by sending an email to info@sangean.com Using the micro USB cable (not supplied) to connect the USB socket in the battery compartment and your PC USB port. Go to the website above to download the latest software. -
Page 37: System Reset
System reset If your radio fails to operate correctly, or some digits on the display are missing or incomplete carry out the following procedure. Press the Power button to switch on your radio. Press the Menu button until the Advanced menu of current mode shows on the display. Rotate the Tuning control until 'System' appears on the display. -
Page 38: Auxiliary Input Socket
Auxiliary input socket A 3.5mm Auxiliary input socket is provided on the right side of your radio to permit an audio signal to be fed into the unit from an external audio device such as an iPod, MP3 or CD player. Connect a stereo or mono audio source (for example, iPod, MP3 or CD player) to the Auxiliary input socket (marked 'Aux In'). -
Page 39: Using Usb Memory Devices
Using USB memory devices IMPORTANT Your radio is only designed to work with USB flash memory devices. It is not intended to be connected to hard disk drives or any other type of USB device. It is possible to use SD or SDHC cards for media playback when held in a suitable USB adaptor. - Page 40 Using USB memory devices Playing files from USB memory devices Insert the USB memory device into the USB slot which is located on the left hand side of the radio behind the rubber cover. Press the Power button to turn on the radio and Press the Source button to select USB mode. The “Loading”...
- Page 41 Using USB memory devices Selecting a file While the USB memory device is playing, press either the Next track button ( ) or Previous track button ( ) to change to the desired file. The file number is updated on the display. If there’s more than one folder, all files in the current folder should have been played and the next folder will be played.
-
Page 42: Specifications
Specifications FM 87.50-108 MHz Frequency Coverage DAB 174.928-239.2 MHz AC Power AC 100~240 V ~ 50/60 Hz 40W (Europe) Batteries 6 x AM-1 (D size) 12V / 1.2A center pin positive DC IN (operational voltage 9-14 V) 5.5mm in diameter. Bluetooth ®... - Page 43 Specifications Approx. 36hours using Alkaline batteries at 500mW Battery life output power. Operating temperature range 0°C to +35°C Dimension 298 x 342 x 268 mm Weight approx. 4.56kgs The company reserves the right to amend the specifications without notice. If at any time in the future you should need to dispose of this product please note that: Waste electrical products should not be disposed of with household waste.
Need help?
Do you have a question about the U4 DBT+ and is the answer not in the manual?
Questions and answers