Advertisement
Quick Links
Advertisement

Subscribe to Our Youtube Channel
Related Manuals for PROAIM Cambird Pro SL-CBPR-01


Summary of Contents for PROAIM Cambird Pro SL-CBPR-01
- Page 1 Cambird Pro 6ft Camera Slider Jib (SL-CBPR-01) Instruction Manual...
-
Page 2: Table Of Contents
At Proaim, our goal is to ensure 100% Customer Satisfaction in all that we do. We back our sales with a 1 year warranty from the date of purchase and work hard to resolve any problems in the unlikely event one should arise. -
Page 3: Foreword
On behalf of all the people that work so hard to provide you with the most up-to-date, flexible and cost-efficient production gear, we would like to welcome you into the Proaim family. By purchasing your Cambird Pro 6ft Camera Slider Jib, you have just joined a host of designers, engineers, machinists, assembly, customer service and office staff that take great pride in all that they do. -
Page 4: Introduction
Introduction Proaim Cambird Pro Slider Jib can be used as Video DSLR Camera Slider, Mini Jib, Tower or Hi-Hat and offers vast range of possible angles and features which make it extremely functional. Proaim Cambird Pro is an All-in-One performance package with solidity of each and every part to improve the quality of your work. -
Page 5: Safety Hints
Safety Hints ATTENTION: PLEASE READ THIS BEFORE USING TO PREVENT SERIOUS DAMAGE TO THE GEAR! DO NOT OVERTIGHTEN CARRIAGE BRAKE Needlessly over tightening the carriage brake can cause misalignment and severely damage the roller bearings. NEVER STRIKE OR PUT METAL OBJECTS ON THE RAILS This can cause nicks and dings which will result in unsteady movement and image vibration. -
Page 6: Assembling
Assembling the Slider NOTE: You must complete the counter balance procedure in first section of this manual, before completing this setup. Place Central Fork along with attached Wedge Plate on tripod and level it accordingly. Then connect it with the Hub by inserting a pin from bottom. ... - Page 7 Insert a black knob into rail system on both sides and lock them with Central Fork. NOTE: Mount your fluid head and camera setup. Remove red nuts and black protective balls from Counterbalance Sled. Then add Counterweights to Sled equal to the weight of Camera and Fluid Head package ...
- Page 8 For slow sliding movements, you may insert Crank Handle into the crank spline on Slider. NOTE: Remove Crank Handle when not in use while operating, as it will cause shaking of Slider Rail. Assembling as Diagonal Slider To give angle to rail for Diagonal Slides, move the camera to middle of the rail Slide brake and apply the Slide Brake.
- Page 9 Hold your camera with one hand and knob loosen the knob on Camera Plate. Circular Adjustment Knob While holding the camera, pull out Circular Adjustment Knob to position the camera at any desired position. Assembling as Mini jib ...
- Page 10 Slide brake Tighten the slider brake once the camera has been moved to the end of the rail. On Central Fork, loosen the bolt to insert one end of Jib Arm into Focal Point Adjustment and tighten back the bolt. ...
- Page 11 Attach other side of Parallelogram/Jib Arm to the camera platform by inserting connected lever into threaded hole on platform. NOTE: The connected lever should be perpendicular to rail. This will ensure camera movement parallel to the ground. You may need to adjust the length of Jib Arm to adjust framing.
- Page 12 Release the knob on Camera Plate. Release the black knobs on each side of rail system to activate Mini Jib Function. NOTE: As Mini Jib moves up and down, camera should stay parallel with the ground. Assembling as Tower ...
- Page 13 To use the slider in Tower mode, loosen the black knob on each side of Wedge Plate and tilt it to a complete 90°. Insert Weight Rod into Wedge Plate. Secure it with Locking Pin carefully. Remove one of the Weight Closers from Rod.
- Page 14 Insert Counterweights (Not Included) into the Rod according to your setup requirement. Secure them with Weight Closer and lock it. Mount your camera onto Camera Plate and balance by setup appropriately. You will see the Slider in Tower Mode as shown in image here.
- Page 15 Attach each End Foot to each end of the rail using the screws provided. Each end of the rail should have two threaded screws for mounting of feet. Adjust threaded screws to achieve desired height. Then mount your fluid head and camera setup.
-
Page 16: Warranty
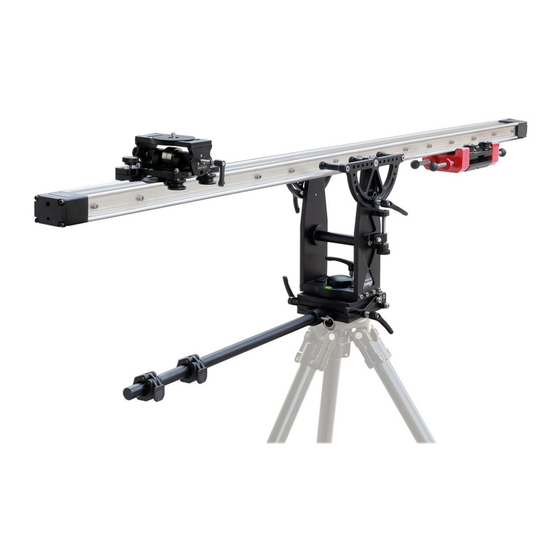
YOUR PROAIM CAMBIRD PRO 6FT CAMERA SLIDER JIB ALL DRESSED UP AND READY TO GO! (SHOWN WITH OPTIONAL ACCESSORIES) WARRANTY We offer a one year warranty for our products from the date of purchase. We will repair or replace your product, free of charge, in the event of a defect in materials or craftsmanship obtained during normal use or handling based on the user manual.
Need help?
Do you have a question about the Cambird Pro SL-CBPR-01 and is the answer not in the manual?
Questions and answers