PROAIM Cinema Series Instruction Manual
Fly 22” camera crane with lw-100 stand
Hide thumbs
Also See for Cinema Series:
- Instruction manual (18 pages) ,
- Assembly manual (14 pages) ,
- Assembly manual (8 pages)
Advertisement
Quick Links
Advertisement

Related Manuals for PROAIM Cinema Series


Summary of Contents for PROAIM Cinema Series
- Page 1 Fly 22” Camera Crane With LW-100 Stand (P-FLY-22-S) Instruction Manual...
- Page 2 At Proaim, our goal is to ensure 100% Customer Satisfaction in all that we do. We back our sales with a 1 year warranty from the date of purchase and work hard to resolve any problems in the unlikely event one should arise.
- Page 3 Proaim family. By purchasing your Proaim Fly 22' Camera Crane with LW-100 Stand, you have just joined a host of designers, engineers, machinists, assembly, customer service and office staff that take great pride in all that they do.
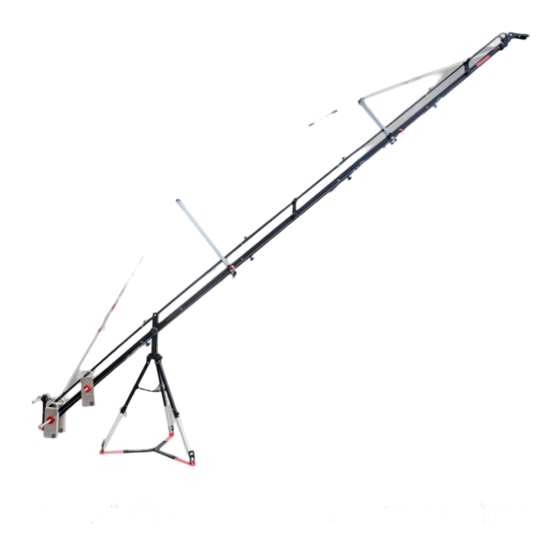
- Page 4 Introduction Heavy-duty yet Lightweight Crane meets various shooting demands.It offers Great Performance, enhanced stability, and fast setup.Adapts Pan Tilt Heads & Gimbals like DJI Ronin® & Freefly MōVI®.High-grade aluminum construction , takes 20kg/44lb payload. The Robust 100mm Tripod Stand steadily supports the Crane setup.
- Page 5 Packing Assembling Take out the Spreader from the Accessory Bag. Spread the spreader on floor and open the legs of spreader with the help of provided knob. Open the legs of 100mm jib stand then attach it to spreader, lock it in place with the rubber grips.
- Page 6 Assembling Jib Sections Now mount the central fork onto the tripod , then attach bottom clamp to secure it well. Slide the (1 A Section) into the central fork (section 2 B) and tighten with the help of knob. Slide ...
- Page 7 Using the same approach insert 3rd, 4th and remaining sections to the joints and secure via knobs as shown below. Assembling Cable Guide And Support Rod Attach short cable guide rod on 3rd section properly. Insert the knob onto the cable guide rod and tighten the knob properly.
- Page 8 Using the same steps to and attach long cable guide rod on 2nd section as shown below. Insert the weight rod on (1 section) and tighten the bolt with the help of allen key as shown in the picture. ...
- Page 9 Adjusting The Stability Cables Cable code (red) Now attach the both red cable hook onto the provided bolts properly as shown below. Note : Both the red cables are following same steps. Attach (Red) cable to the (2 B section) and (section 3 C) & align itproperly with the help of cable guide clamp and attached with (5 E section).
- Page 10 Align it to the cable guide side rod and attach it to the end (section 5th). NOTE: You can adjust the cable with the help of wire tensioner. Attach your head plate properly and tighten the knob.
- Page 11 Now slide in weight to it as per your requirement and screw in weight closer properly. (Counter weight not included) YOUR PROAIM FLY 22 CAMERA CRANE PRODUCTION PACKAGE ALL DRESSED UP AND READY TO GO! (SHOWN WITH OPTIONAL ACCESSORIES)
- Page 12 WARRANTY We offer a one year warranty for our products from the date of purchase. We will repair or replace your product, free of charge, in the event of a defect in materials or craftsmanship obtained during normal use or handling based on the user manual. Please note that we will not cover any shipping costs for returning the product to us.
Need help?
Do you have a question about the Cinema Series and is the answer not in the manual?
Questions and answers