Table of Contents
Advertisement
Quick Links
Advertisement
Table of Contents

Related Manuals for Advantech EKI-1242NR Series


Summary of Contents for Advantech EKI-1242NR Series
- Page 1 User Manual EKI-1242NR Series Node-RED Fieldbus Gateway...
- Page 2 No part of this manual may be reproduced, copied, translated or transmitted in any form or by any means without the prior written permission of Advantech Co., Ltd. Information provided in this manual is intended to be accurate and reliable. How- ever, Advantech Co., Ltd.
- Page 3 Technical Support and Assistance Visit the Advantech web site at www.advantech.com/support where you can find the latest information about the product. Contact your distributor, sales representative, or Advantech's customer service center for technical support if you need additional assistance.
- Page 4 Before setting up the system, check that the items listed below are included and in good condition. If any item does not accord with the table, please contact your dealer immediately. 1 x Fieldbus gateway 1 x DIN-Rail mounting bracket and screws 1 x Wall-mounting bracket EKI-1242NR Series User Manual...
- Page 5 The sound pressure level at the operator's position according to IEC 704-1:1982 is no more than 70 dB (A). DISCLAIMER: This set of instructions is given according to IEC 704-1. Advan- tech disclaims all responsibility for the accuracy of any statements contained herein. EKI-1242NR Series User Manual...
- Page 6 Always disconnect the power from the device before servicing it. Before plugging a cable into any port, discharge the voltage stored on the cable by touching the electrical contacts to the ground surface. EKI-1242NR Series User Manual...
-
Page 7: Table Of Contents
Node-RED Library ..............27 System Management ................28 3.6.1 Change Password ..............28 3.6.2 Backup Manager................. 29 3.6.3 Upgrade Manager............... 30 3.6.4 Reset System ................30 3.6.5 Reboot Device ................30 3.6.6 Apply Configuration ..............31 EKI-1242NR Series User Manual... - Page 8 Figure 2.12 Closing the Component Cover ..................15 Figure 2.13 Installing the Component Cover Screw ............... 15 Figure 2.14 Power Wiring for EKI-1242NR Series................16 Figure 2.15 Grounding Connection....................18 Figure 2.16 Terminal Receptor: Relay Contact ................18 Figure 2.17 Terminal Receptor: Power Input Contacts..............
-
Page 9: Product Overview
Chapter Product Overview... -
Page 10: Specifications
Temperature Ambient Relative 10 ~ 95% (non-condensing) Humidity Power Power 5.2W Consumption Power Input 12 ~ 48 V , redundant dual power inputs Certifications CE, FCC Part 15 Subpart B (Class A) Software Node-RED v0.17.5 version EKI-1242NR Series User Manual... -
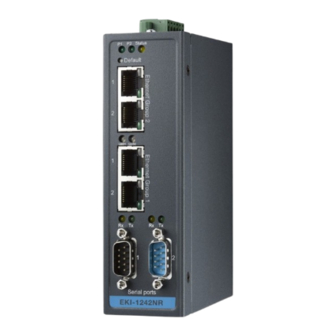
Page 11: Hardware Views
See “LED Indicators” on page 5 for further details. Default Press and hold 2 seconds to restart device. Press and hold 10 seconds to reset to factory default. ETH ports RJ45 ports for Ethernet. Serial ports DB9 pinout supports RS232/422/485. EKI-1242NR Series User Manual... -
Page 12: Rear View
Figure 1.3 Top View No. Item Description Wall mounting Screws (x4) used in the installation of a wall mounting plate. screws Terminal block Connect cabling for power and alarm wiring. Ground terminal Screw terminal used on ground chassis. EKI-1242NR Series User Manual... -
Page 13: Bottom View
– Backup config to SD card successfully during boot- ing. System is powered off. LED1, LED2 Download “advantech-contrib-gpio.tgz” from www.advantech.com.tw and set the LED behavior via Node- RED main page. Serial (Rx, Tx) Orange Serial port is receiving data. Green Serial port is transmitting data. -
Page 14: Dimensions
Dimensions [1.299] [1.378] Unit: mm [inch] [0.591] 104 [4.094] 95 [3.740] 30.50 42 [1.654] 42 [1.654] [1.201] [1.575] 95 [3.740] Figure 1.5 Dimensions EKI-1242NR Series User Manual... -
Page 15: Fieldbus Gateway Installation
Chapter Fieldbus Gateway Installation... -
Page 16: Installation Guidelines
In this instruction, it will explain how to find a proper location for your Fieldbus Gateways, and how to connect to the network, hock up the power cable, and connect to the EKI-1242NR Series. Verifying Fieldbus Gateway Operation Before installing the device in a rack or on a wall, power on the fieldbus gateway to verify that the fieldbus gateway passes the power-on self-test (POST). -
Page 17: Installing The Fieldbus Gateway
DIN rail clip. If seated correctly, the bottom of the DIN rail should be fully inserted in the release tab. DIN rail clip DIN rail DIN rail clip release tab Figure 2.1 Installing the DIN-Rail Mounting Kit EKI-1242NR Series User Manual... -
Page 18: Figure 2.2 Correctly Installed Din Rail Kit
Push down on the top of the DIN rail clip release tab with your finger. As the clip releases, lift the bottom of the fieldbus gateway, as shown in the following illustration. Figure 2.3 Removing the DIN-Rail EKI-1242NR Series User Manual... -
Page 19: Wall-Mounting
Use the wall mount plates as a guide to mark the locations of the screw holes. Drill four holes over the four marked locations on the wall, keeping in mind that the holes must accommodate wall sinks in addition to the screws. EKI-1242NR Series User Manual... -
Page 20: Figure 2.5 Wall Mounting Screw Dimensions
Once the device is installed on the wall, tighten the screws to secure the device. Once the installation is complete, the power terminal block can be installed. See “Wiring the Power Inputs” on page 18 for further details. EKI-1242NR Series User Manual... -
Page 21: Connecting The Fieldbus Gateway To Ethernet Ports
Pin 2 Figure 2.7 Ethernet Plug & Connector Pin Position Maximum cable length: 100 meters (328 ft.) for 10/100BaseT. Serial Connection EKI-1242NR Series provides eight ports DB9 (male) connectors. RS-232/422/485 pin assignments as below: Figure 2.8 DB 9 Pin Position RS-232... -
Page 22: Microsd Card Installation
MicroSD Card Installation The EKI-1242NR Series provides an easy way to backup, restore, and deploy configuration settings. The fieldbus gateway provides a microSD card slot to support simple means to manage system configuration settings. Only microSD cards with the FAT32 or exFAT file systems are supported. -
Page 23: Utilizing A Microsd Card
Check that the microSD card is not write-protected. Check that the file system is not corrupted. Check that the microSD card is not damage. If any of the events occur, the fieldbus gateway halts operation and the status LED begins flashing. EKI-1242NR Series User Manual... -
Page 24: Power Supply Installation
EKI-1242NR Series support 12 to 48 V . Dual power inputs are supported and allow you to connect a backup power source. -
Page 25: Considerations
Caution! Do not service equipment or cables during periods of lightning activity. Caution! Do not service any components unless qualified and authorized to do Caution! Do not block air ventilation holes. EKI-1242NR Series User Manual... -
Page 26: Wiring A Relay Contact
2.7.4 Wiring a Relay Contact The following section details the wiring of the relay output. The terminal block on the EKI-1242NR Series is wired and then installed onto the terminal receptor located on the EKI-1242NR Series. PWR2 DC12-48V... -
Page 27: Figure 2.17 Terminal Receptor: Power Input Contacts
PW2 in the same manner. Tighten the wire-clamp screws to secure the DC wires in place. Loosening Securing Wire-clamp Wire-clamp Screws Screws Installing DC Wires Figure 2.19 Installing DC Wires in a Terminal Block EKI-1242NR Series User Manual... -
Page 28: Default Button
Reset configuration to factory default: Press and hold the Default button for 10 seconds. System reboot: Press and hold the Default button for 2 seconds. Note! Do NOT power off the fieldbus gateway when loading default settings. EKI-1242NR Series User Manual... -
Page 29: Managing Fieldbus Gateway
Chapter Managing Fieldbus Gateway... -
Page 30: Log In
Click Submit to change the current settings. Figure 3.2 Changing a Default Password After saving all the desired settings, perform a system save (System Management > Apply Configuration). The changes are saved following a system reboot. EKI-1242NR Series User Manual... -
Page 31: Overview
Displays the IP address setting mode of the device. IP Address Displays the assigned IP address of the device. Subnet Mask Displays the assigned subnet mask of the device. Gateway Displays the assigned gateway of the device. EKI-1242NR Series User Manual... -
Page 32: Network Setting
Ethernet Group 1 IP Address Setting Mode Click the drop-down menu to select the IP address setting mode: Static address or DHCP client. IP Address Enter a value to specify the IP address of the interface. The default is 192.168.1.1. EKI-1242NR Series User Manual... -
Page 33: Serial Settings
The following table describes the items in the previous figure. Item Description Name Display the name of the serial port. Use the name in the Serial Settings > Port 1/Port 2 to create a serial input or serial output in Node-RED. EKI-1242NR Series User Manual... -
Page 34: Protocol Setting
Click Browse to select the Node-RED control flows (JSON file). Restore Archive Click Restore Archive to restore configuration to the device. Export Archive Click Export Archive to export the Node-RED control flows. Submit Click Submit to save the values and update the screen. EKI-1242NR Series User Manual... -
Page 35: Node-Red Library
Configuration changes take effect after a system reboot. 3.5.2 Node-RED Library You can download more node modules from www.advantech.com.tw and download document and toolchain for how to make node modules by yourself from https:// nodered.org/. It is easy to manage node modules through the Node-RED Library page. The Node- RED service restarts automatically after importing or deleting node modules. -
Page 36: System Management
If you want to disable the password protection, change the password to the default option None (leave the password column blank). Make sure you submit and reboot the system (System Management > Apply Configuration) to save the updates. EKI-1242NR Series User Manual... -
Page 37: Backup Manager
Click the radio button to select upload file source. SD Card Backup Automatically Click the radio button to enable or disable the SD card automatically Backup backup function. Submit Click Submit to save the values and update the screen. EKI-1242NR Series User Manual... -
Page 38: Upgrade Manager
To access this page, click System Management > Reboot Device. Click Reboot to reboot the fieldbus gateway. Configuration changes made last with an issued apply configuration will be lost. Figure 3.12 System Management > Reboot Device EKI-1242NR Series User Manual... -
Page 39: Apply Configuration
Note! Configuration changes take effect after a system reboot. Before the con- figuration changes are applied, the message “Go to Apply page to apply configuration and reboot device.” appears on the top of the web page. EKI-1242NR Series User Manual... - Page 40 No part of this publication may be reproduced in any form or by any means, electronic, photocopying, recording or otherwise, without prior written permission of the publisher. All brand and product names are trademarks or registered trademarks of their respective companies. © Advantech Co., Ltd. 2018...
Need help?
Do you have a question about the EKI-1242NR Series and is the answer not in the manual?
Questions and answers