Akuvox R29 Series User Manual
Hide thumbs
Also See for R29 Series:
- Administrator's manual (187 pages) ,
- Admin manual (80 pages) ,
- User manual (16 pages)
Table of Contents
Advertisement
Advertisement
Table of Contents

Related Manuals for Akuvox R29 Series


Summary of Contents for Akuvox R29 Series
- Page 1 R29 Series Door Phone User Manual...
-
Page 2: About This Manual
About This Manual Thank you for choosing Akuvox’s R29S/F door phone. This manual is intended for end users, who need to properly configure the door phone. It provides all functions and configuration of R29S/F, the information detailed in this user manual applicable to firmware version 29.1.1.116.zip or lower version. - Page 3 FCC Caution: Any Changes or modifications not expressly approved by the party responsible for compliance could void the user's authority to operate the equipment. This device complies with part 15 of the FCC Rules. Operation is subject to the following two conditions: (1) This device may not cause harmful interference, and (2) this device must accept any interference received, including interference that may cause undesired operation. Note: This equipment has been tested and found to comply with the limits for a Class B digital device, pursuant to part 15 of the FCC Rules. These limits are designed to provide reasonable protection against harmful interference in a residential installation. This equipment generates, uses and can radiate radio frequency energy and, if not installed and used in accordance with the instructions, may cause harmful interference to radio communications. However, there is no guarantee that interference will not occur in a particular installation. If this equipment does cause harmful interference to radio or television reception, which can be determined by turning the equipment off and on, the user is encouraged to try to correct the interference by one or more of the following measures: —Reorient or relocate the receiving antenna. —Increase the separation between the equipment and receiver. ...
-
Page 4: Table Of Contents
Content 1. Product overview ................................... 1 1.1. Product Description ................................1 1.2. Power Connection .................................. 2 2. Daily Use ......................................3 2.1. Making a Call ..................................3 2.1.1. Calling From Digital Keypad ............................3 2.1.2. Calling From Phonebook ............................... 3 2.2. - Page 5 3.2.2. Volume ................................... 7 3.2.3. Await ....................................7 3.2.4. Language ..................................8 3.2.5. LED ....................................8 3.3. Advanced Settings .................................. 8 3.3.1. Address ..................................8 3.3.2. Password ..................................9 3.3.3. Contact ..................................9 3.3.4. LockPasswd ................................10 3.3.5. AntiAlarm ..................................10 3.3.6.
-
Page 6: Product Overview
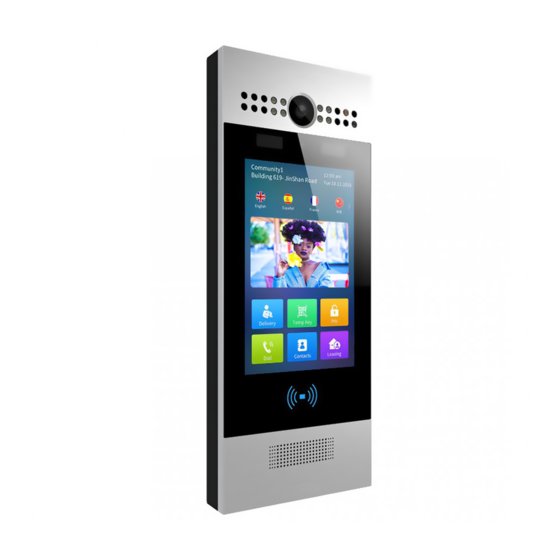
1. Product overview 1.1. Product Description The R29F and R29S are Android-based IP video door phone with a touch screen. It incorporates audio and video communications, access control and video surveillance. Its finely-tuned Android OS allows for feature custo mization to better suit the habit of usage of local people. -
Page 7: Power Connection
1.2. Power Connection The door phone is powered by simply connecting the two wires of he power adapter to the wiring interface on the back of the door phone. Plug the wire printed with white bars to the first pin and slightly ①... -
Page 8: Daily Use
2. Daily Use 2.1. Making a Call There are two ways to make a call from the door phone to monitor units, which can be an indoor monitor or an intercom app. 2.1.1. Calling From Digital Keypad The default interface of the door phone is the dial interface. ①... -
Page 9: Receiving A Call
Tap the dial key next to the contact found. ⑦ 2.2. Receiving a Call When a monitor unit calls the door phone, it will auto answer the incoming call by default. There is no need to press any answer key. 2.3. -
Page 10: Rf (Radio-Frequency) Card
building, which could be set with the help of the door phone administrator. Same as the public key, enter the private key on the digital ① keypad and tap the unlock icon to open door. ② 2.3.3. RF (Radio-Frequency) Card The R29Fand R29S are compatible with both13.56MHz and 125KHz RF cards. -
Page 11: Configuration
monitor units in real time. The URL format is: rtsp://<ip_host>/live/ch00_0 3. Configuration 3.1. How to Access System Settings In the dial interface, input 9999, then press dial key. ① ② ③ Input 3888 in the pop -up setting screen and tap OK to ④... -
Page 12: Volume
3.2.2. Volume Drag the dot to adjust three types of volume, i.e. call volume, advertisement volume and key volume. 3.2.3. Await Tap Await icon to set the standby mode, standby time and unlock mode. ③ There are three options for the standby mode. NO is for the door phone’s default dial interface to remain permanently on;... -
Page 13: Language
3.2.4. Language Tap language icon to select system language. More languages can be added by the administrator. 3.2.5. LED By setting the LED parameter, the door phone will adjust its screen backlight according to the lighting conditions of the environment. 3.3. -
Page 14: Password
automatically. Or input the parameter manually. ② 3.3.2. Password In the Project Passwd menu, reset the password for accessing the ③ system setting, which is 9999 by default. In the Public Ke y Passwd menu, reset the public key ④ password , which is 33333333 by default. -
Page 15: Lockpasswd
3.3.4. LockPasswd ① Add new private keys or edit existing private keys. The private key can also be configured with a date and time to offer ② limited access. 3.3.5. AntiAlarm By turning on the Tamper Proof Switch in the AntiAlarm menu, alarm will be triggered and a notification message will be sent to monitor units when there is any malicious attempt to damage the door phone. -
Page 16: Rfcard (Radio Frequency Card)
3.3.6. RFCard (Radio Frequency Card) Add new access cards or delete registered cards. ③ Administrator can also add a valid date and time to the card to offer ④ limited access. 3.3.7. RTSP (Real Time Streaming Protocol) Server By enabling the RTSP Server, occupants can view the real-time video footage of the door phone camera from a monitor unit.
Need help?
Do you have a question about the R29 Series and is the answer not in the manual?
Questions and answers