Table of Contents
Advertisement
Quick Links
Advertisement
Table of Contents

Related Manuals for Edge-Core ECWO5210-L


Summary of Contents for Edge-Core ECWO5210-L
- Page 1 ECWO5210-L Outdoor Access Point...
-
Page 2: Fcc Caution
Quick Installation Guide ECWO5210-L Outdoor Access Point ENGLISH FCC CAUTION This equipment has been tested and found to comply with the limits for a Class B digital device, pursuant to Part 15 of the FCC Rules. These limits are designed to provide reasonable protection against harmful interference in a residential installation. - Page 3 Quick Installation Guide ECWO5210-L Outdoor Access Point ENGLISH CE CAUTION Declaration of Conformity with Regard to the 1999/5/EC (R&TTE Directive) for European Community, Switzerland, Norway, Iceland, and Liechtenstein Model: ECWO5210-L For 2.4 GHz radios, the device has been tested and passed the requirements of the following standards, and hence fulfills the EMC and safety requirements of R&TTE Directive within the CE marking requirement.
-
Page 4: Package Contents
6. Waterproof RJ45 Connector Pack x 2 modes that can be used for dual purposes. It can be deployed as a traditional multi-wireless Access Point (AP) or a Relay. The ECWO5210-L access points make wireless communication fast, secure It is recommended to keep the original and easy. -
Page 5: System Overview
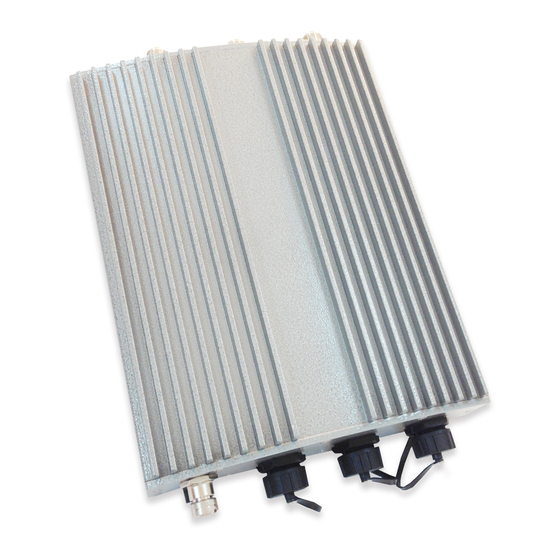
Quick Installation Guide ECWO5210-L Outdoor Access Point ENGLISH System Overview ECWO5210-L N-type Connector x 4 For connecting to an antenna (RF Card A x 2, RF Card B x 2) Connector marked –1 is for the primary antenna when the AP is not in 802.11n or 802.11ac mode. - Page 6 Bottom M12 DC Connector DC input (12V) is supported on ECWO5210-L Ventilation Valve Due to extreme weather conditions, water vapor in the ECWO5210-L may condense. The valve allows ventilation to prevent moisture buildup within the ECWO5210-L. Uplink (PoE Connector) For connecting to the Power Sourcing Equipment (PSE)
-
Page 7: Hardware Installation
Quick Installation Guide ECWO5210-L Outdoor Access Point ENGLISH Hardware Installation The following are the basic installation steps which can be used for testing and configuring the ECWO5210-L. Installation Steps: Step 1. Connect an antenna to the connector. Step 2. Connect the Ethernet Port of ECWO5210-L to the POWER & DATA OUT Port of the PSE. - Page 8 Quick Installation Guide ECWO5210-L Outdoor Access Point ENGLISH Step 3. Insert the cable through the main parts and install a RJ-45 connector using straight-through method (both ends are in the same wiring order: 1 (Tx+), 2 (Tx-), 3 (Rx+), 6 (Rx-)).
- Page 9 Quick Installation Guide ECWO5210-L Outdoor Access Point ENGLISH Installing the Waterproof Connection Pack (Optional): The M12 Waterproof Connector Pack is used for DC power supply, and it consists of 5 parts: Step 1. Pass power cable through the Sealing Nut, Gaskets, and Clamp Ring (items 2-5) Step 2.
- Page 10 Quick Installation Guide ECWO5210-L Outdoor Access Point ENGLISH Step 3. Seal all connectors and fasten sealing nuts Now, the Hardware Installation is complete.
-
Page 11: Getting Started
1. To access the web management interface, connect the administrator PC to the LAN port of ECWO5210-L via an Ethernet cable. Then, set a static IP address on the same subnet mask as ECWO5210-L in TCP/IP of your PC, such as the following example: IP Address: 192.168.1.100... - Page 12 Quick Installation Guide ECWO5210-L Outdoor Access Point ENGLISH 4. After a successful login into ECWO5210-L’s Web user interface (Web UI), a System Overview page of web management interface will appear, as depicted below. The Web Management Interface - System Overview Page 5.
-
Page 13: Common Settings
Quick Installation Guide ECWO5210-L Outdoor Access Point ENGLISH Common Settings Step 1. Change Administrator’s Password Change Password Page Click on the Utilities main menu button, and then select the Change Password tab. Enter a new password with a length of up to 32 characters, and retype it in the Re-enter New Password field. - Page 14 2.4GHz for the band, 802.11g+802.11n for the protocol and 6 for the channel. Admin should be aware of Dynamic Frequency Selection (DFS) mandated on some channels of the 5GHz band. When an ECWO5210-L detects interference, this mechanism will limit the ability to broadcast the SSID on one of the channels listed below: ...
- Page 15 Step 3. Configure VAP (Virtual Access Point) Profile Settings VAP Configuration Page (VAP-1 shown) ECWO5210-L supports up to 16 virtual APs (VAPs) per RF card. Configure VAP profile settings: (a) Select the VAP Config tab to configure the settings of the desired VAP.
- Page 16 Quick Installation Guide ECWO5210-L Outdoor Access Point ENGLISH Virtual AP Overview Page...
- Page 17 ENGLISH Step 4. Configure WDS (Wireless Distribution System) Settings (Optional) To extend the wireless coverage, ECWO5210-L supports up to 8 WDS links for connecting wirelessly to other WDS-capable APs (peer APs). By default, all WDS profiles are disabled. Click on the Wireless main menu button.
- Page 18 Congratulations! Now, Edgecore ECWO5210-L is installed and configured successfully. After ECWO5210-L's network configuration is completed, please remember to change the IP Address of your PC Connection Properties back to its original settings in order to ensure that your PC functions properly in its real network environments.
Need help?
Do you have a question about the ECWO5210-L and is the answer not in the manual?
Questions and answers