Table of Contents
Advertisement
Quick Links
Advertisement
Chapters
Table of Contents

Related Manuals for Regin Regio Maxi


Summary of Contents for Regin Regio Maxi
- Page 1 Regio Maxi - Manual...
- Page 2 The software described in this document is supplied under license by Regin and may be used or copied only in accordance with the terms of the license. No part of this document may be reproduced or transmitted in any form, in any fashion, electronically or mechanically, without the express, written permission of Regin.
-
Page 3: Table Of Contents
Contents At a Glance Part I Introduction Chapter 1 About the manual Chapter 2 Introduction to Regio Maxi Chapter 3 Models Chapter 4 Technical data Part II Installation Chapter 5 Installation preparations Chapter 6 Installation ... -
Page 4: Part I Introduction
Part I Introduction... - Page 5 Table of contents Part I Introduction Chapter 1 About the manual Terms More information Chapter 2 Introduction to Regio Maxi Regio zone controllers Regio Maxi Chapter 3 Models RCP-units Design of the RCP-models RU-units Design of the RU-models Chapter 4 Technical data...
-
Page 6: Chapter 1 About The Manual
Chapter 1 About the manual This manual covers all the models in the Regio Maxi range. This revision covers program revisions from 1.3-1-01. Terms Term used in the manual: Factory setting More information More information about Regio Maxi can be found in: ... -
Page 7: Chapter 2 Introduction To Regio Maxi
The controllers are connected to bus lines such as Modbus or Regin’s own bus system EXOline, to communicate with a central SCADA- system via RS485. They can also be configured for a specific application with Regin’s ©... -
Page 8: Regio Maxi
Regio tool , which can be downloaded free of charge from © Regin’s homepage www.regin.se. See the manual for Regio tool for more information. Models with LON communication use LonWorks, adjusted according to the LonMark LON communication guidelines. - Page 9 Application examples SWITCH TCP/IP RS485 INTERNET EXO4 TCP/IP EX8282 INTERNET EXO4 TCP/IP RU... RU... SWITCH TCP/IP RS485 EX8282 RU... RU... Regio Manual Maxi Chapter 2 Introduction to Regio Maxi...
-
Page 10: Chapter 3 Models
Chapter 3 Models Regio Maxi consists of RCP- and RU-units, which are connected with a RJ12-cable. RCP-units There are 12 different RCP-controllers in the Maxi series. They can be divided according to type of control, see table 1 below. Models Models for control of thermal actuators ●... -
Page 11: Ru-Units
RU-units There are 7 different room units in the Maxi series. They can be divided according to type of control into basic models, models for fan control and a flexible model with special functions (RU-DOS). For information on how the RU-units can be combined with the RCP-controllers, see table 1 on page 9. -
Page 12: Design Of The Ru-Models
Design of the RU-models RU-O RU-DO RU-F RU-FO RU-DFO RU-DOS Part I Introduction... -
Page 13: Chapter 4 Technical Data
Chapter 4 Technical data The data concerns all models. For available I/O for a certain model, see the chapter Installation. Common data Ambient operation temperature ..................0...50°C Ambient transport and storage temperature .............. -20...70°C Ambient humidity ....................Max 95% RH Material casing ..................... - Page 14 Logic 1 ........................12...24 V DC input current at 24 V DC ....................3 mA Condensation input, CI Type ................Regin’s condensation detector, KG-A/1 24 V DC-output, +C Output level on +C ..................24 V DC +/- 2 V Max total load ..................0.1 A, short circuit proof GDO, 24 V AC-output for power supply of actuators etc.
-
Page 15: Accessories For Regio Maxi
Cables for connection between RU and RCP Length 3 m ......................RU-CBL3 Length 10 m ......................RU-CBL10 The accessories are available from Regin. For more information, see the product sheets and instructions for each product, search via www.regin.se. Regio Manual Maxi... -
Page 16: Part Ii Installation
Part II Installation... - Page 17 Table of contents Part II Installation Chapter 5 Installation preparations Using labels Configuration Setting the dipswitches in RU (only models without display) RU-models with display Chapter 6 Installation Mounting Mounting of RU Mounting of RCP Wiring Wiring for RU-… Wiring for RCP100 / RCP100T / RCP100L Wiring for RCP100F / RCP100FT / RCP100FL Wiring for RCP200 / RCP200T / RCP200L Wiring for RCP200F / RCP200FT / RCP200FL...
-
Page 18: Chapter 5 Installation Preparations
Chapter 5 Installation preparations Using labels On the back of the units’ electronics cassette, there is a set of labels which makes it easier to install large numbers of Maxi controllers. By using the labels as carriers of information for the installation engineer, much time will be saved and you can keep wiring errors at a minimum. -
Page 19: Setting The Dipswitches In Ru (Only Models Without Display)
Setting the dipswitches in RU (only models without display) RU-models without display have four dipswitches (SW1-4) for setting basic functions. They are found on the back of the electronics cassette. Figure 3. Dipswitches SW1-2 Basic setpoint (°C) 22 (FS) Table 3. Setting of basic heating setpoint with dipswitch SW1 and SW2 See also the chapter Setpoint calculation for setting of SW1-2. -
Page 20: Chapter 6 Installation
Chapter 6 Installation Installation should be done by a professional installer. Since the RCP-unit is powered by 230 V AC, it must be handled with great care. Always switch the power off before removing the cover and electronics cassette from the bottom plate. Mounting Mounting of RU Place the controller in a location that has a temperature representative for the room. -
Page 21: Mounting Of Rcp
Mounting of RCP RCP is mounted in the ceiling void, on a junction box plate, or on a DIN-rail. The form factor of the casing is EURO norm, which makes it fit into a standard EURO norm cabinet. Figure 6. Mounting of RCP in the ceiling void Figure 7. -
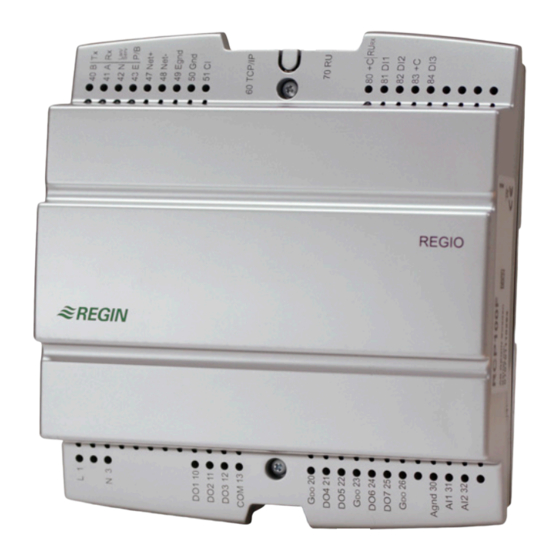
Page 22: Wiring
Wiring The figures below show the location of terminals. The connection diagrams and tables on the following pages show the wiring for the RU- and RCP-models. Figure 7. RU bottom plate with location of terminals Figure 8. RCP bottom plate with location of terminals, and locking of the line voltage cable Part II Installation... -
Page 23: Wiring For Ru
Wiring for RU-… RU-connection with modular cable with RJ12 fast connector (own production). The maximum cable length is 30 m. RU-connection with Regin’s cables RU-CBL3 (3 m) or RU-CBL10 (10 m) with RJ12 fast connector. Terminal Designation Operation 10-33 No function... -
Page 24: Wiring For Rcp100 / Rcp100T / Rcp100L
Wiring for RCP100 / RCP100T / RCP100L Figure 9. Connection diagrams for RCP100, RCP100T and RCP100L Part II Installation... - Page 25 Terminal Designation Operation Line 230 V AC- connection Neutral EMI ground, yellow-green conductor EMI ground 10-13 No function 24 V AC out common for DO4-DO5. Terminals 20, 23 and 26 are connected internally, max total load 12 VA. Digital output 4, 24 V AC-output. For forced ventilation (FS).
- Page 26 Digital output 6, 24 V AC-output. Thermal actuator, heating. Wiring for 24 V AC-loads: 24 V AC actuator is connected between terminal 24 and terminal 23, GDO. Alternatives: - Forced ventilation - Thermal actuator, cooling - Three-point actuator heating increase - Three-point actuator heating decrease - Three-point actuator cooling increase - Three-point actuator cooling decrease...
- Page 27 Digital output 8, 24 V AC-output. Not configured for use (FS). Wiring for 24 V AC-loads: 24 V AC actuator is connected between terminal 27 and terminal 23, GDO. Alternatives: - Forced ventilation - Thermal actuator, heating - Three-point actuator heating increase - Three-point actuator heating decrease - Three-point actuator cooling increase - Three-point actuator cooling decrease...
- Page 28 Net+ LON-connection (only L-models) Net- EGnd Regin’s condensation detector, KG-A/1. The sensor is connected between terminals 51 and 50, Gnd. TCP/IP TCP/IP-connection, only T-models Room unit See the section Wiring for RU-...
- Page 29 © Window contact, potential-free, NO. Open contact corresponds See Regio tool to closed window (FS). configuration of NO/NC. The factory setting is Wiring: normally open (NO) contacts, but Potential-free contact is connected between terminals 82 and 80, the contacts can be configured to NC.
-
Page 30: Wiring For Rcp100F / Rcp100Ft / Rcp100Fl
Wiring for RCP100F / RCP100FT / RCP100FL Figure 10. Connection diagram for RCP100F, RCP100FT and RCP100FL Terminal Designation Operation Line 230 V AC- connection Neutral EMI ground, yellow-green conductor EMI ground For fan control, low speed. 230 V AC output. Fan is connected between terminals 10 and N (Neutral). - Page 31 Digital output 4, 24 V AC-output. For forced ventilation (FS). Wiring for 24 V AC-loads: 24 V AC actuator is connected between terminal 21 and terminal 20, GDO. Alternatives: - Thermal actuator, heating - Thermal actuator, cooling - Three-point actuator heating increase - Three-point actuator heating decrease - Three-point actuator cooling increase - Three-point actuator cooling decrease...
- Page 32 Digital output 6, 24 V AC-output. Thermal actuator, heating. Wiring for 24 V AC-loads: 24 V AC actuator is connected between terminal 24 and terminal 23, GDO. Alternatives: - Forced ventilation - Thermal actuator, cooling - Three-point actuator heating increase - Three-point actuator heating decrease - Three-point actuator cooling increase - Three-point actuator cooling decrease...
- Page 33 Digital output 8, 24 V AC-output. Not configured for use (FS). Wiring for 24 V AC-loads: 24 V AC actuator is connected between terminal 27 and terminal 23, GDO. Alternatives: - Forced ventilation - Thermal actuator, heating - Three-point actuator heating increase - Three-point actuator heating decrease - Three-point actuator cooling increase - Three-point actuator cooling decrease...
- Page 34 Net+ LON-connection (only L-models) Net- EGnd Regin’s condensation detector, KG-A/1. The sensor is connected between terminals 51 and 50, Gnd. TCP/IP TCP/IP-connection, only T-models Room unit See the section Wiring for RU-...
- Page 35 © Window contact, potential-free, NO. Open contact corresponds See Regio tool to closed window (FS). configuration of NO/NC. The factory setting is Wiring: normally open (NO) contacts, but Potential-free contact is connected between terminals 82 and 80, the contacts can be configured to NC.
-
Page 36: Wiring For Rcp200 / Rcp200T / Rcp200L
Wiring for RCP200 / RCP200T / RCP200L Figure 11. Connection diagram for RCP200, RCP200T and RCP200L Terminal Designation Operation Line 230 V AC- connection Neutral EMI ground, yellow-green conductor EMI ground 10-13 No function 24 V AC out common for DO. Terminals 20 and 23 are connected internally, max total... - Page 37 Digital output 4, 24 V AC-output. For forced ventilation (FS). Wiring for 24 V AC-loads: 24 V AC actuator is connected between terminal 21 and terminal 20, GDO. Alternatives: - Thermal actuator, heating - Thermal actuator, cooling - Three-point actuator heating increase - Three-point actuator heating decrease - Three-point actuator cooling increase - Three-point actuator cooling decrease...
- Page 38 Net+ LON-connection (only L-models) Net- EGnd Regin’s condensation detector, KG-A/1. The sensor is connected between terminals 51 and 50, Gnd. TCP/IP TCP-connection, only T-models Room sensor See the section Wiring for RU-...
- Page 39 © Digital input 1, 24 V DC. See Regio tool configuration of Occupancy detector (FS), potential-free, NO. Open contact NO/NC. The corresponds to absence. factory setting is See also the section Occupancy detector in the chapter normally open Operating modes. (NO) contacts, but the contacts can be configured to NC.
- Page 40 Analogue output 2. Valve actuator, 0...10 V DC, max 5 mA. Control state: cooling. Wiring: Valve actuator is connected between terminals 92 and 30, G0. Alternative: - Valve actuator, 0...10 V DC, max 5 mA. Control state: heating. Table 7. I/O connection terminals for RCP200, RCP200T and RCP200L Part II Installation...
-
Page 41: Wiring For Rcp200F / Rcp200Ft / Rcp200Fl
Wiring for RCP200F / RCP200FT / RCP200FL Figure 12. Connection diagram for RCP200F, RCP200FT and RCP200FL Terminal Designation Operation Line 230 V AC- connection Neutral EMI ground, yellow-green conductor EMI ground For fan control, low speed. 230 V AC output. Fan is connected between terminals 10 and N (Neutral). - Page 42 Digital output 4, 24 V AC-output. For forced ventilation (FS). Wiring for 24 V AC-loads: 24 V AC actuator is connected between terminal 21 and terminal 20, GDO. Alternatives: - Thermal actuator, heating - Thermal actuator, cooling - Three-point actuator heating increase - Three-point actuator heating decrease - Three-point actuator cooling increase - Three-point actuator cooling decrease...
- Page 43 Net+ LON-connection (only L-models) Net- EGnd Regin’s condensation detector, KG-A/1. The sensor is connected between terminals 51 and 50, Gnd. TCP/IP TCP-connection, only T-models Room sensor See the section Wiring for RU-...
- Page 44 © Digital input 1, 24 V DC. See Regio tool configuration of Occupancy detector (FS), potential-free, NO. Open contact NO/NC. The corresponds to absence. factory setting is See also the section Occupancy detector in the chapter normally open Operating modes. (NO) contacts, but the contacts can be configured to NC.
- Page 45 Analogue output 2. Valve actuator, 0...10 V DC, max 5 mA. Control state: cooling. Wiring: Valve actuator is connected between terminals 92 and 30, G0. Alternative: - Valve actuator, 0...10 V DC, max 5 mA. Control state: heating. Table 8. I/O connection terminals for RCP200F, RCP200FT and RCP200FL Regio Manual Maxi Chapter 6 Installation...
-
Page 46: Chapter 7 Commissioning
Chapter 7 Commissioning © The easiest way to set parameters is via Regio tool Calibration of a measured room temperature should be done under stable conditions. Troubleshooting © The Hand/Auto function in Regio tool makes it possible to test outputs. The output itself is not affected, only the software object that controls the output. -
Page 47: Part Iii Configuration
Regio Manual Maxi Chapter 7 Commissioning... - Page 48 Table of contents Part III Configuration Chapter 8 Control states Chapter 9 Operating modes Different operating modes Activation of the different operating modes Chapter 10 Setpoint calculation Chapter 11 Actuators Chapter 12 Fan control Chapter 13 Change-over function Chapter 14 Forced ventilation / Condensation detector / Frost protection Chapter 15 Indications Indications on the RU-units...
-
Page 49: Chapter 8 Control States
Chapter 8 Control states The controllers can be configured for different control states/control sequences: Heating Heating or cooling via the change-over function Heating/Heating Heating/Cooling Heating/Cooling with VAV-control and forced supply air function Heating/Cooling with VAV-control ... - Page 50 Heating/Cooling In control state Heating/Cooling, the controller functions as a heating controller when the room temperature is lower than the basic heating setpoint plus half the neutral zone. The neutral zone is the difference in temperature between the heating setpoint and the cooling setpoint.
- Page 51 Cooling In control state Cooling, the unit is always a cooling controller and controls according to the basic cooling setpoint plus the setpoint displacement. Cooling/Cooling In control mode Cooling/Cooling, the controller always functions as a cooling controller and Split output signal controls according to the basic cooling setpoint plus the setpoint displacement.
-
Page 52: Chapter 9 Operating Modes
Chapter 9 Operating modes Different operating modes The Regio controllers have the following operating modes: 0 = Off 1 = Unoccupied 2 = Stand-by 3 = Occupied (FS) 4 = Bypass Operating mode Off means that the controller is not heating or cooling, and the fans are stopped. -
Page 53: Activation Of The Different Operating Modes
Occupied Operating mode Occupied means that the room is in use and is therefore in a comfort mode. The controller regulates the room temperature around a heating setpoint and a cooling setpoint (FS heating setpoint=22°C, cooling setpoint=24°C). The setpoints can also be adjusted +/- 3°C locally via the setpoint knob or in the display of the room unit, or via a central command. - Page 54 When the Occupancy button is held depressed for more than 5 seconds, the controller Shutdown changes operating mode to ”Shutdown” (Off/Unoccupied), regardless of the current © operating mode. Via the display or Regio tool , you can configure which operating mode, Off or Unoccupied, should be activated on ”Shutdown”.
- Page 55 Maxi can be controlled using local time control. This means that there are two time channels, one time channel Occupied for changing between Stand-by and Occupied, and one time channel Unoccupied for changing between Stand-by and Shutdown. If both time channels are active at the same time, the time channel for Occupied will take precedence.
- Page 56 Command ”Shutdown” Command Bypass Off/Unoccupied Bypass Central commands should be regarded as events and can be changed locally via the Occupancy button. Part III Configuration...
-
Page 57: Chapter 10 Setpoint Calculation
Chapter 10 Setpoint calculation Basic setpoint There are two basic setpoints, one basic heating setpoint and one basic cooling setpoint (FS basic heating setpoint=22°C, cooling=24°C). In RU-units with dipswitches for setting the basic setpoint (RU-units without display), the basic heating setpoint is set. The basic cooling setpoint is automatically changed at the same time. - Page 58 In operating mode Stand-by the controller controls according to the basic heating setpoint or Stand-by the basic cooling setpoint plus/minus a settable neutral zone (FS=3°C). The setpoint can also be adjusted via the setpoint knob or display. This means that the factory setting for the heating setpoint is 19°C +/- 3°C (local displacement), and the factory setting for the cooling setpoint is 27°C +/- 3°C (local displacement).
-
Page 59: Chapter 11 Actuators
Chapter 11 Actuators Regio can be used with three types of actuators: Analogue 0…10 V actuators Thermal actuators 3-point actuators (Increase/Decrease actuators) © The actuator type is set via Regio tool The following output signals can be set for analogue actuators: Analogue actuators ... -
Page 60: Chapter 12 Fan Control
Chapter 12 Fan control In room units for fan control (RU-F-models) it is possible to control a fan at the following speeds: Off, Low speed, Medium speed, High speed, Auto. The fan speed in the Auto position depends on the controller output signal and the settings for each speed. The fan can be manually controlled to work at any speed. -
Page 61: Chapter 13 Change-Over Function
Chapter 13 Change-over function Change-over is a function for installations with 2-pipe systems. It makes it possible to use the same pipe for both heating and cooling, depending on requirements during for example the summer (cooling output) and the winter (heating output). To activate the change-over function, control mode Heating or cooling via the change-over Control states function should be configured. -
Page 62: Chapter 14 Forced Ventilation / Condensation Detector / Frost Protection
Condensation detector There is a special input (CI) on all Regio controllers. This input is intended for Regin’s Special input CI condensation detector, KG-A/1, and functions internally as a digital input, i. e. condensation or no condensation. -
Page 63: Chapter 15 Indications
Chapter 15 Indications Indications on the RU-units All room units without display have a LED shaped like a thermometer on the front. A red indication is shown when heating control is functional and a blue indication is shown when cooling control is active. When there is something wrong with the controller, the LED flashes red and blue. -
Page 64: Indications On The Rcp-Units
Indications on the RCP-units Adjacent to terminals 40-43 and 80, there are a number of LED:s which indicate status. Figure 17. LED:s on RCP Designation Colour Description P/B (Power supply/Battery) Green/Red Power supply on/Battery error Lan/Serv Green/Yellow For TCP/IP status indication Green Port 1, Receiving Green... -
Page 65: Chapter 16 Functions For Ru-Dos
Chapter 16 Functions for RU-DOS RU-DOS is a flexible room unit. It has a special button, the Select button, and a number of The Select button special functions which are described below. Select button Figure 17. RU-DOS Lighting control When the RCP-controllers are connected to RU-DOS, they can be used for controlling lighting. -
Page 66: Co 2 -Transmitter
-transmitter If you want it to monitor the current percentage of CO in the room, a CO -transmitter can be connected to the controller. It is also possible to activate presence when the percentage of rises above a set limit value (FS=800ppm) and deactivate presence when the percentage of CO drops below a set limit value minus a hysteresis (FS=160ppm). -
Page 67: Chapter 17 Display Handling
Chapter 17 Display handling The room units RU-DO, RU-DFO and RU-DOS have a display instead of a setpoint knob. These models also have an Occupancy button, as well as an INCREASE button and a INCR./DECR. button DECREASE button to increase and decrease the setpoint. The Select button on RU-DOS allows you to make more advanced settings and see more indications in the display (see the section The Select button below). -
Page 68: The Select Button
The Select button By pressing the Select button on RU-DOS, you move between the following indications: Fan speed. When this symbol is lit you change the fan speed with the INCREASE/DECREASE buttons. Current setpoint in °C to one decimal point and 0.5°C resolution ... - Page 69 Frost protection setpoint 8°C P-band for room controller 10°C I-time (s) for room controller 300 s With a lower temperature on the analogue Change-over input, the cooling function is selected With a higher temperature on the analogue Change-over input, the heating function is selected Control states: 0=Heat, 1=Heat/Heat, 2=Heat or cooling via Change-over, 3=Heat/Cooling , 4=Heat/Cooling with VAV- control and forced supply air, 5=Heat/Cooling with VAV...
- Page 70 State type of heating actuator: 0=0...10V, 1=2…10V, 2=10…2V, 3=10…0V State type of cooling actuator: 0=0...10V, 1=2…10V, 2=10…2V, 3=10…0V Period time for heating actuator with thermal actuator 60 s Period time for cooling actuator with thermal actuator 60 s Run time for heating actuator with increase/decrease actuator 120 s Run time for cooling actuator with increase/decrease actuator 120 s...
- Page 71 Parity bit Modbus communication: 0=No parity, 1=Odd parity, 2=Even parity Modbus communication speed: 0=9600, 1=4800, 2=2400 etc. 15=19200 Activate Modbus as default in Regio Maxi: 0=Off, 1=On Alarm hysteresis Alarm limit high room temperature Alarm limit low room temperature Max room temperature deviation...
- Page 72 Stop time Wednesday Stop time Thursday Stop time Friday Stop time Saturday Stop time Sunday Stop time holidays Start time 2 Monday Occupied Start time Tuesday Start time Wednesday Start time Thursday Start time Friday Start time Saturday Start time Sunday Start time holidays Stop time Monday Stop time Tuesday...
- Page 73 Start time Tuesday Start time Wednesday Start time Thursday Start time Friday Start time Saturday Start time Sunday Start time holidays Stop time 1 Monday Lighting Stop time Tuesday Stop time Wednesday Stop time Thursday Stop time Friday Stop time Saturday Stop time Sunday Stop time holidays Start time 2 Monday Lighting...
-
Page 74: Part Iv Maintenance And Service
Part IV Maintenance and service... - Page 75 Table of contents Part IV Maintenance and service Chapter 18 Maintenance and service Changing the battery Updating EXOreal Resetting the application memory Removing the cover Regio Manual Maxi Chapter 17 Display handling...
-
Page 76: Chapter 18 Maintenance And Service
Chapter 18 Maintenance and service Changing the battery Note! This procedure requires knowledge of proper ESD protection; i.e. an earthed wristband must be used. How to lift off the cover is described in the section Removing the cover below. When the battery LED on the RCP is lit, the battery for backup of program memory has become too weak. -
Page 77: Resetting The Application Memory
Resetting the application memory Note! This procedure may only be carried out by qualified resellers and requires advanced knowledge. The application program will be permanently lost after this procedure. The processor’s program memory (application program) is reset via the reset button in the small hole on the right side of the unit. -
Page 78: Part V Signals
Part V Signals... - Page 79 Table of contents Part V Signals Chapter 19 Signal types Chapter 20 Signals Input Status Register Coil Status Register Input Register Holding Register LonWorks network variables Regio Manual Maxi Chapter 18 Maintenance and service...
-
Page 80: Chapter 19 Signal Types
Chapter 19 Signal types The EXOL type of the signals: EXOL type R = Real (-3.3E38 - 3.3E38) I = Integer (-32768 - 32767) X = Index (0 - 255) L = Logic (0/1) The Modbus type of the signals (type in the list below): Modbus type 1 = Coil Status Register (Modbus function = 1, 5 and 15) 2 = Input Status Register (Modbus function = 2) - Page 81 Models with LON communication have a communication port for LonWorks. Connection to LonWorks the network is established using the programming tool LonMaker. The xif-file is available for download from Regin’s homepage. Network variables for LON can be found at the end of chapter 20. Regio Manual Maxi...
-
Page 82: Chapter 20 Signals
Chapter 20 Signals Input Status Register Signal name Type Modbus Default Description address value RCPActual.RegioDigIn(0) Not used RCPActual.RegioDigIn1 Value of digital input 1. RCPActual.RegioDigIn2 Value of digital input 2. RCPActual.RegioDigIn3 Value of digital input 3. RCPActual.RegioDigOut(0) Not used RCPActual.RegioDigOut1 Value of digital output 1. RCPActual.RegioDigOut2 Value of digital output 2. - Page 83 RCPInternal.RegioNotUsedL Not used RCPInternal.RegioNotUsedL Not used RCPInternal.RegioNotUsedL Not used RCPInternal.RegioNotUsedL Not used RCPInternal.RegioNotUsedL Not used RCPInternal.RegioNotUsedL Not used RCPInternal.RegioNotUsedL Not used RCPActual.RegioCIn Value of condensation input. RCPActual.RegioLighting Indicate lightning is on RCPActual.RegioSumAlarm Indicate sum alarm RCPActual.RegioJalusi Indicate jalusi is out RCPActual.RegioCO2Presence Indicate presence from CO sensor...
- Page 84 RCPSettings.RegioLogActive Activate loging function for EXO4 RCPSettings.RegioAutoSummerTime Enable automatic switch between summer time and normal time. 0=Off, 1=On RCPSettings.RegioLightManual Control the light in manual mode. RCPSettings.RegioCO2Function Activate presence on CO sensor. RCPSettings.RegioJalusiInCmd Command jalusi in. RCPSettings.RegioJalusiOutCmd Command jalusi out RCPSettings.RegioModbusComm Activate modbus communication Input Register Signal name...
- Page 85 RCPActual.RegioSetPAdjustment Setpoint adjustment from internal device RCPActual.RegioPIDSetP The controller setpoint RCPActual.RegioPIDOutput The controller output (0-100%) RCPActual.RegioHeatOutput Heat output (0-100%) RCPActual.RegioCoolOutput Cool output (0-100%) RCPInternal.RegioNotUsedX Not used RCPInternal.RegioNotUsedX Not used RCPInternal.RegioNotUsedX Not used RCPInternal.RegioNotUsedX Not used RCPInternal.RegioNotUsedX Not used RCPInternal.RegioNotUsedX Not used RCPActual.RegioOutDoorTemp Outdoor temperature RCPActual.RegioCondensation...
- Page 86 RCPSettings.RegioFanSelect Select fan mode: 0 = Off 1 = Manual speed 1 2 = Manual speed 2 3 = Manual speed 3 4 = Auto (5 = Auto 2) (only room unit with select (6 = Auto 1) button) RC_Setp_X. RegioFanControlMode Select fan control: 0 = No control 1 = The fan is controlled on heating...
- Page 87 RCPSettings.RegioCVHeatType Actuator type heating: 0 = 0…10 V 1 = 2…10 V 2 = 10…2 V 3 = 10…0 V RCPSettings.RegioCVCoolType Actuator type cooling RCPInternal.RegioNotUsedX Not used RCPInternal.RegioNotUsedX Not used RCPSettings.RegioAi(0) Not used RCPSettings.RegioAi1 Connected signal on AI1: 0 = Not used 1 = Room temperature 2 = Change-over temperature 3 = Outdoor temperature...
- Page 88 RCPSettings.RegioDo4 Connected signal on DO4 RCPSettings.RegioDo5 Connected signal on DO5 RCPSettings.RegioDo6 Connected signal on DO6 RCPSettings.RegioDo7 Connected signal on DO7 RCPInternal.RegioNotUsedX Not used RCPInternal.RegioNotUsedX Not used RCPSettings.RegioModbusSlaveAddr Modbus slave address RCPSettings.RegioModbusParity Modbus parity bit: 0 = No parity bit 1 = Odd parity bit 2 = Even parity bit RCPInternal.RegioNotUsedX Not used...
- Page 89 RCPSettings.RegioSetpointOffsetPos 3 °C Max setpoint adjustment pos RCPSettings.RegioSetpointOffsetNeg 3 °C Max setpoint adjustment neg RCPSettings.RegioSetPOffset 0 °C Setpoint adjustment RCPSettings.RegioPIDPGain 10 °C Room controller P-band RCPSettings.RegioPIDITime 300 sec Room controller I-time RCPSettings.RegioCVDeadband Deadband control valve RCPSettings.RegioAIChangeOverLimitL 18 °C If lower change-over temperature, the controller is cooling RCPSettings.RegioAIChangeOverLimitHi 22 °C...
- Page 90 RCPSettings.RegioALarmCategory(1) Alarm category for presence: 0 = A alarm 1 = B alarm 2 = C alarm 3 = Event 4 = Disabled RCPSettings.RegioALarmCategory(2) Alarm category for open window RCPSettings.RegioALarmCategory(3) Alarm category for condensation RCPSettings.RegioALarmCategory(4) Alarm category for room temp high RCPSettings.RegioALarmCategory(5) Alarm category for room temp low RCPSettings.RegioALarmCategory(6)
- Page 91 RCPSettings.RegioDigOut1Select Manual/Auto digital output 1: 0 = Manual off 1 = Manual on 2 = Auto RCPSettings.RegioDigOut2Select Manual/Auto digital output 2 RCPSettings.RegioDigOut3Select Manual/Auto digital output 3 RCPSettings.RegioDigOut4Select Manual/Auto digital output 4 RCPSettings.RegioDigOut5Select Manual/Auto digital output 5 RCPSettings.RegioDigOut6Select Manual/Auto digital output 6 RCPSettings.RegioDigOut7Select Manual/Auto digital output 7 RCPSettings.RegioAnaOut1Select...
- Page 92 TimeDp.Posts(7).T1 Start time per 1 holiday Occupied TimeDp.Posts(7).T2 Stop time per 1 holiday Occupied TimeDp.Posts(7).T3 Start time per 2 holiday Occupied TimeDp.Posts(7).T4 Stop time per 2 holiday Occupied TimeDp.Posts(8).T1 Start time per 1 Monday Unoccupied (HH.MM) TimeDp.Posts(8).T2 Stop time per 1 Monday Unoccupied TimeDp.Posts(8).T3 Start time per 2 Monday Unoccupied TimeDp.Posts(8).T4...
- Page 93 TimeDp.Posts(18).T1 Start time per 1 Wednesday Lighting TimeDp.Posts(18).T2 Stop time per 1 Wednesday Lighting TimeDp.Posts(18).T3 Start time per 2 Wednesday Lighting TimeDp.Posts(18).T4 Stop time per 2 Wednesday Lighting TimeDp.Posts(19).T1 Start time per 1 Thursday Lighting TimeDp.Posts(19).T2 Stop time per 1 Thursday Lighting TimeDp.Posts(19).T3 Start time per 2 Thursday Lighting TimeDp.Posts(19).T4...
- Page 94 Alarms.AlaAcknow External alarms are acknowledged by setting this signal to the alarm number that you want to acknowledge Alarms.AlaBlock External alarms are blocked by setting this signal to the alarm number that you want to block Alarms.AlaUnBlock External alarms are unblocked by setting this signal to the alarm number that you want to unblock QSystem.Sek...
- Page 95 nviOccSensor SNVT_occupancy Signal from an occupancy detector On/Off nviHeatCool SNVT_hvac_mode Change-over nviEnergyHoldOff SNVT_switch Open window nviSourceTemp SNVT_temp_p AI change-over nviOutdoorTemp SNVT_temp_p Outdoor temperature nviSpaceRH SNVT_lev_percent Relative humidity in the room nviSpaceIAQ SNVT_ppm concentration in the room nviCondenseSens SNVT_percent Condensation detector nviCondenseGuard SNVT_switch Condensation detector On/Off...
-
Page 96: Part Vi Index
Part VI Index... - Page 97 Heating/Cooling with VAV-control and forced supply air function Heating/Heating Cooling Cooling/Cooling A About the manual More information D Terms Accessories for Regio Maxi Activation of the different operating modes Digital inputs Actuators Digital outputs Analogue actuators Dipswitches Exercise Display handling Thermal actuators...
- Page 98 Occupancy button Port 1 Inputs Preset operating mode Analogue Condensation Digital R Installation preparations Relay outputs Introduction to Regio Maxi Remove the cover Resetting the application memory RU-DOS L RU-F-models Labels Lighting control S Local time control LON communication Select button...
- Page 99 Germany France Spain Singapore Hong Kong Regin Controls RICCIUS + SOHN GmbH Regin Controls SARL Regin Ibérica, S.A. Regin Controls Asia Pacific Pte Ltd Hong Kong Ltd Haynauer Str. 49 32 rue Delizy C/Arganda 18 local 66 Tannery Lane...
Need help?
Do you have a question about the Regio Maxi and is the answer not in the manual?
Questions and answers