Table of Contents
Advertisement
Quick Links
Advertisement
Chapters
Table of Contents

Related Manuals for Regin Regio Midi


Summary of Contents for Regin Regio Midi
- Page 1 Regio Midi - Manual...
- Page 2 The software described in this document is supplied under license by Regin and may be used or copied only in accordance with the terms of the license. No part of this document may be reproduced or transmitted in any form, in any fashion, electronically or mechanically, without the express, written permission of Regin.
- Page 3 Contents At a Glance Part I Introduction Chapter 1 About the manual Chapter 2 Introduction to Regio Chapter 3 Models Chapter 4 Technical data Part II Installation Chapter 5 Installation preparations Chapter 6 Installation Chapter 7 Commissioning Part III Configuration Chapter 8 Control states Chapter 9 Operating modes Chapter 10 Setpoint calculation...
-
Page 4: Part I Introduction
Part I Introduction Regio Midi Manual... -
Page 5: Table Of Contents
Part I Introduction Chapter 1 About the manual Terms More information Chapter 2 Introduction to Regio Regio zone controllers Regio Midi Chapter 3 Models Design Chapter 4 Technical data Accessories for Regio Midi Regio Midi Manual Table of contents Part I... -
Page 6: Chapter 1 About The Manual
This manual describes the Regio Midi controllers. Terms Term used in the manual: Factory setting More information More information about Regio Midi can be found in: © Manual – Manual of how to configure the controllers Regio tool ... -
Page 7: Chapter 2 Introduction To Regio
The controllers are connected to bus lines such as Modbus or Regin’s own bus system EXOline, to communicate with a central SCADA- system via RS485. They can also be configured for a specific application with Regin’s ©... -
Page 8: Regio Midi
The controllers can be connected to a central SCADA-system via RS485 (EXOline or Communication © Modbus) and configured for a particular application using the configuration tool Regio tool which can be downloaded free of charge from Regin’s homepage www.regin.se. See the © manual for Regio tool for more information. -
Page 9: Chapter 3 Models
● ● RC-CFO ● ● ● RC-CDFO Models for three-point ● ● RC-CTH control (-T-models) ● ● RC-CT ● ● ● RC-CTO ● ● ● RC-CDTO Table 1. The Midi models and their functions Regio Midi Manual Chapter 3 Models... -
Page 10: Design
Design RC-CH, RC-CTH RC-C, RC-CT RC-CO, RC-CTO RC-CDO, RC-CDTO, RC-CDOC RC-CF RC-CFO RC-CDFO Part I Introduction Regio Midi Manual... -
Page 11: Chapter 4 Technical Data
UI ..............AI: PT1000-sensor, 0...100°C, accuracy +/- 0.2°C ......................... or AI2: 0…10 V ........................or DI: see DI below CI ................... Regin’s condensation detector, KG-A DI ........... Closing potential-free contact connected to +C in one end Regio Midi Manual Chapter 4 Technical data... -
Page 12: Accessories For Regio Midi
Relay module for -F-models....................RB3 Change-over ..................... TG-A1/PT1000 Condensation detector ......................KG-A transmitter......................CO2RT The accessories are available from Regin. For more information, see the product sheets and instructions for each product, search via www.regin.se. Part I Introduction Regio Midi Manual... -
Page 13: Part Ii Installation
Regio Midi Manual Part II Installation... - Page 14 Wiring for basic models (RC-CH, RC-C, RC-CO, RC-CDO) Wiring for model for CO control (RC-CDOC) Wiring for models for fan control (RC-CF, RC- CFO, RC-CDFO) Wiring for models for three-point control (RC- CTH, RC-CT, RC-CTO, RC-CDTO) Chapter 7 Commissioning Troubleshooting Part II Installation Regio Midi Manual...
-
Page 15: Chapter 5 Installation Preparations
If you want to configure the unit, it may be better to do this before sending the cassette to the installation site. For more information about configuration, see the chapter Configuration. Regio Midi Manual Chapter 5 Installation preparations... -
Page 16: Configuration
There are no dipswitches in models with display. For these models, the corresponding © settings are made in the parameter menu in the display or using Regio tool , see the chapter Display handling. Part II Installation Regio Midi Manual... -
Page 17: Chapter 6 Installation
G (terminal 10) and G0 (terminal 11). On the communication loop the A-terminal (terminal 42) should only be connected to another A-terminal and the B-terminal (terminal 43) to another B-terminal. Otherwise, the communication will not work. Regio Midi Manual Chapter 6 Installation... - Page 18 Figure 8. Bottom plate with terminals For detailed information on connection of a communication cable to the Midi-controllers, see the manual Regio in EXO 2005 Projects. Part II Installation Regio Midi Manual...
-
Page 19: Wiring For Basic Models (Rc-Ch, Rc-C, Rc-Co, Rc-Cdo)
This setting refers to which type of actuator, NC or NO, it is intended for. For choice of output function, analogue or digital, see table 5, SW5. On models with display, go into the parameter menu and change parameter 20 to thermal actuator. Regio Midi Manual Chapter 6 Installation... - Page 20 40, +C. Closed contact corresponds to occupancy. See also the section Occupancy detector in the chapter Operating modes. DI2/CI Regin’s condensation detector, KG-A (FS). The sensor is connected between terminals 33 and 41, AGnd. alternative Window contact (DI). A potential-free contact is connected between terminals 33 and 40, +C.
- Page 21 Choosing NC (factory setting) gives direct action on output UO1, i.e. increasing signal (longer pulses) on increasing control output. This setting is used when UO1 is connected to a thermal actuator of type Regin RTAM-24 (NC). In the event of a power cut the valve will close.
-
Page 22: Wiring For Model For Co 2 Control (Rc-Cdoc)
10 and 11. Make sure that the reference pole G0 is connected to the correct terminal on the actuator. alternative For a 24 V AC thermal actuator, max 2.0 A. The thermal actuator is connected between terminals 23 and 20, GDO. . Part II Installation Regio Midi Manual... - Page 23 40, +C. Closed contact corresponds to occupancy. See also the section Occupancy detector in the chapter Operating modes. DI2/CI Regin’s condensation detector, KG-A (FS). The sensor is connected between terminals 33 and 41, AGnd. alternative Window contact (DI). A potential-free contact is connected between terminals 33 and 40, +C.
-
Page 24: Wiring For Models For Fan Control (Rc-Cf, Rc-Cfo, Rc-Cdfo)
0 V common for UO. Internally connected to terminal 11, G0. For forced ventilation. 24 V AC output, max 0.5 A. A 24 V AC actuator is connected between terminal 22 and terminal 20, GDO. Part II Installation Regio Midi Manual... - Page 25 40, +C. Closed contact corresponds to occupancy. See also the section Occupancy detector in the chapter Operating modes. DI2/CI Regin’s condensation detector, KG-A (FS). The sensor is connected between terminals 33 and 41, AGnd. alternative Window contact (DI). A potential-free contact is connected between terminals 33 and 40, +C.
- Page 26 Choosing NC (factory setting) gives direct action on output UO1, i.e. increasing signal (longer pulses) on increasing control output. This setting is used when UO1 is connected to a thermal actuator of type Regin RTAM-24 (NC). In the event of a power cut the valve will close.
-
Page 27: Wiring For Models For Three-Point Control (Rc-Cth, Rc-Ct, Rc-Cto, Rc-Cdto)
23. No function. For an external room sensor, PT1000. Measuring range 0...50°C. The sensor is connected between terminals 30 and 41, AGnd. See table 8, SW7. Regio Midi Manual Chapter 6 Installation... - Page 28 40, +C. Closed contact corresponds to occupancy. See also the section Occupancy detector in the chapter Operating modes. DI2/CI Regin’s condensation detector, KG-A (FS). The sensor is connected between terminals 33 and 41, AGnd. alternative Window contact (DI). A potential-free contact is connected between terminals 33 and 40, +C.
-
Page 29: Chapter 7 Commissioning
This means that built-in safety functions will not be disregarded. The controllers have different indications which can be used for troubleshooting, see the section Indications. Regio Midi Manual Chapter 7 Commissioning... -
Page 30: Part Iii Configuration
Part III Configuration Regio Midi Manual... - Page 31 Chapter 13 Change-over function (not RC- CDOC) Chapter 14 Forced ventilation / Condensation detector / Frost protection Chapter 15 Indications Chapter 16 Display handling Display indications Parameter menu Chapter 17 Memory function on power failure Regio Midi Manual Table of contents Part III...
-
Page 32: Part Iii Configuration
50%, it is divided between two actuators. 0…48% of the signal is sent to actuator 1 and 52…100% of the signal is sent to actuator 2. See the figure below. Output signal 100 % Heating 1 48 % 52 % Heating 2 100 % Heating demand Part III Configuration Regio Midi Manual... - Page 33 The basic flow can also be set separately. Output signal Heating output Cooling output 100 % Increasing airflow on heating demand Max airflow on Basic airflow heating demand (settable) (settable) Heating Temp (°C) Cooling heating cooling Regio Midi Manual Chapter 8 Control states...
- Page 34 The controller will remain in forced ventilation throughout the set Bypass time (FS=2h). There are three different alternatives for the function forced ventilation: 1. Not active (FS) 2. Forced ventilation at 100 % heating or cooling output 3. Forced ventilation at 100 % cooling output Part III Configuration Regio Midi Manual...
- Page 35 (FS=10min). Note: The off-delay must be at least 1 min. The measuring range of the CO sensor is settable. FS 0V=0ppm. FS 10V=2000ppm. Regio Midi Manual Chapter 8 Control states...
-
Page 36: Chapter 9 Operating Modes
19°C and 27°C. The setpoints can also be adjusted +/- 3°C via the setpoint knob or the display. For controllers with display the background lighting is lit (dimmed). STANDBY and the current room temperature (or setpoint depending on the configuration) are shown in the display. Part III Configuration Regio Midi Manual... -
Page 37: Activation Of The Different Operating Modes
Unoccupied, Standby or Occupied. Shutdown Preset operating mode Bypass (Off/Unoccupied) (Unoccupied/Standby/Occupied) Timer > 5 s Regio Midi Manual Chapter 9 Operating modes... - Page 38 (there is a variable list for central control in Part IV of this manual): RegioRemoteState Description Central operating mode Off Central operating mode Unoccupied Central operating mode Stand-by Central operating mode Occupied (Not used) 5 (FS) No central control Table 11. The variable RegioRemoteState Part III Configuration Regio Midi Manual...
- Page 39 Occupancy button, i. e. you can change its operating mode to Off/Unoccupied (Shutdown) or Bypass. Command ”Shutdown” Command Bypass Off/Unoccupied Bypass Central commands should be regarded as events and can be changed locally via the Occupancy button. Regio Midi Manual Chapter 9 Operating modes...
-
Page 40: Chapter 10 Setpoint Calculation
The active setpoint changes in the middle of the neutral zone with a hysteresis of 0.1°C. A setpoint displacement is not active in this operating mode. Part III Configuration Regio Midi Manual... - Page 41 3 = The sum of the cooling setpoint and the displacement is shown in the display. The displacement is added to both the heating and cooling setpoints. Regio Midi Manual Chapter 10 Setpoint calculation...
-
Page 42: Chapter 11 Actuators
Then a closing signal is sent for as long time and the exercise is finished. On units with display, the exercise can be inactivated by setting parameters 36 and 37 to zero (0). Part III Configuration Regio Midi Manual... -
Page 43: Chapter 12 Fan Control
If the temperature is not within the set temperature limits, the fan will be started in the corresponding Auto position, regardless of the settings. Regio Midi Manual Chapter 12 Fan control... -
Page 44: Chapter 13 Change-Over Function (Not Rc-Cdoc)
On open contact, the change-over function sets the heating output to heating. It is also possible to control change-over via a central command. See the variable list in Part IV of this manual. Part III Configuration Regio Midi Manual... -
Page 45: Chapter 14 Forced Ventilation / Condensation Detector / Frost Protection
On RC-CDOC, UO3 can be used for forcing the supply air/damper. Condensation detector There is a special input (CI) on all Regio controllers. This input is intended for Regin’s Special input CI condensation detector, KG-A, and functions internally as a digital input, i. e. condensation or no condensation. -
Page 46: Chapter 15 Indications
On Regio models with display these indications are shown in the display, see the chapter Display handling. When the frame has been removed, a LED is visible in the right edge of the controller. It Communication LED lights up green when the controller is sending information. Part III Configuration Regio Midi Manual... -
Page 47: Chapter 16 Display Handling
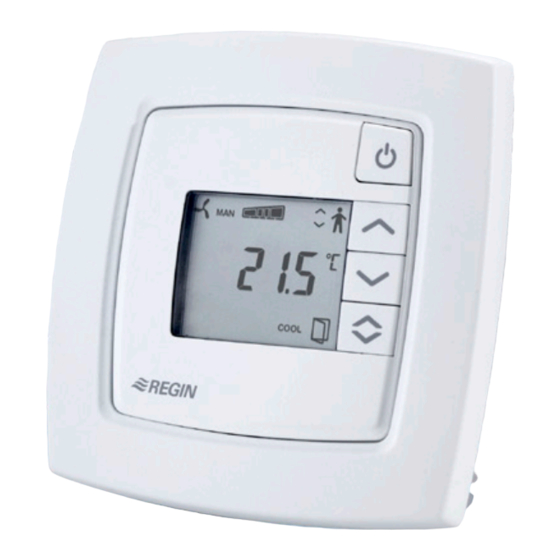
COOL/HEAT: Shows if the unit controls according to the heating or cooling setpoint STANDBY: Standby indication SERVICE: Is shown when parameters are set, flashes when there is something wrong with the controller Figure 18. Indications in the display Regio Midi Manual Chapter 16 Display handling... -
Page 48: Parameter Menu
Switch on delay for occupancy 0 min State connected sensor on AI1: 0=Internal sensor, 1=External room sensor State connected sensor on UI1: 0=None, 1=Change-over digital, 2=Change-over analogue State connected sensor on DI2: 1=Window contact, 2=Condensation detector Part III Configuration Regio Midi Manual... - Page 49 0=NO (Normally open), 1=NC (Normally closed) State NO/NC universal input 1 0=NO (Normally open), 1=NC (Normally closed) Manual/Auto heating output signal: 0=Off, 1=Manual, 2=Auto Manual/Auto cooling output signal: 0=Off, 1=Manual, 2=Auto Manual/Auto forced ventilation: 0=Off, 1=On, 2=Auto Regio Midi Manual Chapter 16 Display handling...
- Page 50 0 V (RC-CDOC) concentration at 10 V (RC-CDOC) 2000 Min. limit for the VAV damper when using CO control (RC-CDOC) Max. limit for the VAV damper when using CO control (RC-CDOC) Table 13. Parameter list Part III Configuration Regio Midi Manual...
-
Page 51: Chapter 17 Memory Function On Power Failure
Activation of Bypass is not stored in the memory. Instead, the controller will return to the Example preset operating mode after power failure. However, the set operating mode will be saved if central control is being used (parameter 47). Regio Midi Manual Chapter 17 Memory function on power failure... -
Page 52: Part Iv Signals
Part IV Signals Regio Midi Manual... - Page 53 Table of contents Part IV Signals Chapter 18 Signal types Chapter 19 Signals Discrete inputs Coil status register Input register Holding register Regio Midi Manual Part IV Signals...
-
Page 54: Part Iv Signals
RS422 is a full duplex communication which means you need 4 wires, 2 for transmit (Tx+ and Tx-) and 2 for receive (Rx+ and Rx-). Tx is used to transmit and Rx to Part IV Signals Regio Midi Manual... - Page 55 If odd or even is chosen only one stop-bit is used otherwise there will be too many bits altogether: 1 start-bit, 8 data-bits, 1 parity-bit and 1 stop-bit give a total of 11 bits which is maximum. Regio Midi Manual Chapter 18 Signal types...
-
Page 56: Chapter 19 Signals
RC_Actual_L.RegioCVCoolInc Indicate increase cooling RC_Actual_L.RegioCVCoolDec Indicate decrease cooling RC_Actual_L.RegioAIChangeOverState Indicate change over state from analog input RC_Actual_L.RegioChangeOverState Indicate change over state from both digital and analog input RC_Actual_L.RegioRoomTempSensorAl Indicate sensor alarm on room sensor Part IV Signals Regio Midi Manual... -
Page 57: Coil Status Register
2 = Cooling RC_Actual_X.RegioFanSpeed Indicate current fan speed: 0 = Off 1 = Fan speed 1 is on 2 = Fan speed 2 is on 3 = Fan speed 3 is on RC_Actual_R.RegioNotUsedX Not used Regio Midi Manual Chapter 19 Signals... -
Page 58: Holding Register
3 = The fan is controlled by both heating and cooling demand RC_Setp_X.RegioFanSpeed1Start Controller output limit start fan speed 1 RC_Setp_X.RegioFanSpeed2Start Controller output limit start fan speed 2 RC_Setp_X.RegioFanSpeed3Start Controller output limit start fan speed 3 Part IV Signals Regio Midi Manual... - Page 59 RC_Setp_X.RegioAi2 Signal connected to AI2: (RC-CDOC) 0=Disabled 5=CO sensor RC_Setp_X.RegioDi(0) Not used RC_Setp_X.RegioDi1 Presence sensor connected on DI1. RC_Setp_X.RegioDi2 Signal connected to DI2: 1 = Open window 2 = Condense alarm RC_Setp_X.RegioDi3 Not used Regio Midi Manual Chapter 19 Signals...
- Page 60 Lighting high (0-255) RC_Setp_X.RegioDispContrast Contrast (0-15) RC_Setp_X.RegioDisplayViewMode Select view mode for the display: 0 = Room temp 1 = Heat setpoint 2 = Cool setpoint 3 = Average cool/heat setpoint 4 = Only setpoint offset Part IV Signals Regio Midi Manual...
- Page 61 Room cool setpoint in Unoccupied mode RC_Setp_R.RegioFrostSetP 8 °C Frost protection setpoint RC_Setp_R.RegioSetpointOffsetPos 3 °C Max setpoint adjustment pos RC_Setp_R.RegioSetpointOffsetNeg 3 °C Max setpoint adjustment neg RC_Setp_R.RegioSetPOffset 0 °C Setpoint adjustment RC_Setp_R.RegioPIDPGain 10 °C Room controller P-band Regio Midi Manual Chapter 19 Signals...
- Page 62 (min=0, max=1000ppm) RC_Setp_R.RegioCO2LimitLow Min. limit for the VAV damper when (RC-CDOC) using CO control (min=0, max=9990ppm) RC_Setp_R.RegioCO2LimitHigh Max. limit for the VAV damper when (RC-CDOC) using CO control (min=0, max=9990ppm) Part IV Signals Regio Midi Manual...
-
Page 63: Part V Index
Regio Midi Manual Chapter 19 Signals... - Page 64 Different operating modes 36 Models 9 Dipswitches 16 More information 6 Discrete inputs 56 Mounting 7 Display handling 47 Display indications 47 Display indications 47 Occupancy button 37, 39, 46 Occupancy detector 38, 39 Part V Index Regio Midi Manual...
- Page 65 Wiring for basic models 19 Setpoint calculation 40 Wiring for model for CO control 22 Basic setpoint 40 Wiring for models for fan control 24 Calculation of the active setpoint 40 Wiring for models for three-point control 27 Regio Midi Manual Part V Index...
- Page 66 Germany France Spain Singapore Hong Kong Regin Controls RICCIUS + SOHN GmbH Regin Controls SARL Regin Ibérica, S.A. Regin Controls Asia Pacific Pte Ltd Hong Kong Ltd Haynauer Str. 49 32 rue Delizy C/Arganda 18 local 66 Tannery Lane...
Need help?
Do you have a question about the Regio Midi and is the answer not in the manual?
Questions and answers